
Owners Manual
Page 3
h In this manual, the SD Memory Card is not included with your camera. Please purchase a commercially sold card. SHOOT, PLAY BACK AND SAVE Preparing the camera 1 Insert the battery pack. 1 While pressing, push towards the bottom. 2 Open 3 Insert by matching the connector markings Connector markings Battery cover 4 Close 2 Insert the SD Memory Card. h An SD Memory Card is referred to as the "card". Monitor unit 1 Open Card 3 Insert Card slot cover 2 Open 4 Close English ii
h In this manual, the SD Memory Card is not included with your camera. Please purchase a commercially sold card. SHOOT, PLAY BACK AND SAVE Preparing the camera 1 Insert the battery pack. 1 While pressing, push towards the bottom. 2 Open 3 Insert by matching the connector markings Connector markings Battery cover 4 Close 2 Insert the SD Memory Card. h An SD Memory Card is referred to as the "card". Monitor unit 1 Open Card 3 Insert Card slot cover 2 Open 4 Close English ii

Owners Manual
Page 5
... to play back. REC/PLAY button SET button 2009.12.24 18:41 HD-SHQ 6.5MB OK 100-0006 00:00:05 Orange frame Remaining battery power idication English iv h The display changes to the Playback Screen. 2 Select the image to a chance camera or card flaw. Playback 1 Press the REC/PLAY... button. h The image information for recorded contents etc. in case of the screen. h Toggle the SET button left, right, up and ready to go i Sanyo declines any claim for compensation for the framed image is set up or down to move the orange frame to the image you wish to...
... to play back. REC/PLAY button SET button 2009.12.24 18:41 HD-SHQ 6.5MB OK 100-0006 00:00:05 Orange frame Remaining battery power idication English iv h The display changes to the Playback Screen. 2 Select the image to a chance camera or card flaw. Playback 1 Press the REC/PLAY... button. h The image information for recorded contents etc. in case of the screen. h Toggle the SET button left, right, up and ready to go i Sanyo declines any claim for compensation for the framed image is set up or down to move the orange frame to the image you wish to...

Owners Manual
Page 10
... stabilizer for sharp pictures 16 Sharp face shots 17 SYSTEM MAP 18 „ SETUP PARTS NAMES 19 CHARGING THE BATTERY PACK 21 Charging the battery pack 22 INSTALLING THE CARD 24 INSTALLING THE BATTERY PACK 26 Installing the DC adaptor (sold separately: VAR-A3U/A3EX) ....... 27 About the temperature alert icon 29 TURNING...
... stabilizer for sharp pictures 16 Sharp face shots 17 SYSTEM MAP 18 „ SETUP PARTS NAMES 19 CHARGING THE BATTERY PACK 21 Charging the battery pack 22 INSTALLING THE CARD 24 INSTALLING THE BATTERY PACK 26 Installing the DC adaptor (sold separately: VAR-A3U/A3EX) ....... 27 About the temperature alert icon 29 TURNING...

Owners Manual
Page 13
... 137 CHECKING THE REMAINING CARD MEMORY 138 Checking the remaining number of images and video recording time 138 For audio recordings 139 CHECKING THE REMAINING BATTERY PACK CHARGE 140 „ OTHER DEVICES AND CONNECTIONS CONNECTING TO A COMPUTER OPERATING ENVIRONMENT 142 When using as a card reader 142 To access the files in...
... 137 CHECKING THE REMAINING CARD MEMORY 138 Checking the remaining number of images and video recording time 138 For audio recordings 139 CHECKING THE REMAINING BATTERY PACK CHARGE 140 „ OTHER DEVICES AND CONNECTIONS CONNECTING TO A COMPUTER OPERATING ENVIRONMENT 142 When using as a card reader 142 To access the files in...

Owners Manual
Page 14
... the multi-indicator 188 Supplied battery pack charger 189 Supplied Li-ion battery pack 189 Others 190 Before capturing those important shots, be sure to first take a test shot to comfirm that your camera is set up and ready to the 480p/720p terminal 159 PLAYING BACK ON ...A TV 160 CONNECTING TO A PRINTER PRINTING 161 „ APPENDICES COMMONLY ASKED QUESTIONS 164 TROUBLESHOOTING 172 Camera 172 Notes regarding the Scene Select feature and filters 180 SPECIFICATIONS 182 Camera 182 Camera connectors 186 Battery life 186 Possible No...
... the multi-indicator 188 Supplied battery pack charger 189 Supplied Li-ion battery pack 189 Others 190 Before capturing those important shots, be sure to first take a test shot to comfirm that your camera is set up and ready to the 480p/720p terminal 159 PLAYING BACK ON ...A TV 160 CONNECTING TO A PRINTER PRINTING 161 „ APPENDICES COMMONLY ASKED QUESTIONS 164 TROUBLESHOOTING 172 Camera 172 Notes regarding the Scene Select feature and filters 180 SPECIFICATIONS 182 Camera 182 Camera connectors 186 Battery life 186 Possible No...

Owners Manual
Page 20
CHECKING THE INCLUDED ACCESSORIES i Li-ion battery pack: 1 i Lithum-ion battery pack charger and power card: 1 i Dedicated USB interface cable (page 143): 1 i Dedicated AV interface cable (page 158): 1 i Lens cap (page 13): 1 11 English
CHECKING THE INCLUDED ACCESSORIES i Li-ion battery pack: 1 i Lithum-ion battery pack charger and power card: 1 i Dedicated USB interface cable (page 143): 1 i Dedicated AV interface cable (page 158): 1 i Lens cap (page 13): 1 11 English
Owners Manual
Page 28
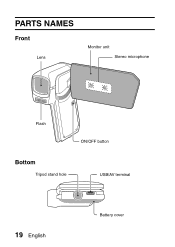
SETUP SETUP PARTS NAMES Front Lens Monitor unit Stereo microphone Flash ON/OFF button Bottom Tripod stand hole USB/AV terminal 19 English Battery cover
SETUP SETUP PARTS NAMES Front Lens Monitor unit Stereo microphone Flash ON/OFF button Bottom Tripod stand hole USB/AV terminal 19 English Battery cover

Owners Manual
Page 30
...When the CHARGE indicator turns off, unplug the power cord from the power outlet, and remove the battery pack from the charger. h Insert it . 1 Connect the supplied power cord to 240 V). Battery pack charger Battery pack [o] mark 3 Plug the power plug into a power outlet (AC 100 V to the ...socket on the battery pack. CHARGE indicator To power outlet HINT i Charging takes approximately 120 min. 21 English ...
...When the CHARGE indicator turns off, unplug the power cord from the power outlet, and remove the battery pack from the charger. h Insert it . 1 Connect the supplied power cord to 240 V). Battery pack charger Battery pack [o] mark 3 Plug the power plug into a power outlet (AC 100 V to the ...socket on the battery pack. CHARGE indicator To power outlet HINT i Charging takes approximately 120 min. 21 English ...

Owners Manual
Page 31
...176;F). If there is interference to sufficiently charge it may be possible to your camera. SETUP Charging the battery pack Be sure to fully charge the supplied or separately sold battery pack before using it whenever the remaining charge is low. Ambient temperature during charging i It is being ...used for the first time, and recharge it in the following cases i A battery pack which has not been used for a long time i Newly purchased battery pack FOR AMERICAN USERS: i Use a UL Listed, 1.8-3m (6-10ft), Type SPT-2 or NiSPT-2, AWG No.18 ...
...176;F). If there is interference to sufficiently charge it may be possible to your camera. SETUP Charging the battery pack Be sure to fully charge the supplied or separately sold battery pack before using it whenever the remaining charge is low. Ambient temperature during charging i It is being ...used for the first time, and recharge it in the following cases i A battery pack which has not been used for a long time i Newly purchased battery pack FOR AMERICAN USERS: i Use a UL Listed, 1.8-3m (6-10ft), Type SPT-2 or NiSPT-2, AWG No.18 ...

Owners Manual
Page 32
...for a long time. Charging finished Lit Charging Flashing Problem with the battery pack or battery pack charger i Immediately remove the battery pack from the charger. Wait until the battery pack has cooled down before attempting to charge the battery pack. CHARGE indicator Not lit Not connected properly i To recharge the...be possible to charge it is used continuously for a long time i The battery pack becomes hot when the camera is not installed correctly (page 21). If you attempt to charge the battery pack in this state, the safety function may be activated and it may...
...for a long time. Charging finished Lit Charging Flashing Problem with the battery pack or battery pack charger i Immediately remove the battery pack from the charger. Wait until the battery pack has cooled down before attempting to charge the battery pack. CHARGE indicator Not lit Not connected properly i To recharge the...be possible to charge it is used continuously for a long time i The battery pack becomes hot when the camera is not installed correctly (page 21). If you attempt to charge the battery pack in this state, the safety function may be activated and it may...

Owners Manual
Page 35
Battery cover 3 Insert by matching the connector markings Connector markings 4 Close English 26 SETUP INSTALLING THE BATTERY PACK Please charge the supplied battery pack before using it is positioned correctly. h Take care that it . 1 Open the battery cover. 1 While pressing, push towards the bottom. 2 Open 2 Insert the battery pack.
Battery cover 3 Insert by matching the connector markings Connector markings 4 Close English 26 SETUP INSTALLING THE BATTERY PACK Please charge the supplied battery pack before using it is positioned correctly. h Take care that it . 1 Open the battery cover. 1 While pressing, push towards the bottom. 2 Open 2 Insert the battery pack.

Owners Manual
Page 36
INSTALLING THE BATTERY PACK Installing the DC adaptor (sold separately: VAR-A3U/A3EX) 1 Insert 3 Close 2 Set the cord in the groove 27 English
INSTALLING THE BATTERY PACK Installing the DC adaptor (sold separately: VAR-A3U/A3EX) 1 Insert 3 Close 2 Set the cord in the groove 27 English

Owners Manual
Page 37
...life of power is still used even if the camera is turned off, and it is therefore recommended that the battery pack be removed from the camera if it for about 7 days. i The lithium-ion battery used , but this is kept in this camera may be sure to confirm that when the...the date and time settings, as well as the shooting settings. English 28 h When the battery is not to partially discharge it before recharging it is removed for a long time. h Do not continually recharge the battery when it again. When not using your camera again, be cleared. Note that the camera ...
...life of power is still used even if the camera is turned off, and it is therefore recommended that the battery pack be removed from the camera if it for about 7 days. i The lithium-ion battery used , but this is kept in this camera may be sure to confirm that when the...the date and time settings, as well as the shooting settings. English 28 h When the battery is not to partially discharge it before recharging it is removed for a long time. h Do not continually recharge the battery when it again. When not using your camera again, be cleared. Note that the camera ...

Owners Manual
Page 38
... the temperature has dropped (or as long as the \ icon remains flashing). k When the battery or internal camera (excluding battery) temperature rises during use h During camera use, if the temperature of the battery or inside the camera (excluding the battery) rises, a \ icon lights on the monitor. h If the temperature rises further, the \ icon will... even when the \ icon is still possible to flash, and the camera will show the time starting about 15 seconds before resuming use. INSTALLING THE BATTERY PACK About the temperature alert icon \ During camera use, if the temperature of the...
... the temperature has dropped (or as long as the \ icon remains flashing). k When the battery or internal camera (excluding battery) temperature rises during use h During camera use, if the temperature of the battery or inside the camera (excluding the battery) rises, a \ icon lights on the monitor. h If the temperature rises further, the \ icon will... even when the \ icon is still possible to flash, and the camera will show the time starting about 15 seconds before resuming use. INSTALLING THE BATTERY PACK About the temperature alert icon \ During camera use, if the temperature of the...

Owners Manual
Page 40
... (factory-preset setting). TURNING THE CAMERA ON AND OFF Turning on the camera when the power save (sleep) mode is active In order to preserve battery pack power, the power save (sleep) function will switch to set the operation sounds appears. i When the AC adaptor is connected, the power save mode...
... (factory-preset setting). TURNING THE CAMERA ON AND OFF Turning on the camera when the power save (sleep) mode is active In order to preserve battery pack power, the power save (sleep) function will switch to set the operation sounds appears. i When the AC adaptor is connected, the power save mode...

Owners Manual
Page 44
... type (follow step 1). h The screen to change, and make the correction. 35 English It is being replaced, an internal battery will last for about 7 days). HINT i Under normal conditions, while the battery pack is recommended to check that the date and time settings are shown. 4 Select the line you wish to set...
... type (follow step 1). h The screen to change, and make the correction. 35 English It is being replaced, an internal battery will last for about 7 days). HINT i Under normal conditions, while the battery pack is recommended to check that the date and time settings are shown. 4 Select the line you wish to set...

Owners Manual
Page 53
SETUP 1 Recording size (page 59) h Select the video clip size to the NORMAL mode. 5 Remaining battery power indication (page 140) English 44 The captured still image size is 1600 × 1200 pixels (4:3 aspect ratio). 2 Focus range (page 60) h Select the focus ...
SETUP 1 Recording size (page 59) h Select the video clip size to the NORMAL mode. 5 Remaining battery power indication (page 140) English 44 The captured still image size is 1600 × 1200 pixels (4:3 aspect ratio). 2 Focus range (page 60) h Select the focus ...

Owners Manual
Page 55
1 Slideshow (page 74) h Specify the slideshow settings and play the slideshow. 2 Playback volume (page 75) h Adjust the volume for video clip and audio file playback. 3 Delete (page 76) h Delete files. 4 S N (page 37) h Set to the NORMAL mode. 5 Remaining battery power indication (page 140) SETUP English 46
1 Slideshow (page 74) h Specify the slideshow settings and play the slideshow. 2 Playback volume (page 75) h Adjust the volume for video clip and audio file playback. 3 Delete (page 76) h Delete files. 4 S N (page 37) h Set to the NORMAL mode. 5 Remaining battery power indication (page 140) SETUP English 46

Owners Manual
Page 57
... and use the flash only when necessary. l: The flash will not operate even in dark situations. 6 Self-timer (page 87) N: Self-timer is pressed. 7 Remaining battery power indication (page 140) English 48 SETUP y: Shooting begins 2 seconds after the [ ] or [ ] button is off.
... and use the flash only when necessary. l: The flash will not operate even in dark situations. 6 Self-timer (page 87) N: Self-timer is pressed. 7 Remaining battery power indication (page 140) English 48 SETUP y: Shooting begins 2 seconds after the [ ] or [ ] button is off.

Owners Manual
Page 59
... sensitivity (page 91) =: Sensitivity is set automatically (video clip recording: ISO 200 to ISO 1600 h The indicated ISO value is the standard output sensitivity. 6 Remaining battery power indication (page 140) English 50 still image shooting: ISO 50 to 400) *: Sets sensitivity to ISO 50 u: Sets sensitivity to ISO 100 v: Sets sensitivity...
... sensitivity (page 91) =: Sensitivity is set automatically (video clip recording: ISO 200 to ISO 1600 h The indicated ISO value is the standard output sensitivity. 6 Remaining battery power indication (page 140) English 50 still image shooting: ISO 50 to 400) *: Sets sensitivity to ISO 50 u: Sets sensitivity to ISO 100 v: Sets sensitivity...


