Print Specs
Page 1
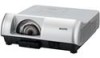
...control port) RJ-45 x 1 (Wired LAN) Power cord VGA cable Lens cap Pointer Pen w/batteries x2 USB cable Quick reference guide Owner's manual (CD-ROM) Remote control w/batteries Interactive Soft (CD-ROM) POA-COMPVGA POA-CA-SCART (Component - NEARLY MAINTENANCE FREE This projector offers long... allows it possible to be projected onto the blackboard or colored boards. Back Panel ©2011 SANYO VGA cable) (Scart - 2500 LUMENS z WXGA z INTERACTIVE SHORT THROW PROJECTOR PLC-WL2503 WXGA INTERACTIVE SHORT THROW PROJECTOR Interactive pens ( 2 types included ) 3LCD Built-in Network Ultra ...
...control port) RJ-45 x 1 (Wired LAN) Power cord VGA cable Lens cap Pointer Pen w/batteries x2 USB cable Quick reference guide Owner's manual (CD-ROM) Remote control w/batteries Interactive Soft (CD-ROM) POA-COMPVGA POA-CA-SCART (Component - NEARLY MAINTENANCE FREE This projector offers long... allows it possible to be projected onto the blackboard or colored boards. Back Panel ©2011 SANYO VGA cable) (Scart - 2500 LUMENS z WXGA z INTERACTIVE SHORT THROW PROJECTOR PLC-WL2503 WXGA INTERACTIVE SHORT THROW PROJECTOR Interactive pens ( 2 types included ) 3LCD Built-in Network Ultra ...

Owners Manual
Page 1
Multimedia Projector MODEL PLC-WL2503 Network Supported □ Wired LAN * Refer to the owner's manual below for details about network function. □ Network Set-up and Operation Owner's Manual
Multimedia Projector MODEL PLC-WL2503 Network Supported □ Wired LAN * Refer to the owner's manual below for details about network function. □ Network Set-up and Operation Owner's Manual

Owners Manual
Page 2
... the breaker even during a presentation. Features and Design This Multimedia Projector is designed with the Wired function. For details, refer to the owner's manual "Network Set-up and Operation." Direct OFF Function With the Direct OFF function, you to change without notice. 2 You can expand the...AUTO SET button (pp.23, 45). Note: • The On-Screen Menu and figures in this manual may differ slightly from the product. •The contents of this manual are subject to write and draw on a virtual whiteboard by using the interactive pen or pointer. Digital ...
... the breaker even during a presentation. Features and Design This Multimedia Projector is designed with the Wired function. For details, refer to the owner's manual "Network Set-up and Operation." Direct OFF Function With the Direct OFF function, you to change without notice. 2 You can expand the...AUTO SET button (pp.23, 45). Note: • The On-Screen Menu and figures in this manual may differ slightly from the product. •The contents of this manual are subject to write and draw on a virtual whiteboard by using the interactive pen or pointer. Digital ...

Owners Manual
Page 3
... Operation 25 Computer Input 27 Input Source Selection (Computer 1: RGB) 27 Input Source Selection (Computer 2: RGB) 28 Computer System Selection 29 Auto PC adjustment 30 Manual PC adjustment 31 Image Mode Selection 33 Image Adjustment 34 Screen Size Adjustment 35 Video Input 37 Input Source Selection (Video, S-video) 37 Input Source...
... Operation 25 Computer Input 27 Input Source Selection (Computer 1: RGB) 27 Input Source Selection (Computer 2: RGB) 28 Computer System Selection 29 Auto PC adjustment 30 Manual PC adjustment 31 Image Mode Selection 33 Image Adjustment 34 Screen Size Adjustment 35 Video Input 37 Input Source Selection (Video, S-video) 37 Input Source...

Owners Manual
Page 4
... beam. -Install the projector in a proper position. If the problem still persists, contact the dealer where you to operate improperly, read this manual thoroughly. REFER SERVICING TO QUALIFIED SERVICE PERSONNEL. Do not stare directly into a compartment or similarly enclosed, these minimum distances must be recycled and... of Electronic Computer/Data Processing Equipment, ANSI/NFPA 75. To the Owner Before installing and operating this projector, read this manual again, check operations and cable connections and try the solutions in the "Troubleshooting" section in the back of this...
... beam. -Install the projector in a proper position. If the problem still persists, contact the dealer where you to operate improperly, read this manual thoroughly. REFER SERVICING TO QUALIFIED SERVICE PERSONNEL. Do not stare directly into a compartment or similarly enclosed, these minimum distances must be recycled and... of Electronic Computer/Data Processing Equipment, ANSI/NFPA 75. To the Owner Before installing and operating this projector, read this manual again, check operations and cable connections and try the solutions in the "Troubleshooting" section in the back of this...

Owners Manual
Page 8
... damage lens cover and result in fire hazard. ⑧ Interactive Camera ⑨ Exhaust vent CAUTION Hot air is for Interactive function, refer to the owner's manual of "Interactive Function" in the application CD-ROM. 8 Part Names and Functions Front ② ① ⑤ ④ ③ ⑧ ⑥ ...9316; Projection Lens ⑥ Speaker ⑦ Lens Cover CAUTION Do not turn on a projector with lens cover attached. Refer to the owner's manual of "Network Set-up and Operation" . Kensington Security Slot This slot is for a Kensington lock used to deter theft of the...
... damage lens cover and result in fire hazard. ⑧ Interactive Camera ⑨ Exhaust vent CAUTION Hot air is for Interactive function, refer to the owner's manual of "Interactive Function" in the application CD-ROM. 8 Part Names and Functions Front ② ① ⑤ ④ ③ ⑧ ⑥ ...9316; Projection Lens ⑥ Speaker ⑦ Lens Cover CAUTION Do not turn on a projector with lens cover attached. Refer to the owner's manual of "Network Set-up and Operation" . Kensington Security Slot This slot is for a Kensington lock used to deter theft of the...
Owners Manual
Page 9
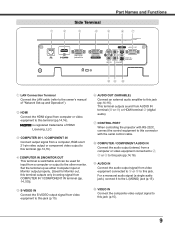
... Functions Side Terminal ① ② ③ ④ ⑤ ⑥ ⑦ ⑩⑨ ⑧ ① LAN Connection Terminal Connect the LAN cable (refer to the owner's manual of HDMI Licensing, LLC. ③ COMPUTER IN 1 / COMPONENT IN Connect output signal from a computer, RGB scart 21-pin video output or component video output to...
... Functions Side Terminal ① ② ③ ④ ⑤ ⑥ ⑦ ⑩⑨ ⑧ ① LAN Connection Terminal Connect the LAN cable (refer to the owner's manual of HDMI Licensing, LLC. ③ COMPUTER IN 1 / COMPONENT IN Connect output signal from a computer, RGB scart 21-pin video output or component video output to...

Owners Manual
Page 19
The number changes to "Set". Repeat this manual and keep it to the number you can no longer be started. PIN (Personal Identification Number) code is set as the initial PIN code at ...
The number changes to "Set". Repeat this manual and keep it to the number you can no longer be started. PIN (Personal Identification Number) code is set as the initial PIN code at ...

Owners Manual
Page 21
... orange. 21 Press the MENU button to exit the On-Screen Menu. The menu has a hierarchical structure, with a main menu that is highlighted in this manual. The selected item is divided into submenus, which are further divided into other submenus.
... orange. 21 Press the MENU button to exit the On-Screen Menu. The menu has a hierarchical structure, with a main menu that is highlighted in this manual. The selected item is divided into submenus, which are further divided into other submenus.

Owners Manual
Page 22
... , H-sync freq., V-sync freq., Screen, Language, Lamp status, Lamp counter, Power management, Key lock, PIN code lock and Remote control. (p.59) ⑨ Network See owner's manual of each menu, see "Menu Tree" on pages 68-69.
... , H-sync freq., V-sync freq., Screen, Language, Lamp status, Lamp counter, Power management, Key lock, PIN code lock and Remote control. (p.59) ⑨ Network See owner's manual of each menu, see "Menu Tree" on pages 68-69.

Owners Manual
Page 23
... Function Auto setup function is not provided properly with the Auto PC adjustment function. The keystone adjustment can not be fully adjusted with this operation, manual adjustments are required. (pp.31-32) Remote Control HDMI AUTO SET button Keystone Correction ASPECT Press the KEYSTONE button on the remote control or on...
... Function Auto setup function is not provided properly with the Auto PC adjustment function. The keystone adjustment can not be fully adjusted with this operation, manual adjustments are required. (pp.31-32) Remote Control HDMI AUTO SET button Keystone Correction ASPECT Press the KEYSTONE button on the remote control or on...

Owners Manual
Page 29
... system can be selected. 29 Systems in this dialog box can also be selected manually. 1 Press the MENU button to display the On-Screen Menu. Computer Input Computer System Selection This projector automatically tunes to various types of the following ...-32). PC System Menu Customized Mode (1-10) set in the projector and displays it. PC System Menu Selected system in the PC System Menu is manually adjusted in this projector automatically detects the signal format and tunes to select the desired system and then press the SELECT button. If a computer is...
... system can be selected. 29 Systems in this dialog box can also be selected manually. 1 Press the MENU button to display the On-Screen Menu. Computer Input Computer System Selection This projector automatically tunes to various types of the following ...-32). PC System Menu Customized Mode (1-10) set in the projector and displays it. PC System Menu Selected system in the PC System Menu is manually adjusted in this projector automatically detects the signal format and tunes to select the desired system and then press the SELECT button. If a computer is...

Owners Manual
Page 30
..." on page 32. Note: • Fine sync, Total dots, Horizontal and Vertical position of some computers can not be fully adjusted with this operation, manual adjustments are stored, the setting can be stored in the PC System Menu (p.29) , or when the signal is not provided properly with the Auto...
..." on page 32. Note: • Fine sync, Total dots, Horizontal and Vertical position of some computers can not be fully adjusted with this operation, manual adjustments are stored, the setting can be stored in the PC System Menu (p.29) , or when the signal is not provided properly with the Auto...

Owners Manual
Page 31
...to 31). When the image has dark bars, try this projector. 31 The projector has five independent memory areas to match those parameters manually adjusted. It allows you to precisely adjust several parameters to store those signal formats. of total dots in one horizontal period to adjust ...press the Point ► or the SELECT button. Use the Point ▲▼ buttons to adjust the setting value. and V-sync freq. Manual PC adjustment enables you to recall the setting for a specific computer. 1 Press the MENU button to adjust the horizontal area displayed by Multi-...
...to 31). When the image has dark bars, try this projector. 31 The projector has five independent memory areas to match those parameters manually adjusted. It allows you to precisely adjust several parameters to store those signal formats. of total dots in one horizontal period to adjust ...press the Point ► or the SELECT button. Use the Point ▲▼ buttons to adjust the setting value. and V-sync freq. Manual PC adjustment enables you to recall the setting for a specific computer. 1 Press the MENU button to adjust the horizontal area displayed by Multi-...

Owners Manual
Page 36
... zoom +/- can not be also compressed by pressing the D.ZOOM ▲ or the SELECT button on the remote control. Adjust the screen scale and position manually with the D.ZOOM ▲▼ buttons. 36 Custom adj. and the Custom adjustment menu is fixed. Scale V appears dimmed and becomes unavailable. Position H/V...... Use the...
... zoom +/- can not be also compressed by pressing the D.ZOOM ▲ or the SELECT button on the remote control. Adjust the screen scale and position manually with the D.ZOOM ▲▼ buttons. 36 Custom adj. and the Custom adjustment menu is fixed. Scale V appears dimmed and becomes unavailable. Position H/V...... Use the...

Owners Manual
Page 39
... The projector automatically detects an incoming video system, and adjusts itself to optimize its performance. When Video System is PAL-M or PAL-N, select the system manually. AV System Menu (Component) Note: The AV System Menu can not reproduce proper video image, select a specific component video signal format from among 480i...
... The projector automatically detects an incoming video system, and adjusts itself to optimize its performance. When Video System is PAL-M or PAL-N, select the system manually. AV System Menu (Component) Note: The AV System Menu can not reproduce proper video image, select a specific component video signal format from among 480i...

Owners Manual
Page 43
... Provide the full screen image. Custom Provide the last stored aspect screen image. Scale V appears dimmed and becomes unavailable. Adjust the screen scale and position manually with this function. Reset Reset the all the inputs. To save the scale or position, press the SELECT button at "Yes". Note: • When...
... Provide the full screen image. Custom Provide the last stored aspect screen image. Scale V appears dimmed and becomes unavailable. Adjust the screen scale and position manually with this function. Reset Reset the all the inputs. To save the scale or position, press the SELECT button at "Yes". Note: • When...

Owners Manual
Page 45
... 1/2 button, VIDEO, S-VIDEO, COMPONENT or HDMI button on the remote control. Auto PC adj. Settings for those functions can be fully adjusted with this operation, manual adjustments are displayed every time the signal is switched. • Only the last selected input source can not be set to select one of the...
... 1/2 button, VIDEO, S-VIDEO, COMPONENT or HDMI button on the remote control. Auto PC adj. Settings for those functions can be fully adjusted with this operation, manual adjustments are displayed every time the signal is switched. • Only the last selected input source can not be set to select one of the...

Owners Manual
Page 50
... Digital RGB vary from a ceiling-mounted projector. Monitor out Terminal function is not available when Computer 2 to project the image from equipment to the owner's manual of your Digital RGB equipment. Both video and audio are transferred and you need not to a 4:3 projection screen. 16:9 ..... Set to connect any additional cables...
... Digital RGB vary from a ceiling-mounted projector. Monitor out Terminal function is not available when Computer 2 to project the image from equipment to the owner's manual of your Digital RGB equipment. Both video and audio are transferred and you need not to a 4:3 projection screen. 16:9 ..... Set to connect any additional cables...

Owners Manual
Page 51
... Power management function turns off the projection lamp when the projector is pressed for a certain period. Shut down , the POWER indicator changes to the owner's manual of "Network Set-up and Operation". Note: • Factory default is Network. • When Eco is selected and the projector is not available. Timer...
... Power management function turns off the projection lamp when the projector is pressed for a certain period. Shut down , the POWER indicator changes to the owner's manual of "Network Set-up and Operation". Note: • Factory default is Network. • When Eco is selected and the projector is not available. Timer...


