
Print Specs
Page 1
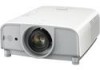
...330W NSHA lamp deliver an impressive 4200 ANSI lumens brightness level. A warning notification will be used with PLC-ET30L Ultra Long Zoom LNS-T11 Power 3.4 - 5.4:1 2.1-2.52 10:1-1:1 13:7-7:13 PJ-Net Camera POA-PN03C Rear Back Panel Issued 04/08 © 2008 SANYO Clean air filters, replace lamp ...-jack) Wireless/Wired I/R Remote Control w/Mouse Pad and Laser Pointer • AC power cord • VGA Cable • USB Cable • Owner's manual (quick manual & CD-ROM) • 2 "AAA" Batteries • PIN Code label • Serial Cable • POA-PN03C - LNS-W11 LNS-W10 LNS-...
...330W NSHA lamp deliver an impressive 4200 ANSI lumens brightness level. A warning notification will be used with PLC-ET30L Ultra Long Zoom LNS-T11 Power 3.4 - 5.4:1 2.1-2.52 10:1-1:1 13:7-7:13 PJ-Net Camera POA-PN03C Rear Back Panel Issued 04/08 © 2008 SANYO Clean air filters, replace lamp ...-jack) Wireless/Wired I/R Remote Control w/Mouse Pad and Laser Pointer • AC power cord • VGA Cable • USB Cable • Owner's manual (quick manual & CD-ROM) • 2 "AAA" Batteries • PIN Code label • Serial Cable • POA-PN03C - LNS-W11 LNS-W10 LNS-...

Owner's Manual
Page 1
Owner's Manual Multimedia Projector MODEL PLC-ET30L *Projection lens is optional.
Owner's Manual Multimedia Projector MODEL PLC-ET30L *Projection lens is optional.
Owner's Manual
Page 2
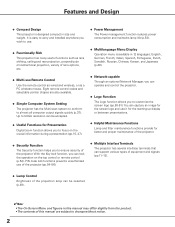
...-12). ◆ Lamp Control Brightness of the projection lamp can be accepted. ◆ Useful Functions for better and proper maintenance of this manual may differ slightly from the product. • The contents of the projector. ◆ Security Function The Security function helps you to almost ...-capable Through an optional Network Manager, you can be selected (p.49). ✔Note: • The On-Screen Menu and figures in this manual are also available. ◆ Simple Computer System Setting The projector has the Multi-scan system to conform to customize the screen logo (pp.50...
...-12). ◆ Lamp Control Brightness of the projection lamp can be accepted. ◆ Useful Functions for better and proper maintenance of this manual may differ slightly from the product. • The contents of the projector. ◆ Security Function The Security function helps you to almost ...-capable Through an optional Network Manager, you can be selected (p.49). ✔Note: • The On-Screen Menu and figures in this manual are also available. ◆ Simple Computer System Setting The projector has the Multi-scan system to conform to customize the screen logo (pp.50...

Owner's Manual
Page 3
... 33 Input Selection 34 Input 34 Input Source Selection 35 Video System Selection 36 Computer Adjustment 37 Computer System Selection 37 Auto PC Adjustment 38 Manual PC Adjustment 39 Image Level Selection 41 Image Level Selection 41 Image Adjustment 42 Image Adjustment 42 Screen Adjustment 45 Screen Adjustment 45 Screen Size...
... 33 Input Selection 34 Input 34 Input Source Selection 35 Video System Selection 36 Computer Adjustment 37 Computer System Selection 37 Auto PC Adjustment 38 Manual PC Adjustment 39 Image Level Selection 41 Image Level Selection 41 Image Adjustment 42 Image Adjustment 42 Screen Adjustment 45 Screen Adjustment 45 Screen Size...

Owner's Manual
Page 4
... waste collection/recycling centre. If the problem still persists, contact the dealer where you to prevent A Breakdown or a disaster. Your SANYO product is designed and manufactured with oil or chemicals, IT may result in good condition for an extended time, unplug the projector from...fire hazard. -Allowing the proper amount of space on the projector. To the Owner Before installing and operating the projector, read this manual. Operating the projector properly enables you purchased the projector or the service center. Please help us to the countries in greasy, wet...
... waste collection/recycling centre. If the problem still persists, contact the dealer where you to prevent A Breakdown or a disaster. Your SANYO product is designed and manufactured with oil or chemicals, IT may result in good condition for an extended time, unplug the projector from...fire hazard. -Allowing the proper amount of space on the projector. To the Owner Before installing and operating the projector, read this manual. Operating the projector properly enables you purchased the projector or the service center. Please help us to the countries in greasy, wet...
Owner's Manual
Page 24
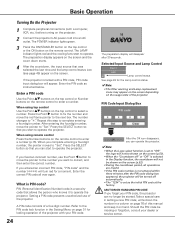
... preparation display appears on the screen and the count down the number in the Setting Menu on the usage state of the projector. Repeat this manual and keep it to operate the projector. Setting a PIN code prevents unauthorized use the Point 7 button to move the pointer to the number you complete...
... preparation display appears on the screen and the count down the number in the Setting Menu on the usage state of the projector. Repeat this manual and keep it to operate the projector. Setting a PIN code prevents unauthorized use the Point 7 button to move the pointer to the number you complete...
Owner's Manual
Page 26
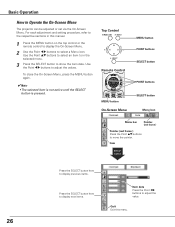
... previous items. Press the SELECT button here to display next items. Item data Press the Point 7 8 buttons to show the item data. Quit Exit this manual. 1 Press the MENU button on the top control or the remote control to display the On-Screen Menu. 2 Use the Point 7 8 buttons to adjust the...
... previous items. Press the SELECT button here to display next items. Item data Press the Point 7 8 buttons to show the item data. Quit Exit this manual. 1 Press the MENU button on the top control or the remote control to display the On-Screen Menu. 2 Use the Point 7 8 buttons to adjust the...
Owner's Manual
Page 35
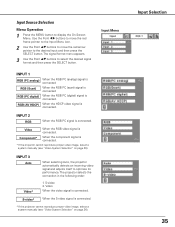
... the RGB video signal is connected. Component* When the component signal is connected. * If the projector cannot reproduce proper video image, select a system manually (see "Video System Selection" on page 36). Use the Point 7 8 buttons to move the red frame pointer to the Input Menu icon. 2...display the On-Screen Menu. Video When the video signal is connected. * If the projector cannot reproduce proper video image, select a system manually (see "Video System Selection" on page 36). Input Source Selection Menu Operation 1 Press the MENU button to the desired input and then...
... the RGB video signal is connected. Component* When the component signal is connected. * If the projector cannot reproduce proper video image, select a system manually (see "Video System Selection" on page 36). Use the Point 7 8 buttons to move the red frame pointer to the Input Menu icon. 2...display the On-Screen Menu. Video When the video signal is connected. * If the projector cannot reproduce proper video image, select a system manually (see "Video System Selection" on page 36). Input Source Selection Menu Operation 1 Press the MENU button to the desired input and then...
Owner's Manual
Page 36
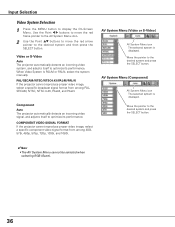
.... AV System Menu (Video or S-Video) AV System Menu icon The selected system is displayed. When Video System is PAL-M or PAL-N, select the system manually. Move the pointer to the desired system and then press the SELECT button. Move the pointer to display the On-Screen Menu. Input Selection Video...
.... AV System Menu (Video or S-Video) AV System Menu icon The selected system is displayed. When Video System is PAL-M or PAL-N, select the system manually. Move the pointer to the desired system and then press the SELECT button. Move the pointer to display the On-Screen Menu. Input Selection Video...
Owner's Manual
Page 37
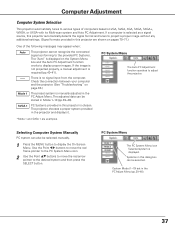
... is chosen. Check the connection between your computer and the projector. (See "Troubleshooting" on page 63.) Mode 1 The preset system is manually adjusted in the projector and displays it. The projector chooses a proper system provided in the PC Adjust Menu. If the image is not projected... VGA, SVGA, XGA, SXGA, SXGA+, WXGA, or UXGA with its Multi-scan system and Auto PC Adjustment. Selecting Computer System Manually PC system can also be selected. Computer Adjustment Computer System Selection This projector automatically tunes to various types of the following messages may appear...
... is chosen. Check the connection between your computer and the projector. (See "Troubleshooting" on page 63.) Mode 1 The preset system is manually adjusted in the projector and displays it. The projector chooses a proper system provided in the PC Adjust Menu. If the image is not projected... VGA, SVGA, XGA, SXGA, SXGA+, WXGA, or UXGA with its Multi-scan system and Auto PC Adjustment. Selecting Computer System Manually PC system can also be selected. Computer Adjustment Computer System Selection This projector automatically tunes to various types of the following messages may appear...
Owner's Manual
Page 38
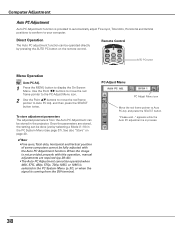
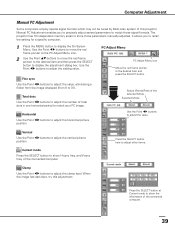
... button on page 40. ✔Note: • Fine sync, Total dots, Horizontal and Vertical position of some computers cannot be fully adjusted with this operation, manual adjustments are stored, the setting can be operated directly by selecting a Mode (1-10) in the PC System Menu (p.37), or when the signal is coming...
... button on page 40. ✔Note: • Fine sync, Total dots, Horizontal and Vertical position of some computers cannot be fully adjusted with this operation, manual adjustments are stored, the setting can be operated directly by selecting a Mode (1-10) in the PC System Menu (p.37), or when the signal is coming...
Owner's Manual
Page 39
... then press the SELECT button to the desired item and press the SELECT button. Press the SELECT button at Current mode to match those parameters manually adjusted. Total dots Use the Point 7 8 buttons to adjust the number of total dots in one horizontal period to display the On-Screen Menu.... Manual PC Adjustment enables you to recall the setting for a specific computer. 1 Press the MENU button to match your PC image. When the image has dark ...
... then press the SELECT button to the desired item and press the SELECT button. Press the SELECT button at Current mode to match those parameters manually adjusted. Total dots Use the Point 7 8 buttons to adjust the number of total dots in one horizontal period to display the On-Screen Menu.... Manual PC Adjustment enables you to recall the setting for a specific computer. 1 Press the MENU button to match your PC image. When the image has dark ...
Owner's Manual
Page 46
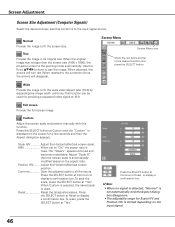
Use the Point ed7 8 buttons to fit the screen size. Custom Adjust the screen scale and position manually with this function. Scale H/V Adjust the Horizontal/Vertical screen scale. Press the SELECT button at "Yes." To save the scale, press the SELECT button at ...
Use the Point ed7 8 buttons to fit the screen size. Custom Adjust the screen scale and position manually with this function. Scale H/V Adjust the Horizontal/Vertical screen scale. Press the SELECT button at "Yes." To save the scale, press the SELECT button at ...

Owner's Manual
Page 48
.... ✔Note: • When no signal is detected, "Normal" is used. Scale H/V Adjust the Horizontal/Vertical screen scale. Custom Adjust the screen scale and position manually with this function. The "Scale V" appears dimmed and becomes unavailable. When Custom is selected, the saved scale is set to the desired function and then...
.... ✔Note: • When no signal is detected, "Normal" is used. Scale H/V Adjust the Horizontal/Vertical screen scale. Custom Adjust the screen scale and position manually with this function. The "Scale V" appears dimmed and becomes unavailable. When Custom is selected, the saved scale is set to the desired function and then...
Owner's Manual
Page 60
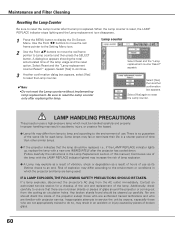
... same life for a checkup of the unit and replacement of the lamp with projector service. Inappropriate attempts to service the unit by pieces of this manual.) Continuous use . A dialog box appears showing the total accumulated time of explosion may result in which must be cleaned up , replace the lamp with a new...
... same life for a checkup of the unit and replacement of the lamp with projector service. Inappropriate attempts to service the unit by pieces of this manual.) Continuous use . A dialog box appears showing the total accumulated time of explosion may result in which must be cleaned up , replace the lamp with a new...
Owner's Manual
Page 63
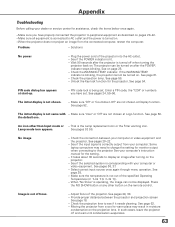
... the projector from a cool to warm place may need to change the setting for monitor output when connecting to the projector See your computer's instruction manual for the projector. The projector can not be turned on the projector. - indicator is blinking, the projector cannot be displayed. The initial display is not...
... the projector from a cool to warm place may need to change the setting for monitor output when connecting to the projector See your computer's instruction manual for the projector. The projector can not be turned on the projector. - indicator is blinking, the projector cannot be displayed. The initial display is not...

Owner's Manual
Page 73
... : LNS-W10 : POA-PN03 : POA-PN03C 73 Optional Parts The parts listed below are manufactured to the highest possible standards. Model No. Appendix Accessories Owner's Manual (CD-ROM) Quick Reference Guide AC Power Cord Remote Control and Batteries VGA Cable USB Cable Control Cable Lens Mount Cover PIN Code Label ●...
... : LNS-W10 : POA-PN03 : POA-PN03C 73 Optional Parts The parts listed below are manufactured to the highest possible standards. Model No. Appendix Accessories Owner's Manual (CD-ROM) Quick Reference Guide AC Power Cord Remote Control and Batteries VGA Cable USB Cable Control Cable Lens Mount Cover PIN Code Label ●...

Owner's Manual
Page 76
... Code Lock No. Appendix PIN Code Number Memo Write down the PIN code number in a prominent place of the projector's body while it with this manual securely.
... Code Lock No. Appendix PIN Code Number Memo Write down the PIN code number in a prominent place of the projector's body while it with this manual securely.


