
Print Specs
Page 1
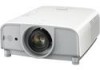
...requirements. REMARKABLE BRIGHTNESS The high-tech optical system and the 330W NSHA lamp deliver an impressive 4200 ANSI lumens brightness level. EXCEPTIONAL CONTRAST RATIO With a high-contrast optical system the PLC-ET30L achieves a remarkable contrast ratio of (1400 x 1050), and 10-Bit digital gamma correction...via a network. A warning notification will be used with PLC-ET30L Ultra Long Zoom LNS-T11 Power 3.4 - 5.4:1 2.1-2.52 10:1-1:1 13:7-7:13 PJ-Net Camera POA-PN03C Rear Back Panel Issued 04/08 © 2008 SANYO Replacement Remote • Optional Lenses (see below) 3 years parts ...
...requirements. REMARKABLE BRIGHTNESS The high-tech optical system and the 330W NSHA lamp deliver an impressive 4200 ANSI lumens brightness level. EXCEPTIONAL CONTRAST RATIO With a high-contrast optical system the PLC-ET30L achieves a remarkable contrast ratio of (1400 x 1050), and 10-Bit digital gamma correction...via a network. A warning notification will be used with PLC-ET30L Ultra Long Zoom LNS-T11 Power 3.4 - 5.4:1 2.1-2.52 10:1-1:1 13:7-7:13 PJ-Net Camera POA-PN03C Rear Back Panel Issued 04/08 © 2008 SANYO Replacement Remote • Optional Lenses (see below) 3 years parts ...
Owner's Manual
Page 2
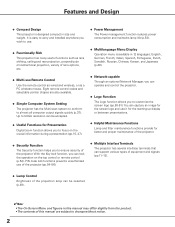
...UXGA resolution can operate and control the projector. ◆ Logo Function The Logo function allows you to focus on the top control or remote control (p.54). Features and Design ◆ Compact Design This projector is available in 12 languages; English, German, French, Italian, Spanish,... life (p.53). ◆ Functionally Rich This projector has many useful functions such as a PC wireless mouse. Up to use Remote Control Use the remote control as wired and wireless, or as lens shifting, ceiling and rear projection, perpendicular omnidirectional projection, variety of lens options, ...
...UXGA resolution can operate and control the projector. ◆ Logo Function The Logo function allows you to focus on the top control or remote control (p.54). Features and Design ◆ Compact Design This projector is available in 12 languages; English, German, French, Italian, Spanish,... life (p.53). ◆ Functionally Rich This projector has many useful functions such as a PC wireless mouse. Up to use Remote Control Use the remote control as wired and wireless, or as lens shifting, ceiling and rear projection, perpendicular omnidirectional projection, variety of lens options, ...

Owner's Manual
Page 3
...and Functions 10 Front 10 Back 10 Bottom 10 Rear Terminal 11 Top Control 13 Remote Control 14 Remote Control Battery Installation 16 Remote Control Receivers and Operating Range 16 Adjustable Feet 16 Remote Control Code 17 Installation 18 Positioning the Projector 18 Lens Installation 19 Connecting to ... to Operate the On-Screen Menu 26 Menu Bar 27 Operating with Projector Control 28 Sound Adjustment 29 Operating with Remote Control 30 Laser Pointer Function 32 Pointer Function 32 Wireless Mouse Operation 33 Input Selection 34 Input 34 Input Source ...
...and Functions 10 Front 10 Back 10 Bottom 10 Rear Terminal 11 Top Control 13 Remote Control 14 Remote Control Battery Installation 16 Remote Control Receivers and Operating Range 16 Adjustable Feet 16 Remote Control Code 17 Installation 18 Positioning the Projector 18 Lens Installation 19 Connecting to ... to Operate the On-Screen Menu 26 Menu Bar 27 Operating with Projector Control 28 Sound Adjustment 29 Operating with Remote Control 30 Laser Pointer Function 32 Pointer Function 32 Wireless Mouse Operation 33 Input Selection 34 Input 34 Input Source ...

Owner's Manual
Page 10
CAUTION Do not turn on the projector with the lens cap attached. yu i Back !0 !1 o✽ y Infrared Remote Receiver (Front) u Projection Lens (optional) i Adjustable Feet o Exhaust Vent !2 !3 !4 !5 Bottom !6 i CAUTION Hot air is a registered trademark of the projector. ... objects near this side. ✽ Kensington Security Slot This slot is for a Kensington lock used to deter theft of ACCO Brand Corporation. !0 Infrared Remote Receiver (Back) !1 Terminals and Connectors !2 Lamp Cover !3 Power Cord Connector !4 Optional Parts Attachment !5 Air Intake Vent !6 Hand Grip 10 Do not...
CAUTION Do not turn on the projector with the lens cap attached. yu i Back !0 !1 o✽ y Infrared Remote Receiver (Front) u Projection Lens (optional) i Adjustable Feet o Exhaust Vent !2 !3 !4 !5 Bottom !6 i CAUTION Hot air is a registered trademark of the projector. ... objects near this side. ✽ Kensington Security Slot This slot is for a Kensington lock used to deter theft of ACCO Brand Corporation. !0 Infrared Remote Receiver (Back) !1 Terminals and Connectors !2 Lamp Cover !3 Power Cord Connector !4 Optional Parts Attachment !5 Air Intake Vent !6 Hand Grip 10 Do not...

Owner's Manual
Page 11
... output (stereo) signal from video equipment connected to r or y to these jacks (p.21). Connect the USB terminal of your computer to this connector with the remote control of the projector. u AUDIO 3 JACKS (L(MONO)/R) Connect the audio output signal from a computer or video equipment connected to q to this jack (pp.20-22...
... output (stereo) signal from video equipment connected to r or y to these jacks (p.21). Connect the USB terminal of your computer to this connector with the remote control of the projector. u AUDIO 3 JACKS (L(MONO)/R) Connect the audio output signal from a computer or video equipment connected to q to this jack (pp.20-22...

Owner's Manual
Page 12
.... Part Names and Functions Rear Terminal ✽ !4 !3 !2 !1 !0 !0 R/C JACK When using the wired remote control, connect the wired remote control to this jack with a remote control cable (not supplied). !1 AUDIO MONITOR OUTPUT JACK (VARIABLE) This jack outputs the audio signal from computer or... PORT CONNECTOR When controlling the projector from a computer, connect the computer to this connector with a control cable. !4 Infrared Remote Receiver (Back) The infrared remote receiver is also located in the front (pp.10, 16). ✽ RESET button A built-in micro processor which controls...
.... Part Names and Functions Rear Terminal ✽ !4 !3 !2 !1 !0 !0 R/C JACK When using the wired remote control, connect the wired remote control to this jack with a remote control cable (not supplied). !1 AUDIO MONITOR OUTPUT JACK (VARIABLE) This jack outputs the audio signal from computer or... PORT CONNECTOR When controlling the projector from a computer, connect the computer to this connector with a control cable. !4 Infrared Remote Receiver (Back) The infrared remote receiver is also located in the front (pp.10, 16). ✽ RESET button A built-in micro processor which controls...

Owner's Manual
Page 14
...not apply benzene, thinner, splay, or any other chemical materials. 14 button Display the input source information (p.28). !2 L-Click button Acts as a wired remote control. e Signal Emission indicator Lights red while the laser beam is being sent from here (p.32). r Laser Light window A laser beam is being emitted... from the laser light window or a signal is emitted from the remote control to this jack when using as the left mouse button for wireless mouse operation (pp.32-33). !1 INFO. Select an item or ...
...not apply benzene, thinner, splay, or any other chemical materials. 14 button Display the input source information (p.28). !2 L-Click button Acts as a wired remote control. e Signal Emission indicator Lights red while the laser beam is being sent from here (p.32). r Laser Light window A laser beam is being emitted... from the laser light window or a signal is emitted from the remote control to this jack when using as the left mouse button for wireless mouse operation (pp.32-33). !1 INFO. Select an item or ...

Owner's Manual
Page 15
... @6 !3 @5 !4 @4 !5 @3 !6 @2 !7 @1 !8 @0 !9 @7 For PIN code and remote control code. !3 MENU button Open or close the On-Screen Menu (p.26). !4 P-TIMER button Operate the... button - Operate the Laser pointer function. When using the remote control, set this button for more than one minute. Slide this switch to "RESET" to initialize the remote control code or switch the Spotlight and Pointer to "ALL ... mouse operation (p.33). @6 SELECT button - Use these buttons when setting the remote control codes (p.17) or when entering the PIN code numbers (pp. 24, 50-51, 55-56). 15
... @6 !3 @5 !4 @4 !5 @3 !6 @2 !7 @1 !8 @0 !9 @7 For PIN code and remote control code. !3 MENU button Open or close the On-Screen Menu (p.26). !4 P-TIMER button Operate the... button - Operate the Laser pointer function. When using the remote control, set this button for more than one minute. Slide this switch to "RESET" to initialize the remote control code or switch the Spotlight and Pointer to "ALL ... mouse operation (p.33). @6 SELECT button - Use these buttons when setting the remote control codes (p.17) or when entering the PIN code numbers (pp. 24, 50-51, 55-56). 15

Owner's Manual
Page 16
...clockwise. You can conveniently use both in sets. ● Do not use a new battery with water or liquid. ● Do not expose the remote control to the instructions. To ensure safe operation, please observe the following precautions : ● Use two (2) AAA or LR03 type alkaline batteries. &#...angle can be sure battery terminals are in contact with the adjustable feet. To correct keystone distortion, press the KEYSTONE button on the remote control, carefully wipe the case clean and install new batteries. ● Risk of an explosion if battery is located farther away from...
...clockwise. You can conveniently use both in sets. ● Do not use a new battery with water or liquid. ● Do not expose the remote control to the instructions. To ensure safe operation, please observe the following precautions : ● Use two (2) AAA or LR03 type alkaline batteries. &#...angle can be sure battery terminals are in contact with the adjustable feet. To correct keystone distortion, press the KEYSTONE button on the remote control, carefully wipe the case clean and install new batteries. ● Risk of an explosion if battery is located farther away from...

Owner's Manual
Page 17
...8) are operated at the same time. The initial code is set to this projector. Change the remote control code for the projector first before changing that corresponds to the remote control code for the remote control. MENU button Number buttons RESET/ON/ALL OFF Switch Press and hold the MENU and a... number button (1-8) for more than five seconds to "ON." See "Remote control" in the Setting Menu on page 52. 1 Press and hold the MENU and a number button (1-8) that for more than five seconds to switch...
...8) are operated at the same time. The initial code is set to this projector. Change the remote control code for the projector first before changing that corresponds to the remote control code for the remote control. MENU button Number buttons RESET/ON/ALL OFF Switch Press and hold the MENU and a... number button (1-8) for more than five seconds to "ON." See "Remote control" in the Setting Menu on page 52. 1 Press and hold the MENU and a number button (1-8) that for more than five seconds to switch...

Owner's Manual
Page 20
...; USB Cable • DVI-Digital Cable • Audio Cables (Mini Plug [stereo] x 2) • BNC Cable (*One cable is needed when operating the computer with the remote control. 20 Unplug the power cords of both the projector and external equipment from the AC outlet before connecting cables. AUDIO OUT (stereo) other cables...
...; USB Cable • DVI-Digital Cable • Audio Cables (Mini Plug [stereo] x 2) • BNC Cable (*One cable is needed when operating the computer with the remote control. 20 Unplug the power cords of both the projector and external equipment from the AC outlet before connecting cables. AUDIO OUT (stereo) other cables...
Owner's Manual
Page 24
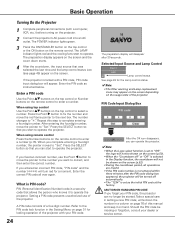
... the projector. Repeat this manual and keep it to complete entering a four-digit number. When using top control Use the Point ed buttons on the remote control to "✳." If you start to select a number. What is a security code that you entered an incorrect PIN code, "PIN code" and ...pointer to operate the projector. The number changes to enter a number. Press the SELECT button so that allows the person who knows it on the remote control. If you want to "Set." CAUTION ON HANDLING PIN CODE If you complete entering a four-digit number, the pointer moves to correct, and...
... the projector. Repeat this manual and keep it to complete entering a four-digit number. When using top control Use the Point ed buttons on the remote control to "✳." If you start to select a number. What is a security code that you entered an incorrect PIN code, "PIN code" and ...pointer to operate the projector. The number changes to enter a number. Press the SELECT button so that allows the person who knows it on the remote control. If you want to "Set." CAUTION ON HANDLING PIN CODE If you complete entering a four-digit number, the pointer moves to correct, and...

Owner's Manual
Page 25
... cooled down completely, unplug the AC power cord. appears on the screen. 2 Press the ON/STAND-BY button or the STAND-BY button on the remote control, and "Power off?" After the projector is blinking, you can turn on the projector. DO NOT UNPLUG THE AC POWER CORD WHILE THE COOLING... 90 seconds. Basic Operation Turning Off the Projector 1 Press the ON/STAND-BY button on the top control or the STAND-BY button on the remote control again to turn off the projector. OTHERWISE IT WILL RESULT IN SHORTENING THE LAMP LIFE. The LAMP indicator turns off ?" After it is cooled...
... cooled down completely, unplug the AC power cord. appears on the screen. 2 Press the ON/STAND-BY button or the STAND-BY button on the remote control, and "Power off?" After the projector is blinking, you can turn on the projector. DO NOT UNPLUG THE AC POWER CORD WHILE THE COOLING... 90 seconds. Basic Operation Turning Off the Projector 1 Press the ON/STAND-BY button on the top control or the STAND-BY button on the remote control again to turn off the projector. OTHERWISE IT WILL RESULT IN SHORTENING THE LAMP LIFE. The LAMP indicator turns off ?" After it is cooled...
Owner's Manual
Page 26
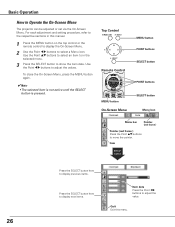
.... Use the Point 7 8 buttons to Operate the On-Screen Menu The projector can be adjusted or set via the On-Screen Menu. Top Control Remote Control MENU button On-Screen Menu MENU button POINT buttons SELECT button POINT buttons SELECT button Menu icon Menu bar Pointer (red frame ) Pointer (red... the selected menu. 3 Press the SELECT button to move the pointer. Quit Exit this manual. 1 Press the MENU button on the top control or the remote control to display the On-Screen Menu. 2 Use the Point 7 8 buttons to select a Menu icon. For each adjustment and setting procedure, refer to ...
.... Use the Point 7 8 buttons to Operate the On-Screen Menu The projector can be adjusted or set via the On-Screen Menu. Top Control Remote Control MENU button On-Screen Menu MENU button POINT buttons SELECT button POINT buttons SELECT button Menu icon Menu bar Pointer (red frame ) Pointer (red... the selected menu. 3 Press the SELECT button to move the pointer. Quit Exit this manual. 1 Press the MENU button on the top control or the remote control to display the On-Screen Menu. 2 Use the Point 7 8 buttons to select a Menu icon. For each adjustment and setting procedure, refer to ...

Owner's Manual
Page 27
... (pp.45- White balance (R/G/B) - Fan control - Quit Input Select either Computer or Video for input source (pp.34-35). Wide - [Full screen] - Dynamic - Normal - [True] - Remote Control - Gamma - - - Security - Language - Menu Bar For detailed functions of the OnScreen Menu. System Select a computer or video system mode (pp.36, 37). [PC Adjust...
... (pp.45- White balance (R/G/B) - Fan control - Quit Input Select either Computer or Video for input source (pp.34-35). Wide - [Full screen] - Dynamic - Normal - [True] - Remote Control - Gamma - - - Security - Language - Menu Bar For detailed functions of the OnScreen Menu. System Select a computer or video system mode (pp.36, 37). [PC Adjust...

Owner's Manual
Page 28
... the top control. The selected adjustment display appears on the screen. The screen can be made with the Lens button on the top control or remote control to adjust focus of the lens shift. ✔Note: • The arrow disappears at the maximum lens shift in this figure may be used...
... the top control. The selected adjustment display appears on the screen. The screen can be made with the Lens button on the top control or remote control to adjust focus of the lens shift. ✔Note: • The arrow disappears at the maximum lens shift in this figure may be used...

Owner's Manual
Page 29
... desired item, and then press the SELECT button. The dialog box disappears after 4 seconds. Sound Menu Sound Menu icon Approximate level of the volume. buttons Remote Control VOL - The Mute function is displayed. Mute Press the MUTE button on the screen for the AUDIO OUT jack. When the sound is turned... Operation 1 Press the MENU button to set the Mute function On or Off. Volume Press the Point 8 button to turn the sound back on the remote control to turn the sound back on, press the MUTE button again or press the VOLUME +/- Exit the Sound Menu. 29
... desired item, and then press the SELECT button. The dialog box disappears after 4 seconds. Sound Menu Sound Menu icon Approximate level of the volume. buttons Remote Control VOL - The Mute function is displayed. Mute Press the MUTE button on the screen for the AUDIO OUT jack. When the sound is turned... Operation 1 Press the MENU button to set the Mute function On or Off. Volume Press the Point 8 button to turn the sound back on the remote control to turn the sound back on, press the MUTE button again or press the VOLUME +/- Exit the Sound Menu. 29

Owner's Manual
Page 30
...buttons. See page 38 for details. mode. LENS SHIFT button See page 28 for details. FOCUS buttons Press the FOCUS buttons on the remote control to enter to make the desired operation quickly without calling up the On-Screen Menu. See page 47 for some frequently used operations... in and out the image. AUTO PC button Press the AUTO PC button on the remote control to operate the Auto PC Adj. Basic Operation Operating with Remote Control Using the remote control for details. Remote Control AUTO PC button D.ZOOM button ZOOM buttons FOCUS buttons FREEZE button INFO. INFO....
...buttons. See page 38 for details. mode. LENS SHIFT button See page 28 for details. FOCUS buttons Press the FOCUS buttons on the remote control to enter to make the desired operation quickly without calling up the On-Screen Menu. See page 47 for some frequently used operations... in and out the image. AUTO PC button Press the AUTO PC button on the remote control to operate the Auto PC Adj. Basic Operation Operating with Remote Control Using the remote control for details. Remote Control AUTO PC button D.ZOOM button ZOOM buttons FOCUS buttons FREEZE button INFO. INFO....

Owner's Manual
Page 31
... countdown, press the P-TIMER button. The keystone adjustment can be canceled. 31 The P-Timer display "00:00" appears on the remote control. P-Timer display Remote Control P-TIMER button KEYSTONE button NO SHOW button ✔Note: • See the previous page for the description of correction. &#...8226; An arrow disappears at the maximum correction. • If you press the KEYSTONE button on the remote control. KEYSTONE button Press the KEYSTONE button on the remote control once more while the keystone dialog box is no correction. • A red arrow indicates the direction...
... countdown, press the P-TIMER button. The keystone adjustment can be canceled. 31 The P-Timer display "00:00" appears on the remote control. P-Timer display Remote Control P-TIMER button KEYSTONE button NO SHOW button ✔Note: • See the previous page for the description of correction. &#...8226; An arrow disappears at the maximum correction. • If you press the KEYSTONE button on the remote control. KEYSTONE button Press the KEYSTONE button on the remote control once more while the keystone dialog box is no correction. • A red arrow indicates the direction...

Owner's Manual
Page 32
... than 10 seconds to activate the Pointer function. (The Laser pointer has switched to activate the laser pointer. See "Pointer" on the remote control. CAUTION: Use of controls, adjustments or performance of procedures other people. To switch to "ON". Press the LASER button pointing toward...3 To clear the Spotlight or Pointer out the screen, press the LASER button pointing toward the projector. Basic Operation Laser Pointer Function This remote control emits a laser beam from the laser light window. Press the LASER button to the Pointer function.) 2 Press the LASER button on...
... than 10 seconds to activate the Pointer function. (The Laser pointer has switched to activate the laser pointer. See "Pointer" on the remote control. CAUTION: Use of controls, adjustments or performance of procedures other people. To switch to "ON". Press the LASER button pointing toward...3 To clear the Spotlight or Pointer out the screen, press the LASER button pointing toward the projector. Basic Operation Laser Pointer Function This remote control emits a laser beam from the laser light window. Press the LASER button to the Pointer function.) 2 Press the LASER button on...


