
Print Specs
Page 1
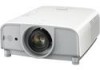
...POA-PN03C - Quick Repair Program under warranty Because its detachable top cover. 4200 ANSI LUMENS z HIGH RESOLUTION SXGA+ z MULTIMEDIA PROJECTORS PLC-ET30L SXGA+ Portable Multimedia Projectors *Lens sold separately RESOLUTION AND MORE The PLC-ET30L projector has a SXGA+ resolution of 1300:1. The many custom screen adjustments and ...° positioning function. A warning notification will be used with its products are subject to continuous improvement, SANYO reserves the right to modify product design and specifications without notice and without incurring any web browser. LNS-W11...
...POA-PN03C - Quick Repair Program under warranty Because its detachable top cover. 4200 ANSI LUMENS z HIGH RESOLUTION SXGA+ z MULTIMEDIA PROJECTORS PLC-ET30L SXGA+ Portable Multimedia Projectors *Lens sold separately RESOLUTION AND MORE The PLC-ET30L projector has a SXGA+ resolution of 1300:1. The many custom screen adjustments and ...° positioning function. A warning notification will be used with its products are subject to continuous improvement, SANYO reserves the right to modify product design and specifications without notice and without incurring any web browser. LNS-W11...

Owner's Manual
Page 1
Multimedia Projector MODEL PLC-ET30L *Projection lens is optional. Owner's Manual
Multimedia Projector MODEL PLC-ET30L *Projection lens is optional. Owner's Manual
Owner's Manual
Page 2
...Manager, you can lock the operation on the top control or remote control (p.54). Features and Design ◆ Compact Design This projector is available in 12 languages; You can capture an image for the screen logo and use it for the starting-up display ...slightly from the product. • The contents of this manual are also available. ◆ Simple Computer System Setting The projector has the Multi-scan system to conform to ensure security of the projector. English, German, French, Italian, Spanish, Portuguese, Dutch, Swedish, Russian, Chinese, Korean, and Japanese (p.49). &#...
...Manager, you can lock the operation on the top control or remote control (p.54). Features and Design ◆ Compact Design This projector is available in 12 languages; You can capture an image for the screen logo and use it for the starting-up display ...slightly from the product. • The contents of this manual are also available. ◆ Simple Computer System Setting The projector has the Multi-scan system to conform to ensure security of the projector. English, German, French, Italian, Spanish, Portuguese, Dutch, Swedish, Russian, Chinese, Korean, and Japanese (p.49). &#...

Owner's Manual
Page 3
... Table of Contents 3 To the Owner 4 Safety Instructions 5 Air Circulation 6 Installing the Projector in Proper Directions 7 Positioning Precautions 7 Moving the Projector 8 Cautions in Handling the Projector 8 Compliance 9 Part Names and Functions 10 Front 10 Back 10 Bottom 10 Rear Terminal ... Installation 16 Remote Control Receivers and Operating Range 16 Adjustable Feet 16 Remote Control Code 17 Installation 18 Positioning the Projector 18 Lens Installation 19 Connecting to a Computer (Digital and Analog RGB) 20 Connecting to Video Equipment (Video, ...
... Table of Contents 3 To the Owner 4 Safety Instructions 5 Air Circulation 6 Installing the Projector in Proper Directions 7 Positioning Precautions 7 Moving the Projector 8 Cautions in Handling the Projector 8 Compliance 9 Part Names and Functions 10 Front 10 Back 10 Bottom 10 Rear Terminal ... Installation 16 Remote Control Receivers and Operating Range 16 Adjustable Feet 16 Remote Control Code 17 Installation 18 Positioning the Projector 18 Lens Installation 19 Connecting to a Computer (Digital and Analog RGB) 20 Connecting to Video Equipment (Video, ...

Owner's Manual
Page 4
.... CAUTION RISK OF ELECTRIC SHOCK DO NOT OPEN CAUTION: TO REDUCE THE RISK OF ELECTRIC SHOCK, DO NOT REMOVE COVER (OR BACK). Your SANYO product is critical for Protection of Electronic Computer/Data Processing Equipment 4 Otherwise it may cause a breakdown or a disaster. Heat build-up can... directly into a compartment or similarly enclosed, these minimum distances must be recycled and reused. To the Owner Before installing and operating the projector, read this manual again, check operations and cable connections and try the solutions in the "Troubleshooting" section in the back of this ...
.... CAUTION RISK OF ELECTRIC SHOCK DO NOT OPEN CAUTION: TO REDUCE THE RISK OF ELECTRIC SHOCK, DO NOT REMOVE COVER (OR BACK). Your SANYO product is critical for Protection of Electronic Computer/Data Processing Equipment 4 Otherwise it may cause a breakdown or a disaster. Heat build-up can... directly into a compartment or similarly enclosed, these minimum distances must be recycled and reused. To the Owner Before installing and operating the projector, read this manual again, check operations and cable connections and try the solutions in the "Troubleshooting" section in the back of this ...

Owner's Manual
Page 5
...serious damage to overturn. Do not overload wall outlets and extension cords as they may cause the appliance and cart combination to the projector. Never spill liquid of according to rain or use a mounting kit approved by the operating instructions as opening should use near a... follow the manufacturer's instructions, and should not be placed near the ventilation duct of the equipment and to service this projector from overheating. If the projector has been exposed to lightning and power line surges. e. Use a damp cloth for long periods of other similar surface...
...serious damage to overturn. Do not overload wall outlets and extension cords as they may cause the appliance and cart combination to the projector. Never spill liquid of according to rain or use a mounting kit approved by the operating instructions as opening should use near a... follow the manufacturer's instructions, and should not be placed near the ventilation duct of the equipment and to service this projector from overheating. If the projector has been exposed to lightning and power line surges. e. Use a damp cloth for long periods of other similar surface...

Owner's Manual
Page 6
...counter" on page 57 and "Maintenance and Filter Cleaning" on page 58. Clean the Filter Regularly!! Damages to the projector caused by using the projector immediately and clean or replace the filter. To ensure reliable operation of the exhaust vent, especially screws and metallic parts. ...is changed according to the temperature inside of the filter, refer to cool down the projector. If the projector detects that has accumulated on the projector and on the screen when the projector detects filter clogging. 6 Safety Instructions Air Circulation Openings in the intake vents to ...
...counter" on page 57 and "Maintenance and Filter Cleaning" on page 58. Clean the Filter Regularly!! Damages to the projector caused by using the projector immediately and clean or replace the filter. To ensure reliable operation of the exhaust vent, especially screws and metallic parts. ...is changed according to the temperature inside of the filter, refer to cool down the projector. If the projector detects that has accumulated on the projector and on the screen when the projector detects filter clogging. 6 Safety Instructions Air Circulation Openings in the intake vents to ...

Owner's Manual
Page 7
...in upward, downward, or inclined position in perpendicular direction to project an image. Safety Instructions Installing the Projector in Proper Directions Use the projector properly in upwardly inclined position, install the projector bottom side up. ✔Note: • When the image is top/bottom and left/right reversed...left . 10˚ 10˚ CAUTION ON CEILING MOUNTING For ceiling mounting, you need the ceiling mount kit designed for this projector does not cover any damage caused by use of any nonrecommended ceiling mount kit or installation of the ceiling mount kit in severe ...
...in upward, downward, or inclined position in perpendicular direction to project an image. Safety Instructions Installing the Projector in Proper Directions Use the projector properly in upwardly inclined position, install the projector bottom side up. ✔Note: • When the image is top/bottom and left/right reversed...left . 10˚ 10˚ CAUTION ON CEILING MOUNTING For ceiling mounting, you need the ceiling mount kit designed for this projector does not cover any damage caused by use of any nonrecommended ceiling mount kit or installation of the ceiling mount kit in severe ...

Owner's Manual
Page 8
... Do not hold the lens when lifting or moving the projector. Please note the followings when using the projector. ● Do not touch the lens while it into a suitable case to the lens and the projector. When carrying the projector, use for an extended period, put it is a ... so may cause damage to strong forces, or put the projector in use a suitable carrying case. - CAUTION Projection lens is moving the projector. Do not put other transport service, consult your dealer. - Safety Instructions Moving the Projector Use the hand grip when moving as this could cause injury...
... Do not hold the lens when lifting or moving the projector. Please note the followings when using the projector. ● Do not touch the lens while it into a suitable case to the lens and the projector. When carrying the projector, use for an extended period, put it is a ... so may cause damage to strong forces, or put the projector in use a suitable carrying case. - CAUTION Projection lens is moving the projector. Do not put other transport service, consult your dealer. - Safety Instructions Moving the Projector Use the hand grip when moving as this could cause injury...

Owner's Manual
Page 9
...into the power outlet. Telephone No. : (818)998-7322 AC Power Cord Requirement The AC Power Cord supplied with this projector meets the requirement for use the plug with the following measures: - AC Power Cord for the United States and Canada: ...class B limits in accordance with the instructions, may not correspond with the letter L or coloured red. Model Number(s) : PLC-ET30L Trade Name : Sanyo Responsible party : SANYO FISHER COMPANY Address : 21605 Plummer Street, Chatsworth, California 91311 U.S.A. This is marked with the coloured markings identifying the terminals...
...into the power outlet. Telephone No. : (818)998-7322 AC Power Cord Requirement The AC Power Cord supplied with this projector meets the requirement for use the plug with the following measures: - AC Power Cord for the United States and Canada: ...class B limits in accordance with the instructions, may not correspond with the letter L or coloured red. Model Number(s) : PLC-ET30L Trade Name : Sanyo Responsible party : SANYO FISHER COMPANY Address : 21605 Plummer Street, Chatsworth, California 91311 U.S.A. This is marked with the coloured markings identifying the terminals...

Owner's Manual
Page 10
... is exhausted from light beam may damage the lens cap and result in fire hazard. CAUTION Do not turn on the projector with the lens cap attached. High temperature from the exhaust vent. Do not put heat-sensitive objects near this side. ✽ Kensington Security Slot This ...
... is exhausted from light beam may damage the lens cap and result in fire hazard. CAUTION Do not turn on the projector with the lens cap attached. High temperature from the exhaust vent. Do not put heat-sensitive objects near this side. ✽ Kensington Security Slot This ...

Owner's Manual
Page 11
... equipment to this terminal. For a mono audio signal (a single audio jack), connect it to G, B, R, H/V, and V jacks (pp.20- 22). Connect the USB terminal of the projector. w COMPUTER INPUT TERMINAL (ANALOG) Connect the computer (or RGB scart) output signal to this jack (pp.20-22). t USB CONNECTOR (Series B) Use this connector with...
... equipment to this terminal. For a mono audio signal (a single audio jack), connect it to G, B, R, H/V, and V jacks (pp.20- 22). Connect the USB terminal of the projector. w COMPUTER INPUT TERMINAL (ANALOG) Connect the computer (or RGB scart) output signal to this jack (pp.20-22). t USB CONNECTOR (Series B) Use this connector with...

Owner's Manual
Page 12
....20-22). !2 MONITOR OUTPUT TERMINAL (ANALOG) This terminal outputs the video signal from computer to external video equipment (p.20). !3 CONTROL PORT CONNECTOR When controlling the projector from a computer, connect the computer to this connector with a pen, which controls this unit may occasionally malfunction and need to be done by pressing the...
....20-22). !2 MONITOR OUTPUT TERMINAL (ANALOG) This terminal outputs the video signal from computer to external video equipment (p.20). !3 CONTROL PORT CONNECTOR When controlling the projector from a computer, connect the computer to this connector with a pen, which controls this unit may occasionally malfunction and need to be done by pressing the...

Owner's Manual
Page 13
... Functions i o !0 !1 !2 u q WARNING TEMP. y POINT ed7 8 (VOLUME +/-) buttons - Execute the selected item (p.26). - Blinks orange indicating the filter needs cleaning. - Lights orange when clogging of the projector exceeds the operating range (pp.61, 68). Blinks during operations. !0 POWER indicator - Blinks in Digital zoom + mode (p.47). - t LENS button Enter the focus, zoom, and.... u SELECT button - w LAMP REPLACE indicator Lights yellow when the projection lamp reaches its end of life (pp.59, 69). e ON/STAND-BY button Turn the projector on the top control blinks when the...
... Functions i o !0 !1 !2 u q WARNING TEMP. y POINT ed7 8 (VOLUME +/-) buttons - Execute the selected item (p.26). - Blinks orange indicating the filter needs cleaning. - Lights orange when clogging of the projector exceeds the operating range (pp.61, 68). Blinks during operations. !0 POWER indicator - Blinks in Digital zoom + mode (p.47). - t LENS button Enter the focus, zoom, and.... u SELECT button - w LAMP REPLACE indicator Lights yellow when the projection lamp reaches its end of life (pp.59, 69). e ON/STAND-BY button Turn the projector on the top control blinks when the...

Owner's Manual
Page 14
...cleaning, use a soft dry cloth. i FREEZE button Freeze the picture on (p.24). !0 Presentation Pointer button Move a pointer of the projector or a pointer for wireless mouse operation (p.33). button Display the input source information (p.28). !2 L-Click button Acts as a wired ...pp.34- 35). To ensure safe operation, observe the following precautions: -Do not bend, drop, or expose the remote control to the projector (p.32). t ON button Turn the projector on the screen (p.30). Adjust the volume level (with Point 7 8 buttons) (p.29). Part Names and Functions Remote Control r ew q...
...cleaning, use a soft dry cloth. i FREEZE button Freeze the picture on (p.24). !0 Presentation Pointer button Move a pointer of the projector or a pointer for wireless mouse operation (p.33). button Display the input source information (p.28). !2 L-Click button Acts as a wired ...pp.34- 35). To ensure safe operation, observe the following precautions: -Do not bend, drop, or expose the remote control to the projector (p.32). t ON button Turn the projector on the screen (p.30). Adjust the volume level (with Point 7 8 buttons) (p.29). Part Names and Functions Remote Control r ew q...

Owner's Manual
Page 16
...is about 16.4' (5 m) and 60 degrees in sets. ● Do not use both feet clockwise. Rotate the adjustable feet and tilt the projector to Infrared (5 m) Remote Receivers) when pressing the buttons. You can conveniently use a new battery with pins in front and back of used battery..., rotate the both in the compartment. Maximum operating range for the remote control is replaced by an incorrect type. ● Dispose of the projector. To ensure safe operation, please observe the following precautions : ● Use two (2) AAA or LR03 type alkaline batteries. ● Always ...
...is about 16.4' (5 m) and 60 degrees in sets. ● Do not use both feet clockwise. Rotate the adjustable feet and tilt the projector to Infrared (5 m) Remote Receivers) when pressing the buttons. You can conveniently use a new battery with pins in front and back of used battery..., rotate the both in the compartment. Maximum operating range for the remote control is replaced by an incorrect type. ● Dispose of the projector. To ensure safe operation, please observe the following precautions : ● Use two (2) AAA or LR03 type alkaline batteries. ● Always ...

Owner's Manual
Page 17
... the codes. 17 Switching the remote control codes prevents interference from other remote controls when several projectors or video equipment next to each other are assigned to "ON." Change the remote control code for the projector first before changing that corresponds to Code 1. The initial code is set to the remote control... seconds to switch between the codes. 2 To initialize the remote control code, slide the RESET/ ON/ALL-OFF switch to "RESET," and then to this projector.
... the codes. 17 Switching the remote control codes prevents interference from other remote controls when several projectors or video equipment next to each other are assigned to "ON." Change the remote control code for the projector first before changing that corresponds to Code 1. The initial code is set to the remote control... seconds to switch between the codes. 2 To initialize the remote control code, slide the RESET/ ON/ALL-OFF switch to "RESET," and then to this projector.

Owner's Manual
Page 18
... be set perpendicularly to the plane of Standard Lens.) For projector positioning, see the figures below. Zoom (Center) Screen Size (W x H) mm 4:3 aspect ratio Zoom (min.) Zoom (max.) 30" 610 x 457 4.1' (1.26 m) ----- 100" 2032 x 1524 14.4' (4.39 m) ... x 2286 21.8' (6.63 m) 16.8' (5.11 m) 200" 4064 x 3048 29.1' (8.86 m) 22.4' (6.84 m) 300" 6096 x 4572 ----- 33.8' (10.30 m) 18 Zoom 230" Min. Installation Positioning the Projector (The figure below is recommended to limit ambient lighting in the room has a great influence on picture quality. It is the example of the screen...
... be set perpendicularly to the plane of Standard Lens.) For projector positioning, see the figures below. Zoom (Center) Screen Size (W x H) mm 4:3 aspect ratio Zoom (min.) Zoom (max.) 30" 610 x 457 4.1' (1.26 m) ----- 100" 2032 x 1524 14.4' (4.39 m) ... x 2286 21.8' (6.63 m) 16.8' (5.11 m) 200" 4064 x 3048 29.1' (8.86 m) 22.4' (6.84 m) 300" 6096 x 4572 ----- 33.8' (10.30 m) 18 Zoom 230" Min. Installation Positioning the Projector (The figure below is recommended to limit ambient lighting in the room has a great influence on picture quality. It is the example of the screen...

Owner's Manual
Page 19
Lens Release button Attaching the lens to the projector 1 Remove the lens mount cover. 2 Fit the lens to the projector by aligning the red dot on the top of the cabinet, turn the lens clockwise... by following the instructions below. Do not drop. Red dots 19 Removing the lens 1 Shift the lens to the projector. CAUTION Be careful when handling the lens. CAUTION Do not press the lens release button when attaching the lens. Ask... 2 While pressing the Lens release button on the lens with the red dot of the projector. 3 Slowly turn the lens counterclockwise until it out slowly from the...
Lens Release button Attaching the lens to the projector 1 Remove the lens mount cover. 2 Fit the lens to the projector by aligning the red dot on the top of the cabinet, turn the lens clockwise... by following the instructions below. Do not drop. Red dots 19 Removing the lens 1 Shift the lens to the projector. CAUTION Be careful when handling the lens. CAUTION Do not press the lens release button when attaching the lens. Ask... 2 While pressing the Lens release button on the lens with the red dot of the projector. 3 Slowly turn the lens counterclockwise until it out slowly from the...

Owner's Manual
Page 20
AUDIO OUT (stereo) other cables are not supplied with the projector.) Monitor Audio Monitor Input Output Monitor Output Output Monitor Output USB port External Audio Equipment VGA cable Audio cable (stereo) BNC cable VGA DVI-...ANALOG OUT AUDIO IN G B R H/V V ANALOG IN DIGITAL (DVI-D) USB Audio Input Audio cable (stereo) ✔Note: • When the AUDIO OUT is plugged-in, the projector's builtin speaker is not available. • USB cable connection is supplied; Installation Connecting to a Computer (Digital and Analog RGB) Cables used for connection • VGA...
AUDIO OUT (stereo) other cables are not supplied with the projector.) Monitor Audio Monitor Input Output Monitor Output Output Monitor Output USB port External Audio Equipment VGA cable Audio cable (stereo) BNC cable VGA DVI-...ANALOG OUT AUDIO IN G B R H/V V ANALOG IN DIGITAL (DVI-D) USB Audio Input Audio cable (stereo) ✔Note: • When the AUDIO OUT is plugged-in, the projector's builtin speaker is not available. • USB cable connection is supplied; Installation Connecting to a Computer (Digital and Analog RGB) Cables used for connection • VGA...


