
Print Specs
Page 1
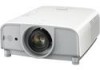
...and Laser Pointer • AC power cord • VGA Cable • USB Cable • Owner's manual (quick manual & CD-ROM) • 2 "AAA" Batteries • PIN Code label • Serial Cable ... with PLC-ET30L Ultra Long Zoom LNS-T11 Power 3.4 - 5.4:1 2.1-2.52 10:1-1:1 13:7-7:13 PJ-Net Camera POA-PN03C Rear Back Panel Issued 04/08 © 2008 SANYO To ... labor; 90 days original lamp; 4200 ANSI LUMENS z HIGH RESOLUTION SXGA+ z MULTIMEDIA PROJECTORS PLC-ET30L SXGA+ Portable Multimedia Projectors *Lens sold separately RESOLUTION AND MORE The PLC-ET30L projector has a SXGA+ resolution of...
...and Laser Pointer • AC power cord • VGA Cable • USB Cable • Owner's manual (quick manual & CD-ROM) • 2 "AAA" Batteries • PIN Code label • Serial Cable ... with PLC-ET30L Ultra Long Zoom LNS-T11 Power 3.4 - 5.4:1 2.1-2.52 10:1-1:1 13:7-7:13 PJ-Net Camera POA-PN03C Rear Back Panel Issued 04/08 © 2008 SANYO To ... labor; 90 days original lamp; 4200 ANSI LUMENS z HIGH RESOLUTION SXGA+ z MULTIMEDIA PROJECTORS PLC-ET30L SXGA+ Portable Multimedia Projectors *Lens sold separately RESOLUTION AND MORE The PLC-ET30L projector has a SXGA+ resolution of...

Owner's Manual
Page 1
Multimedia Projector MODEL PLC-ET30L *Projection lens is optional. Owner's Manual
Multimedia Projector MODEL PLC-ET30L *Projection lens is optional. Owner's Manual
Owner's Manual
Page 2
... all computer output signals quickly (p.37). Up to UXGA resolution can be selected (p.49). ✔Note: • The On-Screen Menu and figures in this manual are also available. ◆ Simple Computer System Setting The projector has the Multi-scan system to conform to ensure security of this...
... all computer output signals quickly (p.37). Up to UXGA resolution can be selected (p.49). ✔Note: • The On-Screen Menu and figures in this manual are also available. ◆ Simple Computer System Setting The projector has the Multi-scan system to conform to ensure security of this...

Owner's Manual
Page 3
... 33 Input Selection 34 Input 34 Input Source Selection 35 Video System Selection 36 Computer Adjustment 37 Computer System Selection 37 Auto PC Adjustment 38 Manual PC Adjustment 39 Image Level Selection 41 Image Level Selection 41 Image Adjustment 42 Image Adjustment 42 Screen Adjustment 45 Screen Adjustment 45 Screen Size...
... 33 Input Selection 34 Input 34 Input Source Selection 35 Video System Selection 36 Computer Adjustment 37 Computer System Selection 37 Auto PC Adjustment 38 Manual PC Adjustment 39 Image Level Selection 41 Image Level Selection 41 Image Adjustment 42 Image Adjustment 42 Screen Adjustment 45 Screen Adjustment 45 Screen Size...

Owner's Manual
Page 4
...dispose of the projector cabinet is designed and manufactured with dust, and it may result in a proper position. READ AND KEEP THIS OWNER'S MANUAL FOR LATER USE. Be especially careful that electrical and electronic equipment, at your projector, and can also be maintained. -Do not cover the... NOT REMOVE COVER (OR BACK). THIS SYMBOL INDICATES THAT DANGEROUS VOLTAGE CONSTITUTING A RISK OF ELECTRIC SHOCK IS PRESENT WITHIN THIS UNIT. Your SANYO product is critical for use in a computer room as possible, otherwise eye damage could result. Safety Precaution WARNING: TO REDUCE THE RISK ...
...dispose of the projector cabinet is designed and manufactured with dust, and it may result in a proper position. READ AND KEEP THIS OWNER'S MANUAL FOR LATER USE. Be especially careful that electrical and electronic equipment, at your projector, and can also be maintained. -Do not cover the... NOT REMOVE COVER (OR BACK). THIS SYMBOL INDICATES THAT DANGEROUS VOLTAGE CONSTITUTING A RISK OF ELECTRIC SHOCK IS PRESENT WITHIN THIS UNIT. Your SANYO product is critical for use in a computer room as possible, otherwise eye damage could result. Safety Precaution WARNING: TO REDUCE THE RISK ...
Owner's Manual
Page 24
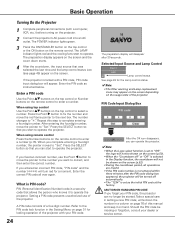
... cord into an AC outlet. Enter a PIN code Use the Point ed buttons on the top control or Number buttons on the screen. Repeat this manual and keep it to the PIN code lock function in the Display function, the countdown will turn red for a moment. Basic Operation Turning On the...
... cord into an AC outlet. Enter a PIN code Use the Point ed buttons on the top control or Number buttons on the screen. Repeat this manual and keep it to the PIN code lock function in the Display function, the countdown will turn red for a moment. Basic Operation Turning On the...
Owner's Manual
Page 26
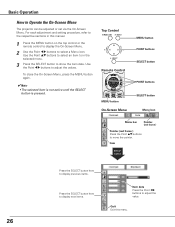
... previous items. Press the SELECT button here to display next items. Item data Press the Point 7 8 buttons to show the item data. Quit Exit this manual. 1 Press the MENU button on the top control or the remote control to display the On-Screen Menu. 2 Use the Point 7 8 buttons to Operate the...
... previous items. Press the SELECT button here to display next items. Item data Press the Point 7 8 buttons to show the item data. Quit Exit this manual. 1 Press the MENU button on the top control or the remote control to display the On-Screen Menu. 2 Use the Point 7 8 buttons to Operate the...
Owner's Manual
Page 35
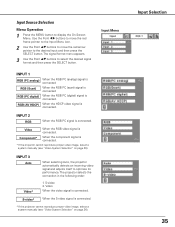
... 2 RGB When the RGB PC signal is connected. Component* When the component signal is connected. * If the projector cannot reproduce proper video image, select a system manually (see "Video System Selection" on page 36). Video When the video signal is connected. S-video* When the S-video signal is connected. The projector selects the... (scart) signal is connected RGB (PC digital) When the RGB PC (digital) signal is connected. * If the projector cannot reproduce proper video image, select a system manually (see "Video System Selection" on page 36). Input Selection 35
... 2 RGB When the RGB PC signal is connected. Component* When the component signal is connected. * If the projector cannot reproduce proper video image, select a system manually (see "Video System Selection" on page 36). Video When the video signal is connected. S-video* When the S-video signal is connected. The projector selects the... (scart) signal is connected RGB (PC digital) When the RGB PC (digital) signal is connected. * If the projector cannot reproduce proper video image, select a system manually (see "Video System Selection" on page 36). Input Selection 35
Owner's Manual
Page 36
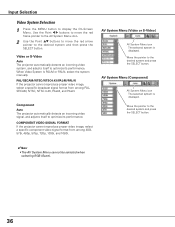
..., SECAM, NTSC, NTSC 4.43, PAL-M, and PAL-N. AV System Menu (Component) AV System Menu icon The selected system is PAL-M or PAL-N, select the system manually. Input Selection Video System Selection 1 Press the MENU button to the desired system and press the SELECT button. ✔Note: • The AV System Menu...
..., SECAM, NTSC, NTSC 4.43, PAL-M, and PAL-N. AV System Menu (Component) AV System Menu icon The selected system is PAL-M or PAL-N, select the system manually. Input Selection Video System Selection 1 Press the MENU button to the desired system and press the SELECT button. ✔Note: • The AV System Menu...
Owner's Manual
Page 37
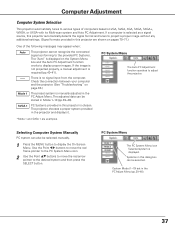
SVGA 1 PC Systems provided in this dialog box can be selected. Selecting Computer System Manually PC system can be selected manually. 1 Press the MENU button to display the On-Screen Menu. Systems in this projector are examples. The projector chooses a proper system ... PC System Menu icon Selected system is no signal input from the computer. There is displayed. If the image is not projected properly, a manual adjustment is manually adjusted in Mode 1-10 (pp.39-40). Check the connection between your computer and the projector. (See "Troubleshooting" on page 63.) Mode...
SVGA 1 PC Systems provided in this dialog box can be selected. Selecting Computer System Manually PC system can be selected manually. 1 Press the MENU button to display the On-Screen Menu. Systems in this projector are examples. The projector chooses a proper system ... PC System Menu icon Selected system is no signal input from the computer. There is displayed. If the image is not projected properly, a manual adjustment is manually adjusted in Mode 1-10 (pp.39-40). Check the connection between your computer and the projector. (See "Troubleshooting" on page 63.) Mode...
Owner's Manual
Page 38
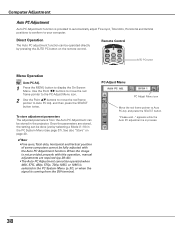
.... PC Adjust Menu PC Adjust Menu icon Move the red frame pointer to your computer. When the image is not provided properly with this operation, manual adjustments are stored, the setting can be done just by pressing the AUTO PC button on page 40. ✔Note: • Fine sync, Total dots...
.... PC Adjust Menu PC Adjust Menu icon Move the red frame pointer to your computer. When the image is not provided properly with this operation, manual adjustments are stored, the setting can be done just by pressing the AUTO PC button on page 40. ✔Note: • Fine sync, Total dots...
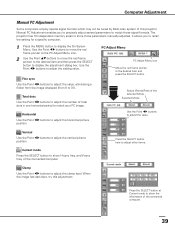
Owner's Manual
Page 39
... 7 8 buttons to adjust the number of the selected Mode. Status (Stored/Free) of total dots in one horizontal period to match those parameters manually adjusted. Vertical Use the Point 7 8 buttons to display the adjustment dialog box. Press the SELECT button here to adjust other items. Clamp Use ...the Point 7 8 buttons to adjust the horizontal picture position. Computer Adjustment Manual PC Adjustment Some computers employ special signal formats which may not be tuned by Multi-scan system of this adjustment...
... 7 8 buttons to adjust the number of the selected Mode. Status (Stored/Free) of total dots in one horizontal period to match those parameters manually adjusted. Vertical Use the Point 7 8 buttons to display the adjustment dialog box. Press the SELECT button here to adjust other items. Clamp Use ...the Point 7 8 buttons to adjust the horizontal picture position. Computer Adjustment Manual PC Adjustment Some computers employ special signal formats which may not be tuned by Multi-scan system of this adjustment...
Owner's Manual
Page 46
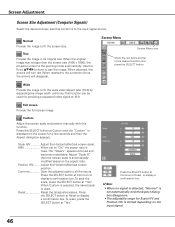
Use the Point ed7 8 buttons to fit the screen size. This function can be used . Custom Adjust the screen scale and position manually with this function. Adjust "Scale H," then the screen scale is displayed on the screen for a few seconds and then the Aspect dialog box appears. Reset ...
Use the Point ed7 8 buttons to fit the screen size. This function can be used . Custom Adjust the screen scale and position manually with this function. Adjust "Scale H," then the screen scale is displayed on the screen for a few seconds and then the Aspect dialog box appears. Reset ...

Owner's Manual
Page 48
..., 1035i, or 1080i is selected in the AV System Menu (p.36) 48 Reset Reset the all the inputs. Custom Adjust the screen scale and position manually with this function. Scale H/V Adjust the Horizontal/Vertical screen scale. Common Save the adjusted scale to the desired function and press the SELECT button. Screen...
..., 1035i, or 1080i is selected in the AV System Menu (p.36) 48 Reset Reset the all the inputs. Custom Adjust the screen scale and position manually with this function. Scale H/V Adjust the Horizontal/Vertical screen scale. Common Save the adjusted scale to the desired function and press the SELECT button. Screen...
Owner's Manual
Page 60
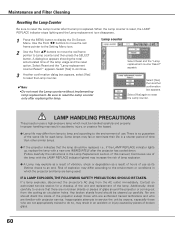
... service station for each lamp. No one IMMEDIATELY after the projector has cooled down. (Follow carefully the instructions in the Lamp Replacement section of this manual.) Continuous use of the lamp with the LAMP REPLACE indicator lighted may increase the risk of lamp explosion. ● A Lamp may explode as a result of...
... service station for each lamp. No one IMMEDIATELY after the projector has cooled down. (Follow carefully the instructions in the Lamp Replacement section of this manual.) Continuous use of the lamp with the LAMP REPLACE indicator lighted may increase the risk of lamp explosion. ● A Lamp may explode as a result of...
Owner's Manual
Page 63
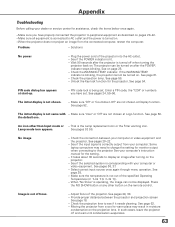
... turned on the projection lens. Check the projection lamp. Some laptop computers may result in moisture condensation on . Provide proper distance between your computer's instruction manual for the projector. In such cases, leave the projector off when turning the projector back on page 25. - PIN code dialog box appears - the "1234...
... turned on the projection lens. Check the projection lamp. Some laptop computers may result in moisture condensation on . Provide proper distance between your computer's instruction manual for the projector. In such cases, leave the projector off when turning the projector back on page 25. - PIN code dialog box appears - the "1234...

Owner's Manual
Page 73
... are effective, a tiny fraction of the pixels (0.01% or less) may be ineffective by the characteristics of the pixels are optionally available. Appendix Accessories Owner's Manual (CD-ROM) Quick Reference Guide AC Power Cord Remote Control and Batteries VGA Cable USB Cable Control Cable Lens Mount Cover PIN Code Label ●...
... are effective, a tiny fraction of the pixels (0.01% or less) may be ineffective by the characteristics of the pixels are optionally available. Appendix Accessories Owner's Manual (CD-ROM) Quick Reference Guide AC Power Cord Remote Control and Batteries VGA Cable USB Cable Control Cable Lens Mount Cover PIN Code Label ●...

Owner's Manual
Page 76
... number be invalid. Appendix PIN Code Number Memo Write down the PIN code number in a prominent place of the projector's body while it with this manual securely.
... number be invalid. Appendix PIN Code Number Memo Write down the PIN code number in a prominent place of the projector's body while it with this manual securely.


