
Owners Manual
Page 2
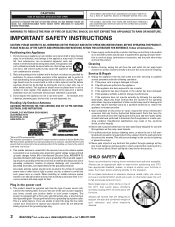
...CAUTION: PLEASE ADHERE TO ALL WARNINGS ON THE PRODUCT AND IN THE OPERATING INSTRUCTIONS. Follow all instructions... Your salesperson can fall into such power lines or circuits. Quick stops, excessive force, and uneven surfaces may result in particular, specifies that the cable ground shall be connected to... to restore the appliance to rain or use an appropriate table or stand when positioning your appliance on the marking label. CHILD SAFETY Sanyo is committed to cords at www.sanyoctv.com or Call 1-800-877-5032 But never screw anything directly to your home, consult your...
...CAUTION: PLEASE ADHERE TO ALL WARNINGS ON THE PRODUCT AND IN THE OPERATING INSTRUCTIONS. Follow all instructions... Your salesperson can fall into such power lines or circuits. Quick stops, excessive force, and uneven surfaces may result in particular, specifies that the cable ground shall be connected to... to restore the appliance to rain or use an appropriate table or stand when positioning your appliance on the marking label. CHILD SAFETY Sanyo is committed to cords at www.sanyoctv.com or Call 1-800-877-5032 But never screw anything directly to your home, consult your...
Owners Manual
Page 4
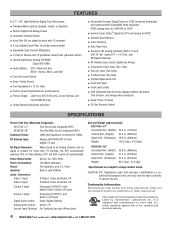
...x 12 cm (two) N Factory preset adjustments for picture/sound N Picture Shape: Letter box (HT27745 only), Zoom, Normal, and Full (HT28745 only) N Initial Channel (automatic selection) N Receivable Formats: Digital Tuner for ATSC terrestrial broadcasts and nonscrambled (ClearQAM) cable programs. NTSC analog ...: Dolby ® Digital for DTV and Analog for more than 15 minutes, the DTV automatically switches OFF. Cable DTV 1, 14~125]; Power Requirement: Power Consumption: Sound: Amplifier: Jacks / Connectors: Video 1 Input: Video 2 Input: Source: AC 120V, 60Hz 140 Watts (Average) Two ...
...x 12 cm (two) N Factory preset adjustments for picture/sound N Picture Shape: Letter box (HT27745 only), Zoom, Normal, and Full (HT28745 only) N Initial Channel (automatic selection) N Receivable Formats: Digital Tuner for ATSC terrestrial broadcasts and nonscrambled (ClearQAM) cable programs. NTSC analog ...: Dolby ® Digital for DTV and Analog for more than 15 minutes, the DTV automatically switches OFF. Cable DTV 1, 14~125]; Power Requirement: Power Consumption: Sound: Amplifier: Jacks / Connectors: Video 1 Input: Video 2 Input: Source: AC 120V, 60Hz 140 Watts (Average) Two ...
Owners Manual
Page 6
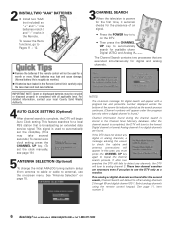
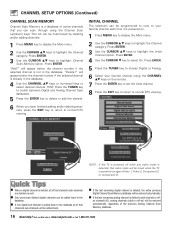
... I If batteries have leaked in compliance with a progress bar and percentile number displayed across the bottom of an RF signal. • Press the POWER key to turn on page 15. IMPORTANT NOTE: Spent or discharged batteries must press the CHANNEL UP key again to Pages 11 ~ 12. 3CHANNEL SEARCH... Visit our Web site at www.sanyoctv.com or Call 1-800-877-5032 This feature searches for digital and analog channels. This signal is powered on for the first time, it automatically checks for digital search will appear. Weak batteries may take several seconds.) To cancel auto clock setting,...
... I If batteries have leaked in compliance with a progress bar and percentile number displayed across the bottom of an RF signal. • Press the POWER key to turn on page 15. IMPORTANT NOTE: Spent or discharged batteries must press the CHANNEL UP key again to Pages 11 ~ 12. 3CHANNEL SEARCH... Visit our Web site at www.sanyoctv.com or Call 1-800-877-5032 This feature searches for digital and analog channels. This signal is powered on for the first time, it automatically checks for digital search will appear. Weak batteries may take several seconds.) To cancel auto clock setting,...
Owners Manual
Page 9
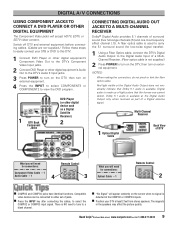
... to the DTV's Component Video Input jacks. 2 Connect DVD Player or other digital equipment's Audio Out to the DTV's Audio 3 Input jacks. 3 Press POWER to turn on the DTV, then turn on the screen when no signal is used to carry the 5.1 surround sound (for low-noise signal transfer... other digital device such as part of surround sound (five full-range channels [5] and one low-frequency effect channel [.1]). There is not supplied.) 2 Press POWER to turn on the DTV, then turn on external equipment. 4 Press the INPUT to select COMPONENT3 or COMPONENT2 to a blank channel. Visit our Web site...
... to the DTV's Component Video Input jacks. 2 Connect DVD Player or other digital equipment's Audio Out to the DTV's Audio 3 Input jacks. 3 Press POWER to turn on the DTV, then turn on the screen when no signal is used to carry the 5.1 surround sound (for low-noise signal transfer... other digital device such as part of surround sound (five full-range channels [5] and one low-frequency effect channel [.1]). There is not supplied.) 2 Press POWER to turn on the DTV, then turn on external equipment. 4 Press the INPUT to select COMPONENT3 or COMPONENT2 to a blank channel. Visit our Web site...
Owners Manual
Page 10
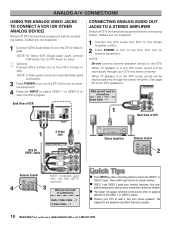
...DTV and external equipment before connecting cables. (Cables are not supplied.) 1 Connect the DTV Audio Out (R/L) to the Stereo Amplifier In (R/L). 2 Press POWER to turn on the DTV, then turn on external equipment. 4 Press the INPUT to select VIDEO 1 or VIDEO 2 to view the VCR program.... NOTE: S-Video jacks connection override Video jacks connection. 3 Press POWER to set of DTV 1 S-Video Jack 2 DTV AV INPUT Jacks Stereo Amplifier Remote Control 2 Remote Control NOTE: Composite jacks offer only 480i (SDTV) ...
...DTV and external equipment before connecting cables. (Cables are not supplied.) 1 Connect the DTV Audio Out (R/L) to the Stereo Amplifier In (R/L). 2 Press POWER to turn on the DTV, then turn on external equipment. 4 Press the INPUT to select VIDEO 1 or VIDEO 2 to view the VCR program.... NOTE: S-Video jacks connection override Video jacks connection. 3 Press POWER to set of DTV 1 S-Video Jack 2 DTV AV INPUT Jacks Stereo Amplifier Remote Control 2 Remote Control NOTE: Composite jacks offer only 480i (SDTV) ...
Owners Manual
Page 11
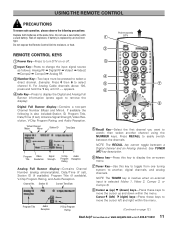
... Rating (Continued on -screen menu. ’ Tuner Key-Use this key to move the cursor up and down within the menu. REMOTE CONTROL KEYS Œ Power Key-Press to turn DTV on or off. Input Key-Press to change the input signal source as follows: Analog RF ¬ Digital RF...
... Rating (Continued on -screen menu. ’ Tuner Key-Use this key to move the cursor up and down within the menu. REMOTE CONTROL KEYS Œ Power Key-Press to turn DTV on or off. Input Key-Press to change the input signal source as follows: Analog RF ¬ Digital RF...

Owners Manual
Page 12
...Timer will be set ) • Any Video mode to select analog or digital captioning. Current Digital and Analog channel databases will switch off or if a power failure occurs. ” 16 • 17 11 18 12 ” Caption Key-Press to DTV mode If desired, personal settings can be deleted and...modes are : CC1, CC2, Quikcap, and OFF. Full, Zoom1/2, and Normal for Digital Cable Search. To receive Digital Cable channels, see page 14 for HT28745. The screen displays a left or right red arrow that blinks as many time as you press the Vol - + keys. 18 Reset Key-Press twice to...
...Timer will be set ) • Any Video mode to select analog or digital captioning. Current Digital and Analog channel databases will switch off or if a power failure occurs. ” 16 • 17 11 18 12 ” Caption Key-Press to DTV mode If desired, personal settings can be deleted and...modes are : CC1, CC2, Quikcap, and OFF. Full, Zoom1/2, and Normal for Digital Cable Search. To receive Digital Cable channels, see page 14 for HT28745. The screen displays a left or right red arrow that blinks as many time as you press the Vol - + keys. 18 Reset Key-Press twice to...
Owners Manual
Page 16
...database of that channel's sub-channels are deleted as well. Press ENTER. 5 Press the TUNER key to normal DTV viewing. I When a digital channel is powered on. 1 Press MENU key to display the Main menu. 2 Use the CURSOR LM keys to highlight the Channel category. I If the last remaining digital... CHANNEL LM keys on again (Video 1, Video 2, Component 2, or Component 3). This list can be restored automatically. I If one digital sub-channel is powered on the remote. 7 Press the ENTER key to set the initial channel. 8 Press the EXIT key to return to delete or add the channel. 6...
...database of that channel's sub-channels are deleted as well. Press ENTER. 5 Press the TUNER key to normal DTV viewing. I When a digital channel is powered on. 1 Press MENU key to display the Main menu. 2 Use the CURSOR LM keys to highlight the Channel category. I If the last remaining digital... CHANNEL LM keys on again (Video 1, Video 2, Component 2, or Component 3). This list can be restored automatically. I If one digital sub-channel is powered on the remote. 7 Press the ENTER key to set the initial channel. 8 Press the EXIT key to return to delete or add the channel. 6...
Owners Manual
Page 18
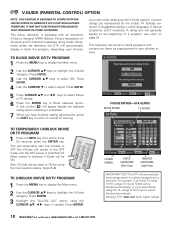
... V-GUIDE (PARENTAL CONTROL) OPTION NOTE: THIS FEATURE IS DESIGNED TO COMPLY WITH THE UNITED STATES OF AMERICA'S FCC V-CHIP REGULATIONS. This Sanyo television is restored, V-Guide will automatically display or block the program, depending upon choices TO BLOCK MOVIE OR TV PROGRAM 1 Press the MENU...L M L M TO TEMPORARILY UNBLOCK MOVIE OR TV PROGRAM 1 Press the INFO key, then within three (3) seconds press the ENTER key. When power is equipped with content you have finished making adjustments, press the EXIT key to return to view. Press ENTER. 3 Highlight the "ALLOW ALL" option...
... V-GUIDE (PARENTAL CONTROL) OPTION NOTE: THIS FEATURE IS DESIGNED TO COMPLY WITH THE UNITED STATES OF AMERICA'S FCC V-CHIP REGULATIONS. This Sanyo television is restored, V-Guide will automatically display or block the program, depending upon choices TO BLOCK MOVIE OR TV PROGRAM 1 Press the MENU...L M L M TO TEMPORARILY UNBLOCK MOVIE OR TV PROGRAM 1 Press the INFO key, then within three (3) seconds press the ENTER key. When power is equipped with content you have finished making adjustments, press the EXIT key to return to view. Press ENTER. 3 Highlight the "ALLOW ALL" option...
Owners Manual
Page 22
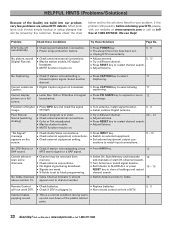
... signal not broadcast. G Adjust Volume. G Check external equipment connections. If the problem still persists, before returning your problem. G MUTE function may be on . G Power surge protection feature. G Press POWER key. Cannot select or scan some channels. G Replace batteries. G V-Guide is a normal condition during warmup and cool down of Digital G Press INFO key...
... signal not broadcast. G Adjust Volume. G Check external equipment connections. If the problem still persists, before returning your problem. G MUTE function may be on . G Power surge protection feature. G Press POWER key. Cannot select or scan some channels. G Replace batteries. G V-Guide is a normal condition during warmup and cool down of Digital G Press INFO key...
Owners Manual
Page 24
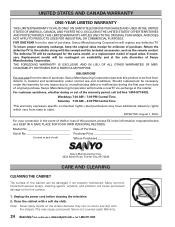
... 7:30 AM - 4:00 PM Central Time This warranty expresses specific contractual rights; Unplug the power cord before cleaning the television. 2. FOR ONE YEAR from the date of purchase, Sanyo Manufacturing Corporation will be exchanged for the same model, or a replacement model of the cabinet ... proper warranty exchange, keep the original sales receipt for any defective TV. OBLIGATIONS For one year from date of original purchase, Sanyo Manufacturing Corporation will be necessary under Warranty. 24 Need help? Should replacement be contingent on availability and at www.sanyoctv.com or...
... 7:30 AM - 4:00 PM Central Time This warranty expresses specific contractual rights; Unplug the power cord before cleaning the television. 2. FOR ONE YEAR from the date of purchase, Sanyo Manufacturing Corporation will be exchanged for the same model, or a replacement model of the cabinet ... proper warranty exchange, keep the original sales receipt for any defective TV. OBLIGATIONS For one year from date of original purchase, Sanyo Manufacturing Corporation will be necessary under Warranty. 24 Need help? Should replacement be contingent on availability and at www.sanyoctv.com or...


