

Owners Manual
Page 5
... THE LCD HDTV 6 WALL MOUNTING (OPTIONAL 6 GETTING STARTED 7 PReCAUTIONS 7 GETTING STARTED-CONTROLS AND JACKS 8 REMOTE CONTROL OPERATION 9 GETTING STARTED-CONNECTIONS.....10 POWER CONNECTION 11 INITIAL SETUP 11 INITIAL CHANNEL SCAN 11 GETTING STARTED-POWER CONNECTION/CHANNEL SEARCH..11 ADVANCED AV CONNECTIONS........... 12 ADVANCED DIGITAL SIGNAL CONNECTIONS-HDMI TO HDMI.......12 DVI...
... THE LCD HDTV 6 WALL MOUNTING (OPTIONAL 6 GETTING STARTED 7 PReCAUTIONS 7 GETTING STARTED-CONTROLS AND JACKS 8 REMOTE CONTROL OPERATION 9 GETTING STARTED-CONNECTIONS.....10 POWER CONNECTION 11 INITIAL SETUP 11 INITIAL CHANNEL SCAN 11 GETTING STARTED-POWER CONNECTION/CHANNEL SEARCH..11 ADVANCED AV CONNECTIONS........... 12 ADVANCED DIGITAL SIGNAL CONNECTIONS-HDMI TO HDMI.......12 DVI...
Owners Manual
Page 12
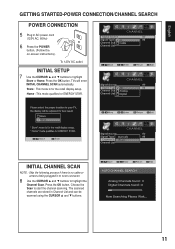
... 5 Plug in AC power cord (120V AC, 60Hz) 6 Press the POWER button, (Follow the on-screen instructions). Home : This mode qualifies for the retail display setup. INITIAL setup 7 Use the CURSOR ▲ and ▼ buttons to start the channel scanning. Press the OK button.
... 5 Plug in AC power cord (120V AC, 60Hz) 6 Press the POWER button, (Follow the on-screen instructions). Home : This mode qualifies for the retail display setup. INITIAL setup 7 Use the CURSOR ▲ and ▼ buttons to start the channel scanning. Press the OK button.

Owners Manual
Page 14
... set automatically when Auto Adjustment is completely done. English PC CONNECTIONS NOTE: Before connecting any other peripheral equipment before you disconnect it from the PC Setup Menu.
... set automatically when Auto Adjustment is completely done. English PC CONNECTIONS NOTE: Before connecting any other peripheral equipment before you disconnect it from the PC Setup Menu.


