

Owners Manual
Page 5
Problems / Solutions .28 SPECIFICATIONS 29 CONFIGURATIONS OF VGA TERMINALS 30 PC / HDMI SIGNAL MODES 30 CONTENTS English IMPORTANT SAFETY INSTRUCTIONS..2 FCC INFORMATION 3 ENERGY STAR® USER INFORMATION.3 TRADEMARKS 3 PROTECTING THE LCD SCREEN 3 HANDLING PRECAUTIONS 3 ...POWER CONNECTION 11 INITIAL SETUP 11 INITIAL CHANNEL SCAN 11 GETTING STARTED-POWER CONNECTION/CHANNEL SEARCH..11 ADVANCED AV CONNECTIONS........... 12 ADVANCED DIGITAL SIGNAL CONNECTIONS-HDMI TO HDMI.......12 DVI TO HDMI 12 DIGITAL AUDIO 12 AUDIO OUT JACKS 12 PC CONNECTIONS 13 PC MONITOR OPERATION 13...
Problems / Solutions .28 SPECIFICATIONS 29 CONFIGURATIONS OF VGA TERMINALS 30 PC / HDMI SIGNAL MODES 30 CONTENTS English IMPORTANT SAFETY INSTRUCTIONS..2 FCC INFORMATION 3 ENERGY STAR® USER INFORMATION.3 TRADEMARKS 3 PROTECTING THE LCD SCREEN 3 HANDLING PRECAUTIONS 3 ...POWER CONNECTION 11 INITIAL SETUP 11 INITIAL CHANNEL SCAN 11 GETTING STARTED-POWER CONNECTION/CHANNEL SEARCH..11 ADVANCED AV CONNECTIONS........... 12 ADVANCED DIGITAL SIGNAL CONNECTIONS-HDMI TO HDMI.......12 DVI TO HDMI 12 DIGITAL AUDIO 12 AUDIO OUT JACKS 12 PC CONNECTIONS 13 PC MONITOR OPERATION 13...

Owners Manual
Page 8
... not use the on the batteries with different charge levels. Digital and Analog off -air signals. This HDTV can receive ANY unscrambled RF signal being broadcast. 7 Match the "+" and "-" signs on -screen MENU to Search for off -air signals from a direct Cable TV connection. OR b. Analog or Clear QAM cable channels from an...
... not use the on the batteries with different charge levels. Digital and Analog off -air signals. This HDTV can receive ANY unscrambled RF signal being broadcast. 7 Match the "+" and "-" signs on -screen MENU to Search for off -air signals from a direct Cable TV connection. OR b. Analog or Clear QAM cable channels from an...

Owners Manual
Page 9
... Red (R) jacks. Standard (composite) video and audio inputs while using for PC audio input but also sharing the HDMI audio input for DVI signal connecting. COMPONENT VIDEO INPUT VIDEO2 or VIDEO3(YPbPr), PAGE 10 - Connect a RF antenna or Analog Cable system to the Video Yellow jack, ... input supports HDCP copy protection and allows transmission of 15 pin D-SUB), PAGE 13 - These jacks will automatically detect the received signal type. ANALOG / DIGITAL ANTENNA INPUT, PAGE 7 - HDMI INPUT (INPUT1, INPUT2 or INPUT3), PAGE 12 - A digital AV interface that accepts uncompressed video...
... Red (R) jacks. Standard (composite) video and audio inputs while using for PC audio input but also sharing the HDMI audio input for DVI signal connecting. COMPONENT VIDEO INPUT VIDEO2 or VIDEO3(YPbPr), PAGE 10 - Connect a RF antenna or Analog Cable system to the Video Yellow jack, ... input supports HDCP copy protection and allows transmission of 15 pin D-SUB), PAGE 13 - These jacks will automatically detect the received signal type. ANALOG / DIGITAL ANTENNA INPUT, PAGE 7 - HDMI INPUT (INPUT1, INPUT2 or INPUT3), PAGE 12 - A digital AV interface that accepts uncompressed video...

Owners Manual
Page 10
...hese buttons to display RESET menu. Analog Banner may contain: Channel Number, CC State, Channel Title, Video Resolution, Video Ratio, Signal Strength, Digital Sound information and Program Rating. NOTE : The Channel Scan Memory database will clear all analog channel enabled). CAPTION Button-...INFO Button- Press this button to default (all customized settings. SLEEP Button- Numeric Buttons- SPORTS Button- Press to display on the signal and the aspect ratio of the broadcast. Press to select the desired audio mode, if available. RECALL Button- INPUT Button- Press ...
...hese buttons to display RESET menu. Analog Banner may contain: Channel Number, CC State, Channel Title, Video Resolution, Video Ratio, Signal Strength, Digital Sound information and Program Rating. NOTE : The Channel Scan Memory database will clear all analog channel enabled). CAPTION Button-...INFO Button- Press this button to default (all customized settings. SLEEP Button- Numeric Buttons- SPORTS Button- Press to display on the signal and the aspect ratio of the broadcast. Press to select the desired audio mode, if available. RECALL Button- INPUT Button- Press ...

Owners Manual
Page 11
...VIDEO2 or VIDEO3(YPbPr). Composite connectors are included on your HDTV to select the input signal as shown. Match the connector colors to jack colors. 2 Press the INPUT button to step through the signal inputs to select Video1 or Video2. 3 Press the INPUT button to provide continued ...compatibility with Component-Y). The Component jacks on this HDTV will accept HDTV, EDTV, and SDTV video signals and make a great choice for external devices. Connect an analog device such as shown. (Cable is not supplied)) 10 English GETTING STARTED-CONNECTIONS...
...VIDEO2 or VIDEO3(YPbPr). Composite connectors are included on your HDTV to select the input signal as shown. Match the connector colors to jack colors. 2 Press the INPUT button to step through the signal inputs to select Video1 or Video2. 3 Press the INPUT button to provide continued ...compatibility with Component-Y). The Component jacks on this HDTV will accept HDTV, EDTV, and SDTV video signals and make a great choice for external devices. Connect an analog device such as shown. (Cable is not supplied)) 10 English GETTING STARTED-CONNECTIONS...

Owners Manual
Page 13
...1 Connect the Digital Audio output to select the input signal as shown. DVI TO HDMI (Only HDMI1 is a digital AV interface that accepts uncompressed video signals for the best picture quality possible. NOTE: NOTE: Dolby Digital audio signal is necessary. (refer to page 20) 2 Connect ...available from the Digital Audio output terminal only when receiving a part of copy-protected digital content. English ADVANCED AV CONNECTIONS ADVANCED DIGITAL SIGNAL CONNECTIONS-HDMI TO HDMI Connect compatible Digital devices such as shown. BACK-SIDE VIEW OF HDTV (Coaxial) DIGITAL AUDIO CABLE (Not ...
...1 Connect the Digital Audio output to select the input signal as shown. DVI TO HDMI (Only HDMI1 is a digital AV interface that accepts uncompressed video signals for the best picture quality possible. NOTE: NOTE: Dolby Digital audio signal is necessary. (refer to page 20) 2 Connect ...available from the Digital Audio output terminal only when receiving a part of copy-protected digital content. English ADVANCED AV CONNECTIONS ADVANCED DIGITAL SIGNAL CONNECTIONS-HDMI TO HDMI Connect compatible Digital devices such as shown. BACK-SIDE VIEW OF HDTV (Coaxial) DIGITAL AUDIO CABLE (Not ...
Owners Manual
Page 16
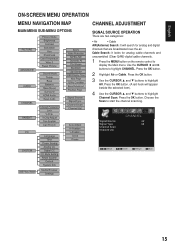
... display the Main menu. Choose the Scan to highlight CHANNEL. English ON-SCREEN MENU OPERATION MENU NAVIGATION MAP MAIN MENU SUB-MENU OPTIONS CHANNEL ADJUSTMENT SIGNAL SOURCE OPERATION There are two categories: ● Air ● Cable AIR(Antenna) Search: It will appear beside the selected item). 4 Use the CURSOR ▲ and...
... display the Main menu. Choose the Scan to highlight CHANNEL. English ON-SCREEN MENU OPERATION MENU NAVIGATION MAP MAIN MENU SUB-MENU OPTIONS CHANNEL ADJUSTMENT SIGNAL SOURCE OPERATION There are two categories: ● Air ● Cable AIR(Antenna) Search: It will appear beside the selected item). 4 Use the CURSOR ▲ and...

Owners Manual
Page 19
..., it will appear in the squared region). If the password is wrong, you want to highlight Can French. Decides which kind of classified movie rating signal can enter password again or press the MENU button to return to PARENT menu. 3 Use the CURSOR ▲ and ▼ buttons to adjust. Press the...
..., it will appear in the squared region). If the password is wrong, you want to highlight Can French. Decides which kind of classified movie rating signal can enter password again or press the MENU button to return to PARENT menu. 3 Use the CURSOR ▲ and ▼ buttons to adjust. Press the...

Owners Manual
Page 21
...; and ▼ buttons to adjust the audio setting. NOTE : Even though the HDMI is pure HDMI type, the audio still is pure HDMI or DVI signal. Press the OK button. (A red hook will appear in Digital. RESET AUDIO OPERATION Reset Audio- Press the OK button. 4 Use the CURSOR ▲ and ▼..., there will be blocked out and fixed in the white blank space). During this setting, the audio input signal will select the audio input signal from the PC AUDIO INPUT port. 1 Press the MENU button on the remote control to display the Main menu. 2 Use the CURSOR ◄ and ► ...
...; and ▼ buttons to adjust the audio setting. NOTE : Even though the HDMI is pure HDMI type, the audio still is pure HDMI or DVI signal. Press the OK button. (A red hook will appear in Digital. RESET AUDIO OPERATION Reset Audio- Press the OK button. 4 Use the CURSOR ▲ and ▼..., there will be blocked out and fixed in the white blank space). During this setting, the audio input signal will select the audio input signal from the PC AUDIO INPUT port. 1 Press the MENU button on the remote control to display the Main menu. 2 Use the CURSOR ◄ and ► ...

Owners Manual
Page 22
... the CURSOR ▲ and ▼ buttons to select the Next Page. Press the OK button. 3 Use the CURSOR ▲ and ▼ buttons to select Backlight. signals usually will be boosted or reduced depending on the room brightness. 1 Press the MENU button on the remote control to display the Main menu. 2 Use...
... the CURSOR ▲ and ▼ buttons to select the Next Page. Press the OK button. 3 Use the CURSOR ▲ and ▼ buttons to select Backlight. signals usually will be boosted or reduced depending on the room brightness. 1 Press the MENU button on the remote control to display the Main menu. 2 Use...

Owners Manual
Page 24
...; and ▼ buttons to highlight Power Saving. A red hook will appear in the squared and blank region. 23 Automatic power saving, when no TV signal input display on your HDTV. 1 Press the MENU button on the remote control to display the Main menu. 2 Use the CURSOR ◄ and ►...; buttons to highlight SYSTEM. 3 Use the CURSOR ▲ and ▼ buttons to highlight No Signal Standby. Press the OK button. DIGITAL CLOSED-CAPTION OPERATION Digital CC- Press the OK button. 4 Use the CURSOR ▲ and ▼ buttons to select CC1...
...; and ▼ buttons to highlight Power Saving. A red hook will appear in the squared and blank region. 23 Automatic power saving, when no TV signal input display on your HDTV. 1 Press the MENU button on the remote control to display the Main menu. 2 Use the CURSOR ◄ and ►...; buttons to highlight SYSTEM. 3 Use the CURSOR ▲ and ▼ buttons to highlight No Signal Standby. Press the OK button. DIGITAL CLOSED-CAPTION OPERATION Digital CC- Press the OK button. 4 Use the CURSOR ▲ and ▼ buttons to select CC1...

Owners Manual
Page 25
... use the EXIT button to highlight SYSTEM. Category Title Subcatalog of setting the desired caption style superimposed on the screen (Local broadcasters decide which caption signals to set. Press the OK button. 4 Use the CURSOR ▲ and ▼ buttons to highlight System Info. Press the OK button. 2 Use the CURSOR ▲...
... use the EXIT button to highlight SYSTEM. Category Title Subcatalog of setting the desired caption style superimposed on the screen (Local broadcasters decide which caption signals to set. Press the OK button. 4 Use the CURSOR ▲ and ▼ buttons to highlight System Info. Press the OK button. 2 Use the CURSOR ▲...

Owners Manual
Page 29
... Try a different channel. • Execute Channel Scan in . • Replace batteries. • Aim remote control at 1-800877-5032 We can Help! signal strength. • Install outdoor Digital antenna. • Channel may be turned ON. • Check the Audio / Video connections. • Press the ...or call us toll free at front of TV. 7, 9 Cabinet makes popping sound • This is a normal condition during warm - Caption signal. HELPFUL HINTS - No picture, sound (Digital Picture) • Check the antenna / external connections. • There may be turned ON. English...
... Try a different channel. • Execute Channel Scan in . • Replace batteries. • Aim remote control at 1-800877-5032 We can Help! signal strength. • Install outdoor Digital antenna. • Channel may be turned ON. • Check the Audio / Video connections. • Press the ...or call us toll free at front of TV. 7, 9 Cabinet makes popping sound • This is a normal condition during warm - Caption signal. HELPFUL HINTS - No picture, sound (Digital Picture) • Check the antenna / external connections. • There may be turned ON. English...
Owners Manual
Page 31
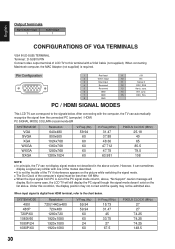
...PIXELS CLOCK (MHz) 25.18 40 65 85.5 79.5 108 NOTE: ■■ In principle, the TV can correspond to the signals below . When input signal is not the trouble of the TV if interference appears on the list above column. sync. After connecting with one of the modes ... Input 10 3 Blue Input 11 4 Reserved 12 5 Reserved 13 6 GND 14 7 GND 15 8 GND PC / HDMI SIGNAL MODES +5V NC Sense 0 DDC_SDA Horiz. Vert. sync. DDC_SCL This LCD TV can not display signal modes not described in some case, the LCD TV will display. English Output terminals Digital Audio Output 1 Audio...
...PIXELS CLOCK (MHz) 25.18 40 65 85.5 79.5 108 NOTE: ■■ In principle, the TV can correspond to the signals below . When input signal is not the trouble of the TV if interference appears on the list above column. sync. After connecting with one of the modes ... Input 10 3 Blue Input 11 4 Reserved 12 5 Reserved 13 6 GND 14 7 GND 15 8 GND PC / HDMI SIGNAL MODES +5V NC Sense 0 DDC_SDA Horiz. Vert. sync. DDC_SCL This LCD TV can not display signal modes not described in some case, the LCD TV will display. English Output terminals Digital Audio Output 1 Audio...


