
Owners Manual
Page 2
... use caution when moving the cart/apparatus combination to proper grounding of the mast and supporting structure, grounding of the lead-in the vicinity of the polarized or grounding-type plug. Refer all servicing to an antenna discharge unit, size of grounding conductors, location of the National Electrical Code provides information with one wider than the other electrical light or power...
... use caution when moving the cart/apparatus combination to proper grounding of the mast and supporting structure, grounding of the lead-in the vicinity of the polarized or grounding-type plug. Refer all servicing to an antenna discharge unit, size of grounding conductors, location of the National Electrical Code provides information with one wider than the other electrical light or power...
Owners Manual
Page 3
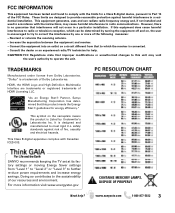
... equipment does cause harmful interference to radio or television reception, which the receiver is Listed by one or more information visit www.energystar.gov Need help . Consult the dealer or an experienced radio/TV technician for help ? This symbol on the nameplate means the product is connected. - For more of HDMI Licensing LLC. These limits are trademarks or registered...
... equipment does cause harmful interference to radio or television reception, which the receiver is Listed by one or more information visit www.energystar.gov Need help . Consult the dealer or an experienced radio/TV technician for help ? This symbol on the nameplate means the product is connected. - For more of HDMI Licensing LLC. These limits are trademarks or registered...
Owners Manual
Page 4
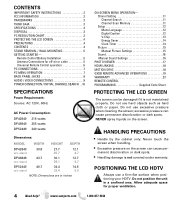
....7 4.7 DP52449 w/o stand 49.7 34.4 32.4 14.6 5.0 NOTE: Dimensions are in a confined area. Remote Control Battery Installation 5 Antenna Connections for proper ventilation. 4 Need help? Never touch the screen when handling. • Excessive pressure on the screen. www.sanyoctv.com 1-800-877-5032 Chanel Setting 11 Channel Search 11 Channel Scan Memory 11 Setup 12 Menu Language 12 Digital Caption 12 V-Chip 13 Energy Saver 14 Clock Timer 14 Picture 15 Manual Picture Settings 15 Sound 16 Manual Sound Settings 16...
....7 4.7 DP52449 w/o stand 49.7 34.4 32.4 14.6 5.0 NOTE: Dimensions are in a confined area. Remote Control Battery Installation 5 Antenna Connections for proper ventilation. 4 Need help? Never touch the screen when handling. • Excessive pressure on the screen. www.sanyoctv.com 1-800-877-5032 Chanel Setting 11 Channel Search 11 Channel Scan Memory 11 Setup 12 Menu Language 12 Digital Caption 12 V-Chip 13 Energy Saver 14 Clock Timer 14 Picture 15 Manual Picture Settings 15 Sound 16 Manual Sound Settings 16...
Owners Manual
Page 5
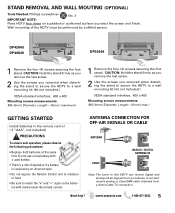
... a wall mounting kit (kit not included.) VESA standard interface: 400 x 400 Mounting screws measurements: M6 (6mm) Diameter, Length-16mm (maximum) 1 Remove the four (4) screws securing the foot stand. It can receive digital and analog off air signals from a direct Cable TV connection. DP42849 DP46849 DP52449 1 Remove the four (4) screws securing the foot stand. Need help? www.sanyoctv.com 1-800-877-5032 5 ANTENNA CONNECTION FOR OFF-AIR SIGNALS OR CABLE ANTENNA CABLE ANALOG / DIGITAL ANTENNA IN Note: The tuner in the remote control ( 2 "AAA...
... a wall mounting kit (kit not included.) VESA standard interface: 400 x 400 Mounting screws measurements: M6 (6mm) Diameter, Length-16mm (maximum) 1 Remove the four (4) screws securing the foot stand. It can receive digital and analog off air signals from a direct Cable TV connection. DP42849 DP46849 DP52449 1 Remove the four (4) screws securing the foot stand. Need help? www.sanyoctv.com 1-800-877-5032 5 ANTENNA CONNECTION FOR OFF-AIR SIGNALS OR CABLE ANTENNA CABLE ANALOG / DIGITAL ANTENNA IN Note: The tuner in the remote control ( 2 "AAA...
Owners Manual
Page 7
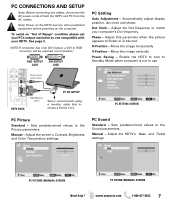
... Setting Auto Adjustment - Adjust the screen's Contrast, Brightness and Color Temperature settings. PC Sound Standard - PC CONNECTIONS AND SETUP Note: Before connecting any other peripheral equipment before powering on the HDTV and any cables, disconnect the AC power cords of Range" condition please set your PC's output resolution to match your HDTV. Automatically adjust display position, dot clock and phase. Adjust this parameter when the picture appears to flicker or is not in use. Manual - Adjust the HDTV...
... Setting Auto Adjustment - Adjust the screen's Contrast, Brightness and Color Temperature settings. PC Sound Standard - PC CONNECTIONS AND SETUP Note: Before connecting any other peripheral equipment before powering on the HDTV and any cables, disconnect the AC power cords of Range" condition please set your PC's output resolution to match your HDTV. Automatically adjust display position, dot clock and phase. Adjust this parameter when the picture appears to flicker or is not in use. Manual - Adjust the HDTV...
Owners Manual
Page 8
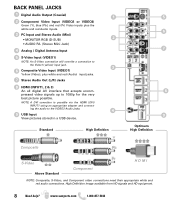
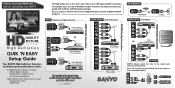
... very best picture possible. BACK PANEL JACKS 1 Digital Audio Output (Coaxial) 1 2 Component Video Input (VIDEO2 or VIDEO3) Green (Y), blue (Pb), and red (Pr) Video inputs plus the white and red Audio inputs. 3 PC Input and Stereo Audio (Mini) • MONITOR RGB (D-SUB) 2 • AUDIO R/L (Stereo Mini Jack) 4 Analog / Digital Antenna Input 5 S-Video Input (VIDEO1) NOTE: An S-Video connection will override a connection to the Video1 (yellow) input jack. 3 6 Composite Video Input (VIDEO1) Yellow (Video), plus white and red (Audio) input jacks. 7 Stereo Audio Out (L/R) Jacks 8 HDMI...
... very best picture possible. BACK PANEL JACKS 1 Digital Audio Output (Coaxial) 1 2 Component Video Input (VIDEO2 or VIDEO3) Green (Y), blue (Pb), and red (Pr) Video inputs plus the white and red Audio inputs. 3 PC Input and Stereo Audio (Mini) • MONITOR RGB (D-SUB) 2 • AUDIO R/L (Stereo Mini Jack) 4 Analog / Digital Antenna Input 5 S-Video Input (VIDEO1) NOTE: An S-Video connection will override a connection to the Video1 (yellow) input jack. 3 6 Composite Video Input (VIDEO1) Yellow (Video), plus white and red (Audio) input jacks. 7 Stereo Audio Out (L/R) Jacks 8 HDMI...
Owners Manual
Page 9
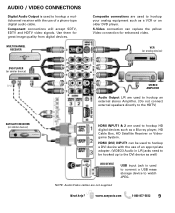
... use of a phono-type digital audio cable. Need help? AUDIO / VIDEO CONNECTIONS Digital Audio Output is used to connect a USB mass storage device to hookup your analog equipment such as a Blu-ray player, HD Cable Box, HD Satellite Receiver or Videogame System. VCR (or analog device) DVD PLAYER (or similar device) DVI STEREO AMPLIFIER Audio Output L/R are used to hookup an external stereo Amplifier. (Do not connect external speakers directly to the HDTV) SATELLITE RECEIVER (or similar device) HDMI INPUT1 & 2 are not supplied USB input jack is used...
... use of a phono-type digital audio cable. Need help? AUDIO / VIDEO CONNECTIONS Digital Audio Output is used to connect a USB mass storage device to hookup your analog equipment such as a Blu-ray player, HD Cable Box, HD Satellite Receiver or Videogame System. VCR (or analog device) DVD PLAYER (or similar device) DVI STEREO AMPLIFIER Audio Output L/R are used to hookup an external stereo Amplifier. (Do not connect external speakers directly to the HDTV) SATELLITE RECEIVER (or similar device) HDMI INPUT1 & 2 are not supplied USB input jack is used...
Owners Manual
Page 10
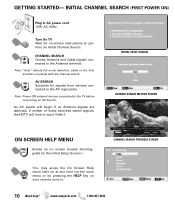
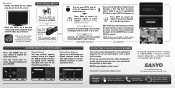
.... CHANNEL SEARCH PROGRESS SCREEN 10 Need help? GETTING STARTED- Note: "Auto" detects the mode detection, Cable or Air, first, and then proceeds with the channel search. Note: Power ON external devices connected to the Antenna terminal. INITIAL SETUP SCREEN CHANNEL SEARCH METHOD SCREEN ON SCREEN HELP MENU Access an on screen trouble shooting guide (in AC power cord 120V AC, 60Hz Turn On TV Wait for signals from devices connected to input Video1. INITIAL CHANNEL SEARCH (FIRST POWER ON) Plug in the Initial Setup Screen...
.... CHANNEL SEARCH PROGRESS SCREEN 10 Need help? GETTING STARTED- Note: "Auto" detects the mode detection, Cable or Air, first, and then proceeds with the channel search. Note: Power ON external devices connected to the Antenna terminal. INITIAL SETUP SCREEN CHANNEL SEARCH METHOD SCREEN ON SCREEN HELP MENU Access an on screen trouble shooting guide (in AC power cord 120V AC, 60Hz Turn On TV Wait for signals from devices connected to input Video1. INITIAL CHANNEL SEARCH (FIRST POWER ON) Plug in the Initial Setup Screen...
Owners Manual
Page 11
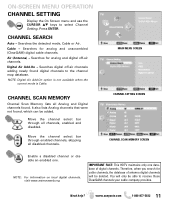
... for cable channels, the database of digital channels. Air (Antenna) - Move the channel select bar through all Analog and Digital channels found digital channels to select Channel Setting. NOTE: For information on local digital channels, visit www.antennaweb.org IMPORTANT FACT: This HDTV maintains only one . NOTE: Digital Air Add-On option is not available when the current mode is Cable. Searches digital off -air channels. CHANNEL SEARCH Auto - ON-SCREEN MENU OPERATION CHANNEL SETTING Display the On Screen menu and use...
... for cable channels, the database of digital channels. Air (Antenna) - Move the channel select bar through all Analog and Digital channels found digital channels to select Channel Setting. NOTE: For information on local digital channels, visit www.antennaweb.org IMPORTANT FACT: This HDTV maintains only one . NOTE: Digital Air Add-On option is not available when the current mode is Cable. Searches digital off -air channels. CHANNEL SEARCH Auto - ON-SCREEN MENU OPERATION CHANNEL SETTING Display the On Screen menu and use...
Owners Manual
Page 12
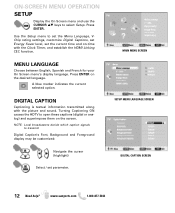
Use the Setup menu to open these captions (digital or analog) and superimpose them on -time with the picture and sound. Turning Captioning ON causes the HDTV to set the Menu Language, VChip rating settings, customize Digital Captions, set Energy Saver level, set parameter. MAIN MENU SCREEN SETUP MENU LANGUAGE SCREEN DIGITAL CAPTION SCREEN 12 Need help? MENU LANGUAGE Choose between English, Spanish and French for your On Screen menu's display language. NOTE: Local broadcasters decide which caption signals to select Setup. Digital Caption's Font, Background and Foreground...
Use the Setup menu to open these captions (digital or analog) and superimpose them on -time with the picture and sound. Turning Captioning ON causes the HDTV to set the Menu Language, VChip rating settings, customize Digital Captions, set Energy Saver level, set parameter. MAIN MENU SCREEN SETUP MENU LANGUAGE SCREEN DIGITAL CAPTION SCREEN 12 Need help? MENU LANGUAGE Choose between English, Spanish and French for your On Screen menu's display language. NOTE: Local broadcasters decide which caption signals to select Setup. Digital Caption's Font, Background and Foreground...
Owners Manual
Page 14
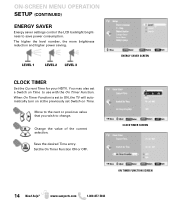
ON-SCREEN MENU OPERATION SETUP (CONTINUED) ENERGY SAVER Energy saver settings control the LCD backlight brightness to change. Set the On Timer Function ON or OFF. ENERGY SAVER SCREEN CLOCK TIMER SCREEN ON TIMER FUNCTION SCREEN 14 Need help? LEVEL 1 LEVEL 2 LEVEL 3 CLOCK TIMER Set the Current Time for your HDTV. You may also set Switch on Time to ON, the TV will automatically turn on at the previously set a Switch on Time. Change the value of the current selection. Move...
ON-SCREEN MENU OPERATION SETUP (CONTINUED) ENERGY SAVER Energy saver settings control the LCD backlight brightness to change. Set the On Timer Function ON or OFF. ENERGY SAVER SCREEN CLOCK TIMER SCREEN ON TIMER FUNCTION SCREEN 14 Need help? LEVEL 1 LEVEL 2 LEVEL 3 CLOCK TIMER Set the Current Time for your HDTV. You may also set Switch on Time to ON, the TV will automatically turn on at the previously set a Switch on Time. Change the value of the current selection. Move...
Owners Manual
Page 15
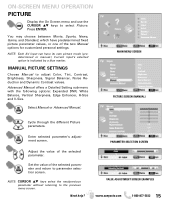
... to select Picture. Advanced Manual offers a Detailed Setting sub-menu with the following options: Expanded DNR, White Balance, Vertical Sharpness, Edge Enhancer, H-Size and V-Size. ON-SCREEN MENU OPERATION PICTURE Display the On Screen menu and use the CURSOR LM keys to parameter selection screen. Enter selected parameter's adjustment screen. You may choose between Movie, Sports, News, Game, and Standard, which have its own picture mode (predetermined or manual.) Current input's selected option...
... to select Picture. Advanced Manual offers a Detailed Setting sub-menu with the following options: Expanded DNR, White Balance, Vertical Sharpness, Edge Enhancer, H-Size and V-Size. ON-SCREEN MENU OPERATION PICTURE Display the On Screen menu and use the CURSOR LM keys to parameter selection screen. Enter selected parameter's adjustment screen. You may choose between Movie, Sports, News, Game, and Standard, which have its own picture mode (predetermined or manual.) Current input's selected option...
Owners Manual
Page 17
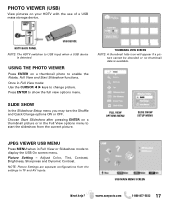
... Slideshow functions. NOTE: Picture Settings are separate configurations from the current picture. USING THE PHOTO VIEWER Press ENTER on a thumbnail photo to change picture. FULL VIEW OPTIONS MENU SLIDE SHOW SETUP MENU JPEG VIEWER USB MENU Press MENU when in Full View or Slideshow mode to show the full view options menu. USB MAIN MENU SCREEN Need help? PHOTO VIEWER (USB) View pictures on a thumbnail picture or in the Full View options menu to USB Input when a USB device is available...
... Slideshow functions. NOTE: Picture Settings are separate configurations from the current picture. USING THE PHOTO VIEWER Press ENTER on a thumbnail photo to change picture. FULL VIEW OPTIONS MENU SLIDE SHOW SETUP MENU JPEG VIEWER USB MENU Press MENU when in Full View or Slideshow mode to show the full view options menu. USB MAIN MENU SCREEN Need help? PHOTO VIEWER (USB) View pictures on a thumbnail picture or in the Full View options menu to USB Input when a USB device is available...
Owners Manual
Page 18
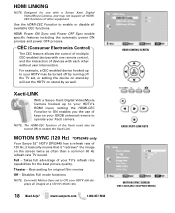
..., your HDTV still displays all images at a 120 Hz refesh rate. 18 Need help? Disables Full mode functions NOTE: Even with Motion Sync set , or setting the device on stand-by as often than a common 60 Hz refresh rate TV would. For example, a CEC-enabled device hooked up to your HDTV's HDMI input, setting the HDMI-CEC Function to ON enables you the use with a Sanyo Xacti Digital VIdeo/Movie...
..., your HDTV still displays all images at a 120 Hz refesh rate. 18 Need help? Disables Full mode functions NOTE: Even with Motion Sync set , or setting the device on stand-by as often than a common 60 Hz refresh rate TV would. For example, a CEC-enabled device hooked up to your HDTV's HDMI input, setting the HDMI-CEC Function to ON enables you the use with a Sanyo Xacti Digital VIdeo/Movie...
Owners Manual
Page 19
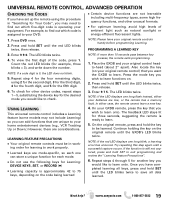
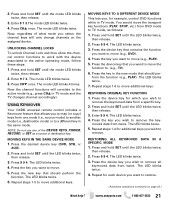
... locate the key (on . 2. Enter 9 7 5. In either your DVD: 1. Try repeating this step again until the LED blinks twice, then release. 3. UNIVERSAL REMOTE CONTROL, ADVANCED OPERATION CHECKING THE CODES If you have set up the remote using 2 for the second digit, 3 for the third digit, 4 for the fourth digit, and 5 for the fifth digit. 6. Repeat step 4 for the four remaining digits, using the procedure in work properly. The LED blinks twice...
... locate the key (on . 2. Enter 9 7 5. In either your DVD: 1. Try repeating this step again until the LED blinks twice, then release. 3. UNIVERSAL REMOTE CONTROL, ADVANCED OPERATION CHECKING THE CODES If you have set up the remote using 2 for the second digit, 3 for the third digit, 4 for the fourth digit, and 5 for the fifth digit. 6. Repeat step 4 for the four remaining digits, using the procedure in work properly. The LED blinks twice...
Owners Manual
Page 20
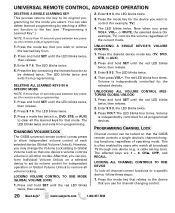
... Volume Unlock to remove all broadcast TV through one device's volume controls volume in all channel-control functions to the device that one device (e.g., a cable set its original programming for all programmed devices. After that mode. Press and hold SET until the LED blinks twice, then release. 3. The red LED blinks four times. This is independently controlled for channel changing control. 20 Need help? The affected keys are 1 - 0, CHL, CHM, and RECALL. CHANGING VOLUME LOCK The GXDB universal remote control comes preset to set -top box...
... Volume Unlock to remove all broadcast TV through one device's volume controls volume in all channel-control functions to the device that one device (e.g., a cable set its original programming for all programmed devices. After that mode. Press and hold SET until the LED blinks twice, then release. 3. The red LED blinks four times. This is independently controlled for channel changing control. 20 Need help? The affected keys are 1 - 0, CHL, CHM, and RECALL. CHANGING VOLUME LOCK The GXDB universal remote control comes preset to set -top box...
Owners Manual
Page 21
... function. Press the key in TV mode. RESTORING ALL KEYMOVED DATA IN A SPECIFIC MODE 1. UNLOCKING CHANNEL LOCKS To unlock Channel Lock and thus allow the channel control functions to work with the device associated to move (e.g., PLAY). 5. Now the channel functions will only change channels on page 22.) Need help? Press 9 9 4. The LED blinks twice. 6. Press the device key for example, control DVD functions while in the new mode that contains the function you...
... function. Press the key in TV mode. RESTORING ALL KEYMOVED DATA IN A SPECIFIC MODE 1. UNLOCKING CHANNEL LOCKS To unlock Channel Lock and thus allow the channel control functions to work with the device associated to move (e.g., PLAY). 5. Now the channel functions will only change channels on page 22.) Need help? Press 9 9 4. The LED blinks twice. 6. Press the device key for example, control DVD functions while in the new mode that contains the function you...
Quik 'N Easy Setup Guide
Page 1
... Connections BEST Quality Connections QUALITY PICTURE High Definition QUIK 'N EASY Setup Guide Your SANYO High Definition Television can improve your HDTV's initial setup! Component cables - For example, if you can display great quality picture when: A High Definition signal is due to Satellite or Cable service you suscribe to the use of a HD signal and HD connections. HDMI cable The quality of the output jack, connector, and input jack. Part No. 1JC6P1P0338-- Please read and REMOVE before operating...
... Connections BEST Quality Connections QUALITY PICTURE High Definition QUIK 'N EASY Setup Guide Your SANYO High Definition Television can improve your HDTV's initial setup! Component cables - For example, if you can display great quality picture when: A High Definition signal is due to Satellite or Cable service you suscribe to the use of a HD signal and HD connections. HDMI cable The quality of the output jack, connector, and input jack. Part No. 1JC6P1P0338-- Please read and REMOVE before operating...
Quik 'N Easy Setup Guide
Page 2
... preferences. Searches for Antenna signals or Cable signals connected to display the On Screen menu. excessive pressure can be glad to assist you receive Satellite or Cable service through a Set Top Box (receiver), please hook it 's not maintained properly. Check that the selected input matches the one that is hooked up to it. Channel Search You may add (enable) or remove (disable) channels to an appropriate AV Input on your HDTV's remote) NOTE: Tune...
... preferences. Searches for Antenna signals or Cable signals connected to display the On Screen menu. excessive pressure can be glad to assist you receive Satellite or Cable service through a Set Top Box (receiver), please hook it 's not maintained properly. Check that the selected input matches the one that is hooked up to it. Channel Search You may add (enable) or remove (disable) channels to an appropriate AV Input on your HDTV's remote) NOTE: Tune...
GXDB Remote Guide
Page 1
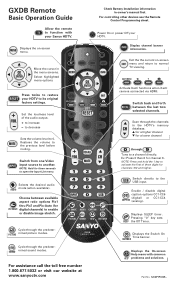
... owner's manual first. USB CC PIX SHAPE AUDIO CAPTION SLEEP PICTURE SOUND HELP ON TIMER GXDB 1-800-877-5032 Cycle through the predeterPICTURE mined picture modes. Exit the the current on -screen menu. NOTE: Hold for PIX SHAPE digital channels) to enable or disable image stretch. ON TIMER Displays the On-screen Help menu with your Sanyo HDTV. to decrease XACTI MENU W T LIST RESET Sets the volume level to open the Input List menu. Displays SLEEP timer. XACTI MENU W T Activate Xacti functions when Xacti camera connected via HDMI...
... owner's manual first. USB CC PIX SHAPE AUDIO CAPTION SLEEP PICTURE SOUND HELP ON TIMER GXDB 1-800-877-5032 Cycle through the predeterPICTURE mined picture modes. Exit the the current on -screen menu. NOTE: Hold for PIX SHAPE digital channels) to enable or disable image stretch. ON TIMER Displays the On-screen Help menu with your Sanyo HDTV. to decrease XACTI MENU W T LIST RESET Sets the volume level to open the Input List menu. Displays SLEEP timer. XACTI MENU W T Activate Xacti functions when Xacti camera connected via HDMI...


