
Owners Manual (w/ GXEA remote)
Page 4
... Caption 11 Energy Saver 11 Clock Timer 12 Light Sensor 12 HDMI Linking 12 V-Chip 13 Picture 14 Manual Picture Settings 14 Sound 15 aaManual Sound Settings 15 PC CONNECTIONS 16 PC MENU OPERATION 16 PHOTO VIEWER 17 WARRANTY...27.7 25.7 12.0 4.7 DP46840 w/o stand 43.7 30.7 28.1 12.7 4.7 NOTE: Dimensions are in inches Please read before operating your HDTV! CONTENTS IMPORTANT SAFETY INSTRUCTIONS 2 FCC INFORMATION 3 TRADEMARKS 3 PC RESOLUTIONS 3 CONTENTS 4 SPECIFICATIONS 4 PROTECTING THE LCD SCREEN 4 HANDLING PRECAUTIONS 4 POSITIONING THE LCD HDTV 5 STAND REMOVAL / WALL...
... Caption 11 Energy Saver 11 Clock Timer 12 Light Sensor 12 HDMI Linking 12 V-Chip 13 Picture 14 Manual Picture Settings 14 Sound 15 aaManual Sound Settings 15 PC CONNECTIONS 16 PC MENU OPERATION 16 PHOTO VIEWER 17 WARRANTY...27.7 25.7 12.0 4.7 DP46840 w/o stand 43.7 30.7 28.1 12.7 4.7 NOTE: Dimensions are in inches Please read before operating your HDTV! CONTENTS IMPORTANT SAFETY INSTRUCTIONS 2 FCC INFORMATION 3 TRADEMARKS 3 PC RESOLUTIONS 3 CONTENTS 4 SPECIFICATIONS 4 PROTECTING THE LCD SCREEN 4 HANDLING PRECAUTIONS 4 POSITIONING THE LCD HDTV 5 STAND REMOVAL / WALL...
Owners Manual (w/ GXEA remote)
Page 6
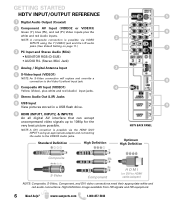
NOTE: A DVI conection is possible via the HDMI (DVI) INPUT1 using the Y (VIDEO) jack and the L/R audio jacks. (See Video2 Setting on page 11.) 7 3 PC Input and Stereo Audio (Mini) • MONITOR RGB (D-SUB) • AUDIO R/L (Stereo Mini Jack) 4 Analog /... all digital AV interface that can accept uncompressed video signals up to 1080p for the very best picture possible. Standard Definition High Definition HDTV BACK PANEL Optimum High Definition Composite S-Video Component H D M I (or DVI to HDMI cable/adapter) NOTE: Composite, S-Video, Component, and DVI video ...
NOTE: A DVI conection is possible via the HDMI (DVI) INPUT1 using the Y (VIDEO) jack and the L/R audio jacks. (See Video2 Setting on page 11.) 7 3 PC Input and Stereo Audio (Mini) • MONITOR RGB (D-SUB) • AUDIO R/L (Stereo Mini Jack) 4 Analog /... all digital AV interface that can accept uncompressed video signals up to 1080p for the very best picture possible. Standard Definition High Definition HDTV BACK PANEL Optimum High Definition Composite S-Video Component H D M I (or DVI to HDMI cable/adapter) NOTE: Composite, S-Video, Component, and DVI video ...
Owners Manual (w/ GXEA remote)
Page 9
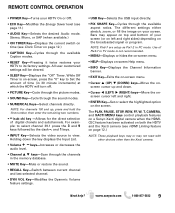
... the direct selection of time (in PC mode. REMOTE CONTROL OPERATION • POWER Key-Turns your HDTV to its factory settings. For example: to select channel 39.1 press the 3 and 9 keys followed by the dash -,...the video source to Set the amount of digital chanels and subchannels. The PLAY, PAUSE, STOP, REW, FF, W, T, CAMERA, and XACTI MENU keys control playback features on a Sanyo Xacti digital camera when...modes. • RESET Key-Pressing it twice restores your HDTV On or Off. • ECO Key-Modifies the Energy Saver level (see HDMI Linking feature on -screen, press the "0" key to...
... the direct selection of time (in PC mode. REMOTE CONTROL OPERATION • POWER Key-Turns your HDTV to its factory settings. For example: to select channel 39.1 press the 3 and 9 keys followed by the dash -,...the video source to Set the amount of digital chanels and subchannels. The PLAY, PAUSE, STOP, REW, FF, W, T, CAMERA, and XACTI MENU keys control playback features on a Sanyo Xacti digital camera when...modes. • RESET Key-Pressing it twice restores your HDTV On or Off. • ECO Key-Modifies the Energy Saver level (see HDMI Linking feature on -screen, press the "0" key to...
Owners Manual (w/ GXEA remote)
Page 12
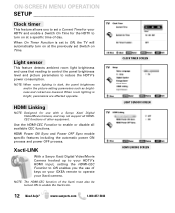
... the TV will automatically turn on at the previously set a Current Time for your Xacti camera. NOTE: The HDMI-CEC function of other equipment. Xacti-LINK With a Sanyo Xacti Digital Video/Movie Camera hooked up to your HDTV's HDMI input, setting the HDMI-CEC Function to ON enables you to turn on ..., the panel brightness and/or the picture setting parameters such as brightness and cotrast are affected opposite. HDMI Linking NOTE: Designed for use of keys on your GXEA remote to operate your HDTV and enable a Switch On Time for the HDTV to set Switch on at a specific time of day...
... the TV will automatically turn on at the previously set a Current Time for your Xacti camera. NOTE: The HDMI-CEC function of other equipment. Xacti-LINK With a Sanyo Xacti Digital Video/Movie Camera hooked up to your HDTV's HDMI input, setting the HDMI-CEC Function to ON enables you to turn on ..., the panel brightness and/or the picture setting parameters such as brightness and cotrast are affected opposite. HDMI Linking NOTE: Designed for use of keys on your GXEA remote to operate your HDTV and enable a Switch On Time for the HDTV to set Switch on at a specific time of day...
Owners Manual (w/ GXEA remote)
Page 16
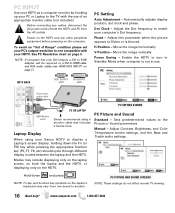
... has only DVI Output, a DVI to RGB adapter will be required, or, a DVI to HDMI cable and RCA audio cables (see HDMI (DVI) INPUT1 on page 3. Adjust the Dot frequency to match your Sanyo HDTV to display a Laptop's screen display, holding down and press NOTE: Fn key and function key ...Phase - Adjust this parameter when the picture appears to the Picture or Sound parameters. PC SETTING SCREEN PC Picture and Sound Standard - See PC Resolution chart on page 7.) PC Setting Auto Adjustment - HDTV BACK RGB OUTPUT JACK DVI OUTPUT JACK Stereo mini audio cable PC OR LAPTOP RGB Monitor cable...
... has only DVI Output, a DVI to RGB adapter will be required, or, a DVI to HDMI cable and RCA audio cables (see HDMI (DVI) INPUT1 on page 3. Adjust the Dot frequency to match your Sanyo HDTV to display a Laptop's screen display, holding down and press NOTE: Fn key and function key ...Phase - Adjust this parameter when the picture appears to the Picture or Sound parameters. PC SETTING SCREEN PC Picture and Sound Standard - See PC Resolution chart on page 7.) PC Setting Auto Adjustment - HDTV BACK RGB OUTPUT JACK DVI OUTPUT JACK Stereo mini audio cable PC OR LAPTOP RGB Monitor cable...


