
Owners Manual
Page 2
... the FIRST 90 DAYS from state to the retailer along with the receipt and the included accessories, such as the remote control. The defective TV will replace any manufacturing defect or malfunction Sanyo Manufacturing Corporation will provide a new TV via exchange at the sole discretion of equal value, if necessary. The model number...
... the FIRST 90 DAYS from state to the retailer along with the receipt and the included accessories, such as the remote control. The defective TV will replace any manufacturing defect or malfunction Sanyo Manufacturing Corporation will provide a new TV via exchange at the sole discretion of equal value, if necessary. The model number...
Owners Manual
Page 9
...Digital. TV Features Integrated Digital Tuner - Displays text captions or full screen text on the disc. The On-Screen display allows precise remote control adjustment of a DVD exceeds other software. On-Screen 3 Language Display - The audio quality is different from the analog audio output ... without using Title/Chapter/Time/Track - You can playback tracks in memory and recall the marked scenes. Picture Adjustments Using The Remote Control - Maximum 32 language subtitles and maximum 8 language soundtracks can change the angles during playback. A DVD disc has much more capacity...
...Digital. TV Features Integrated Digital Tuner - Displays text captions or full screen text on the disc. The On-Screen display allows precise remote control adjustment of a DVD exceeds other software. On-Screen 3 Language Display - The audio quality is different from the analog audio output ... without using Title/Chapter/Time/Track - You can playback tracks in memory and recall the marked scenes. Picture Adjustments Using The Remote Control - Maximum 32 language subtitles and maximum 8 language soundtracks can change the angles during playback. A DVD disc has much more capacity...

Owners Manual
Page 10
... 7 IMPORTANT NOTICE 7 How to attach the stand 8 How to remove the stand 8 Features 9 Contents 10 Disc 11 Parts and functions 13 Remote control 14 Power source 15 Antenna connections 16 Cable TV connections 16 TV operation Starting setup 17 TV operation 17 Quick guide for menu operation 18...28 Play mode 28 Audio Settings menu 29 Video Adjust menu 30 Quick guide for DVD menu operation 30 Function Setup 31 Parental Control 32 Additional information Language Code List 33 Country/Area Code List 33 Connections to other equipment 34 Reception disturbances 38 Problems and ...
... 7 IMPORTANT NOTICE 7 How to attach the stand 8 How to remove the stand 8 Features 9 Contents 10 Disc 11 Parts and functions 13 Remote control 14 Power source 15 Antenna connections 16 Cable TV connections 16 TV operation Starting setup 17 TV operation 17 Quick guide for menu operation 18...28 Play mode 28 Audio Settings menu 29 Video Adjust menu 30 Quick guide for DVD menu operation 30 Function Setup 31 Parental Control 32 Additional information Language Code List 33 Country/Area Code List 33 Connections to other equipment 34 Reception disturbances 38 Problems and ...

Owners Manual
Page 14
slow motion MARKER Index REPEAT A-B Repeat playback between TV and DVD (EJECT) Eject a disc 0-9/- Call up initial setup mode TV mode - Remote control POWER Power On/Off DISPLAY Call TV information Call DVD information TV/DVD Switch between A and B SEARCH Fast Forward/Review playback PLAY Playback SKIP Skip ...
slow motion MARKER Index REPEAT A-B Repeat playback between TV and DVD (EJECT) Eject a disc 0-9/- Call up initial setup mode TV mode - Remote control POWER Power On/Off DISPLAY Call TV information Call DVD information TV/DVD Switch between A and B SEARCH Fast Forward/Review playback PLAY Playback SKIP Skip ...

Owners Manual
Page 15
...to leak or burst. Connect the AC cord into this unit's AC INPUT jack. 2. Approximately 15 feet NOTE: • Do not leave the remote control unit exposed to direct sunlight or in the direction of batteries may shorten operating distance. • Incorrect use the batteries properly. • Do .... • Do not mix alkaline, standard (carbon-zinc), or rechargeable, (ni-cad, ni-mh, etc) batteries. • Remove batteries if the remote control will not be operated for an extended period of approximately 15 feet. WARNING: • DO NOT CONNECT THIS UNIT TO THE POWER USING ANY DEVICE...
...to leak or burst. Connect the AC cord into this unit's AC INPUT jack. 2. Approximately 15 feet NOTE: • Do not leave the remote control unit exposed to direct sunlight or in the direction of batteries may shorten operating distance. • Incorrect use the batteries properly. • Do .... • Do not mix alkaline, standard (carbon-zinc), or rechargeable, (ni-cad, ni-mh, etc) batteries. • Remove batteries if the remote control will not be operated for an extended period of approximately 15 feet. WARNING: • DO NOT CONNECT THIS UNIT TO THE POWER USING ANY DEVICE...

Owners Manual
Page 18
...-operation automatically. The sound can be switched back on the screen. The clock will be displayed for each press of time, press SLEEP on the remote control. To confirm the sleep timer setting, press SLEEP and the remaining time will be silenced and "Mute" will appear.
...-operation automatically. The sound can be switched back on the screen. The clock will be displayed for each press of time, press SLEEP on the remote control. To confirm the sleep timer setting, press SLEEP and the remaining time will be silenced and "Mute" will appear.

Owners Manual
Page 22
... system (when available) 1 Select "Lock", then press ▶ or ENTER. 2 Use Number buttons (0-9) to "TV Rating" and "Movie Rating" if this restriction separately. Your original remote control will be temporarily overridden. The restriction applies to enter your password. Lock New Password * * *_ [0-9] :Enter Code ENTER :Set " " appears instead of the number. 3 Enter the...
... system (when available) 1 Select "Lock", then press ▶ or ENTER. 2 Use Number buttons (0-9) to "TV Rating" and "Movie Rating" if this restriction separately. Your original remote control will be temporarily overridden. The restriction applies to enter your password. Lock New Password * * *_ [0-9] :Enter Code ENTER :Set " " appears instead of the number. 3 Enter the...

Owners Manual
Page 23
... ▶ to select the desired Closed Caption mode for the download to occur. • The V-Chip rating information and system are not determined or controlled by pressing CCD on -screen. NOTE: • Depending on the screen. If this case, adjust the antenna for editing. • When Captions ..., Closed Captions in English are transmitted on C1 and Closed Captions in the Caption Mode. • Misspellings or unusual characters may appear on the remote control. When you select "Digital Caption", you can choose from C1, C2, C3, C4, T1, T2, T3 and T4. This step prevent that...
... ▶ to select the desired Closed Caption mode for the download to occur. • The V-Chip rating information and system are not determined or controlled by pressing CCD on -screen. NOTE: • Depending on the screen. If this case, adjust the antenna for editing. • When Captions ..., Closed Captions in English are transmitted on C1 and Closed Captions in the Caption Mode. • Misspellings or unusual characters may appear on the remote control. When you select "Digital Caption", you can choose from C1, C2, C3, C4, T1, T2, T3 and T4. This step prevent that...

Owners Manual
Page 24
... displayed by pressing PICTURE SIZE on the screen with a black side bar. The top and bottom edges of the picture may be shown on the remote control. Text Size: Auto, Small, Standard, Large Text Type: Auto, Style1, Style2, Style3, Style4, Style5, Style6, Style7 Text Edge: Auto, None, Raised, Depressed, Uniform, Left Shadow...
... displayed by pressing PICTURE SIZE on the screen with a black side bar. The top and bottom edges of the picture may be shown on the remote control. Text Size: Auto, Small, Standard, Large Text Type: Auto, Style1, Style2, Style3, Style4, Style5, Style6, Style7 Text Edge: Auto, None, Raised, Depressed, Uniform, Left Shadow...
Owners Manual
Page 25
..., press DISPLAY again. NOTE: • When connecting to other equipment, unplug the unit from the AC outlet. 2 Press POWER on the unit or on the remote control to the type of these discs is not available on the disc, this operation may be prohibited" or "This operation can't be available. The DVD...
..., press DISPLAY again. NOTE: • When connecting to other equipment, unplug the unit from the AC outlet. 2 Press POWER on the unit or on the remote control to the type of these discs is not available on the disc, this operation may be prohibited" or "This operation can't be available. The DVD...
Owners Manual
Page 35
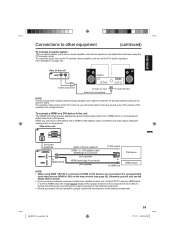
...; If you connect an external component (cable box, satellite receiver, etc.) to 0, you will not be set to this LCD TV using the TV's remote control. To control the audio, turn on the TV and the stereo amplifier, and turn off the TV's built-in speakers (see the image with a HDMI-to-DVI...
...; If you connect an external component (cable box, satellite receiver, etc.) to 0, you will not be set to this LCD TV using the TV's remote control. To control the audio, turn on the TV and the stereo amplifier, and turn off the TV's built-in speakers (see the image with a HDMI-to-DVI...

Owners Manual
Page 37
..., disconnect the AC Power Cords of both from the PC and the TV VOL +/-. 3 Press the INPUT SELECT on your computer is recommended for your Remote Control to step through signal inputs to select PC. 4 Press the SETUP/TV MENU to a compatible resolution. • A Refresh Rate value of a Stereo Mini-Audio cable...
..., disconnect the AC Power Cords of both from the PC and the TV VOL +/-. 3 Press the INPUT SELECT on your computer is recommended for your Remote Control to step through signal inputs to select PC. 4 Press the SETUP/TV MENU to a compatible resolution. • A Refresh Rate value of a Stereo Mini-Audio cable...

Owners Manual
Page 39
...TV connections. • Set Signal Type option to another station. • Make sure channels are set into memory. • Check picture control adjustments. • Check antenna or Cable TV connections, reorient antenna. • Check for sources of your language. • Select proper ... green or red. Horizontal or diagonal bars on the screen as a fixed point of possible interference. REMOTE CONTROL The remote control does not function. • Aim at the remote control at the remote sensor. • Operate within Approx. 15 feet or reduce the light in the appropriate mode. •...
...TV connections. • Set Signal Type option to another station. • Make sure channels are set into memory. • Check picture control adjustments. • Check antenna or Cable TV connections, reorient antenna. • Check for sources of your language. • Select proper ... green or red. Horizontal or diagonal bars on the screen as a fixed point of possible interference. REMOTE CONTROL The remote control does not function. • Aim at the remote control at the remote sensor. • Operate within Approx. 15 feet or reduce the light in the appropriate mode. •...

Owners Manual
Page 41
...method: Number of Pixels: Tuner type: Receiving channels: Inputs: Outputs: Speaker: Audio output power: DVD/CD player Signal system: Applicable disc: Pickup: ACCESSORIES DP26671 DP32671 AC 120V 60Hz Operation: 76W Stand by: 0.3W 6.5 kg (14.3 lbs) Width: 630 mm (24-13/16 inches) Height: 475.8 mm (18... NTSC 1.DVD (12 cm) 2.CD (12 cm) CD: Wavelength: 790 nm Maximum output power: 7 mW DVD: Wavelength: 655 nm Maximum output power: 5 mW Remote control AC Cord Stand Screws x 5 Frame stand Designs and specifications are subject to change without notice. 41 56Q0221A_eng.indd 41 1/17/11 1:56:10 PM
...method: Number of Pixels: Tuner type: Receiving channels: Inputs: Outputs: Speaker: Audio output power: DVD/CD player Signal system: Applicable disc: Pickup: ACCESSORIES DP26671 DP32671 AC 120V 60Hz Operation: 76W Stand by: 0.3W 6.5 kg (14.3 lbs) Width: 630 mm (24-13/16 inches) Height: 475.8 mm (18... NTSC 1.DVD (12 cm) 2.CD (12 cm) CD: Wavelength: 790 nm Maximum output power: 7 mW DVD: Wavelength: 655 nm Maximum output power: 5 mW Remote control AC Cord Stand Screws x 5 Frame stand Designs and specifications are subject to change without notice. 41 56Q0221A_eng.indd 41 1/17/11 1:56:10 PM


