
Instruction Manual
Page 1
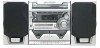
INSTRUCTION MANUAL Mini Shelf System SANYO AWM-2800 0 00 a 1 1 I \ 1 \ ''' 000 000 000 00 SANYO SANYO CONTENTS Warranty Accessories Safety certification Connections For safe and efficient operation Controls Remote control Adjusting the clock Before operation Compact disc preparations CD play Listening to tapes 1AD6P1P1858--A AWM-2800, Issue Number 2 El Listening to the radio E2 Before recording and dubbing E3 Recording...
INSTRUCTION MANUAL Mini Shelf System SANYO AWM-2800 0 00 a 1 1 I \ 1 \ ''' 000 000 000 00 SANYO SANYO CONTENTS Warranty Accessories Safety certification Connections For safe and efficient operation Controls Remote control Adjusting the clock Before operation Compact disc preparations CD play Listening to tapes 1AD6P1P1858--A AWM-2800, Issue Number 2 El Listening to the radio E2 Before recording and dubbing E3 Recording...
Instruction Manual
Page 3
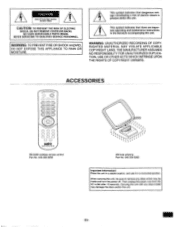
... unit. ! i This symbol indicates that there are important operating and maintenance instructions in a horizontal position. ACCESSORIES 0 0 000 $O777O c70 C) =70 000 0 CD 0 0 0 0 0 0 0 0 0 0 swiro REMOTE CONTROLlERRe.....:1 RB-S390 wireless remote control Part No. 645 059 8258 s AM loop antenna Part No. 645 059 8265 Important Information! REFER SERVICING TO QUALIFIED SERVICE PERSONNEL. THE...
... unit. ! i This symbol indicates that there are important operating and maintenance instructions in a horizontal position. ACCESSORIES 0 0 000 $O777O c70 C) =70 000 0 CD 0 0 0 0 0 0 0 0 0 0 swiro REMOTE CONTROLlERRe.....:1 RB-S390 wireless remote control Part No. 645 059 8258 s AM loop antenna Part No. 645 059 8265 Important Information! REFER SERVICING TO QUALIFIED SERVICE PERSONNEL. THE...
Instruction Manual
Page 6
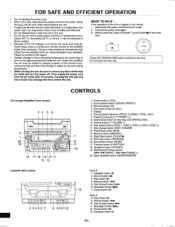
If this should enter the unit, electrical shock or a malfunction may be inside may produce an excessively high output from the outlet. Remote sensor (IR) 4. Disc trays (inside the unit. Disc select buttons (DISC 1, DISC 2, DISC 3, DISC 4, DISC 5) 11. Play/Pause button (►/uq 13. Rewind button (4I4I) 5. ...
If this should enter the unit, electrical shock or a malfunction may be inside may produce an excessively high output from the outlet. Remote sensor (IR) 4. Disc trays (inside the unit. Disc select buttons (DISC 1, DISC 2, DISC 3, DISC 4, DISC 5) 11. Play/Pause button (►/uq 13. Rewind button (4I4I) 5. ...
Instruction Manual
Page 7
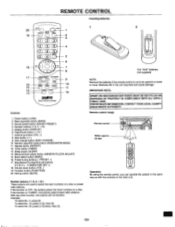
...No. 25, press [+10] twice, then [5]. 0 0 0 Two "AAA" batteries (not supplied) NOTE: Remove the batteries if the remote control is not to select the track numbers on a disc. REMOTE CONTROL Inserting batteries MUTE o/ON 1 2 20 SOUND FUNCTION PRESET BASS 19 2 5 6 4 0 CD CD DISPLAY 0 5 l>/ 0... 8 17 TUNING/TIME SET + DISC CHANGE 1.14 DI> 9 PRESET A" 16 10 REPEAT 15 11 14 SLEEP TIMER 13 12 who REMOTE CONTROLLER REI-S390 Controls 1. IMPORTANT NOTE: SPENT OR DISCHARGED BATTERIES MUST BE RECYCLED OR DISPOSED OF PROPERLY IN COMPLIANCE WITH ALL APPLICABLE LAWS. ...
...No. 25, press [+10] twice, then [5]. 0 0 0 Two "AAA" batteries (not supplied) NOTE: Remove the batteries if the remote control is not to select the track numbers on a disc. REMOTE CONTROL Inserting batteries MUTE o/ON 1 2 20 SOUND FUNCTION PRESET BASS 19 2 5 6 4 0 CD CD DISPLAY 0 5 l>/ 0... 8 17 TUNING/TIME SET + DISC CHANGE 1.14 DI> 9 PRESET A" 16 10 REPEAT 15 11 14 SLEEP TIMER 13 12 who REMOTE CONTROLLER REI-S390 Controls 1. IMPORTANT NOTE: SPENT OR DISCHARGED BATTERIES MUST BE RECYCLED OR DISPOSED OF PROPERLY IN COMPLIANCE WITH ALL APPLICABLE LAWS. ...
Instruction Manual
Page 8
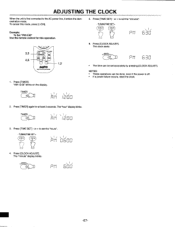
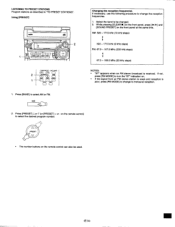
ADJUSTING THE CLOCK When the unit is first connected to set the "minutes". - "AM 12:00" blinks on the display. 5. To cancel this operation. •TUNMIGRME SET, DISC C.NGE 3,5 4,6 >CI cnS5.L7EE7PRnn 1,2 SANYO \ ,...REM0TE CONTROLLER 1. Press [TIME SET] - or + to the AC power line, it enters the demonstration mode. Press [TIMER]. TUNING/TIME SET + Q Example: To Set "PM 6:30" Use the remote control for this mode, press [(1)/ON].
ADJUSTING THE CLOCK When the unit is first connected to set the "minutes". - "AM 12:00" blinks on the display. 5. To cancel this operation. •TUNMIGRME SET, DISC C.NGE 3,5 4,6 >CI cnS5.L7EE7PRnn 1,2 SANYO \ ,...REM0TE CONTROLLER 1. Press [TIME SET] - or + to the AC power line, it enters the demonstration mode. Press [TIMER]. TUNING/TIME SET + Q Example: To Set "PM 6:30" Use the remote control for this mode, press [(1)/ON].
Instruction Manual
Page 9
... enhance the bass sound. Selecting the function Press [FUNCTION] to . Each time the button is automati- POPS: Pops, etc. The volume level appears on the remote control. JAZZ: Jazz, etc. •I• II I I r. cally stopped. MUTE SOUND FUNCTION PRESET th/ON BASS 0 0 0 W '0 4 cp 6 ALITO1,11 SYS /44 O Selecting the sound mode... the sound mode matching the music to be listened to select the desired function. "MUTE" disappears. Bass expander system Press [BASSXPANDER] to commands from the remote control. - To turn off Press [ O/ON ].
... enhance the bass sound. Selecting the function Press [FUNCTION] to . Each time the button is automati- POPS: Pops, etc. The volume level appears on the remote control. JAZZ: Jazz, etc. •I• II I I r. cally stopped. MUTE SOUND FUNCTION PRESET th/ON BASS 0 0 0 W '0 4 cp 6 ALITO1,11 SYS /44 O Selecting the sound mode... the sound mode matching the music to be listened to select the desired function. "MUTE" disappears. Bass expander system Press [BASSXPANDER] to commands from the remote control. - To turn off Press [ O/ON ].
Instruction Manual
Page 11
...: During programmed play Example: To skip to select the desired mode in the following sequence. Remove (or replace) the disc. 3. To resume play (Remote control only) 1. Search (forward/reverse) If [ /44 ] or [ ] is playing, press [414 /440] repeatedly until "6" appears in the...display selection Press [DISPLAY] repeatedly during play, the changer will automatically select and play discs and tracks at any time to start play (Remote control only) This unit has three different repeat modes. Playback starts from the desired track 1. Press [REPEAT] on the selected disc) ...
...: During programmed play Example: To skip to select the desired mode in the following sequence. Remove (or replace) the disc. 3. To resume play (Remote control only) 1. Search (forward/reverse) If [ /44 ] or [ ] is playing, press [414 /440] repeatedly until "6" appears in the...display selection Press [DISPLAY] repeatedly during play, the changer will automatically select and play discs and tracks at any time to start play (Remote control only) This unit has three different repeat modes. Playback starts from the desired track 1. Press [REPEAT] on the selected disc) ...

Instruction Manual
Page 12
...Select DISC 2 by pressing [ ]. - cn 6DVA ®C)I I \ 4. Press [MEMORY]. Select DISC 1 by pressing [DISC 1]. • [DISC CHANGE] on the remote control can be deleted individually. -E11- Select track 2 by pressing [DISC 3]. MEMORY 01 TR O® u OOIIn U \ 1/ MEMORY n - If you want to ... C) TR copc®) C7 \ I / MEMORY u n • I U 8. UL 10. Select DISC 3 by pressing [ ]. • The number buttons on the remote control can be programmed for the 5 discs and DISC 3 is pressed in the stop mode. • The same disc or track can be programmed more...
...Select DISC 2 by pressing [ ]. - cn 6DVA ®C)I I \ 4. Press [MEMORY]. Select DISC 1 by pressing [DISC 1]. • [DISC CHANGE] on the remote control can be deleted individually. -E11- Select track 2 by pressing [DISC 3]. MEMORY 01 TR O® u OOIIn U \ 1/ MEMORY n - If you want to ... C) TR copc®) C7 \ I / MEMORY u n • I U 8. UL 10. Select DISC 3 by pressing [ ]. • The number buttons on the remote control can be programmed for the 5 discs and DISC 3 is pressed in the stop mode. • The same disc or track can be programmed more...
Instruction Manual
Page 14
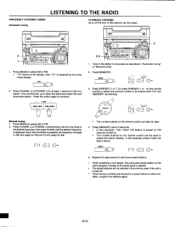
.... MEMORY v in 7 in \ Manual tuning 1. PI 51 0 2 O 1. Press [TUNING +] or [TUNING -] for AM. When presetting a new station, the previously preset station on the remote control can be used . 4. TUNING st I LJ z 3. Press [MEMORY]. Press [PRESET] A or V (or press [PRESET] + or - NI II I I- 1 -1 IUD I ...- lU mHz 5. Press [BAND] to select AM or FM. • "TU" blinks on the remote control) to select the channel number to be preset while "CH" and "MEMORY" are close to the desired frequency, then press it briefly until the...
.... MEMORY v in 7 in \ Manual tuning 1. PI 51 0 2 O 1. Press [TUNING +] or [TUNING -] for AM. When presetting a new station, the previously preset station on the remote control can be used . 4. TUNING st I LJ z 3. Press [MEMORY]. Press [PRESET] A or V (or press [PRESET] + or - NI II I I- 1 -1 IUD I ...- lU mHz 5. Press [BAND] to select AM or FM. • "TU" blinks on the remote control) to select the channel number to be preset while "CH" and "MEMORY" are close to the desired frequency, then press it briefly until the...
Instruction Manual
Page 15
... an FM stereo station is weak and reception is received. PRESET • The number buttons on the remote control) to select AM or FM. BAND 2. Press [BAND] to select the desired program number. on the remote control can also be changed. 2. Select the band to change the reception frequencies. 1. Press [PRESET] A or...
... an FM stereo station is weak and reception is received. PRESET • The number buttons on the remote control) to select AM or FM. BAND 2. Press [BAND] to select the desired program number. on the remote control can also be changed. 2. Select the band to change the reception frequencies. 1. Press [PRESET] A or...
Instruction Manual
Page 18
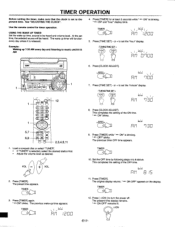
At the set to the present time. The wake up timer will be heard and volume level. Example: Waking up time, source to music until 8:15 AM 4. TIMER OPERATION Before setting the timer, make sure that the clock is set time, the selected source will function every day unless it is blinking. See "ADJUSTING THE CLOCK". " Press [TIMER] for timer operation. USING THE WAKE UP TIMER Set the wake-up 7:30 AM every day and listening to be heard. Use the remote control for at least 2 seconds while " ON" is released.
At the set to the present time. The wake up timer will be heard and volume level. Example: Waking up time, source to music until 8:15 AM 4. TIMER OPERATION Before setting the timer, make sure that the clock is set time, the selected source will function every day unless it is blinking. See "ADJUSTING THE CLOCK". " Press [TIMER] for timer operation. USING THE WAKE UP TIMER Set the wake-up 7:30 AM every day and listening to be heard. Use the remote control for at least 2 seconds while " ON" is released.
Instruction Manual
Page 19
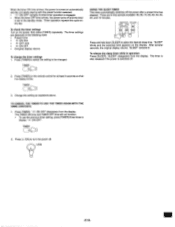
The timer settings are displayed in the following order. • Present time • When the timer ON time arrives, the power is set to the standby mode. Timer operation repeats this cycle every day. To check the timer settings Turn on automatically and the unit starts playing with the preset function selected. • " ON OFF" remains lit while timer operation is engaged. • When the timer OFF time arrives, the power turns off and the timer is turned on the power, then press [TIMER] repeatedly.
The timer settings are displayed in the following order. • Present time • When the timer ON time arrives, the power is set to the standby mode. Timer operation repeats this cycle every day. To check the timer settings Turn on automatically and the unit starts playing with the preset function selected. • " ON OFF" remains lit while timer operation is engaged. • When the timer OFF time arrives, the power turns off and the timer is turned on the power, then press [TIMER] repeatedly.
Instruction Manual
Page 20
... 8 -E19- TIMER SET CLOCK ADJUST- Cleaning the cabinet Use a clean soft cloth moistened with isopropyl alcohol or special head-cleaning fluid. REMOTE CONTROL OPERATION rey NOTE: The buttons on the remote control perfom similar functions to similarly marked buttons on the front panel. Never use benzol, benzene or other strong chemical cleaners...
... 8 -E19- TIMER SET CLOCK ADJUST- Cleaning the cabinet Use a clean soft cloth moistened with isopropyl alcohol or special head-cleaning fluid. REMOTE CONTROL OPERATION rey NOTE: The buttons on the remote control perfom similar functions to similarly marked buttons on the front panel. Never use benzol, benzene or other strong chemical cleaners...
Instruction Manual
Page 22
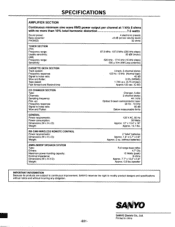
...REMOTE CONTROL Power requirements: Dimensions (W x H x D): Weight: 2 "AAA" batteries Approx. 1.9" x 5.7" x 0.8" Approx. 2 oz. (without batteries) AWM-2800SP SPEAKER SYSTEM Type: Drivers: Maximum power-handing capacity: Nominal impedance: Dimensions (W x H X D): Weight: Full range bass reflex 4.7" Dia 15 Watts (peak) 8 ohms Approx. 7.7" x 13.2" x 5.8" Approx. 0.8 lbs./speaker IMPORTANT INFORMATION Because its products are subject to continuous improvement, SANYO... x 13.4" x 16" Approx. 13.1 lbs. sifivo SANYO Electric Co., Ltd. SPECIFICATIONS AMPLIFIER SECTION Continuous minimum sine wave...
...REMOTE CONTROL Power requirements: Dimensions (W x H x D): Weight: 2 "AAA" batteries Approx. 1.9" x 5.7" x 0.8" Approx. 2 oz. (without batteries) AWM-2800SP SPEAKER SYSTEM Type: Drivers: Maximum power-handing capacity: Nominal impedance: Dimensions (W x H X D): Weight: Full range bass reflex 4.7" Dia 15 Watts (peak) 8 ohms Approx. 7.7" x 13.2" x 5.8" Approx. 0.8 lbs./speaker IMPORTANT INFORMATION Because its products are subject to continuous improvement, SANYO... x 13.4" x 16" Approx. 13.1 lbs. sifivo SANYO Electric Co., Ltd. SPECIFICATIONS AMPLIFIER SECTION Continuous minimum sine wave...
