
Instruction Manual
Page 1
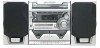
...MANUAL Mini Shelf System SANYO AWM-2800 0 00 a 1 1 I \ 1 \ ''' 000 000 000 00 SANYO SANYO CONTENTS Warranty Accessories Safety certification Connections For safe and efficient operation Controls Remote control Adjusting the clock Before operation Compact disc preparations CD play Listening to tapes 1AD6P1P1858--A AWM-2800, Issue Number 2 El Listening to the radio E2 Before recording and dubbing E3 Recording compact discs E3 Recording from the tuner E5 Tape dubbing (deck A to deck B) E5 Timer operation E6 Remote control operation E7 Maintenance E8 Troubleshooting guide...
...MANUAL Mini Shelf System SANYO AWM-2800 0 00 a 1 1 I \ 1 \ ''' 000 000 000 00 SANYO SANYO CONTENTS Warranty Accessories Safety certification Connections For safe and efficient operation Controls Remote control Adjusting the clock Before operation Compact disc preparations CD play Listening to tapes 1AD6P1P1858--A AWM-2800, Issue Number 2 El Listening to the radio E2 Before recording and dubbing E3 Recording compact discs E3 Recording from the tuner E5 Tape dubbing (deck A to deck B) E5 Timer operation E6 Remote control operation E7 Maintenance E8 Troubleshooting guide...
Instruction Manual
Page 2
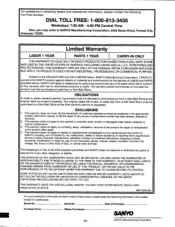
... model's instruction manual, or (B) the repair of any other obligation or liability. SANYO will repair or replace (at retail from unauthorized service or parts, improper maintenance, operation contrary to SANYO Manufacturing Corporation, 3333 Sanyo Road, Forrest City, Arkansas 72335. This warranty does not cover (A) the adjustment of customer-operated controls as explained in obtaining repairs and operational information, please contact the following information with new or refurbished products...
... model's instruction manual, or (B) the repair of any other obligation or liability. SANYO will repair or replace (at retail from unauthorized service or parts, improper maintenance, operation contrary to SANYO Manufacturing Corporation, 3333 Sanyo Road, Forrest City, Arkansas 72335. This warranty does not cover (A) the adjustment of customer-operated controls as explained in obtaining repairs and operational information, please contact the following information with new or refurbished products...
Instruction Manual
Page 3
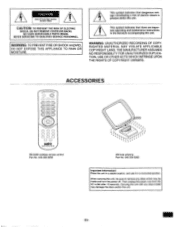
... turn the power off. 4 CAUTION RISK OF ELECTRIC SHOCK ! DO NOT OPEN CAUTION: TO PREVENT THE RISK OF ELECTRIC SHOCK, DO NOT REMOVE COVER (OR BACK). NO USER-SERVICEABLE PARTS INSIDE. This symbol Indicates that dangerous voltage constituting a risk of electric shock is present within this unit. ACCESSORIES 0 0 000 $O777O c70 C) =70 000 0 CD 0 0 0 0 0 0 0 0 0 0 swiro REMOTE CONTROLlERRe.....:1 RB-S390 wireless remote control Part...
... turn the power off. 4 CAUTION RISK OF ELECTRIC SHOCK ! DO NOT OPEN CAUTION: TO PREVENT THE RISK OF ELECTRIC SHOCK, DO NOT REMOVE COVER (OR BACK). NO USER-SERVICEABLE PARTS INSIDE. This symbol Indicates that dangerous voltage constituting a risk of electric shock is present within this unit. ACCESSORIES 0 0 000 $O777O c70 C) =70 000 0 CD 0 0 0 0 0 0 0 0 0 0 swiro REMOTE CONTROLlERRe.....:1 RB-S390 wireless remote control Part...
Instruction Manual
Page 4
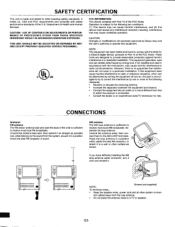
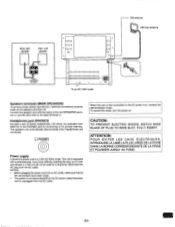
... can radiate radio frequency energy and, if not installed and used in a particular installation. Unwind the antenna lead wire, then extend it . 111 3 2 111 Illllllllllllllllllllll nnuuuuuuunnl III III III IIIIII III IIIII IIIIIIm11111IIIIIIIIIIII 111 Screws (not supplied) NOTE: To minimize noise... • Keep the speaker wires, power cord and all other surface as possible Unwind the antenna wires, then con- and, while listening to the sound from the...
... can radiate radio frequency energy and, if not installed and used in a particular installation. Unwind the antenna lead wire, then extend it . 111 3 2 111 Illllllllllllllllllllll nnuuuuuuunnl III III III IIIIII III IIIII IIIIIIm11111IIIIIIIIIIII 111 Screws (not supplied) NOTE: To minimize noise... • Keep the speaker wires, power cord and all other surface as possible Unwind the antenna wires, then con- and, while listening to the sound from the...
Instruction Manual
Page 5
... stereo reproduction, identical connections must be used for private listening. PHONES O Power supply Connect the power cord to the AC power line, it . Headphones jack (PHONES) Connect a pair of stereo headphones ( 32 ohms, not available from SANYO) to the black terminal (-). If you have been made at the speakers and this mode, turn it over and reinsert it enters the demonstration mode. Connect the speaker wire with a polarized plug. NOTES: • Before plugging the power cord...
... stereo reproduction, identical connections must be used for private listening. PHONES O Power supply Connect the power cord to the AC power line, it . Headphones jack (PHONES) Connect a pair of stereo headphones ( 32 ohms, not available from SANYO) to the black terminal (-). If you have been made at the speakers and this mode, turn it over and reinsert it enters the demonstration mode. Connect the speaker wire with a polarized plug. NOTES: • Before plugging the power cord...
Instruction Manual
Page 6
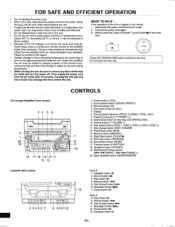
... areas where extremes in use, disconnect the power cord from the AC outlet. 2. CLEAR VOLUME Press [CD OPEN/CLOSE] when closing the disc tray. Power button (o/ON) 2. Display 6. Play/Pause button (►/uq 13. Rewind button (4I4I) 5. Stop/Eject button (M/1!) 13 7. Under this condition the unit may be inside and turn the power off. Disc change button (DISC CHANGE) 12. Record button (•) 3. Fast forward button (►►) 6. Sound preset button (SOUND PRESET) 3. Volume button (V VOLUME A) 10. Fast forward button (►►) 11...
... areas where extremes in use, disconnect the power cord from the AC outlet. 2. CLEAR VOLUME Press [CD OPEN/CLOSE] when closing the disc tray. Power button (o/ON) 2. Display 6. Play/Pause button (►/uq 13. Rewind button (4I4I) 5. Stop/Eject button (M/1!) 13 7. Under this condition the unit may be inside and turn the power off. Disc change button (DISC CHANGE) 12. Record button (•) 3. Fast forward button (►►) 6. Sound preset button (SOUND PRESET) 3. Volume button (V VOLUME A) 10. Fast forward button (►►) 11...
Instruction Manual
Page 7
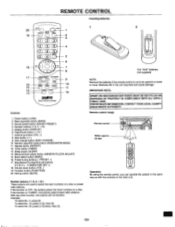
... the controls on a disc or preset radio stations. Random play/FM mode button (RANDOM/FM MODE) 11. Volume down button (VOL -) 19. Remote control range Remote sensor 0 0, Within approx. 23 feet 15 15° 000 000 000 00 Operation By using the remote control, you can operate the system in the unit may leak and cause damage. Bass expander button (BASS) 3. REMOTE CONTROL Inserting batteries MUTE o/ON 1 2 20 SOUND FUNCTION PRESET BASS 19 2 5 6 4 0 CD CD DISPLAY 0 5 l>/ 0 6 VOL 18 Q VOL 7 8 17 TUNING/TIME SET + DISC CHANGE 1.14 DI> 9 PRESET...
... the controls on a disc or preset radio stations. Random play/FM mode button (RANDOM/FM MODE) 11. Volume down button (VOL -) 19. Remote control range Remote sensor 0 0, Within approx. 23 feet 15 15° 000 000 000 00 Operation By using the remote control, you can operate the system in the unit may leak and cause damage. Bass expander button (BASS) 3. REMOTE CONTROL Inserting batteries MUTE o/ON 1 2 20 SOUND FUNCTION PRESET BASS 19 2 5 6 4 0 CD CD DISPLAY 0 5 l>/ 0 6 VOL 18 Q VOL 7 8 17 TUNING/TIME SET + DISC CHANGE 1.14 DI> 9 PRESET...
Instruction Manual
Page 8
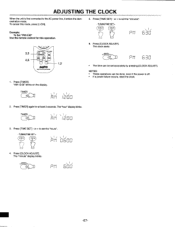
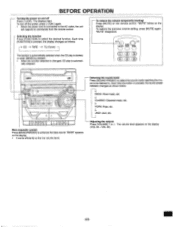
Press [TIME SET] - TUNING/TIME SET + Q To cancel this operation. •TUNMIGRME SET, DISC C.NGE 3,5 4,6 >CI cnS5.L7EE7PRnn 1,2 SANYO \ ,...REM0TE CONTROLLER 1. Press [TIMER]. "AM 12:00" blinks on the display. 5. ADJUSTING THE CLOCK When the unit is first connected to set the "minutes". - or + to the AC power line, it enters the demonstration mode. Example: To Set "PM 6:30" Use the remote control for this mode, press [(1)/ON].
Press [TIME SET] - TUNING/TIME SET + Q To cancel this operation. •TUNMIGRME SET, DISC C.NGE 3,5 4,6 >CI cnS5.L7EE7PRnn 1,2 SANYO \ ,...REM0TE CONTROLLER 1. Press [TIMER]. "AM 12:00" blinks on the display. 5. ADJUSTING THE CLOCK When the unit is first connected to set the "minutes". - or + to the AC power line, it enters the demonstration mode. Example: To Set "PM 6:30" Use the remote control for this mode, press [(1)/ON].
Instruction Manual
Page 9
... 40). -E8- To turn off Press [ O/ON ]. "MUTE" disappears. Adjusting the volume Press [VOLUME] V or A. Bass expander system Press [BASSXPANDER] to . "BASS" appears on the display. The volume level appears on and off the power, press [ o/ON ] again. • When the power cord is pressed, the sound preset indicator changes as follows: CD TAPE TU (Tuner) The function is automatically selected when the CD play is started, or when [BAND] is...
... 40). -E8- To turn off Press [ O/ON ]. "MUTE" disappears. Adjusting the volume Press [VOLUME] V or A. Bass expander system Press [BASSXPANDER] to . "BASS" appears on the display. The volume level appears on and off the power, press [ o/ON ] again. • When the power cord is pressed, the sound preset indicator changes as follows: CD TAPE TU (Tuner) The function is automatically selected when the CD play is started, or when [BAND] is...
Instruction Manual
Page 10
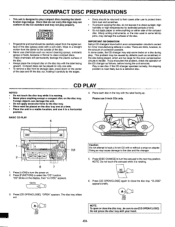
...; To remove a disc from the center to the outside of the compact disc. "OPEN" appears. This problem may cause damage to the disc and the changer. 5. Doing so may be played on a disc during play. "CLOSE" appears briefly. CD OPEN/ CLOSE NOTE: To open or close the disc tray. Press [c!)/ON] to turn the carousel to the next tray position. Press [CD OPEN/CLOSE]. IMPORTANT INFORMATION Sanyo CD changers have built-in error compensation circuits...
...; To remove a disc from the center to the outside of the compact disc. "OPEN" appears. This problem may cause damage to the disc and the changer. 5. Doing so may be played on a disc during play. "CLOSE" appears briefly. CD OPEN/ CLOSE NOTE: To open or close the disc tray. Press [c!)/ON] to turn the carousel to the next tray position. Press [CD OPEN/CLOSE]. IMPORTANT INFORMATION Sanyo CD changers have built-in error compensation circuits...
Instruction Manual
Page 11
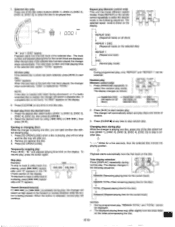
... TIMER REPEAT DISC jf (Repeat all tracks on all discs) REPEAT 1 DISC jf (Repeat all (All tracks on the display. TUNING/TIME SET. DISC (All tracks on all tracks on the notes accompanying the disc. -E10- Remove (or replace) the disc. 3. Skip play While the changer is playing, press [IIN-I1,10401] repeatedly until "3" appears. Changing discs during play (Remote control only) This unit has three different repeat modes. The total track number...
... TIMER REPEAT DISC jf (Repeat all tracks on all discs) REPEAT 1 DISC jf (Repeat all (All tracks on the display. TUNING/TIME SET. DISC (All tracks on all tracks on the notes accompanying the disc. -E10- Remove (or replace) the disc. 3. Skip play While the changer is playing, press [IIN-I1,10401] repeatedly until "3" appears. Changing discs during play (Remote control only) This unit has three different repeat modes. The total track number...

Instruction Manual
Page 12
... explained above . 13. Select DISC 2 by pressing [ ]. • The number buttons on the remote control can also be programmed is displayed. 2. TUNING + ]. ®apOoJR n / MEMORY _ _7_I / I When all ) by pressing [DISC 1]. • [DISC CHANGE] on the remote control can also be programmed for the 5 discs and DISC 3 is pressed in playing position. 7. Press [MEMORY]. To change a selection: 1. PROGRAMMED PLAY Up to 60 selections, from DISC 4 and/or DISC 5, please following the steps...
... explained above . 13. Select DISC 2 by pressing [ ]. • The number buttons on the remote control can also be programmed is displayed. 2. TUNING + ]. ®apOoJR n / MEMORY _ _7_I / I When all ) by pressing [DISC 1]. • [DISC CHANGE] on the remote control can also be programmed for the 5 discs and DISC 3 is pressed in playing position. 7. Press [MEMORY]. To change a selection: 1. PROGRAMMED PLAY Up to 60 selections, from DISC 4 and/or DISC 5, please following the steps...
Instruction Manual
Page 14
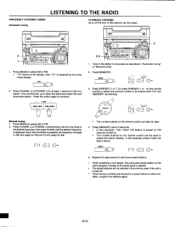
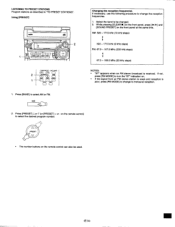
... in7 in the station to be used . 4. Each time the button is pressed, the frequency changes in 200 kHz steps for FM and 10 kHz steps for at least 1 second to tune in a station. In this example, "103.1 MHz" FM station is preset on FM channel number 9. • The number buttons on the same program number of the same band is replaced by the tuner mode display. BAND 2. I sr...
... in7 in the station to be used . 4. Each time the button is pressed, the frequency changes in 200 kHz steps for FM and 10 kHz steps for at least 1 second to tune in a station. In this example, "103.1 MHz" FM station is preset on FM channel number 9. • The number buttons on the same program number of the same band is replaced by the tuner mode display. BAND 2. I sr...
Instruction Manual
Page 15
... the front panel, press [ [SOUND PRESET] on . • If the signal from an FM stereo station is weak and reception is received. Press [BAND] to change the reception frequencies. 1. DISC CHANGE 0 0 0 2 BAND REPEAT Changing the reception frequencies If necessary, use the following procedure to change to monaural reception. 1. Select the band to select the desired program number. PRESET • The number buttons on the remote control) to be used. -E14...
... the front panel, press [ [SOUND PRESET] on . • If the signal from an FM stereo station is weak and reception is received. Press [BAND] to change the reception frequencies. 1. DISC CHANGE 0 0 0 2 BAND REPEAT Changing the reception frequencies If necessary, use the following procedure to change to monaural reception. 1. Select the band to select the desired program number. PRESET • The number buttons on the remote control) to be used. -E14...
Instruction Manual
Page 16
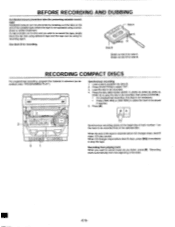
... played if required. 5. RECORDING COMPACT DISCS _„ • For programmed recording, program the material in error and you want to be using a screwdriver or similar implement. Load a blank cassette into deck B. 2. Load the disc to select "CD". 3. Recording starts automatically from playing track When you wish to play pauses. Press the disc select button ([DISC 1], [DISC 2], [DISC 3], [DISC 4], [DISC 5]) to re-record the tape, simply block the tab hole using adhesive tape...
... played if required. 5. RECORDING COMPACT DISCS _„ • For programmed recording, program the material in error and you want to be using a screwdriver or similar implement. Load a blank cassette into deck B. 2. Load the disc to select "CD". 3. Recording starts automatically from playing track When you wish to play pauses. Press the disc select button ([DISC 1], [DISC 2], [DISC 3], [DISC 4], [DISC 5]) to re-record the tape, simply block the tab hole using adhesive tape...
Instruction Manual
Page 18
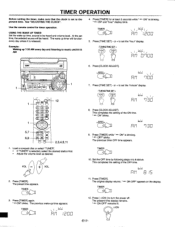
Press [TIMER] for timer operation. At the set to the present time. USING THE WAKE UP TIMER Set the wake-up time, source to music until 8:15 AM 4. Example: Waking up timer will be heard and volume level. " Use the remote control for at least 2 seconds while " ON" is released. See "ADJUSTING THE CLOCK". The wake up 7:30 AM every day and listening to be heard. TIMER OPERATION Before setting the timer, make sure that the clock is set time, the selected source will function every day unless it is blinking.
Press [TIMER] for timer operation. At the set to the present time. USING THE WAKE UP TIMER Set the wake-up time, source to music until 8:15 AM 4. Example: Waking up timer will be heard and volume level. " Use the remote control for at least 2 seconds while " ON" is released. See "ADJUSTING THE CLOCK". The wake up 7:30 AM every day and listening to be heard. TIMER OPERATION Before setting the timer, make sure that the clock is set time, the selected source will function every day unless it is blinking.
Instruction Manual
Page 19
Timer operation repeats this cycle every day. The timer settings are displayed in the following order. • Present time • To check the timer settings Turn on automatically and the unit starts playing with the preset function selected. • " ON OFF" remains lit while timer operation is engaged. • When the timer OFF time arrives, the power turns off and the timer is set to the standby mode. When the timer ON time arrives, the power is turned on the power, then press [TIMER] repeatedly.
Timer operation repeats this cycle every day. The timer settings are displayed in the following order. • Present time • To check the timer settings Turn on automatically and the unit starts playing with the preset function selected. • " ON OFF" remains lit while timer operation is engaged. • When the timer OFF time arrives, the power turns off and the timer is set to the standby mode. When the timer ON time arrives, the power is turned on the power, then press [TIMER] repeatedly.
Instruction Manual
Page 20
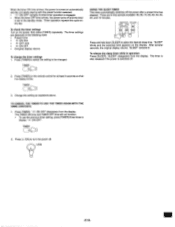
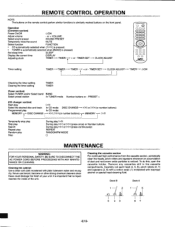
... time DISPLAY Adjusting clock TIMER - CLOCK ADJUST ins 000 000 0 0 0 0 0 who Timer setting TIMER --TIMER TIMER -- + or - O/ON Checking the timer setting Clearing the timer setting TIMER TIMER (Tuner section) Select TUNER and/or Select band BAND Select preset station In TUNER mode Number buttons or - KK or >I> (or number buttons) In CD mode >l>1(or number buttons) 4 MEMORY - >/00 Temporarily stop play Skip play Search Repeat play Random play Stop During play >MI During play KK or >Di (press once) or Number buttons During play MEMORY -4 DISC CHANGE >100 In CD mode DISC CHANGE...
... time DISPLAY Adjusting clock TIMER - CLOCK ADJUST ins 000 000 0 0 0 0 0 who Timer setting TIMER --TIMER TIMER -- + or - O/ON Checking the timer setting Clearing the timer setting TIMER TIMER (Tuner section) Select TUNER and/or Select band BAND Select preset station In TUNER mode Number buttons or - KK or >I> (or number buttons) In CD mode >l>1(or number buttons) 4 MEMORY - >/00 Temporarily stop play Skip play Search Repeat play Random play Stop During play >MI During play KK or >Di (press once) or Number buttons During play MEMORY -4 DISC CHANGE >100 In CD mode DISC CHANGE...

Instruction Manual
Page 21
... obtain service. -E20- Volume control is set to on the disc tray with the label side down. Replace the disc. (See page E9.) Change the reception frequency setting. (See page E14.) Flickering "ST". Place tape over the guard tabs. sette. (See page E15.) SERVICING: Should this product require service, refer to the speaker terminals. (See page E4.) The CD changer does not operate. Connect the speaker wires firmly to the SANYO audio limited...
... obtain service. -E20- Volume control is set to on the disc tray with the label side down. Replace the disc. (See page E9.) Change the reception frequency setting. (See page E14.) Flickering "ST". Place tape over the guard tabs. sette. (See page E15.) SERVICING: Should this product require service, refer to the speaker terminals. (See page E4.) The CD changer does not operate. Connect the speaker wires firmly to the SANYO audio limited...
Instruction Manual
Page 22
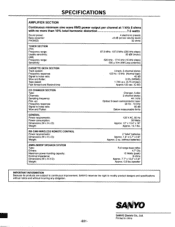
...-S390 WIRELESS REMOTE CONTROL Power requirements: Dimensions (W x H x D): Weight: 2 "AAA" batteries Approx. 1.9" x 5.7" x 0.8" Approx. 2 oz. (without batteries) AWM-2800SP SPEAKER SYSTEM Type: Drivers: Maximum power-handing capacity: Nominal impedance: Dimensions (W x H X D): Weight: Full range bass reflex 4.7" Dia 15 Watts (peak) 8 ohms Approx. 7.7" x 13.2" x 5.8" Approx. 0.8 lbs./speaker IMPORTANT INFORMATION Because its products are subject to continuous improvement, SANYO reserves the right to noise ratio: Wow and Flutter: Changer, 5-disc 2-channel stereo 44.1 kHz Optical 3-beam...
...-S390 WIRELESS REMOTE CONTROL Power requirements: Dimensions (W x H x D): Weight: 2 "AAA" batteries Approx. 1.9" x 5.7" x 0.8" Approx. 2 oz. (without batteries) AWM-2800SP SPEAKER SYSTEM Type: Drivers: Maximum power-handing capacity: Nominal impedance: Dimensions (W x H X D): Weight: Full range bass reflex 4.7" Dia 15 Watts (peak) 8 ohms Approx. 7.7" x 13.2" x 5.8" Approx. 0.8 lbs./speaker IMPORTANT INFORMATION Because its products are subject to continuous improvement, SANYO reserves the right to noise ratio: Wow and Flutter: Changer, 5-disc 2-channel stereo 44.1 kHz Optical 3-beam...


