Instruction Manual
Page 1
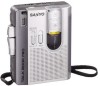
MIN SANYO INSTRUCTION MANUAL TRC-2050C Standard Cassette Stereo Dictation 00 SANYO'S HELP-LINE Call the toll-free number below if you have any difficulties operating this product. 1-877-999-1840 (Weekdays: 8:00 AM - 5:00 PM, Pacific Time) LINEA DE CONSULTA SANYO Llame gratis al numero indicado a continuacion si tiene dificultades al utilizer este producto. 1-877-999-1840 (dias laborables de 8:00 AM a 5:00 PM, hora del Pacifico) 1AD6P1P1819-A TRC-2050C, Issue Number 1 Printed in China ENGLISH ESPANOL 20/3/03, 9:39
MIN SANYO INSTRUCTION MANUAL TRC-2050C Standard Cassette Stereo Dictation 00 SANYO'S HELP-LINE Call the toll-free number below if you have any difficulties operating this product. 1-877-999-1840 (Weekdays: 8:00 AM - 5:00 PM, Pacific Time) LINEA DE CONSULTA SANYO Llame gratis al numero indicado a continuacion si tiene dificultades al utilizer este producto. 1-877-999-1840 (dias laborables de 8:00 AM a 5:00 PM, hora del Pacifico) 1AD6P1P1819-A TRC-2050C, Issue Number 1 Printed in China ENGLISH ESPANOL 20/3/03, 9:39
Instruction Manual
Page 2
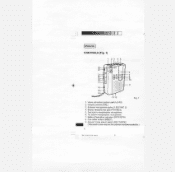
WM 4 ENGLISH CONTROLS (Fig. 1) 1 23 45 23 22 6 21 7 20 19 18 17 ) 8 9 10 11 16 15 14 13 12 Fig. 1 1. Volume control (VOL) 3. Stereo headphones jack (PHONES) 5. 2nd built-in nondirection microphone 6. 1st built-in nondirection microphone 7. Voice activation system switch (VAS) 2. Battery/Operation indicator (BATT/OPR) 8. Record mode select switch (REC MODE) (This switch is also used as the external microphone selector.) 1 TRC-2050C/US-book 2 4 Cue index button (INDEX) 9. External microphone jacks (1 EXT-MIC 2) 4.
WM 4 ENGLISH CONTROLS (Fig. 1) 1 23 45 23 22 6 21 7 20 19 18 17 ) 8 9 10 11 16 15 14 13 12 Fig. 1 1. Volume control (VOL) 3. Stereo headphones jack (PHONES) 5. 2nd built-in nondirection microphone 6. 1st built-in nondirection microphone 7. Voice activation system switch (VAS) 2. Battery/Operation indicator (BATT/OPR) 8. Record mode select switch (REC MODE) (This switch is also used as the external microphone selector.) 1 TRC-2050C/US-book 2 4 Cue index button (INDEX) 9. External microphone jacks (1 EXT-MIC 2) 4.

Instruction Manual
Page 3
...-strap 15. Fig. 2 2 Tape playback speed switch (TAPE PLAY SPEED) 13. Rewind/Review button (REW/REVIEW) 19. Stop button (STOP) 21. Fast forward/Cue button (FFWD/CUE) 18. Play button (PLAY) 20. Battery compartment lid (back panel) 11. Remote controller jack (REMOTE) 14. External DC 3V jack (EXT DC 3V) 16. Pause switch (PAUSE) 23. Tape counter and reset button POWER SUPPLY AC adaptor Connect the included AC adaptor (Sanyo Model No. 3CV120US) to the EXT DC 3V jack (Fig. 2). (The batteries are automatically disconnected.) •...
...-strap 15. Fig. 2 2 Tape playback speed switch (TAPE PLAY SPEED) 13. Rewind/Review button (REW/REVIEW) 19. Stop button (STOP) 21. Fast forward/Cue button (FFWD/CUE) 18. Play button (PLAY) 20. Battery compartment lid (back panel) 11. Remote controller jack (REMOTE) 14. External DC 3V jack (EXT DC 3V) 16. Pause switch (PAUSE) 23. Tape counter and reset button POWER SUPPLY AC adaptor Connect the included AC adaptor (Sanyo Model No. 3CV120US) to the EXT DC 3V jack (Fig. 2). (The batteries are automatically disconnected.) •...
Instruction Manual
Page 4
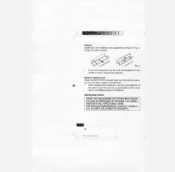
... batteries of batteries. Battery replacement When the BATT/OPR indicator does not light during operation or is lit dimly, replace the batteries. • When replacing the batteries, use the unit with a new one month or more, remove the batteries. FOR DETAILED INFORMATION, CONTACT YOUR LOCAL COUNTY SOLID WASTE AUTHORITY. 3 TRC-2050C/US-book 4 Do not mix a used battery with batteries for one or mix different types of the same type. Battery Install...
... batteries of batteries. Battery replacement When the BATT/OPR indicator does not light during operation or is lit dimly, replace the batteries. • When replacing the batteries, use the unit with a new one month or more, remove the batteries. FOR DETAILED INFORMATION, CONTACT YOUR LOCAL COUNTY SOLID WASTE AUTHORITY. 3 TRC-2050C/US-book 4 Do not mix a used battery with batteries for one or mix different types of the same type. Battery Install...

Instruction Manual
Page 5
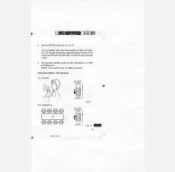
...) to the REMOTE jack. (The PAUSE switch on the main unit is automatically cut off.) Fig. 5 Fig. 6 4 20/3/03, 9:39 OFF Fig. 4 • Using one stereo microphones (not supplied) Stereo microphone 0 1EXT.M. 2 ( L MONO R ) ST M. OFF Pause function remote control REMOTE/ Connect the remote con- MEE CONNECTIONS External microphone (not supplied) NOTE: If you don't connect any external microphones, skip this section. • Using two monaural microphones (not supplied) 1st monaural microphone 2nd monaural microphone 1EXT...
...) to the REMOTE jack. (The PAUSE switch on the main unit is automatically cut off.) Fig. 5 Fig. 6 4 20/3/03, 9:39 OFF Fig. 4 • Using one stereo microphones (not supplied) Stereo microphone 0 1EXT.M. 2 ( L MONO R ) ST M. OFF Pause function remote control REMOTE/ Connect the remote con- MEE CONNECTIONS External microphone (not supplied) NOTE: If you don't connect any external microphones, skip this section. • Using two monaural microphones (not supplied) 1st monaural microphone 2nd monaural microphone 1EXT...

Instruction Manual
Page 6
Press the reset button to set the counter to the PHONES jack for monitoring or private listening. (The built-in Fig. 8. 2. MS Stereo headphones jack Connect a pair of stereo headphones with mini plug (not supplied) to "000". The counter shows relative tape position. 5 TRC-2050C/US-book 6 Fig. 8 Load a cassette tape as shown in speaker is automatically disconnected.) RECORDING (Fig. 7) NOTE: Do not use C-120 or endless tapes. 5 2 WM. 8 6 4 7 3 Fig. 7 1.
Press the reset button to set the counter to the PHONES jack for monitoring or private listening. (The built-in Fig. 8. 2. MS Stereo headphones jack Connect a pair of stereo headphones with mini plug (not supplied) to "000". The counter shows relative tape position. 5 TRC-2050C/US-book 6 Fig. 8 Load a cassette tape as shown in speaker is automatically disconnected.) RECORDING (Fig. 7) NOTE: Do not use C-120 or endless tapes. 5 2 WM. 8 6 4 7 3 Fig. 7 1.
Instruction Manual
Page 7
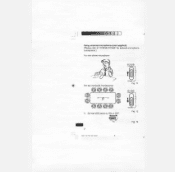
Set the SPEED switch to DIC (Dictation) or CONF (Conference). NOTE: This switch does not affect playback. Fig. 10 6 Set the REC MODE switch to 2.4 or 4.8. 4.8: Compatible with most single speed cassette recorders. 2.4: For longer recordings; C-60). 4. 3. Using the built-in microphones For dictation REC MODE CONF/MICii erN For conference KIT 20/3/03. 9:39 DIC/MIC1.2 Fig. 9 REC MODE CONF/MICI fTh e7\ t DiC/MiCi. approximately 2 hours of recording time (total for both sides of a 60-minute cassette;
Set the SPEED switch to DIC (Dictation) or CONF (Conference). NOTE: This switch does not affect playback. Fig. 10 6 Set the REC MODE switch to 2.4 or 4.8. 4.8: Compatible with most single speed cassette recorders. 2.4: For longer recordings; C-60). 4. 3. Using the built-in microphones For dictation REC MODE CONF/MICii erN For conference KIT 20/3/03. 9:39 DIC/MIC1.2 Fig. 9 REC MODE CONF/MICI fTh e7\ t DiC/MiCi. approximately 2 hours of recording time (total for both sides of a 60-minute cassette;
Instruction Manual
Page 8
Fig. 12 Fig. 13 Set the VAS switch to "CONNECTIONS" for external microphone connections.) For one stereo microphone ti For two monaural microphones (W) 1,041 110 REC MODE CONF/MIC11 c"N f I DIC/MIC1 2 Fig. 11 REC MODE CONF/MICI c1 RS) roeatt,,a tad 5. Using external microphones (not supplied) (Please refer to ON or OFF. OFF • • ON VAS 7 TKC-2054C/US-book 8 DIC/MIC1.
Fig. 12 Fig. 13 Set the VAS switch to "CONNECTIONS" for external microphone connections.) For one stereo microphone ti For two monaural microphones (W) 1,041 110 REC MODE CONF/MIC11 c"N f I DIC/MIC1 2 Fig. 11 REC MODE CONF/MICI c1 RS) roeatt,,a tad 5. Using external microphones (not supplied) (Please refer to ON or OFF. OFF • • ON VAS 7 TKC-2054C/US-book 8 DIC/MIC1.

Instruction Manual
Page 9
... tape is pressed. 7. Release the INDEX button to start recording. If recording does not stop recording. 8 20/3/03, 9:39 NOTE: If the first few words you dictate. (For important recordings, set the VAS switch to stop when talking stops, decrease volume. II • 6. Press the STOP button to OFF.) VAS OFF: Standard recording Recording will continue until the STOP button is played back. 8. Press the REC button. (The PLAY button is engaged simultaneously.) VAS ON: Voice...
... tape is pressed. 7. Release the INDEX button to start recording. If recording does not stop recording. 8 20/3/03, 9:39 NOTE: If the first few words you dictate. (For important recordings, set the VAS switch to stop when talking stops, decrease volume. II • 6. Press the STOP button to OFF.) VAS OFF: Standard recording Recording will continue until the STOP button is played back. 8. Press the REC button. (The PLAY button is engaged simultaneously.) VAS ON: Voice...

Instruction Manual
Page 10
... mode on the remote control (not supplied) to perform the similar functions as the PAUSE switch. Fast forwarding or rewinding In the stop system At the end of the tape is reached. Example (When using C-60 tape): Press the STOP button after approximately 2 minutes have elapsed under fast forward and rewind operation. Press the STOP button when the desired point or end of the tape while recording or playing back, the cassette tape stops...
... mode on the remote control (not supplied) to perform the similar functions as the PAUSE switch. Fast forwarding or rewinding In the stop system At the end of the tape is reached. Example (When using C-60 tape): Press the STOP button after approximately 2 minutes have elapsed under fast forward and rewind operation. Press the STOP button when the desired point or end of the tape while recording or playing back, the cassette tape stops...

Instruction Manual
Page 11
To protect side B, break out tab (2). • To erase or record a protected cassette, cover the tab openings with adhesive tape (3). Press the REC button to play back your recording. Release the REW/REVIEW button to resume recording. Fig. 16 NOTE: The REC button cannot be depressed when using a protected cassette. 10 20/3/03. 9:39 Safeguards against accidental erasure (Fig. 16) To protect side A, break out tab (1). Quick reviewing and recording While recording, press and hold the REW/REVIEW button (the REC button is released) until the tape has rewound to the desired point.
To protect side B, break out tab (2). • To erase or record a protected cassette, cover the tab openings with adhesive tape (3). Press the REC button to play back your recording. Release the REW/REVIEW button to resume recording. Fig. 16 NOTE: The REC button cannot be depressed when using a protected cassette. 10 20/3/03. 9:39 Safeguards against accidental erasure (Fig. 16) To protect side A, break out tab (1). Quick reviewing and recording While recording, press and hold the REW/REVIEW button (the REC button is released) until the tape has rewound to the desired point.
Instruction Manual
Page 12
Playback continues. 11 TRC-2050C/US-book 12 Press the STOP button to SLOW, NOR or FAST as shown in Fig. 8. 2. Set the TAPE PLAY SPEED switch to stop playback. Load the cassette tape as desired SLOW: Slow speed NOR: Normal speed FAST: Fast speed 5. Release the button when the desired point is reached. Cue and reviewing During playback, press and hold the FFWD/CUE or REW/ REVIEW button. Press the PLAY button and adjust the VOL control. 3. PLAYBACK (Fig...
Playback continues. 11 TRC-2050C/US-book 12 Press the STOP button to SLOW, NOR or FAST as shown in Fig. 8. 2. Set the TAPE PLAY SPEED switch to stop playback. Load the cassette tape as desired SLOW: Slow speed NOR: Normal speed FAST: Fast speed 5. Release the button when the desired point is reached. Cue and reviewing During playback, press and hold the FFWD/CUE or REW/ REVIEW button. Press the PLAY button and adjust the VOL control. 3. PLAYBACK (Fig...

Instruction Manual
Page 13
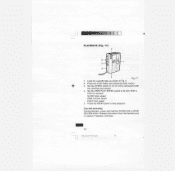
MAINTENANCE To ensure continued high performance, use cotton swab (1) moistened with head cleaner to clean the heads (4, 5), pinch roller (3) and capstan (2) after about every 10 hours of use (Fig. 18). 3 4 5 Fig. 18 12 20/3/03, 9:39
MAINTENANCE To ensure continued high performance, use cotton swab (1) moistened with head cleaner to clean the heads (4, 5), pinch roller (3) and capstan (2) after about every 10 hours of use (Fig. 18). 3 4 5 Fig. 18 12 20/3/03, 9:39
Instruction Manual
Page 14
... to obtain factory warranty service for service. THE ORIGINAL DATED BILL OF SALE OR SALES SLIP MUST BE SUBMITTED AT THE TIME WARRANTY SERVICE IS REQUESTED. 13 TRC-2050C/US-book 14 The unit must be packed in the original carton or a well-padded sturdy carton in order to the retail store for Sanyo Dictation Products, call Toll Free 1-877-999...
... to obtain factory warranty service for service. THE ORIGINAL DATED BILL OF SALE OR SALES SLIP MUST BE SUBMITTED AT THE TIME WARRANTY SERVICE IS REQUESTED. 13 TRC-2050C/US-book 14 The unit must be packed in the original carton or a well-padded sturdy carton in order to the retail store for Sanyo Dictation Products, call Toll Free 1-877-999...
Instruction Manual
Page 15
... conform to this SANYO Dictation product against defects in the appropriate model's instruction manual, or (B) the repair of LABOR and PARTS specified below , SANYO FISHER COMPANY (SFC) warrants this warranty or (b) ship a replacement product. This warranty does not apply to repairs or replacements necessitated by any malfunction, defect, or failure caused by or resulting from unauthorized service or parts, improper maintenance, operation contrary to the...
... conform to this SANYO Dictation product against defects in the appropriate model's instruction manual, or (B) the repair of LABOR and PARTS specified below , SANYO FISHER COMPANY (SFC) warrants this warranty or (b) ship a replacement product. This warranty does not apply to repairs or replacements necessitated by any malfunction, defect, or failure caused by or resulting from unauthorized service or parts, improper maintenance, operation contrary to the...
Instruction Manual
Page 16
...ARISING FROM OWNERSHIP OR USE OF THIS PRODUCT, OR FOR ANY DELAY IN THE PERFORMANCE OF ITS OBLIGATIONS UNDER THIS WARRANTY DUE TO CAUSES BEYOND ITS CONTROL. S/D R2 For your own personal records. PLY TO YOU... AND EXCLUSIONS MAY NOT AP- THIS WARRANTY GIVES YOU SPECIFIC LEGAL RIGHTS. Model No Serial No (Located on back or bottom side of unit) Date of all other obligation or liability. SOME STATES DO... or loss of this product, please fill in lieu of Purchase Purchase Price Where Purchased SA1 21605 Plummer Street Chatsworth, CA 91311 15 ':RC-2050C/US-bock 16 THE DURATION...
...ARISING FROM OWNERSHIP OR USE OF THIS PRODUCT, OR FOR ANY DELAY IN THE PERFORMANCE OF ITS OBLIGATIONS UNDER THIS WARRANTY DUE TO CAUSES BEYOND ITS CONTROL. S/D R2 For your own personal records. PLY TO YOU... AND EXCLUSIONS MAY NOT AP- THIS WARRANTY GIVES YOU SPECIFIC LEGAL RIGHTS. Model No Serial No (Located on back or bottom side of unit) Date of all other obligation or liability. SOME STATES DO... or loss of this product, please fill in lieu of Purchase Purchase Price Where Purchased SA1 21605 Plummer Street Chatsworth, CA 91311 15 ':RC-2050C/US-bock 16 THE DURATION...
Instruction Manual
Page 17
... carrying cases, cassette tapes and cables. (f). This warranty only applies in favour of the original retail purchaser of a manufacturing defect in materials or workmanship. Dicta Recorder products purchased outside Canada. (b). 0) NNE For Canada THE SANYO COMFORT WARRANTY BUSINESS SYSTEMS - SANYO CANADA INC.'S RESPONSIBILITY During the warranty period, SANYO Canada Inc. Replacement PARTS are warranted for labour, from the date of the...
... carrying cases, cassette tapes and cables. (f). This warranty only applies in favour of the original retail purchaser of a manufacturing defect in materials or workmanship. Dicta Recorder products purchased outside Canada. (b). 0) NNE For Canada THE SANYO COMFORT WARRANTY BUSINESS SYSTEMS - SANYO CANADA INC.'S RESPONSIBILITY During the warranty period, SANYO Canada Inc. Replacement PARTS are warranted for labour, from the date of the...

Instruction Manual
Page 18
or an authorized Sanyo Service Depot. You also are responsible for the cost of any repair to and from the use of this product. 17 TRC-2050C/US-book 18 WARRANTY BECOMES VOID This warranty becomes void if the product's serial numbers are responsible for special or consequential damage arising from SANYO Canada Inc. LIMITATIONS (a) SANYO Canada Inc. or any improvement in...
or an authorized Sanyo Service Depot. You also are responsible for the cost of any repair to and from the use of this product. 17 TRC-2050C/US-book 18 WARRANTY BECOMES VOID This warranty becomes void if the product's serial numbers are responsible for special or consequential damage arising from SANYO Canada Inc. LIMITATIONS (a) SANYO Canada Inc. or any improvement in...

Instruction Manual
Page 19
STATUTORY WARRANTIES The above provisions do not preclude the operation of any terms of this Warranty are prohibited by such a statute, they shall be deemed null and void but the remainder of this warranty shall ... OBTAIN WARRANTY SERVICE Please contact the Sanyo Authorized Dealer from whom the product was purchased, or contact us directly at: SANYO Canada Inc. 1-300 Applewood Cresent Concord, Ontario L4K 5C7 (905) 760-9944 1-800-263-2244 http://www.sanyocanada.com SDR 01/05 (R11) Model No Serial No (Located on back or bottom side of unit) Date of the...
STATUTORY WARRANTIES The above provisions do not preclude the operation of any terms of this Warranty are prohibited by such a statute, they shall be deemed null and void but the remainder of this warranty shall ... OBTAIN WARRANTY SERVICE Please contact the Sanyo Authorized Dealer from whom the product was purchased, or contact us directly at: SANYO Canada Inc. 1-300 Applewood Cresent Concord, Ontario L4K 5C7 (905) 760-9944 1-800-263-2244 http://www.sanyocanada.com SDR 01/05 (R11) Model No Serial No (Located on back or bottom side of unit) Date of the...


