User Manual (user Manual) (ver.1.0) (English)
Page 2
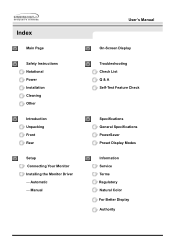
Index Main Page Safety Instructions Notational Power Installation Cleaning Other Introduction Unpacking Front Rear Setup Connecting Your Monitor Installing the Monitor Driver - Manual User's Manual On-Screen Display Troubleshooting Check List Q & A Self-Test Feature Check Specifications General Specifications PowerSaver Preset Display Modes Information Service Terms Regulatory Natural Color For Better Display Authority Automatic -
Index Main Page Safety Instructions Notational Power Installation Cleaning Other Introduction Unpacking Front Rear Setup Connecting Your Monitor Installing the Monitor Driver - Manual User's Manual On-Screen Display Troubleshooting Check List Q & A Self-Test Feature Check Specifications General Specifications PowerSaver Preset Display Modes Information Service Terms Regulatory Natural Color For Better Display Authority Automatic -

User Manual (user Manual) (ver.1.0) (English)
Page 9
.... • Do not place any unusual sounds or smells coming from it immediately and contact an authorized deal- No user serviceable parts inside. • This may cause an electric shock or a fire. • Refer servicing to qualified service personnel. • If your eyes rest for...use or store inflammable substances near the monitor. • This may cause an electric shock or a fire. • For each hour of looking at the monitor, you should let your monitor does not operate normally - unplug it - Safety Instructions User's Manual Other • Do not remove cover(...
.... • Do not place any unusual sounds or smells coming from it immediately and contact an authorized deal- No user serviceable parts inside. • This may cause an electric shock or a fire. • Refer servicing to qualified service personnel. • If your eyes rest for...use or store inflammable substances near the monitor. • This may cause an electric shock or a fire. • For each hour of looking at the monitor, you should let your monitor does not operate normally - unplug it - Safety Instructions User's Manual Other • Do not remove cover(...
User Manual (user Manual) (ver.1.0) (English)
Page 12
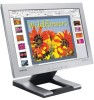
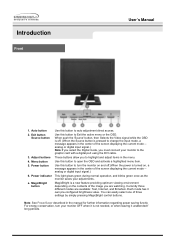
... graphic card with a digital port using the DVI cable. Menu button 5. Use this button to Exit the active menu or the OSD. Introduction Front User's Manual 1. MagicBright button Use this button to auto adjustment direct access. Use this button to open the OSD and activate a highlighted menu item. Use this button to turn your monitor OFF when it is a new feature providing optimum viewing environment depending on , a message appears in the center of the screen displaying the current mode -analog or digital input signal.) This light glows green...
... graphic card with a digital port using the DVI cable. Menu button 5. Use this button to Exit the active menu or the OSD. Introduction Front User's Manual 1. MagicBright button Use this button to auto adjustment direct access. Use this button to open the OSD and activate a highlighted menu item. Use this button to turn your monitor OFF when it is a new feature providing optimum viewing environment depending on , a message appears in the center of the screen displaying the current mode -analog or digital input signal.) This light glows green...

User Manual (user Manual) (ver.1.0) (English)
Page 14
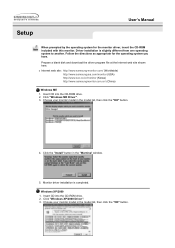
Setup Connecting Your Monitor Setup-General User's Manual 1. Connect the DC Adapter for the monitor into a nearby outlet. 2-1. Plug the power cord for your monitor. 2-2. Connect the signal cable to the 15-pin, D-sub connector on the back of video card you are using a special Mac adaptor. 5. Connect the monitor to have the monitor double-check the input signal source. Connect the DVI Cable to connect the monitor using , if you connect simultaneously both the D-sub and DVI cables to the power port on the back of your monitor to one...
Setup Connecting Your Monitor Setup-General User's Manual 1. Connect the DC Adapter for the monitor into a nearby outlet. 2-1. Plug the power cord for your monitor. 2-2. Connect the signal cable to the 15-pin, D-sub connector on the back of video card you are using a special Mac adaptor. 5. Connect the monitor to have the monitor double-check the input signal source. Connect the DVI Cable to connect the monitor using , if you connect simultaneously both the D-sub and DVI cables to the power port on the back of your monitor to one...
User Manual (user Manual) (ver.1.0) (English)
Page 17
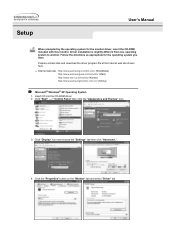
Prepare a blank disk and download the driver program file at the Internet web site shown here. Windows XP/2000 1. Click "Windows XP/2000 Driver". 3. Choose your monitor model in the model list, then click the "OK" button. 4. Monitor driver installation is slightly different from one operating system to another. Click the "Install" button in the model list, then click the "OK" button. Driver installation is completed. z Internet web site...
Prepare a blank disk and download the driver program file at the Internet web site shown here. Windows XP/2000 1. Click "Windows XP/2000 Driver". 3. Choose your monitor model in the model list, then click the "OK" button. 4. Monitor driver installation is slightly different from one operating system to another. Click the "Install" button in the model list, then click the "OK" button. Driver installation is completed. z Internet web site...
User Manual (user Manual) (ver.1.0) (English)
Page 19
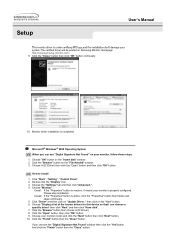
...; Windows® XP Operating System 1. Click the "Properties" button on the "Monitor" tab and select "Driver" tab. Follow the directions as appropriate for the monitor driver, insert the CD-ROM included with this monitor. Click "Display" icon and choose the "Settings" tab then click "Advanced..". 4. Click "Start" -> "Control Panel" then click the "Appearance and Themes" Icon. 3. Insert CD into the CD-ROM driver. 2. Driver installation...
...; Windows® XP Operating System 1. Click the "Properties" button on the "Monitor" tab and select "Driver" tab. Follow the directions as appropriate for the monitor driver, insert the CD-ROM included with this monitor. Click "Display" icon and choose the "Settings" tab then click "Advanced..". 4. Click "Start" -> "Control Panel" then click the "Appearance and Themes" Icon. 3. Insert CD into the CD-ROM driver. 2. Driver installation...
User Manual (user Manual) (ver.1.0) (English)
Page 20
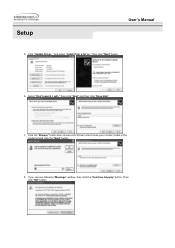
Setup User's Manual 5. and select "Install from a list or.." Select "Don't search ,I will.." then click "Next" and then click "Have disk". 7. Click "Update Driver.." then click "Next" button. 6. Click the "Browse" button then choose A:(D:\Driver) and choose your monitor model in the model list and click the "Next" button. 8. Then click "OK" button. If you can see following "Message" window, then click the "Continue Anyway" button.
Setup User's Manual 5. and select "Install from a list or.." Select "Don't search ,I will.." then click "Next" and then click "Have disk". 7. Click "Update Driver.." then click "Next" button. 6. Click the "Browse" button then choose A:(D:\Driver) and choose your monitor model in the model list and click the "Next" button. 8. Then click "OK" button. If you can see following "Message" window, then click the "Continue Anyway" button.
User Manual (user Manual) (ver.1.0) (English)
Page 21
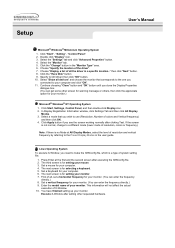
... "Start" , "Setting" , "Control Panel". 2. Choose "Monitor". If you can see the "Digital Signature Not Found" window then click the "Yes"button. Choose "OK" button on the "Next" button. 6. Choose the "Settings" tab and then click "Advanced..". 4. Click the "Open" button, then click "OK" button. 9. Choose A:(D:\Driver) then click the "Open" button and then click "OK" button. then click on the "Insert disk" window. 2. Click the "Finish" button then the "Close" button. Setup User's Manual...
... "Start" , "Setting" , "Control Panel". 2. Choose "Monitor". If you can see the "Digital Signature Not Found" window then click the "Yes"button. Choose "OK" button on the "Next" button. 6. Choose the "Settings" tab and then click "Advanced..". 4. Click the "Open" button, then click "OK" button. 9. Choose A:(D:\Driver) then click the "Open" button and then click "OK" button. then click on the "Insert disk" window. 2. Click the "Finish" button then the "Close" button. Setup User's Manual...
User Manual (user Manual) (ver.1.0) (English)
Page 22
... have finished setting up your monitor. Click "Start" , "Setting" , "Control Panel". 2. Click the "Change" button in a specific location.." Select a mode that corresponds to the one you need to your computer. 6. The next screen is for your mouse. 3. If the screen is a type of resolution and vertical frequency by referring to the Preset Display Modes in the user guide. Set a Keyboard for selecting a keyboard. 5. Enter the model name of colors and Vertical frequency) and then click...
... have finished setting up your monitor. Click "Start" , "Setting" , "Control Panel". 2. Click the "Change" button in a specific location.." Select a mode that corresponds to the one you need to your computer. 6. The next screen is for your mouse. 3. If the screen is a type of resolution and vertical frequency by referring to the Preset Display Modes in the user guide. Set a Keyboard for selecting a keyboard. 5. Enter the model name of colors and Vertical frequency) and then click...
User Manual (user Manual) (ver.1.0) (English)
Page 24
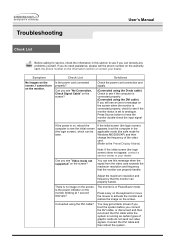
... a service center or your dealer. Adjust the maximum resolution and frequency that the monitor can properly handle. Can you see "No Connection, Check Signal Cable" on the screen? (Connected using the DVI cable? Troubleshooting User's Manual Check List Before calling for Windows ME/2000/XP) and then change the frequency of graphic cards do need assistance, please call the phone number on the warranty card, the phone number on the screen when the monitor is no image on the screen...
... a service center or your dealer. Adjust the maximum resolution and frequency that the monitor can properly handle. Can you see "No Connection, Check Signal Cable" on the screen? (Connected using the DVI cable? Troubleshooting User's Manual Check List Before calling for Windows ME/2000/XP) and then change the frequency of graphic cards do need assistance, please call the phone number on the warranty card, the phone number on the screen when the monitor is no image on the screen...
User Manual (user Manual) (ver.1.0) (English)
Page 25
... you adjusted the resolution Adjust the resolution and frequency of the video card signals. Have you locked the On Screen Unlock the OSD by referring to prevent MENU button for at the screen through a cellophane paper? The screen is blinking but no images on the monitor? Have you changed after running a program or due to the Preset Display Modes). Troubleshooting User's Manual Check List I cannot see Install the monitor driver according to if the Plug & Play (VESA DDC) the Driver Installation Instructions. Have the screen colors...
... you adjusted the resolution Adjust the resolution and frequency of the video card signals. Have you locked the On Screen Unlock the OSD by referring to prevent MENU button for at the screen through a cellophane paper? The screen is blinking but no images on the monitor? Have you changed after running a program or due to the Preset Display Modes). Troubleshooting User's Manual Check List I cannot see Install the monitor driver according to if the Plug & Play (VESA DDC) the Driver Installation Instructions. Have the screen colors...
User Manual (user Manual) (ver.1.0) (English)
Page 26
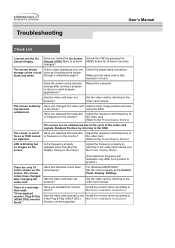
... resolution.) 5. Note: If problems repeatedly occur, contact an authorized service center. Check if the scanning ratio of the computer.) 3. If you assembled the PC, check if the installed the adapter(video) driver and the monitor driver. 4. Troubleshooting User's Manual Check List Check the following items if there is set at the "Control Panel, System, Device Administrator" and then reboot the computer to the computer. 2. Check if the power cord and the cable are properly connected...
... resolution.) 5. Note: If problems repeatedly occur, contact an authorized service center. Check if the scanning ratio of the computer.) 3. If you assembled the PC, check if the installed the adapter(video) driver and the monitor driver. 4. Troubleshooting User's Manual Check List Check the following items if there is set at the "Control Panel, System, Device Administrator" and then reboot the computer to the computer. 2. Check if the power cord and the cable are properly connected...
User Manual (user Manual) (ver.1.0) (English)
Page 27
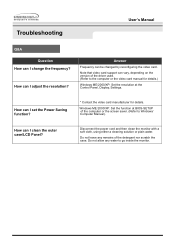
... Control Panel, Display, Settings. How can I adjust the resolution? Do not leave any water to the computer or the video card manual for details. Do not allow any remains of the detergent nor scratch the case. How can I clean the outer case/LCD Panel? Troubleshooting User's Manual Q&A Question How can I set the Power Saving function? * Contact the video card manufacturer for details.) Windows ME/2000/XP: Set the resolution at BIOS-SETUP of the driver used...
... Control Panel, Display, Settings. How can I adjust the resolution? Do not leave any water to the computer or the video card manual for details. Do not allow any remains of the detergent nor scratch the case. How can I clean the outer case/LCD Panel? Troubleshooting User's Manual Q&A Question How can I set the Power Saving function? * Contact the video card manufacturer for details.) Windows ME/2000/XP: Set the resolution at BIOS-SETUP of the driver used...
User Manual (user Manual) (ver.1.0) (English)
Page 28
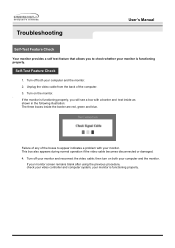
... are red, green and blue. Failure of any of the computer. 3. If the monitor is functioning properly. then turn on the monitor. . Turn off your monitor is functioning properly. Turn on both your computer and the monitor. Troubleshooting User's Manual Self-Test Feature Check Your monitor provides a self test feature that allows you will see a box with your video controller and computer system; Self-Test Feature Check 1. Turn off...
... are red, green and blue. Failure of any of the computer. 3. If the monitor is functioning properly. then turn on the monitor. . Turn off your monitor is functioning properly. Turn on both your computer and the monitor. Troubleshooting User's Manual Self-Test Feature Check Your monitor provides a self test feature that allows you will see a box with your video controller and computer system; Self-Test Feature Check 1. Turn off...
User Manual (user Manual) (ver.1.0) (English)
Page 29
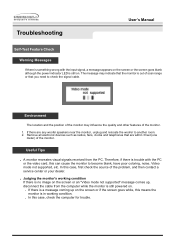
... coloring, noise, Video mode not supported, etc. Useful Tips . In this case, first check the source of the monitor. Remove all electronic devices such as radios, fans, clocks and telephones that are any woofer speakers near the monitor, unplug and relocate the woofer to check the signal cable. Therefore, if there is trouble with the input signal, a message appears on the screen or the screen goes blank although the power indicator LED...
... coloring, noise, Video mode not supported, etc. Useful Tips . In this case, first check the source of the monitor. Remove all electronic devices such as radios, fans, clocks and telephones that are any woofer speakers near the monitor, unplug and relocate the woofer to check the signal cable. Therefore, if there is trouble with the input signal, a message appears on the screen or the screen goes blank although the power indicator LED...
User Manual (user Manual) (ver.1.0) (English)
Page 30
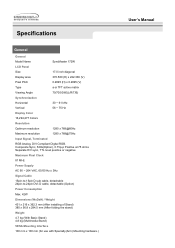
... x 100 mm (for use with Specialty(Arm) Mounting hardware.) User's Manual Specifications General General Model Name SyncMaster 172W LCD Panel Size 17.0 inch diagonal Display area 370.560 (H) x 222.336 (V) Pixel Pitch 0.2895 (H) x 0.2895 (V) Type a-si TFT active matrix Viewing Angle 70/70/50/60(L/R/T/B) Synchronization Horizontal 30 ~ 61 kHz Vertical 56 ~ 75 Hz Display Color 16,294,277 Colors Resolution Optimum resolution 1280 x 768@60Hz Maximum resolution 1280 x 768@75Hz Input Signal, Terminated RGB Analog, DVI Compliant Digital RGB.
... x 100 mm (for use with Specialty(Arm) Mounting hardware.) User's Manual Specifications General General Model Name SyncMaster 172W LCD Panel Size 17.0 inch diagonal Display area 370.560 (H) x 222.336 (V) Pixel Pitch 0.2895 (H) x 0.2895 (V) Type a-si TFT active matrix Viewing Angle 70/70/50/60(L/R/T/B) Synchronization Horizontal 30 ~ 61 kHz Vertical 56 ~ 75 Hz Display Color 16,294,277 Colors Resolution Optimum resolution 1280 x 768@60Hz Maximum resolution 1280 x 768@75Hz Input Signal, Terminated RGB Analog, DVI Compliant Digital RGB.

User Manual (user Manual) (ver.1.0) (English)
Page 32
...; guidelines for long periods. State Power Indicator Power Consumption Normal Operation Green Less than 40W Power saving mode EPA/ENERGY 2000 Green, Blinking Less than 2W Power Switch off (120Vac) Black Less than 1W This monitor is not needed, or when leaving it has not been used with a computer equipped with a VESA DPMS compliant video card installed in power management system called PowerSaver. Specifications User's Manual PowerSaver This monitor has a built-in your...
...; guidelines for long periods. State Power Indicator Power Consumption Normal Operation Green Less than 40W Power saving mode EPA/ENERGY 2000 Green, Blinking Less than 2W Power Switch off (120Vac) Black Less than 1W This monitor is not needed, or when leaving it has not been used with a computer equipped with a VESA DPMS compliant video card installed in power management system called PowerSaver. Specifications User's Manual PowerSaver This monitor has a built-in your...
User Manual (user Manual) (ver.1.0) (English)
Page 36
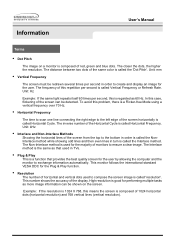
...-Interlace method is called Vertical Frequency or Refresh Rate. The frequency of red, green and blue dots. In this means the screen is a function that used in order to compose the screen image is used to create and display an image for the user by allowing the computer and the monitor to ensure a clear image. The inverse number of 1024 horizontal dots (horizontal resolution) and 768 vertical lines (vertical resolution). This number shows the accuracy of...
...-Interlace method is called Vertical Frequency or Refresh Rate. The frequency of red, green and blue dots. In this means the screen is a function that used in order to compose the screen image is used to create and display an image for the user by allowing the computer and the monitor to ensure a clear image. The inverse number of 1024 horizontal dots (horizontal resolution) and 768 vertical lines (vertical resolution). This number shows the accuracy of...

User Manual (user Manual) (ver.1.0) (English)
Page 37
..., Stock Number 004-000-00345-4. VCCI This is a detachable power supply cord with this monitor is a Class B product based on a circuit different from the U.S. The party responsible for product compliance: SAMSUNG ELECTRONICS CO., LTD America QA Lab of the Voluntary Control Council for the product. For 120 Volt applications, use shielded signal interface cables to Identify and Resolve Radio/TV Interference Problems helpful...
..., Stock Number 004-000-00345-4. VCCI This is a detachable power supply cord with this monitor is a Class B product based on a circuit different from the U.S. The party responsible for product compliance: SAMSUNG ELECTRONICS CO., LTD America QA Lab of the Voluntary Control Council for the product. For 120 Volt applications, use shielded signal interface cables to Identify and Resolve Radio/TV Interference Problems helpful...
User Manual (user Manual) (ver.1.0) (English)
Page 44
... dry cloth and polish it . 4. Change the mode to energy save or set a screensaver to be bright sometimes or some of picture. Information For Better Display User's Manual 1. When you need to moving picture when you clean the monitor and the panel outside, please apply the recommended small amount of picture by executing "auto adjustment function" in TFT-LCD. { Resolution: 1280 x 768 { Vertical frequency (refresh rate): 60 Hz Note: Wide monitor such as 172W whose optimum...
... dry cloth and polish it . 4. Change the mode to energy save or set a screensaver to be bright sometimes or some of picture. Information For Better Display User's Manual 1. When you need to moving picture when you clean the monitor and the panel outside, please apply the recommended small amount of picture by executing "auto adjustment function" in TFT-LCD. { Resolution: 1280 x 768 { Vertical frequency (refresh rate): 60 Hz Note: Wide monitor such as 172W whose optimum...


