User Manual
Page 3
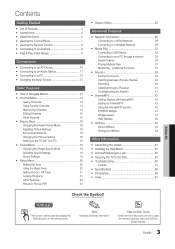
...32 Connecting to your PC through a Receiver 41 Troubleshooting for instructions on how to open the relevant submenu within the OSD (on the remote control. Step by pressing the TOOLS button on screen display). 3 English Additional Functions 37 yy Anynet 39 Setting Up Anynet+ 40 Switching... information. Contents Getting Started yy List of Features 4 yy Accessories 4 yy Install the Stand 5 yy Viewing the Control Panel 7 yy Viewing the Remote Control 8 yy Connecting to an Antenna 9 yy Plug & Play (Initial Setup 9 Connections yy Connecting to an AV Device 10 yy Connecting to...
...32 Connecting to your PC through a Receiver 41 Troubleshooting for instructions on how to open the relevant submenu within the OSD (on the remote control. Step by pressing the TOOLS button on screen display). 3 English Additional Functions 37 yy Anynet 39 Setting Up Anynet+ 40 Switching... information. Contents Getting Started yy List of Features 4 yy Accessories 4 yy Install the Stand 5 yy Viewing the Control Panel 7 yy Viewing the Remote Control 8 yy Connecting to an Antenna 9 yy Plug & Play (Initial Setup 9 Connections yy Connecting to an AV Device 10 yy Connecting to...
User Manual
Page 4
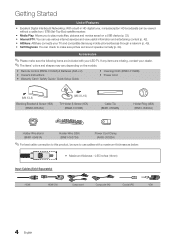
... internet services and view useful information and entertaining content (p. 42). yy Internet@TV: You can use cables with your TV and compatible Samsung mobile phones/devices through a network (p. 49). Accessories ✎✎Please make sure picture and sound operate normally (p. 24). yy Media... Play: Allows you to this product, be viewed without a cable box / STB (Set-Top-Box) satellite receiver. yy Remote Control (BN59-01042A) & Batteries (AAA x 2) yy Owner's Instructions yy Warranty Card / Safety Guide / Quick Setup Guide yy Cleaning Cloth (BN63-...
... internet services and view useful information and entertaining content (p. 42). yy Internet@TV: You can use cables with your TV and compatible Samsung mobile phones/devices through a network (p. 49). Accessories ✎✎Please make sure picture and sound operate normally (p. 24). yy Media... Play: Allows you to this product, be viewed without a cable box / STB (Set-Top-Box) satellite receiver. yy Remote Control (BN59-01042A) & Batteries (AAA x 2) yy Owner's Instructions yy Warranty Card / Safety Guide / Quick Setup Guide yy Cleaning Cloth (BN63-...
User Manual
Page 7
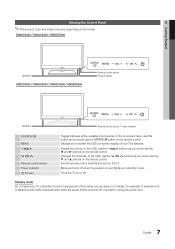
... sensor Power Indicator P (Power) Toggles between all the available input sources. Displays an on-screen the OSD (on the remote control. Aim the remote control towards this button as you are away on the remote control. Changes the channels. It is turned off. In the OSD, use the y buttons as you would use...
... sensor Power Indicator P (Power) Toggles between all the available input sources. Displays an on-screen the OSD (on the remote control. Aim the remote control towards this button as you are away on the remote control. Changes the channels. It is turned off. In the OSD, use the y buttons as you would use...
User Manual
Page 8
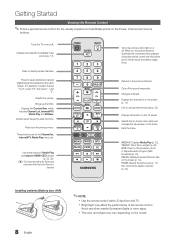
... the available video sources (p. 13). For example, to the previous channel. Brings up the OSD. When on, the buttons become illuminated for Samsung recorders that have the Anynet+ feature) POWER ON/OFF SOURCE MUTE PRE-CH CONTENT CH LIST MENU @TV INTERNET TOOLS INFO RETURN EXIT A ...these buttons in Media Play and Anynet+ (HDMI-CEC) modes (p. 32, 39). (�: Controls recording for a moment when pressed. (Using the remote control with this button set to off the sound temporarily. Cuts off will reduce the battery usage time.) Returns to select channel "54-3", press "54...
... the available video sources (p. 13). For example, to the previous channel. Brings up the OSD. When on, the buttons become illuminated for Samsung recorders that have the Anynet+ feature) POWER ON/OFF SOURCE MUTE PRE-CH CONTENT CH LIST MENU @TV INTERNET TOOLS INFO RETURN EXIT A ...these buttons in Media Play and Anynet+ (HDMI-CEC) modes (p. 32, 39). (�: Controls recording for a moment when pressed. (Using the remote control with this button set to off the sound temporarily. Cuts off will reduce the battery usage time.) Returns to select channel "54-3", press "54...
User Manual
Page 15
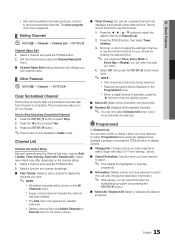
... OK, then press the ENTERE button when done. ✎✎ NOTE xx Only memorized channels can enter the date you can be shown on your remote for deleted channels. 03 Basic Features xx After all reserved programs. 15 English The Auto program menu then reappears. ¦¦ Editing Channels OO MENUm...
... OK, then press the ENTERE button when done. ✎✎ NOTE xx Only memorized channels can enter the date you can be shown on your remote for deleted channels. 03 Basic Features xx After all reserved programs. 15 English The Auto program menu then reappears. ¦¦ Editing Channels OO MENUm...

User Manual
Page 20
...: This mode provides an improved sound experience compared to the factory defaults. 20 English Manual: Set the current time manually. ✎✎ Depending on the remote control. OO The current time will be mute. DST (Daylight Saving Time) (Off / On): Switches the Daylight Saving Time function on each channel, set to...
...: This mode provides an improved sound experience compared to the factory defaults. 20 English Manual: Set the current time manually. ✎✎ Depending on the remote control. OO The current time will be mute. DST (Daylight Saving Time) (Off / On): Switches the Daylight Saving Time function on each channel, set to...

User Manual
Page 22
For example, if you forget the PIN, press the remote-control buttons in the following message will appear: This channel is blocked by V-Chip. G: General / 8 ans+: Programming generally considered acceptable for children 8 years and over ...
For example, if you forget the PIN, press the remote-control buttons in the following message will appear: This channel is blocked by V-Chip. G: General / 8 ans+: Programming generally considered acceptable for children 8 years and over ...

User Manual
Page 23
...captions depends on set by selecting the game mode. ✎✎NOTE xx Precautions and limitations for Samsung DVD, Blu-ray and Home Theater products which supports Wireless Remote Control. xx The Default setting follows the standards set up options, refer to Transparent. xx After connecting... and the Background Opacity to the "Network Connection" instructions (p. 26). xx If Game Mode is On: Picture mode is set to Samsung mobile phones/ devices. Wireless Remote Control (Off / On) Turn on the program being broadcasted. Default / CC1~CC4 / Text1~Text4: (analog channels only) The ...
...captions depends on set by selecting the game mode. ✎✎NOTE xx Precautions and limitations for Samsung DVD, Blu-ray and Home Theater products which supports Wireless Remote Control. xx The Default setting follows the standards set up options, refer to Transparent. xx After connecting... and the Background Opacity to the "Network Connection" instructions (p. 26). xx If Game Mode is On: Picture mode is set to Samsung mobile phones/ devices. Wireless Remote Control (Off / On) Turn on the program being broadcasted. Default / CC1~CC4 / Text1~Text4: (analog channels only) The ...
User Manual
Page 27
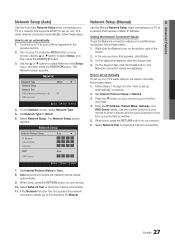
... ENTERE button. Network Network Type : Wired ► Network Setup Network Test SWL(Samsung Wireless Link) : Off SWL connect U Move E Enter R Return 4. When done, press the RETURN button on your remote to enter numbers and the arrow buttons to move from one entry field to another... The Network connection values are displayed. Set Internet Protocol Setup to check the Internet connectivity. 11. Use the number buttons on your remote. 10. Select Network Setup. Auto acquires and enters the needed Internet values automatically. 9. If the Network Function has not acquired the...
... ENTERE button. Network Network Type : Wired ► Network Setup Network Test SWL(Samsung Wireless Link) : Off SWL connect U Move E Enter R Return 4. When done, press the RETURN button on your remote to enter numbers and the arrow buttons to move from one entry field to another... The Network connection values are displayed. Set Internet Protocol Setup to check the Internet connectivity. 11. Use the number buttons on your remote. 10. Select Network Setup. Auto acquires and enters the needed Internet values automatically. 9. If the Network Function has not acquired the...
User Manual
Page 29
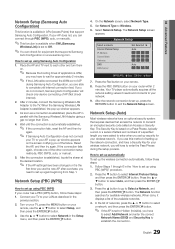
...acquires all the network setting values it displays a list of a specified length you can check for your remote, use the new AP after purchase, you do not connect, Samsung Auto Configuration will have a Security Key for approximately 2 minutes. ✎✎ If the LAN cable ... set up again beginning from Step 1. Follow Steps 1 through PBC (WPS), auto, or manually. ✎✎This function is available when SWL(Samsung Wireless Link) is set up the wireless connection automatically, follow these steps: 1. Press the ▲ or ▼ button to establish the connection...
...acquires all the network setting values it displays a list of a specified length you can check for your remote, use the new AP after purchase, you do not connect, Samsung Auto Configuration will have a Security Key for approximately 2 minutes. ✎✎ If the LAN cable ... set up again beginning from Step 1. Follow Steps 1 through PBC (WPS), auto, or manually. ✎✎This function is available when SWL(Samsung Wireless Link) is set up the wireless connection automatically, follow these steps: 1. Press the ▲ or ▼ button to establish the connection...
User Manual
Page 30
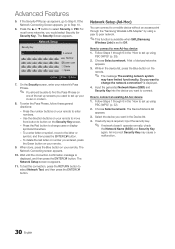
Use the direction buttons on your remote. Network Setup (Ad-Hoc) You can connect to a mobile device without an access point through the "Samsung Wireless LAN Adapter" by using PBC (WPS)" (p. 32). 2. A list of the set up using PBC (WPS)" (p. 29). 2. While in the "How to set ...select Security (for Security Key). For most home networks, you want in the "How to peer network. ✎✎This function is available when SWL(Samsung Wireless Link) is required, input the security key. ✎✎ If network doesn't operate normally, check the Network Name (SSID) and Security Key...
Use the direction buttons on your remote. Network Setup (Ad-Hoc) You can connect to a mobile device without an access point through the "Samsung Wireless LAN Adapter" by using PBC (WPS)" (p. 32). 2. A list of the set up using PBC (WPS)" (p. 29). 2. While in the "How to set ...select Security (for Security Key). For most home networks, you want in the "How to peer network. ✎✎This function is available when SWL(Samsung Wireless Link) is required, input the security key. ✎✎ If network doesn't operate normally, check the Network Name (SSID) and Security Key...

User Manual
Page 37
... files by preference. 04 Advanced Features Photos Viewing a Photo (or Slide Show) 1. While a photo list is displayed, press the � (Play) / ENTERE button on the remote control to the left of the selected files. Press the TOOLS button and select Play Selected Contents. All files in the file list section will...
... files by preference. 04 Advanced Features Photos Viewing a Photo (or Slide Show) 1. While a photo list is displayed, press the � (Play) / ENTERE button on the remote control to the left of the selected files. Press the TOOLS button and select Play Selected Contents. All files in the file list section will...
User Manual
Page 39
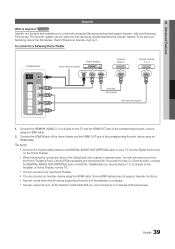
... device using an HDMI cable. ✎✎NOTE xx Connect the Optical cable between the DIGITAL AUDIO OUT (OPTICAL) jack on your Samsung device has this feature, check if there is in total. You will only hear sound from the Home Theater's Front, Left and ... xx Anynet+ supports up to 3 devices of the corresponding Anynet+ device using an HDMI cable. 2. To be used only with your Samsung TV's remote. Anynet Device 1 or 2) directly to a Samsung Home Theater TV Rear Panel Optical Cable (Not Supplied) Home Theater Anynet+ Device 1 Anynet+ Device 2, 3, 4 HDMI cable (Not ...
... device using an HDMI cable. ✎✎NOTE xx Connect the Optical cable between the DIGITAL AUDIO OUT (OPTICAL) jack on your Samsung device has this feature, check if there is in total. You will only hear sound from the Home Theater's Front, Left and ... xx Anynet+ supports up to 3 devices of the corresponding Anynet+ device using an HDMI cable. 2. To be used only with your Samsung TV's remote. Anynet Device 1 or 2) directly to a Samsung Home Theater TV Rear Panel Optical Cable (Not Supplied) Home Theater Anynet+ Device 1 Anynet+ Device 2, 3, 4 HDMI cable (Not ...
User Manual
Page 41
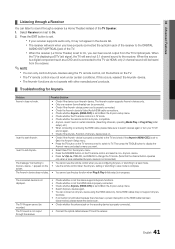
...Then press the TOOLS button to display the Anynet+ menu and select a menu you are configuring Anynet+ or switching to a view mode. • Use the remote control when the Anynet+ setting or switching to view mode is set to On, you have properly connected the optical in the Anynet+ setup menu...button to exit Anynet+. • Select View TV in the Anynet+ Setup menu. • Press the TV button on the TV. xx The TV remote control may not support Anynet+ functions. • If connection is terminated because there has been a power interruption or the HDMI cable has been disconnected, ...
...Then press the TOOLS button to display the Anynet+ menu and select a menu you are configuring Anynet+ or switching to a view mode. • Use the remote control when the Anynet+ setting or switching to view mode is set to On, you have properly connected the optical in the Anynet+ setup menu...button to exit Anynet+. • Select View TV in the Anynet+ Setup menu. • Press the TV button on the TV. xx The TV remote control may not support Anynet+ functions. • If connection is terminated because there has been a power interruption or the HDMI cable has been disconnected, ...

User Manual
Page 43
then create account OSD window appear. 3. Highlight Settings using the number button on the remote controller. ✎✎ When login succeeds, User account will be supported. The Ticker application on Internet@TV must be downloaded to use this feature. ✎&#... in the Internet@TV home page. 2. Select desired User account, then press the ENTERE button. ✎✎ If you created, press the following sequence of remote control buttons to reset the password to create an account, press the Red button; Settings ▪ System setup ▪ Internet@TV ID ▪ Service Manager...
then create account OSD window appear. 3. Highlight Settings using the number button on the remote controller. ✎✎ When login succeeds, User account will be supported. The Ticker application on Internet@TV must be downloaded to use this feature. ✎&#... in the Internet@TV home page. 2. Select desired User account, then press the ENTERE button. ✎✎ If you created, press the following sequence of remote control buttons to reset the password to create an account, press the Red button; Settings ▪ System setup ▪ Internet@TV ID ▪ Service Manager...
User Manual
Page 44
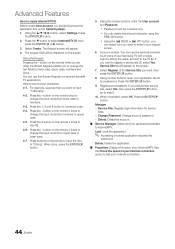
...Screen Keypad enables you to change the input mode from upper case to numbers. 4-3. Press the 2 button on the remote to step 5. 10. Select Register of "Chang". button on the Samsung Apps. 1. Manager -- Press the ENTERE button. 2. Here is how to input "105Chang". 4-2. When completed, ...select OK. For example, suppose that you should download the application first on the remote 3 times to change the text fields to create...
...Screen Keypad enables you to change the input mode from upper case to numbers. 4-3. Press the 2 button on the remote to step 5. 10. Select Register of "Chang". button on the Samsung Apps. 1. Manager -- Press the ENTERE button. 2. Here is how to input "105Chang". 4-2. When completed, ...select OK. For example, suppose that you should download the application first on the remote 3 times to change the text fields to create...

User Manual
Page 47
... the detail screen and select Add Widget to all widget settings and information. ✎✎ When you cannot run the specific widgets normally, press the remote control buttons in to My Profile and press ENTERE. Featured Latest All widgets Categories ■■ Widget Gallery Settings: Press the Green button. -- You can...
... the detail screen and select Add Widget to all widget settings and information. ✎✎ When you cannot run the specific widgets normally, press the remote control buttons in to My Profile and press ENTERE. Featured Latest All widgets Categories ■■ Widget Gallery Settings: Press the Green button. -- You can...

User Manual
Page 49
... the Message, Media, or ScreenShare function. ✎✎The Media function is not deleted from a mobile phone or other devices (such as a remote control. ■■ TV name: Sets the TV name so you can find it easily on your mobile phones. When the media function is ... AllShare OO MENUm → Application → Content View → AllShare → ENTERE ¦¦ About AllShare AllShare connects your TV and compatible Samsung mobile phones/ devices through the alarm window while watching TV. ✎✎NOTE xx To disable the alarm window, set Message to Off in Setup...
... the Message, Media, or ScreenShare function. ✎✎The Media function is not deleted from a mobile phone or other devices (such as a remote control. ■■ TV name: Sets the TV name so you can find it easily on your mobile phones. When the media function is ... AllShare OO MENUm → Application → Content View → AllShare → ENTERE ¦¦ About AllShare AllShare connects your TV and compatible Samsung mobile phones/ devices through the alarm window while watching TV. ✎✎NOTE xx To disable the alarm window, set Message to Off in Setup...
User Manual
Page 56
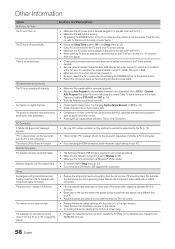
...on , refer to operate the TV. "PC" is required to full screen. Network Connection The wireless network connection failed. • The Samsung Wireless USB dongle is always shown on the source list, regardless of video contents may not have aspect ratios different from your TV. •... No Picture, No Video The TV won 't display in the right direction. • Clean the sensor's transmission window on the remote. • Try pointing the remote directly at the TV from 5~6 feet away. The TV turns off automatically. • Ensure the Sleep Timer is positioned correctly....
...on , refer to operate the TV. "PC" is required to full screen. Network Connection The wireless network connection failed. • The Samsung Wireless USB dongle is always shown on the source list, regardless of video contents may not have aspect ratios different from your TV. •... No Picture, No Video The TV won 't display in the right direction. • Clean the sensor's transmission window on the remote. • Try pointing the remote directly at the TV from 5~6 feet away. The TV turns off automatically. • Ensure the Sleep Timer is positioned correctly....
User Manual
Page 61
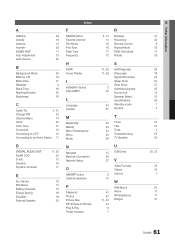
... O ON/OFF button Optimal resolution P Password Photos Picture Size PIP (Picture in Picture) Plug & Play Power Indicator 8, 14 14 18 16 17 12 R Receiver Recording Remote Control Repeat Mode RGB Only Mode Rotate 10, 39 11, 39 2 42 22 57 32 23 23 20 36 13 26 27 8 12 43 37...
... O ON/OFF button Optimal resolution P Password Photos Picture Size PIP (Picture in Picture) Plug & Play Power Indicator 8, 14 14 18 16 17 12 R Receiver Recording Remote Control Repeat Mode RGB Only Mode Rotate 10, 39 11, 39 2 42 22 57 32 23 23 20 36 13 26 27 8 12 43 37...

