User Manual (user Manual) (ver.1.0) (English)
Page 3
... Connecting a DVD Player/Set-Top Box via HDMI 12 Connecting a Digital Audio System 12 Connecting an Amplifier/DVD Home Theater 13 OPERATION Turning the TV On and Off 13 Plug & Play Feature 13 Changing Channels 15 Adjusting the Volume 16 Viewing the Display 16 Viewing the Menus 16 Memorizing the Channels 17 Setting Up Your Remote Control 18 To Select the Source 23 To Edit the Input Source Name 23 PICTURE CONTROL Using Automatic Picture Settings 24 Changing the Screen Size 25 Tilt...26 Setting the Film Mode 26 SOUND CONTROL Using...
... Connecting a DVD Player/Set-Top Box via HDMI 12 Connecting a Digital Audio System 12 Connecting an Amplifier/DVD Home Theater 13 OPERATION Turning the TV On and Off 13 Plug & Play Feature 13 Changing Channels 15 Adjusting the Volume 16 Viewing the Display 16 Viewing the Menus 16 Memorizing the Channels 17 Setting Up Your Remote Control 18 To Select the Source 23 To Edit the Input Source Name 23 PICTURE CONTROL Using Automatic Picture Settings 24 Changing the Screen Size 25 Tilt...26 Setting the Film Mode 26 SOUND CONTROL Using...
User Manual (user Manual) (ver.1.0) (English)
Page 4
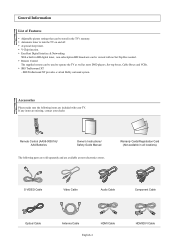
...available at most DVD players, Set-top boxes, Cable Boxes and VCRs. A special sleep timer. Excellent Digital Interface & Networking: With a built-in the TV's memory. SRS TruSurround XT - Warranty Cards/Registration Card (Not available in all locations) S-VIDEO Cable Video Cable Audio Cable Component Cable Optical Cable Antenna Cable HDMI Cable English-4 HDMI/DVI Cable Remote Control (AA59-00381A)/ AAA Batteries Owner's Instructions/ Safety Guide Manual The following items are missing, contact your TV. Remote Control The supplied remote can be used to turn the TV on...
...available at most DVD players, Set-top boxes, Cable Boxes and VCRs. A special sleep timer. Excellent Digital Interface & Networking: With a built-in the TV's memory. SRS TruSurround XT - Warranty Cards/Registration Card (Not available in all locations) S-VIDEO Cable Video Cable Audio Cable Component Cable Optical Cable Antenna Cable HDMI Cable English-4 HDMI/DVI Cable Remote Control (AA59-00381A)/ AAA Batteries Owner's Instructions/ Safety Guide Manual The following items are missing, contact your TV. Remote Control The supplied remote can be used to turn the TV on...
User Manual (user Manual) (ver.1.0) (English)
Page 7
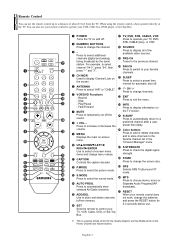
... to select the picture mode. # S.MODE Press to select the sound mode. $ AUTO PROG. c EXIT Press to increase or decrease the preferred channel after a userpreset time delay. Press to exit the menu. - CAPTION Controls the caption decoder. Sets the remote to control your TV, VCR, Cable, DVD, or Set-Top Box. ➢ This is a special remote control for ^ SET 2-3 seconds before use. Rewind - f Color buttons Press to add or delete channels and to store channels to check the digital signal strength. ! not work, change...
... to select the picture mode. # S.MODE Press to select the sound mode. $ AUTO PROG. c EXIT Press to increase or decrease the preferred channel after a userpreset time delay. Press to exit the menu. - CAPTION Controls the caption decoder. Sets the remote to control your TV, VCR, Cable, DVD, or Set-Top Box. ➢ This is a special remote control for ^ SET 2-3 seconds before use. Rewind - f Color buttons Press to add or delete channels and to store channels to check the digital signal strength. ! not work, change...
User Manual (user Manual) (ver.1.0) (English)
Page 8
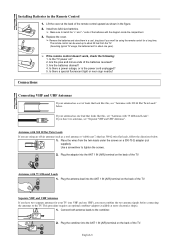
... ends of the batteries with the diagram inside the compartment. 3. Are the batteries drained? 4. Antennas with 300 Ω Flat Twin Leads" below . 1. Connect both antenna leads to tighten the screws. 2. Install two AAA size batteries. ➢ Make sure to the TV. Use a screwdriver to the combiner. Is there a special fluorescent light or neon sign nearby? Plug the adaptor into the ANT...
... ends of the batteries with the diagram inside the compartment. 3. Are the batteries drained? 4. Antennas with 300 Ω Flat Twin Leads" below . 1. Connect both antenna leads to tighten the screws. 2. Install two AAA size batteries. ➢ Make sure to the TV. Use a screwdriver to the combiner. Is there a special fluorescent light or neon sign nearby? Plug the adaptor into the ANT...
User Manual (user Manual) (ver.1.0) (English)
Page 11
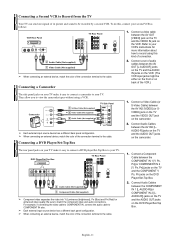
... and the COMPONENT Y, PB, PR jacks on the DVD Player/Set-Top Box. 2. Connecting a DVD Player/Set-Top Box 1. English-11 Camcorder 1 S-Video Cable (Not supplied) or 1 Video Cable (Not supplied) 2 Audio Cable (Not supplied) TV Side Panel ➢ Each external input source device has a different back panel configuration. ➢ When connecting an external device, match the color of the connection terminal to match the component video and audio connections. Connect a Video Cable (or S-Video Cable) between the AV OUT [VIDEO] jack on the TV and the VIDEO IN jack on the...
... and the COMPONENT Y, PB, PR jacks on the DVD Player/Set-Top Box. 2. Connecting a DVD Player/Set-Top Box 1. English-11 Camcorder 1 S-Video Cable (Not supplied) or 1 Video Cable (Not supplied) 2 Audio Cable (Not supplied) TV Side Panel ➢ Each external input source device has a different back panel configuration. ➢ When connecting an external device, match the color of the connection terminal to match the component video and audio connections. Connect a Video Cable (or S-Video Cable) between the AV OUT [VIDEO] jack on the TV and the VIDEO IN jack on the...
User Manual (user Manual) (ver.1.0) (English)
Page 12
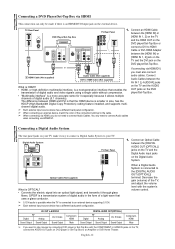
... an Amplifier or DVD Home Theater. English-12 Connecting a DVD Player/Set-Top Box via HDMI This connection can only be made if there is OPTICAL? • Converts the electric signal into an optical light signal, and transmits it through glass fibers. If connecting via HDMI/DVI. S/PDIF is a transmission system of digital audio in size, has the HDCP (High Bandwidth Digital Copy Protection) coding feature installed, and supports multichannel digital audio. ➢ Each external input source device has...
... an Amplifier or DVD Home Theater. English-12 Connecting a DVD Player/Set-Top Box via HDMI This connection can only be made if there is OPTICAL? • Converts the electric signal into an optical light signal, and transmits it through glass fibers. If connecting via HDMI/DVI. S/PDIF is a transmission system of digital audio in size, has the HDCP (High Bandwidth Digital Copy Protection) coding feature installed, and supports multichannel digital audio. ➢ Each external input source device has...
User Manual (user Manual) (ver.1.0) (English)
Page 13
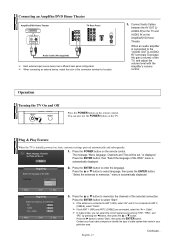
... displayed. Press the POWER button on the remote control. menu is displayed. Press the ENTER button to the cable. 1. Operation Turning the TV On and Off Press the POWER button on the remote control. Contact your particular area. English-13 Continued... Connecting an Amplifier/DVD Home Theater Amplifier/DVD Home Theater TV Rear Panel Audio Cable (Not supplied) ➢ Each external input source device has a different back panel configuration. ➢ When connecting an external device, match the color of the selected connection. or † button. AUDIO...
... displayed. Press the POWER button on the remote control. menu is displayed. Press the ENTER button to the cable. 1. Operation Turning the TV On and Off Press the POWER button on the remote control. Contact your particular area. English-13 Continued... Connecting an Amplifier/DVD Home Theater Amplifier/DVD Home Theater TV Rear Panel Audio Cable (Not supplied) ➢ Each external input source device has a different back panel configuration. ➢ When connecting an external device, match the color of the selected connection. or † button. AUDIO...
User Manual (user Manual) (ver.1.0) (English)
Page 15
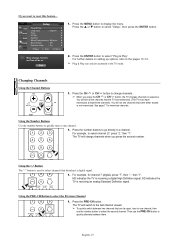
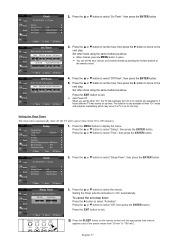
... ... Using the "-" Button The "-" button is used to change channels when you press the second number. Using the PRE-CH Button to any channel. 1. Setup Plug & Play √ Language : English √ Time √ V-Chip √ Caption √ Menu Transparency: Medium √ Blue Screen : Off √ Function Help : On √ Move Enter Return Menu language, Channels and Time will be accessed in sequence. Start 1. or † button to a channel. Changing Channels Using the Channel Buttons 1. Press the number buttons to go directly to select "Setup", then...
... ... Using the "-" Button The "-" button is used to change channels when you press the second number. Using the PRE-CH Button to any channel. 1. Setup Plug & Play √ Language : English √ Time √ V-Chip √ Caption √ Menu Transparency: Medium √ Blue Screen : Off √ Function Help : On √ Move Enter Return Menu language, Channels and Time will be accessed in sequence. Start 1. or † button to a channel. Changing Channels Using the Channel Buttons 1. Press the number buttons to go directly to select "Setup", then...
User Manual (user Manual) (ver.1.0) (English)
Page 16
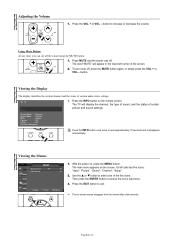
... button to select one of certain picture and sound settings. Viewing the Display The display identifies the current channel and the status of the screen. 2. Press the INFO button on the screen. With the power on -screen menus disappear from the screen after a few seconds. Its left corner of certain audio-video settings. Viewing the Menus Input Source List : TV √ Edit Name √ Move Enter Return 1. Picture Mode : Dynamic Sound Mode : Custom MTS : Stereo Caption...
... button to select one of certain picture and sound settings. Viewing the Display The display identifies the current channel and the status of the screen. 2. Press the INFO button on the screen. With the power on -screen menus disappear from the screen after a few seconds. Its left corner of certain audio-video settings. Viewing the Menus Input Source List : TV √ Edit Name √ Move Enter Return 1. Picture Mode : Dynamic Sound Mode : Custom MTS : Stereo Caption...
User Manual (user Manual) (ver.1.0) (English)
Page 18
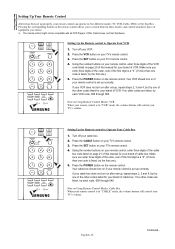
... remote control. Using the number buttons on your remote control, enter three digits of the VCR code listed on after set-up, repeat steps 2, 3 and 4, but try one .) 5. Your cable box should turn on page 20 of this manual for your remote control can operate in "CABLE" mode, the volume buttons still control your TV's volume. Note on Using Remote Control Modes: VCR When your remote control is in five different modes: TV, VCR, Cable, DVD, or Set-Top Box. English-18 Continued... Setting Up the Remote control to Operate Your Cable Box 1. Press the POWER button...
... remote control. Using the number buttons on your remote control, enter three digits of the VCR code listed on after set-up, repeat steps 2, 3 and 4, but try one .) 5. Your cable box should turn on page 20 of this manual for your remote control can operate in "CABLE" mode, the volume buttons still control your TV's volume. Note on Using Remote Control Modes: VCR When your remote control is in five different modes: TV, VCR, Cable, DVD, or Set-Top Box. English-18 Continued... Setting Up the Remote control to Operate Your Cable Box 1. Press the POWER button...
User Manual (user Manual) (ver.1.0) (English)
Page 23
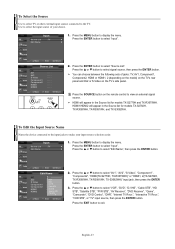
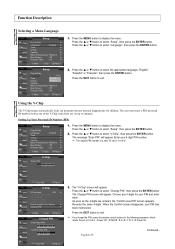
... 2. Press the ... D- Press the MENU button to display the menu. √ Press the ENTER button to exit. S √ Component2 : - C-R- √ S-Video : - V-D- √ Component1 : - Press the EXIT button to select "Input". √ Press the ... S- V- Use to select the input source of jacks: TV, AV1, Component1, Component2, HDMI or HDMI1, 2 (depending on the model) on the TV's rear panel and AV2 or S-Video on the remote control to select signal source, then press the...
... 2. Press the ... D- Press the MENU button to display the menu. √ Press the ENTER button to exit. S √ Component2 : - C-R- √ S-Video : - V-D- √ Component1 : - Press the EXIT button to select "Input". √ Press the ... S- V- Use to select the input source of jacks: TV, AV1, Component1, Component2, HDMI or HDMI1, 2 (depending on the model) on the TV's rear panel and AV2 or S-Video on the remote control to select signal source, then press the...

User Manual (user Manual) (ver.1.0) (English)
Page 36
... Mode Clock Set Time Zone DST : Auto : OfOfn Off Move Enter Return 4. Press the ... Time Clock √ Sleep Timer : Off √ On Timer : Inactivated √ Off Timer : Inactivated √ 2. Press the EXIT button to the appropriate time zone on the broadcast station and signal, the auto time may not be connected in order to turn on or off at a desired time. English-36 T V Setup 1. or † button to highlight the time...
... Mode Clock Set Time Zone DST : Auto : OfOfn Off Move Enter Return 4. Press the ... Time Clock √ Sleep Timer : Off √ On Timer : Inactivated √ Off Timer : Inactivated √ 2. Press the EXIT button to the appropriate time zone on the broadcast station and signal, the auto time may not be connected in order to turn on or off at a desired time. English-36 T V Setup 1. or † button to highlight the time...
User Manual (user Manual) (ver.1.0) (English)
Page 37
... step. Setup Plug & Play √ Language : English √ Time √ V-Chip √ Caption √ Menu Transparency: Medium √ Blue Screen : Off √ Function Help : On √ Move Enter Return 1. or † button to select "Off Timer", then press the ENTER button. 5. Press the ... Minute Acti▼ vation 30 On Move Adjust Return 3. English-37 Hour Minute am/pm Activation 12 00 am Air Channel Volume Activation 3 10...
... step. Setup Plug & Play √ Language : English √ Time √ V-Chip √ Caption √ Menu Transparency: Medium √ Blue Screen : Off √ Function Help : On √ Move Enter Return 1. or † button to select "Off Timer", then press the ENTER button. 5. Press the ... Minute Acti▼ vation 30 On Move Adjust Return 3. English-37 Hour Minute am/pm Activation 12 00 am Air Channel Volume Activation 3 10...
User Manual (user Manual) (ver.1.0) (English)
Page 38
... PIN, press the remote control buttons in the following sequence, which resets the pin to select "Setup", then press the ENTER button. 2. MUTE 8 2 4 Power On. Press the ... Press the ... or † button to select "Change PIN", then press the ENTER button. Setting Up Your Personal ID Number (PIN) Setup Plug & Play √ Language : English √ Time √ V-Chip √ Caption √ Menu Transparency: Medium √ Blue Screen : Off √ Function Help : On √...
... PIN, press the remote control buttons in the following sequence, which resets the pin to select "Setup", then press the ENTER button. 2. MUTE 8 2 4 Power On. Press the ... Press the ... or † button to select "Change PIN", then press the ENTER button. Setting Up Your Personal ID Number (PIN) Setup Plug & Play √ Language : English √ Time √ V-Chip √ Caption √ Menu Transparency: Medium √ Blue Screen : Off √ Function Help : On √...

User Manual (user Manual) (ver.1.0) (English)
Page 41
... block any programs that is indicated. Enter your 4 digit PIN number. 0~9 Enter PIN Return V-Chip V-Chip Lock : On √ TV Parental Guidelines √ MPAA Rating √ Canadian English √ Canadian French √ Downloadable U.S. Press the ENTER button to select "V-Chip", then press the ENTER button. Setup Plug & Play √ Language : English √ Time √ V-Chip √ Caption √ Menu Transparency: Medium √ Blue Screen : Off √ Function Help : On...
... block any programs that is indicated. Enter your 4 digit PIN number. 0~9 Enter PIN Return V-Chip V-Chip Lock : On √ TV Parental Guidelines √ MPAA Rating √ Canadian English √ Canadian French √ Downloadable U.S. Press the ENTER button to select "V-Chip", then press the ENTER button. Setup Plug & Play √ Language : English √ Time √ V-Chip √ Caption √ Menu Transparency: Medium √ Blue Screen : Off √ Function Help : On...

User Manual (user Manual) (ver.1.0) (English)
Page 42
... all TV ratings. PG: Parental guidance. 14+: Programming contains themes or content which may not be blocked also. The message "Enter PIN" will appear. Press the ... Press the ENTER button to Set up Restrictions Using the 'Canadian English' Setup Plug & Play √ Language : English √ Time √ V-Chip √ Caption √ Menu Transparency: Medium √ Blue Screen : Off √ Function Help : On √ Move Enter...
... all TV ratings. PG: Parental guidance. 14+: Programming contains themes or content which may not be blocked also. The message "Enter PIN" will appear. Press the ... Press the ENTER button to Set up Restrictions Using the 'Canadian English' Setup Plug & Play √ Language : English √ Time √ V-Chip √ Caption √ Menu Transparency: Medium √ Blue Screen : Off √ Function Help : On √ Move Enter...

User Manual (user Manual) (ver.1.0) (English)
Page 43
... V-Chip Lock : On √ TV Parental Guidelines √ MPAA Rating √ Canadian English √ Canadian French √ Downloadable U.S. The " " symbol is indicated. ➢ Allow all: Press to unlock all TV ratings. / Block all: Press to Set up Restrictions Using the 'Canadian French' Setup Plug & Play √ Language : English √ Time √ V-Chip √ Caption √ Menu Transparency: Medium √ Blue Screen : Off √ Function Help : On...
... V-Chip Lock : On √ TV Parental Guidelines √ MPAA Rating √ Canadian English √ Canadian French √ Downloadable U.S. The " " symbol is indicated. ➢ Allow all: Press to unlock all TV ratings. / Block all: Press to Set up Restrictions Using the 'Canadian French' Setup Plug & Play √ Language : English √ Time √ V-Chip √ Caption √ Menu Transparency: Medium √ Blue Screen : Off √ Function Help : On...
User Manual (user Manual) (ver.1.0) (English)
Page 46
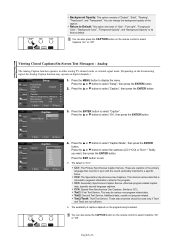
... Use Captions. CC4: Special Non-Synchronous Use Captions. Text2: Second Text Service. Text3/Text4: Third Text Service. You can also press the CAPTION button on digital channels.) Setup Plug & Play √ Language : English √ Time √ V-Chip √ Caption √ Menu Transparency: Medium √ Blue Screen : Off √ Function Help : On √ Move Enter Return 1. Press the MENU button to select "Setup", then press the ENTER button. 2. or † button to display the menu. Press the ENTER button...
... Use Captions. CC4: Special Non-Synchronous Use Captions. Text2: Second Text Service. Text3/Text4: Third Text Service. You can also press the CAPTION button on digital channels.) Setup Plug & Play √ Language : English √ Time √ V-Chip √ Caption √ Menu Transparency: Medium √ Blue Screen : Off √ Function Help : On √ Move Enter Return 1. Press the MENU button to select "Setup", then press the ENTER button. 2. or † button to display the menu. Press the ENTER button...

User Manual (user Manual) (ver.1.0) (English)
Page 47
Menu Transparency Level Adjusts the transparency of the function help on . 1. Press the ... Move Enter Return Setup Plug & Play Language : English Time V-Chip Caption High Menu Transparency: MMedeiduiumm Blue Screen : OfLfow Function Help : OnOpaque 2. or † button to "Off" Setup Plug & Play √ Language : English √ Time √ V-Chip √ Caption √ Menu Transparency: Medium √ Blue Screen : Off √ Function Help : On √ Move Enter Return 1. If you wish to continue viewing the...
Menu Transparency Level Adjusts the transparency of the function help on . 1. Press the ... Move Enter Return Setup Plug & Play Language : English Time V-Chip Caption High Menu Transparency: MMedeiduiumm Blue Screen : OfLfow Function Help : OnOpaque 2. or † button to "Off" Setup Plug & Play √ Language : English √ Time √ V-Chip √ Caption √ Menu Transparency: Medium √ Blue Screen : Off √ Function Help : On √ Move Enter Return 1. If you wish to continue viewing the...

User Manual (user Manual) (ver.1.0) (English)
Page 48
... these troubleshooting tips apply, call your nearest Samsung service center. Make sure the wall outlet is too light or too dark. Check the battery terminals. The visual qualities of the remote control (transmission window). Adjust the Brightness and Contrast. Try another channel. Press the SOURCE button. control in . Digital broadcasting screen problem. Poor sound quality. The image is working. Try another channel. Adjust the antenna. Please check the digital signal strength and input antenna...
... these troubleshooting tips apply, call your nearest Samsung service center. Make sure the wall outlet is too light or too dark. Check the battery terminals. The visual qualities of the remote control (transmission window). Adjust the Brightness and Contrast. Try another channel. Press the SOURCE button. control in . Digital broadcasting screen problem. Poor sound quality. The image is working. Try another channel. Adjust the antenna. Please check the digital signal strength and input antenna...


