

Open Source Guide (ENGLISH)
Page 1
... it, that you can apply it clear that refer to this free software. The precise terms and conditions for questions regarding open sources, contact Samsung via Email (vdswmanager@samsung. The "Program", below, refers to any such program or work, and a "work based on you (whether by court order, agreement or otherwise) that...
... it, that you can apply it clear that refer to this free software. The precise terms and conditions for questions regarding open sources, contact Samsung via Email (vdswmanager@samsung. The "Program", below, refers to any such program or work, and a "work based on you (whether by court order, agreement or otherwise) that...
User Manual (user Manual) (ver.1.0) (English)
Page 5
... Chapter 3: Operation 3.1 Turning the TV On and Off 3.1 Plug & Play Feature 3.1 Viewing the Menus and On-Screen Displays 3.3 Viewing the Menus 3.3 Viewing the Display 3.3 Selecting a Menu Language 3.4 Memorizing the Channels 3.5 Selecting the Video Signal-source 3.5 Storing Channels in Memory (Automatic Method 3.6 Adding and Erasing Channels (Manual Method 3.7 Changing Channels 3.8 Using the...
... Chapter 3: Operation 3.1 Turning the TV On and Off 3.1 Plug & Play Feature 3.1 Viewing the Menus and On-Screen Displays 3.3 Viewing the Menus 3.3 Viewing the Display 3.3 Selecting a Menu Language 3.4 Memorizing the Channels 3.5 Selecting the Video Signal-source 3.5 Storing Channels in Memory (Automatic Method 3.6 Adding and Erasing Channels (Manual Method 3.7 Changing Channels 3.8 Using the...
User Manual (user Manual) (ver.1.0) (English)
Page 7
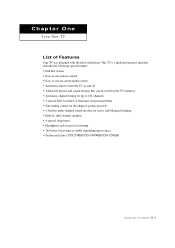
... a high-performance unit that includes the following special features: • Full Flat Screen • Easy-to-use remote control • Easy-to-use on-screen menu system • Automatic timer to turn the TV on and off • Adjustable picture and sound settings that can be stored in the TV's memory... speakers • A special sleep timer • Headphone jack for private listening • 16:9 letter box format available depending upon source • Picture in Picture (TXN2798HF/TXN3098WHF/TXN3298HF) 1.1 CHAPTER ONE: YOUR NEW TV
... a high-performance unit that includes the following special features: • Full Flat Screen • Easy-to-use remote control • Easy-to-use on-screen menu system • Automatic timer to turn the TV on and off • Adjustable picture and sound settings that can be stored in the TV's memory... speakers • A special sleep timer • Headphone jack for private listening • 16:9 letter box format available depending upon source • Picture in Picture (TXN2798HF/TXN3098WHF/TXN3298HF) 1.1 CHAPTER ONE: YOUR NEW TV
User Manual (user Manual) (ver.1.0) (English)
Page 8
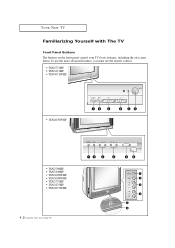
YOUR NEW TV Familiarizing Yourself with The TV Front Panel Buttons The buttons on the front panel control your TV's basic features, including the on-screen menu. To use the more advanced features, you must use the remote control. • TXN2771HF • TXN3271HF • TXN3071WHF • TXN2670WHF • TXN2798HF • TXN3298HF • TXN3098WHF • TXN3098WHF • TXN2775HF • TXN3275HF • TXN3075WHF 1.2 CHAPTER ONE: YOUR NEW TV
YOUR NEW TV Familiarizing Yourself with The TV Front Panel Buttons The buttons on the front panel control your TV's basic features, including the on-screen menu. To use the more advanced features, you must use the remote control. • TXN2771HF • TXN3271HF • TXN3071WHF • TXN2670WHF • TXN2798HF • TXN3298HF • TXN3098WHF • TXN3098WHF • TXN2775HF • TXN3275HF • TXN3075WHF 1.2 CHAPTER ONE: YOUR NEW TV

User Manual (user Manual) (ver.1.0) (English)
Page 9
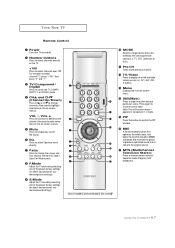
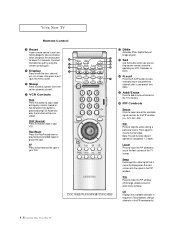
... the front panel jacks to connect an A/V component that is used to select items on the onmscreen menu. ¨ CH w and CH v Press to change between viewing TV programs and signals from other components. ´ MENU Press to see an on connecting equipment, see pages 2.1 - 2.10.) Œ AUDIO INPUT jacks Used to... volume. YOUR NEW TV Œ TV/VIDEO Press to change channels. Also used only occasionally, such as a camcorder or video game. (For information on -screen menu of external headphones to this spot on the TV. Ø POWER Press to turn the TV on -screen...
... the front panel jacks to connect an A/V component that is used to select items on the onmscreen menu. ¨ CH w and CH v Press to change between viewing TV programs and signals from other components. ´ MENU Press to see an on connecting equipment, see pages 2.1 - 2.10.) Œ AUDIO INPUT jacks Used to... volume. YOUR NEW TV Œ TV/VIDEO Press to change channels. Also used only occasionally, such as a camcorder or video game. (For information on -screen menu of external headphones to this spot on the TV. Ø POWER Press to turn the TV on -screen...

User Manual (user Manual) (ver.1.0) (English)
Page 11
... be controlled by selecting one of the preset factory settings (or select your personal, customized picture settings). Ú S.MODE Adjust the TV sound by the Samsung remote control (i.e., TV, VCR, Cable box, or DVD). SET Use this button when you are Normal, Zoom1, Zoom2 or Wide screen. &#... AV1, AV2, AV3, S-VIDEO). ¯ VOL -, VOL + Press to increase or decrease the volume(Also used to highlight selections on the on -screen menu. ¿ STILL(Main) Press to stop the action during a particular scene. Re-insert the batteries and try using the remote, always point it directly at...
... be controlled by selecting one of the preset factory settings (or select your personal, customized picture settings). Ú S.MODE Adjust the TV sound by the Samsung remote control (i.e., TV, VCR, Cable box, or DVD). SET Use this button when you are Normal, Zoom1, Zoom2 or Wide screen. &#... AV1, AV2, AV3, S-VIDEO). ¯ VOL -, VOL + Press to increase or decrease the volume(Also used to highlight selections on the on -screen menu. ¿ STILL(Main) Press to stop the action during a particular scene. Re-insert the batteries and try using the remote, always point it directly at...
User Manual (user Manual) (ver.1.0) (English)
Page 13
... or Separate Audio Program (SAP broadcast). 1.7 CHAPTER ONE: YOUR NEW TV Press to select Equalizer menu directly. ∏ P.size Press to change channels (Also used to make selections on the on-... (or select your personal, customized picture settings). ' S.Mode Adjust the TV sound by the Samsung remote control (i.e., TV, VCR, Cable box, or DVD). Ô Pre-CH Tunes to the...Stereo) Press to resume normal video. Your choices are Normal, Zoom1, Zoom2 or Wide screen. TXN2798HF/TXN3098WHF/TXN3298HF ˝ MODE Selects a target device to select channels over 100. " P.Mode Adjust the ...
... or Separate Audio Program (SAP broadcast). 1.7 CHAPTER ONE: YOUR NEW TV Press to select Equalizer menu directly. ∏ P.size Press to change channels (Also used to make selections on the on-... (or select your personal, customized picture settings). ' S.Mode Adjust the TV sound by the Samsung remote control (i.e., TV, VCR, Cable box, or DVD). Ô Pre-CH Tunes to the...Stereo) Press to resume normal video. Your choices are Normal, Zoom1, Zoom2 or Wide screen. TXN2798HF/TXN3098WHF/TXN3298HF ˝ MODE Selects a target device to select channels over 100. " P.Mode Adjust the ...
User Manual (user Manual) (ver.1.0) (English)
Page 14
... Swap Exchanges the video signal that is pressed during Full-Automatic play , record, rewind or fast forward. Also press to exit (quit) the menu system. ¿ Sleep Press to stop a tape during a particular scene. Play/Pause Press the Play/Pausebutton to resume normal video. Note: The... only). 1.8 CHAPTER ONE: YOUR NEW TV Still Press to select a preset time interval for the PIP window (i.e., AV1, AV2, AV3). TXN2798HF/TXN3098WHF/TXN3298HF ˛ DNIe Activates DNIe (Digital Natural Image engine). ◊ Set Use this button to operate your VCR. PIP Controls Source Press to ...
... Swap Exchanges the video signal that is pressed during Full-Automatic play , record, rewind or fast forward. Also press to exit (quit) the menu system. ¿ Sleep Press to stop a tape during a particular scene. Play/Pause Press the Play/Pausebutton to resume normal video. Note: The... only). 1.8 CHAPTER ONE: YOUR NEW TV Still Press to select a preset time interval for the PIP window (i.e., AV1, AV2, AV3). TXN2798HF/TXN3098WHF/TXN3298HF ˛ DNIe Activates DNIe (Digital Natural Image engine). ◊ Set Use this button to operate your VCR. PIP Controls Source Press to ...
User Manual (user Manual) (ver.1.0) (English)
Page 26
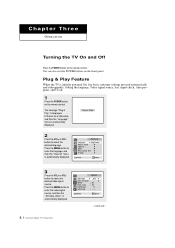
...panel. C h a pOtPEeRArTIOTN h r e e OPERATION Turning the TV On and Off Press the POWER button on the remote control. Press the MENU button to enter the video signal source, and then the "Ant Input check" is automatically displayed. 2 Press the VOL+ or VOLbutton to select ...video signal source. It flickers for a little while and then the "Language" menu is automatically displayed. 3.1 CHAPTER THREE: TV OPERATION continued... Press the MENU button to enter the language, and then the "Channel" menu is automatically displayed. 3 Press the VOL+ or VOLbutton to select the desired language...
...panel. C h a pOtPEeRArTIOTN h r e e OPERATION Turning the TV On and Off Press the POWER button on the remote control. Press the MENU button to enter the video signal source, and then the "Ant Input check" is automatically displayed. 2 Press the VOL+ or VOLbutton to select ...video signal source. It flickers for a little while and then the "Language" menu is automatically displayed. 3.1 CHAPTER THREE: TV OPERATION continued... Press the MENU button to enter the language, and then the "Channel" menu is automatically displayed. 3 Press the VOL+ or VOLbutton to select the desired language...

User Manual (user Manual) (ver.1.0) (English)
Page 27
... Plug & Play feature doesn't work when the V-chip is displayed. And then press the VOL+ or VOL- is displayed. 7 If you have finished, press the MENU button. OPERATION 4 Make sure that the antenna is connected to "Setting the clock" on page 3.10.) 6 When you want to reset this feature (1)Press the... MENU button. (2)Press the CHw button three times to select the Function menu and press the VOL+ button. (3)Press the CHw button to the hour or minute. Set the hour or minute by...
... Plug & Play feature doesn't work when the V-chip is displayed. And then press the VOL+ or VOL- is displayed. 7 If you have finished, press the MENU button. OPERATION 4 Make sure that the antenna is connected to "Setting the clock" on page 3.10.) 6 When you want to reset this feature (1)Press the... MENU button. (2)Press the CHw button three times to select the Function menu and press the VOL+ button. (3)Press the CHw button to the hour or minute. Set the hour or minute by...
User Manual (user Manual) (ver.1.0) (English)
Page 28
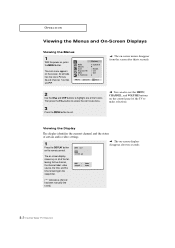
..., the channel label, video source, the time, and the time remaining on -screen menus disappear from the screen after ten seconds. The main menu appears on , press the MENU button. w The on the sleep timer. ("*" indicates a channel has been manually fine tuned.) 3.3 CHAPTER THREE: TV OPERATION w You can ... display identifies the current channel and the status of the TV to exit. Then press the VOL+ button to access the icon's sub-menu. 3 Press the MENU button to make selections. The on the remote control. Its left side has five icons: Picture, Sound, Channel, Function and PIP. ...
..., the channel label, video source, the time, and the time remaining on -screen menus disappear from the screen after ten seconds. The main menu appears on , press the MENU button. w The on the sleep timer. ("*" indicates a channel has been manually fine tuned.) 3.3 CHAPTER THREE: TV OPERATION w You can ... display identifies the current channel and the status of the TV to exit. Then press the VOL+ button to access the icon's sub-menu. 3 Press the MENU button to make selections. The on the remote control. Its left side has five icons: Picture, Sound, Channel, Function and PIP. ...

User Manual (user Manual) (ver.1.0) (English)
Page 29
Press the CH w button to select "Function", then press the VOL + button 2 Press the VOL + button to select the appropriate language: English, Español, or Français. 3 Press the MENU button to display the menu. OPERATION Selecting a Menu Language 1 Press the MENU button to exit. 3.4 CHAPTER THREE: TV OPERATION
Press the CH w button to select "Function", then press the VOL + button 2 Press the VOL + button to select the appropriate language: English, Español, or Français. 3 Press the MENU button to display the menu. OPERATION Selecting a Menu Language 1 Press the MENU button to exit. 3.4 CHAPTER THREE: TV OPERATION
User Manual (user Manual) (ver.1.0) (English)
Page 30
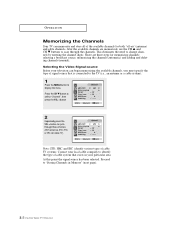
... are three steps for both "off-air" (antenna) and cable channels. There are memorized, use the CH v and CH w buttons to display the menu. Proceed to "Storing Channels in your local cable company to identify the type of cable system that is connected to the TV (i.e., an antenna or... a cable system). 1 Press the MENU button to scan through these choices: ANT (antenna) STD, HRC or IRC (all of the available channels for memorizing channels: selecting a broadcast source, ...
... are three steps for both "off-air" (antenna) and cable channels. There are memorized, use the CH v and CH w buttons to display the menu. Proceed to "Storing Channels in your local cable company to identify the type of cable system that is connected to the TV (i.e., an antenna or... a cable system). 1 Press the MENU button to scan through these choices: ANT (antenna) STD, HRC or IRC (all of the available channels for memorizing channels: selecting a broadcast source, ...

User Manual (user Manual) (ver.1.0) (English)
Page 31
This takes about one to the Channel menu. w 3 Press the VOL + button. Press MENU at any time to interrupt the memorization process and return to two minutes. After all of the available channels and stores them in Memory (Automatic ... function when the V-chip is active. 3.6 CHAPTER THREE: TV OPERATION The TV will begin memorizing all the available channels are stored, the Auto program menu reappears. Press the MENU button to select "Auto program". OPERATION Storing Channels in memory. See steps 1~4 on previous page. Press the CH w button to select "Channel", then...
This takes about one to the Channel menu. w 3 Press the VOL + button. Press MENU at any time to interrupt the memorization process and return to two minutes. After all of the available channels and stores them in Memory (Automatic ... function when the V-chip is active. 3.6 CHAPTER THREE: TV OPERATION The TV will begin memorizing all the available channels are stored, the Auto program menu reappears. Press the MENU button to select "Auto program". OPERATION Storing Channels in memory. See steps 1~4 on previous page. Press the CH w button to select "Channel", then...

User Manual (user Manual) (ver.1.0) (English)
Page 32
Press the CH v/w button or the number buttons to select the channel you want to exit. 3.7 CHAPTER THREE: TV OPERATION Press the MENU button to add or erase. OPERATION Adding and Erasing Channels (Manual Method) 1 Press the MENU button to select "Added" or "Erased". Press the VOL+ or VOLbutton to display the menu. Press the MENU button. 4 Press the CH v or CH w button to select "Add/Erase", then press the VOL+ button. 3 Press the VOL+ button. Press the CH w button to select "Channel", then press the VOL+ button. 2 Press the CH v or CH w button to select "Select".
Press the CH v/w button or the number buttons to select the channel you want to exit. 3.7 CHAPTER THREE: TV OPERATION Press the MENU button to add or erase. OPERATION Adding and Erasing Channels (Manual Method) 1 Press the MENU button to select "Added" or "Erased". Press the VOL+ or VOLbutton to display the menu. Press the MENU button. 4 Press the CH v or CH w button to select "Add/Erase", then press the VOL+ button. 3 Press the VOL+ button. Press the CH w button to select "Channel", then press the VOL+ button. 2 Press the CH v or CH w button to select "Select".

User Manual (user Manual) (ver.1.0) (English)
Page 34
... When the DISPLAY button is a letter, a number, "*", or a blank. The left-most field will be labeled. 2 Press the MENU button to display the menu, then press the CH w button to select "Channel". w Note: You cannot select "Labeling" in this feature to assign an easy-to...button to tune to the channel that will be highlighted. (Each label has four fields. OPERATION Labeling the Channels Use this sequence: A,B,...Z,*, blank,0,1,...9). Press the MENU button to select "Labeling". Select a second letter or digit using the CH v and CH w buttons, as above. Press the VOL + button. ...
... When the DISPLAY button is a letter, a number, "*", or a blank. The left-most field will be labeled. 2 Press the MENU button to display the menu, then press the CH w button to select "Channel". w Note: You cannot select "Labeling" in this feature to assign an easy-to...button to tune to the channel that will be highlighted. (Each label has four fields. OPERATION Labeling the Channels Use this sequence: A,B,...Z,*, blank,0,1,...9). Press the MENU button to select "Labeling". Select a second letter or digit using the CH v and CH w buttons, as above. Press the VOL + button. ...

User Manual (user Manual) (ver.1.0) (English)
Page 35
... can check the time while watching the TV (Just press the DISPLAY button). Option 1: Setting the Clock Manually 1 Press the MENU button to select "Time" menu. After selecting the correct minutes, press the VOL + button. OPERATION Setting the Clock Setting the clock is entered, Press the VOL + button. ...the DISPLAY button. 3.10 CHAPTER THREE: TV OPERATION Press the CH v or CH w button to exit. Press the MENU button to select the correct minutes. Press the VOL + button: The Time menu will appear on the screen, and "Clock" will be highlighted. 3 Press the VOL + button again (the hours...
... can check the time while watching the TV (Just press the DISPLAY button). Option 1: Setting the Clock Manually 1 Press the MENU button to select "Time" menu. After selecting the correct minutes, press the VOL + button. OPERATION Setting the Clock Setting the clock is entered, Press the VOL + button. ...the DISPLAY button. 3.10 CHAPTER THREE: TV OPERATION Press the CH v or CH w button to exit. Press the MENU button to select the correct minutes. Press the VOL + button: The Time menu will appear on the screen, and "Clock" will be highlighted. 3 Press the VOL + button again (the hours...

User Manual (user Manual) (ver.1.0) (English)
Page 36
...Using the Local PBS Channel to Automatically Set the TV Clock 1 Press the MENU button to select your local PBS channel. Press the MENU button. 3.11 CHAPTER THREE: TV OPERATION continued... Press the CH v and CH w to display the menu. While "PBS channel" is selected, press the VOL + button to select ..."PBS channel". Press the CH w button to select "Function", then press the VOL + button. 2 Press the CH w button to select "Auto clock set" menu, then press the VOL + button. 3 Press the VOL + button to select Auto clock set "On". 4 Press the CH w button to activate the channel-number ...
...Using the Local PBS Channel to Automatically Set the TV Clock 1 Press the MENU button to select your local PBS channel. Press the MENU button. 3.11 CHAPTER THREE: TV OPERATION continued... Press the CH v and CH w to display the menu. While "PBS channel" is selected, press the VOL + button to select ..."PBS channel". Press the CH w button to select "Function", then press the VOL + button. 2 Press the CH w button to select "Auto clock set" menu, then press the VOL + button. 3 Press the VOL + button to select Auto clock set "On". 4 Press the CH w button to activate the channel-number ...

User Manual (user Manual) (ver.1.0) (English)
Page 37
While "Time zone" is selected, press the VOL+ or VOL- While "DST" is selected, then press the VOL+ or VOL- The clock is set. Press the MENU button to change the Time zone. to exit. 3.12 CHAPTER THREE: TV OPERATION Sequence: ATL., EAST, CEN., MTN., PAC., ALAS., HAW.. 6 Press the CH w button to select "Time zone". OPERATION 5 Press the CH w button to select "DST"(Daylight saving time). button to indicate "Yes" or "No".
While "Time zone" is selected, press the VOL+ or VOL- While "DST" is selected, then press the VOL+ or VOL- The clock is set. Press the MENU button to change the Time zone. to exit. 3.12 CHAPTER THREE: TV OPERATION Sequence: ATL., EAST, CEN., MTN., PAC., ALAS., HAW.. 6 Press the CH w button to select "Time zone". OPERATION 5 Press the CH w button to select "DST"(Daylight saving time). button to indicate "Yes" or "No".
User Manual (user Manual) (ver.1.0) (English)
Page 38
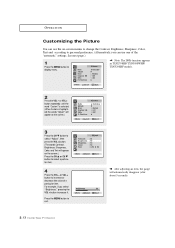
OPERATION Customizing the Picture You can use the on the screen.) Press the CH v or CH w button to display menu. See next page.) 1 Press the MENU button to select a particular item. 4 Press the VOL - or VOL + button repeatedly, until the word "Custom" is selected. (When Custom is highlighted, the words.... (Alternatively, you select "Brightness," pressing the VOL + button increases it. For example, if you can use one of a particular item. Press the MENU button to increase or decrease the value of the "automatic" settings. w Note: The DNIe function appears in TXN2798HF...
OPERATION Customizing the Picture You can use the on the screen.) Press the CH v or CH w button to display menu. See next page.) 1 Press the MENU button to select a particular item. 4 Press the VOL - or VOL + button repeatedly, until the word "Custom" is selected. (When Custom is highlighted, the words.... (Alternatively, you select "Brightness," pressing the VOL + button increases it. For example, if you can use one of a particular item. Press the MENU button to increase or decrease the value of the "automatic" settings. w Note: The DNIe function appears in TXN2798HF...


