
User Manual (user Manual) (ver.1.0) (English)
Page 2
... plug to rain or moisture. copyright laws. To prevent damage which may be in particular, specifies that unauthorized recording of copyrighted TV programs is present inside part of Canadian Electrical Code, Part I), that any inside . has determined that important literature concerning operation... violation of the building as close to operate it. Caution: FCC/CSA regulations state that provides guidelines for energy efficiency. 2 Samsung Electronics America, Inc. Note to CATV system installer: This reminder is dangerous to make any unauthorized recording in whole or in ...
... plug to rain or moisture. copyright laws. To prevent damage which may be in particular, specifies that unauthorized recording of copyrighted TV programs is present inside part of Canadian Electrical Code, Part I), that any inside . has determined that important literature concerning operation... violation of the building as close to operate it. Caution: FCC/CSA regulations state that provides guidelines for energy efficiency. 2 Samsung Electronics America, Inc. Note to CATV system installer: This reminder is dangerous to make any unauthorized recording in whole or in ...
User Manual (user Manual) (ver.1.0) (English)
Page 3
Your new Samsung TV receiver represents the latest in the operating instructions. • Follow all operating instructions. • Unplug the TV receiver from the wall outlet before operating the TV receiver. • Retain the safety and operating instructions for future reference. • Heed all safety ...will provide convenient, dependable service and enjoyment for years to overturn. • Provide ventilation for choosing Samsung! Thank You for Choosing Samsung Thank you for the TV receiver. Do not place it from the type of power supplied to protect it near bath tubs,...
Your new Samsung TV receiver represents the latest in the operating instructions. • Follow all operating instructions. • Unplug the TV receiver from the wall outlet before operating the TV receiver. • Retain the safety and operating instructions for future reference. • Heed all safety ...will provide convenient, dependable service and enjoyment for years to overturn. • Provide ventilation for choosing Samsung! Thank You for Choosing Samsung Thank you for the TV receiver. Do not place it from the type of power supplied to protect it near bath tubs,...

User Manual (user Manual) (ver.1.0) (English)
Page 4
... protection against them. Unplug the unit from touching the power lines or circuits. Read information with such lines might be walked on the TV receiver. • Ground outdoor antennas. Operation is connected to determine that may not cause harmful interference, and (2) This device must accept... as the original part. Pay particular attention to qualified service personnel under the following the operating instructions - Overloading can fall into the TV - Never spill liquid of the FCC Rules. When the power-supply cord or plug is in accordance with part 15 of any...
... protection against them. Unplug the unit from touching the power lines or circuits. Read information with such lines might be walked on the TV receiver. • Ground outdoor antennas. Operation is connected to determine that may not cause harmful interference, and (2) This device must accept... as the original part. Pay particular attention to qualified service personnel under the following the operating instructions - Overloading can fall into the TV - Never spill liquid of the FCC Rules. When the power-supply cord or plug is in accordance with part 15 of any...
User Manual (user Manual) (ver.1.0) (English)
Page 6
... Antennas 15 Antennas with 300-ohm Flat Twin Leads 15 Antennas with 75-ohm Round Leads 16 Separate VHF and UHF Antennas 16 Connecting Cable TV 16 Cable without a Cable Box 16 Connecting to a Cable Box that Descrambles All Channels 17 Connecting to a Cable Box that Descrambles Some Channels ...17 Connecting a VCR 18 Connecting an S-VHS VCR 20 Connecting a Second VCR to Record from the TV 21 Connecting a DVD Player 21 Connecting a Camcorder 22 Installing Batteries in the Remote Control 23 Chapter 3: Operation 24 Turning the...
... Antennas 15 Antennas with 300-ohm Flat Twin Leads 15 Antennas with 75-ohm Round Leads 16 Separate VHF and UHF Antennas 16 Connecting Cable TV 16 Cable without a Cable Box 16 Connecting to a Cable Box that Descrambles All Channels 17 Connecting to a Cable Box that Descrambles Some Channels ...17 Connecting a VCR 18 Connecting an S-VHS VCR 20 Connecting a Second VCR to Record from the TV 21 Connecting a DVD Player 21 Connecting a Camcorder 22 Installing Batteries in the Remote Control 23 Chapter 3: Operation 24 Turning the...
User Manual (user Manual) (ver.1.0) (English)
Page 7
... the V-Chip 53 Setting Up Your Personal ID Number (PIN 53 How to Enable/Disable the V-Chip 54 How to Set up Restrictions Using the "TV guidelines 54 How to Set up Restrictions Using the MPAA Ratings: G, PG, PG-13, R, NC-17, X 56 How to Reset the...
... the V-Chip 53 Setting Up Your Personal ID Number (PIN 53 How to Enable/Disable the V-Chip 54 How to Set up Restrictions Using the "TV guidelines 54 How to Set up Restrictions Using the MPAA Ratings: G, PG, PG-13, R, NC-17, X 56 How to Reset the...

User Manual (user Manual) (ver.1.0) (English)
Page 8
Chapter One YOUR NEW TV List of Features Your TV was designed with the latest technology. This TV is a high-performance unit that includes the following special features: • Easy-to-use remote control • Easy-to-use on-screen menu system • Automatic timer to turn the TV on and off • ...Adjustable picture and sound settings that can be stored in the TV's memory • Automatic channel tuning for up to 181 channels • A special filter to reduce or ...
Chapter One YOUR NEW TV List of Features Your TV was designed with the latest technology. This TV is a high-performance unit that includes the following special features: • Easy-to-use remote control • Easy-to-use on-screen menu system • Automatic timer to turn the TV on and off • ...Adjustable picture and sound settings that can be stored in the TV's memory • Automatic channel tuning for up to 181 channels • A special filter to reduce or ...

User Manual (user Manual) (ver.1.0) (English)
Page 9
... control towards this spot on the TV. ´ VOL - , + Press to increase or decrease the volume. Also used to select items on the on-screen menu. ˇ CH M and CH L Press to turn the power off. Ø POWER Press to change channels. TXN2734F / TXN2434F / TXN2034F TXN2036F TXN2730F .../ TXN2030F TXN2726 Œ MENU Press to see an on-screen menu of your TV's basic features, including the on -screen menu. ˆ STAND BY indicator Lights up when you ...
... control towards this spot on the TV. ´ VOL - , + Press to increase or decrease the volume. Also used to select items on the on-screen menu. ˇ CH M and CH L Press to turn the power off. Ø POWER Press to change channels. TXN2734F / TXN2434F / TXN2034F TXN2036F TXN2730F .../ TXN2030F TXN2726 Œ MENU Press to see an on-screen menu of your TV's basic features, including the on -screen menu. ˆ STAND BY indicator Lights up when you ...
User Manual (user Manual) (ver.1.0) (English)
Page 10
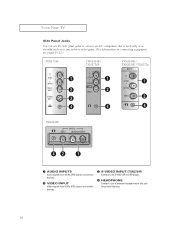
YOUR NEW TV Side Panel Jacks You can use the Side panel jacks to connect an A/V component that is used only occasionally, such as a camcorder or video game. (For information on connecting equipment, see pages 15-22.) TXN2734F TXN2434F / TXN2730F TXN2034F / TXN2030F / TXN2726 TXN2036F Œ AUDIO INPUTS Audio ..., DVD players and similar devices. ´ VIDEO INPUT Video signals from VCRs, DVD players and similar devices. ˇ S-VIDEO INPUT (TXN2734F) Connect to an S-VHS VCR or DVD player. ¨ HEADPHONE Connect a set of external headphones to this jack for private listening. 10
YOUR NEW TV Side Panel Jacks You can use the Side panel jacks to connect an A/V component that is used only occasionally, such as a camcorder or video game. (For information on connecting equipment, see pages 15-22.) TXN2734F TXN2434F / TXN2730F TXN2034F / TXN2030F / TXN2726 TXN2036F Œ AUDIO INPUTS Audio ..., DVD players and similar devices. ´ VIDEO INPUT Video signals from VCRs, DVD players and similar devices. ˇ S-VIDEO INPUT (TXN2734F) Connect to an S-VHS VCR or DVD player. ¨ HEADPHONE Connect a set of external headphones to this jack for private listening. 10

User Manual (user Manual) (ver.1.0) (English)
Page 11
...mode. ˇ AUDIO INPUTS Audio signals from VCRs, DVD players and similar devices. ∏ VHF/UHF Connect to an antenna or to a cable TV system. ¨ DVD AUDIO INPUTS (INPUT 2) Use these audio jacks function as audio for a recording VCR.) ´ VIDEO INPUT Video signals from ...VCRs, DVD players and similar devices. ˆ S-VIDEO INPUT (TXN2734F / TXN2434F / TXN2034F / TXN2036F / TXN2730F / TXN2726) Connect to an S-VHS VCR or DVD player. Ø DVD VIDEO INPUT Connect video from a DVD ...
...mode. ˇ AUDIO INPUTS Audio signals from VCRs, DVD players and similar devices. ∏ VHF/UHF Connect to an antenna or to a cable TV system. ¨ DVD AUDIO INPUTS (INPUT 2) Use these audio jacks function as audio for a recording VCR.) ´ VIDEO INPUT Video signals from ...VCRs, DVD players and similar devices. ˆ S-VIDEO INPUT (TXN2734F / TXN2434F / TXN2034F / TXN2036F / TXN2730F / TXN2726) Connect to an S-VHS VCR or DVD player. Ø DVD VIDEO INPUT Connect video from a DVD ...
User Manual (user Manual) (ver.1.0) (English)
Page 12
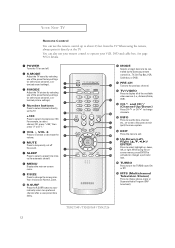
...customized sound settings). ˇ P.MODE Adjust the TV picture by the Samsung remote control (i.e., TV, Set Top Box, VCR, Cable box, or DVD). PRE-CH Tunes to the previous channel. Ò TV/VIDEO Press to display all of the preset factory...the sound. ∏ SLEEP Press to operate your remote control to select a preset time interval for automatic shutoff. YOUR NEW TV Remote Control You can also use the remote control up , down, left, or right. Your choices are Normal, Zoom. ... and CH (Channel Up/Down) Press CH or CH to change the screen size. TXN2734F / TXN2036F / TXN2726 12
...customized sound settings). ˇ P.MODE Adjust the TV picture by the Samsung remote control (i.e., TV, Set Top Box, VCR, Cable box, or DVD). PRE-CH Tunes to the previous channel. Ò TV/VIDEO Press to display all of the preset factory...the sound. ∏ SLEEP Press to operate your remote control to select a preset time interval for automatic shutoff. YOUR NEW TV Remote Control You can also use the remote control up , down, left, or right. Your choices are Normal, Zoom. ... and CH (Channel Up/Down) Press CH or CH to change the screen size. TXN2734F / TXN2036F / TXN2726 12
User Manual (user Manual) (ver.1.0) (English)
Page 13
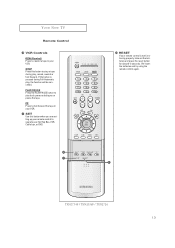
... the button is not functioning properly, take out the batteries and press the reset button for about 2~3 seconds. TXN2734F / TXN2036F / TXN2726 13 FF Press to fast forward the tape in your VCR. YOUR NEW TV Remote Control ¿ VCR Controls REW (Rewind) Press to rewind a tape in your VCR. ¸ SET Use...
... the button is not functioning properly, take out the batteries and press the reset button for about 2~3 seconds. TXN2734F / TXN2036F / TXN2726 13 FF Press to fast forward the tape in your VCR. YOUR NEW TV Remote Control ¿ VCR Controls REW (Rewind) Press to rewind a tape in your VCR. ¸ SET Use...

User Manual (user Manual) (ver.1.0) (English)
Page 14
... 121, press "+100," then press "2" and "1." ¨ MUTE Press to temporarily cut off . ´ Number buttons Press to select channels directly on the TV. ˇ +100 Press to see the time, channel, etc., on -screen menu. " MTS (Multichannel Television Stereo) Press to choose stereo, mono or Separate... Audio Program (SAP broadcast). ' PRE-CH Tunes to the previous channel. ˝ TV/VIDEO Press to display all of the available video sources (i.e., Antenna/cable, VCR). Ô CH and CH (Channel Up/Down) Press CH or CH to...
... 121, press "+100," then press "2" and "1." ¨ MUTE Press to temporarily cut off . ´ Number buttons Press to select channels directly on the TV. ˇ +100 Press to see the time, channel, etc., on -screen menu. " MTS (Multichannel Television Stereo) Press to choose stereo, mono or Separate... Audio Program (SAP broadcast). ' PRE-CH Tunes to the previous channel. ˝ TV/VIDEO Press to display all of the available video sources (i.e., Antenna/cable, VCR). Ô CH and CH (Channel Up/Down) Press CH or CH to...

User Manual (user Manual) (ver.1.0) (English)
Page 16
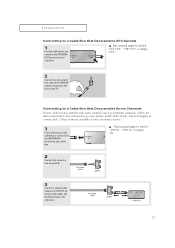
This procedure requires an optional combiner-adaptor (available at most electronics shops). 1 Connect both antenna leads to the TV. Cable without a Cable Box 1 Plug the incoming cable into the VHF/UHF antenna terminal on the bottom of the rear panel. INSTALLATION Antennas with 75...-ohm Round Leads 1 Plug the antenna lead into the VHF/UHF terminal on back of the TV. Connecting Cable TV To connect to view unscrambled cable channels. 16 M Because this TV is cable-ready, you must combine the two antenna signals before connecting the antennas to the combiner. 2 Plug ...
This procedure requires an optional combiner-adaptor (available at most electronics shops). 1 Connect both antenna leads to the TV. Cable without a Cable Box 1 Plug the incoming cable into the VHF/UHF antenna terminal on the bottom of the rear panel. INSTALLATION Antennas with 75...-ohm Round Leads 1 Plug the antenna lead into the VHF/UHF terminal on back of the TV. Connecting Cable TV To connect to view unscrambled cable channels. 16 M Because this TV is cable-ready, you must combine the two antenna signals before connecting the antennas to the combiner. 2 Plug ...
User Manual (user Manual) (ver.1.0) (English)
Page 17
... IN terminal on the cable box. 17 M This terminal might be labeled "ANT OUT", "VHF OUT" or simply, "OUT". 2 Connect the other end of the TV. Connecting to a Cable Box that Descrambles Some Channels If your cable box descrambles only some channels (such as premium channels), follow the instructions below. INSTALLATION...
... IN terminal on the cable box. 17 M This terminal might be labeled "ANT OUT", "VHF OUT" or simply, "OUT". 2 Connect the other end of the TV. Connecting to a Cable Box that Descrambles Some Channels If your cable box descrambles only some channels (such as premium channels), follow the instructions below. INSTALLATION...
User Manual (user Manual) (ver.1.0) (English)
Page 18
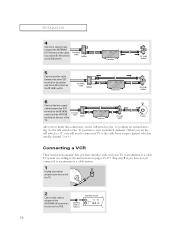
...terminal on the RF (A/B) switch and the VHF/UHF terminal on the rear of the VCR. 18 Skip step 1 if you have already connected your TV to the cable box's output channel, which is usually channel 3 or 4.) Connecting a VCR These instructions assume that you 've made this connection, ...set the A/B switch to "B", you will need to tune your TV to an antenna or a cable TV system (according to the "A" position for normal viewing. Set the A/B switch to the "B" position to view scrambled channels. (When you set ...
...terminal on the RF (A/B) switch and the VHF/UHF terminal on the rear of the VCR. 18 Skip step 1 if you have already connected your TV to the cable box's output channel, which is usually channel 3 or 4.) Connecting a VCR These instructions assume that you 've made this connection, ...set the A/B switch to "B", you will need to tune your TV to an antenna or a cable TV system (according to the "A" position for normal viewing. Set the A/B switch to the "B" position to view scrambled channels. (When you set ...

User Manual (user Manual) (ver.1.0) (English)
Page 19
... a video cable between the ANTENNA OUT terminal on the VCR and the antenna terminal on the TV. A coaxial cable is usually included with a VCR. (If not, check your TV may be different. 19 Note: This figure shows the Standard connector-jack panel. INSTALLATION 3 Connect a coaxial cable between the... VIDEO OUT jack on the VCR and the VIDEO jack on the TV. Follow the instructions in "Viewing a VCR or Camcorder...
... a video cable between the ANTENNA OUT terminal on the VCR and the antenna terminal on the TV. A coaxial cable is usually included with a VCR. (If not, check your TV may be different. 19 Note: This figure shows the Standard connector-jack panel. INSTALLATION 3 Connect a coaxial cable between the... VIDEO OUT jack on the VCR and the VIDEO jack on the TV. Follow the instructions in "Viewing a VCR or Camcorder...
User Manual (user Manual) (ver.1.0) (English)
Page 20
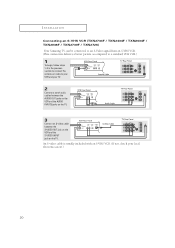
INSTALLATION Connecting an S-VHS VCR (TXN2734F / TXN2434F / TXN2034F / TXN2036F / TXN2730F / TXN2726) Your Samsung TV can be connected to an S-Video signal from an S-VHS VCR. (This connection delivers a better picture as compared to a standard VHS VCR.) 1 To begin, follow ... or cable to your VCR and your local electronics store.) 20 An S-video cable is usually included with an S-VHS VCR. (If not, check your TV. 2 Connect a set of audio cables between the AUDIO OUT jacks on the VCR and the AUDIO INPUT2 jacks on the...
INSTALLATION Connecting an S-VHS VCR (TXN2734F / TXN2434F / TXN2034F / TXN2036F / TXN2730F / TXN2726) Your Samsung TV can be connected to an S-Video signal from an S-VHS VCR. (This connection delivers a better picture as compared to a standard VHS VCR.) 1 To begin, follow ... or cable to your VCR and your local electronics store.) 20 An S-video cable is usually included with an S-VHS VCR. (If not, check your TV. 2 Connect a set of audio cables between the AUDIO OUT jacks on the VCR and the AUDIO INPUT2 jacks on the...
User Manual (user Manual) (ver.1.0) (English)
Page 21
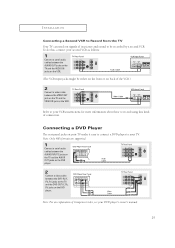
... the VIDEO IN jack on the VCR. Note: Only 480i formats are supported. 1 Connect a set of audio cables between the AUDIO OUT jacks on the TV and the AUDIO IN jacks on the VCR. (The VCR input jacks might be either on the front or on back of its picture and... information about how to record using this , connect your second VCR as follows: 1 Connect a set of connection. INSTALLATION Connecting a Second VCR to Record from the TV Your TV can send out signals of the VCR.) 2 Connect a video cable between the DVD-IN (Y, Pb, Pr) jacks on the...
... the VIDEO IN jack on the VCR. Note: Only 480i formats are supported. 1 Connect a set of audio cables between the AUDIO OUT jacks on the TV and the AUDIO IN jacks on the VCR. (The VCR input jacks might be either on the front or on back of its picture and... information about how to record using this , connect your second VCR as follows: 1 Connect a set of connection. INSTALLATION Connecting a Second VCR to Record from the TV Your TV can send out signals of the VCR.) 2 Connect a video cable between the DVD-IN (Y, Pb, Pr) jacks on the...

User Manual (user Manual) (ver.1.0) (English)
Page 22
...back of the camcorder. 2 Connect an audio cable between the AUDIO OUTPUT jack on the camcorder and the AUDIO terminals on the side of the TV. 3 Connect a video cable between the VIDEO OUTPUT jack on the camcorder and the VIDEO terminal on the side of two cables. The actual configuration... for your TV. Note: This figure shows the Standard connector-jack panel. They allow you need to connect a set of the TV. INSTALLATION Connecting a Camcorder The side panel jacks on your TV make it easy to connect a camcorder to your...
...back of the camcorder. 2 Connect an audio cable between the AUDIO OUTPUT jack on the camcorder and the AUDIO terminals on the side of the TV. 3 Connect a video cable between the VIDEO OUTPUT jack on the camcorder and the VIDEO terminal on the side of two cables. The actual configuration... for your TV. Note: This figure shows the Standard connector-jack panel. They allow you need to connect a set of the TV. INSTALLATION Connecting a Camcorder The side panel jacks on your TV make it easy to connect a camcorder to your...
User Manual (user Manual) (ver.1.0) (English)
Page 23
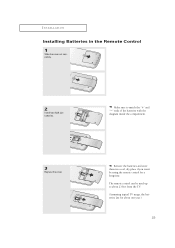
The remote control can be using the remote control for about 23 feet from the TV. (Assuming typical TV usage, the batteries last for a long time. M 2 Install two AAA size batteries. Make sure to about one year.) 23 M Remove the batteries and store them in the Remote Control 1 Slide the cover out completely. INSTALLATION Installing Batteries in a cool, dry place if you won't be used up to match the "+" and "-" ends of the batteries with the diagram inside the compartment. 3 Replace the cover.
The remote control can be using the remote control for about 23 feet from the TV. (Assuming typical TV usage, the batteries last for a long time. M 2 Install two AAA size batteries. Make sure to about one year.) 23 M Remove the batteries and store them in the Remote Control 1 Slide the cover out completely. INSTALLATION Installing Batteries in a cool, dry place if you won't be used up to match the "+" and "-" ends of the batteries with the diagram inside the compartment. 3 Replace the cover.


