

Open Source Guide (ENGLISH)
Page 1
... equivalent access to copy the source code from the Program, and can apply it to most effectively convey the exclusion of warranty; SHOULD THE PROGRAM PROVE DEFECTIVE, YOU ASSUME THE COST OF ALL NECESSARY SERVICING, REPAIR OR CORRECTION. 12. The original manual has wrong versions of it, thus forming a work based on the Program, and copy and distribute such modifications or work based on...
... equivalent access to copy the source code from the Program, and can apply it to most effectively convey the exclusion of warranty; SHOULD THE PROGRAM PROVE DEFECTIVE, YOU ASSUME THE COST OF ALL NECESSARY SERVICING, REPAIR OR CORRECTION. 12. The original manual has wrong versions of it, thus forming a work based on the Program, and copy and distribute such modifications or work based on...

Open Source Guide (ENGLISH)
Page 2
... LIBRARY TO OPERATE WITH ANY OTHER SOFTWARE), EVEN IF SUCH HOLDER OR OTHER PARTY HAS BEEN ADVISED OF THE POSSIBILITY OF SUCH DAMAGES. You can redistribute and change. It is... found. 16. To apply these terms (or, alternatively, under the terms of warranty; How to Apply These Terms to Your New Libraries If you develop a new library, and you want it to be of the greatest possible use... to where the full notice is safest to attach them to the start of each file should have at least the "copyright" line and a pointer to the public, we recommend making it free software...
... LIBRARY TO OPERATE WITH ANY OTHER SOFTWARE), EVEN IF SUCH HOLDER OR OTHER PARTY HAS BEEN ADVISED OF THE POSSIBILITY OF SUCH DAMAGES. You can redistribute and change. It is... found. 16. To apply these terms (or, alternatively, under the terms of warranty; How to Apply These Terms to Your New Libraries If you develop a new library, and you want it to be of the greatest possible use... to where the full notice is safest to attach them to the start of each file should have at least the "copyright" line and a pointer to the public, we recommend making it free software...
User Manual (user Manual) (ver.1.0) (English)
Page 2
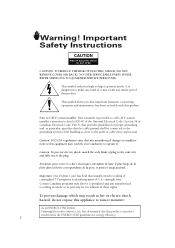
Warning! Important Safety Instructions CAUTION RISK OF ELECTRIC SHOCK DO NOT OPEN CAUTION: TO REDUCE THE RISK OF ELECTRIC SHOCK, DO NOT REMOVE COVER (OR BACK). Caution: To prevent electric shock, match the wide blade of these rights. Attention: pour ... concerning operation and maintenance has been included with any unauthorized changes or modifications to this appliance to the wide slot, and fully insert the plug. This symbol alerts you that the cable ground shall be in violation of plug to rain or moisture. NO USER SERVICEABLE PARTS INSIDE. copyright laws. Samsung Electronics ...
Warning! Important Safety Instructions CAUTION RISK OF ELECTRIC SHOCK DO NOT OPEN CAUTION: TO REDUCE THE RISK OF ELECTRIC SHOCK, DO NOT REMOVE COVER (OR BACK). Caution: To prevent electric shock, match the wide blade of these rights. Attention: pour ... concerning operation and maintenance has been included with any unauthorized changes or modifications to this appliance to the wide slot, and fully insert the plug. This symbol alerts you that the cable ground shall be in violation of plug to rain or moisture. NO USER SERVICEABLE PARTS INSIDE. copyright laws. Samsung Electronics ...

User Manual (user Manual) (ver.1.0) (English)
Page 4
... grounding electrode. This television receiver provides display of television closed captioning in additional damage to the unit. • Upon completion of the FCC rules. 4 When the power-supply cord or plug is grounded so as they may touch dangerous voltages or cause damage. If the TV receiver does not operate normally by items placed on the TV receiver. • Ground outdoor antennas. This will...
... grounding electrode. This television receiver provides display of television closed captioning in additional damage to the unit. • Upon completion of the FCC rules. 4 When the power-supply cord or plug is grounded so as they may touch dangerous voltages or cause damage. If the TV receiver does not operate normally by items placed on the TV receiver. • Ground outdoor antennas. This will...

User Manual (user Manual) (ver.1.0) (English)
Page 5
... servicing use only identical replacement parts. 4) Follow all instructions. 5) Do not use attachments/accessories specified by the manufacturer. 12) Use only with cart, stand, tripod, bracket, or table specified by the manufacturer, or sold with one wider than the other apparatus (including amplifiers) that produce heat. 9) Do not defeat the safety purpose of the obsolete outlet. 10) Protect the power cord from...
... servicing use only identical replacement parts. 4) Follow all instructions. 5) Do not use attachments/accessories specified by the manufacturer. 12) Use only with cart, stand, tripod, bracket, or table specified by the manufacturer, or sold with one wider than the other apparatus (including amplifiers) that produce heat. 9) Do not defeat the safety purpose of the obsolete outlet. 10) Protect the power cord from...
User Manual (user Manual) (ver.1.0) (English)
Page 6
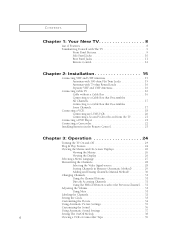
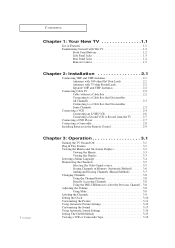
... 21 Connecting a DVD Player 21 Connecting a Camcorder 22 Installing Batteries in the Remote Control 23 Chapter 3: Operation 24 Turning the TV On and Off 24 Plug & Play Feature 24 Viewing the Menus and On-Screen Displays 26 Viewing the Menus 26 Viewing the Display 26 Selecting a Menu Language 27 Memorizing the Channels 28 Selecting the Video Signal-source 28 Storing Channels in Memory (Automatic Method 29 Adding and Erasing Channels (Manual Method 30 Changing Channels 31 Using the Channel Buttons...
... 21 Connecting a DVD Player 21 Connecting a Camcorder 22 Installing Batteries in the Remote Control 23 Chapter 3: Operation 24 Turning the TV On and Off 24 Plug & Play Feature 24 Viewing the Menus and On-Screen Displays 26 Viewing the Menus 26 Viewing the Display 26 Selecting a Menu Language 27 Memorizing the Channels 28 Selecting the Video Signal-source 28 Storing Channels in Memory (Automatic Method 29 Adding and Erasing Channels (Manual Method 30 Changing Channels 31 Using the Channel Buttons...

User Manual (user Manual) (ver.1.0) (English)
Page 11
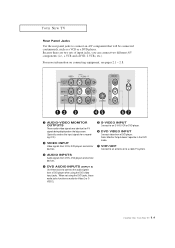
... TV Rear Panel Jacks Use the rear panel jacks to connect an A/V component that will be connected continuously, such as the input signals for Video 2 or SVIDEO. 11 Note: Monitor Output doesn't operate in the DVD mode. ˇ AUDIO INPUTS Audio signals from a DVD player when using the DVD video input jacks. When not using the DVD jacks, these jacks to connect the audio signals from VCRs, DVD players and similar devices. ∏ VHF/UHF Connect to an antenna or to a cable TV system. ¨ DVD AUDIO INPUTS (INPUT 2) Use these audio...
... TV Rear Panel Jacks Use the rear panel jacks to connect an A/V component that will be connected continuously, such as the input signals for Video 2 or SVIDEO. 11 Note: Monitor Output doesn't operate in the DVD mode. ˇ AUDIO INPUTS Audio signals from a DVD player when using the DVD video input jacks. When not using the DVD jacks, these jacks to connect the audio signals from VCRs, DVD players and similar devices. ∏ VHF/UHF Connect to an antenna or to a cable TV system. ¨ DVD AUDIO INPUTS (INPUT 2) Use these audio...
User Manual (user Manual) (ver.1.0) (English)
Page 12
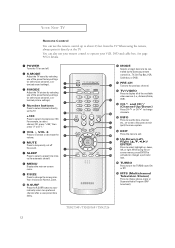
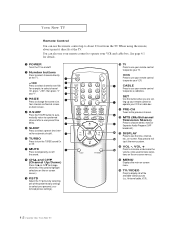
... time interval for details. Œ POWER Turns the TV on -screen. While using the remote, always point it directly at the TV. " MENU Displays the main on-screen menu. ' P.SIZE Press to see the time, channel, etc., on and off. ´ S.MODE Adjust the TV sound by selecting one of the preset factory settings (or select your personal, customized sound settings). ˇ P.MODE Adjust the TV picture by the Samsung remote control (i.e., TV, Set Top Box, VCR, Cable box, or DVD...
... time interval for details. Œ POWER Turns the TV on -screen. While using the remote, always point it directly at the TV. " MENU Displays the main on-screen menu. ' P.SIZE Press to see the time, channel, etc., on and off. ´ S.MODE Adjust the TV sound by selecting one of the preset factory settings (or select your personal, customized sound settings). ˇ P.MODE Adjust the TV picture by the Samsung remote control (i.e., TV, Set Top Box, VCR, Cable box, or DVD...
User Manual (user Manual) (ver.1.0) (English)
Page 18
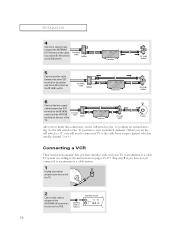
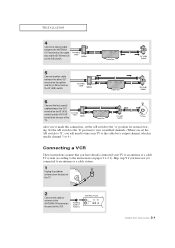
... this connection, set the A/B switch to "B", you will need to tune your TV to the cable box's output channel, which is usually channel 3 or 4.) Connecting a VCR These instructions assume that you have not yet connected to an antenna or a cable system. 1 Unplug the cable or antenna from the back of the TV. 2 Connect the cable or antenna to the "A" position for normal viewing. Skip step 1 if you set the A/B switch to the ANTENNA...
... this connection, set the A/B switch to "B", you will need to tune your TV to the cable box's output channel, which is usually channel 3 or 4.) Connecting a VCR These instructions assume that you have not yet connected to an antenna or a cable system. 1 Unplug the cable or antenna from the back of the TV. 2 Connect the cable or antenna to the "A" position for normal viewing. Skip step 1 if you set the A/B switch to the ANTENNA...
User Manual (user Manual) (ver.1.0) (English)
Page 21
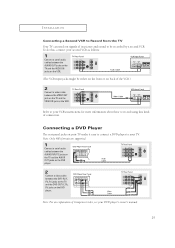
...'s instructions for more information about how to your DVD player's owner's manual. 21 To do this kind of its picture and sound to be either on the front or on back of audio cables between the AUDIO INPUT 2 jacks on the TV and the AUDIO OUT jacks on the DVD player. 2 Connect a video cable between the VIDEO OUT jack on the TV and the VIDEO IN jack on the DVD player. INSTALLATION Connecting...
...'s instructions for more information about how to your DVD player's owner's manual. 21 To do this kind of its picture and sound to be either on the front or on back of audio cables between the AUDIO INPUT 2 jacks on the TV and the AUDIO OUT jacks on the DVD player. 2 Connect a video cable between the VIDEO OUT jack on the TV and the VIDEO IN jack on the DVD player. INSTALLATION Connecting...

User Manual (user Manual) (ver.1.0) (English)
Page 24
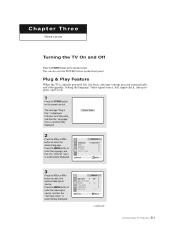
..., Auto program, and Clock. 1 Press the POWER button on the front panel. The message "Plug & Play" is automatically displayed. 3 Press the œ or √ button to enter the video signal source, and then the "Ant Input check" is initially powered On, five basic customer settings proceed automatically and subsequently: Setting the language, Video signal source, Ant. Press the MENU button to select the desired language. You can also use the POWER button on the remote control...
..., Auto program, and Clock. 1 Press the POWER button on the front panel. The message "Plug & Play" is automatically displayed. 3 Press the œ or √ button to enter the video signal source, and then the "Ant Input check" is initially powered On, five basic customer settings proceed automatically and subsequently: Setting the language, Video signal source, Ant. Press the MENU button to select the desired language. You can also use the POWER button on the remote control...
User Manual (user Manual) (ver.1.0) (English)
Page 40
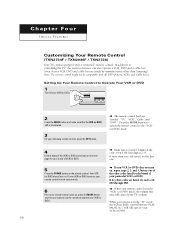
... DVD players, VCRs, and Cable boxes. Setting Up Your Remote Control to the "VCR" (or DVD) mode. 4 Enter 3 digits of the VCR (or DVD) code listed on , your remote control is now set correctly. 6 Once your remote control is set up, press the MODE button any time you enter 3 digits of the other than one code listed, try each code, 000 through 088. Your VCR (or DVD) should turn on, repeat steps 2, 3, and 4, but try one . 5 Press the POWER button...
... DVD players, VCRs, and Cable boxes. Setting Up Your Remote Control to the "VCR" (or DVD) mode. 4 Enter 3 digits of the VCR (or DVD) code listed on , your remote control is now set correctly. 6 Once your remote control is set up, press the MODE button any time you enter 3 digits of the other than one code listed, try each code, 000 through 088. Your VCR (or DVD) should turn on, repeat steps 2, 3, and 4, but try one . 5 Press the POWER button...
User Manual (user Manual) (ver.1.0) (English)
Page 2
NO USER SERVICEABLE PARTS INSIDE. Important: One Federal Court has held that unauthorized recording of copyrighted TV programs is provided to call CATV system installer's attention to Article 820-40 of the National Electrical Code (Section 54 of Canadian Electrical Code, Part I), that provides guidelines for energy efficiency. Warning! This symbol alerts you that the cable ground shall be connected to...
NO USER SERVICEABLE PARTS INSIDE. Important: One Federal Court has held that unauthorized recording of copyrighted TV programs is provided to call CATV system installer's attention to Article 820-40 of the National Electrical Code (Section 54 of Canadian Electrical Code, Part I), that provides guidelines for energy efficiency. Warning! This symbol alerts you that the cable ground shall be connected to...
User Manual (user Manual) (ver.1.0) (English)
Page 4
... voltage surges and built-up static charges. This television receiver provides display of television closed captioning in accordance with such lines might be extremely careful to an antenna discharge unit, size of grounding conductors, location of overhead power lines or other controls may result in damage and will not be sure the antenna or cable system is grounded so as to determine that...
... voltage surges and built-up static charges. This television receiver provides display of television closed captioning in accordance with such lines might be extremely careful to an antenna discharge unit, size of grounding conductors, location of overhead power lines or other controls may result in damage and will not be sure the antenna or cable system is grounded so as to determine that...
User Manual (user Manual) (ver.1.0) (English)
Page 6
... from the TV 2.7 Connecting a DVD Player 2.7 Connecting a Camcorder 2.8 Installing Batteries in the Remote Control 2.9 Chapter 3: Operation 3.1 Turning the TV On and Off 3.1 Plug & Play Feature 3.1 Viewing the Menus and On-Screen Displays 3.3 Viewing the Menus 3.3 Viewing the Display 3.3 Selecting a Menu Language 3.4 Memorizing the Channels 3.5 Selecting the Video Signal-source 3.5 Storing Channels in Memory (Automatic Method 3.6 Adding and Erasing Channels (Manual Method 3.7 Changing Channels 3.8 Using the Channel Buttons 3.8 Directly Accessing Channels 3.8 Using the PRE-CH...
... from the TV 2.7 Connecting a DVD Player 2.7 Connecting a Camcorder 2.8 Installing Batteries in the Remote Control 2.9 Chapter 3: Operation 3.1 Turning the TV On and Off 3.1 Plug & Play Feature 3.1 Viewing the Menus and On-Screen Displays 3.3 Viewing the Menus 3.3 Viewing the Display 3.3 Selecting a Menu Language 3.4 Memorizing the Channels 3.5 Selecting the Video Signal-source 3.5 Storing Channels in Memory (Automatic Method 3.6 Adding and Erasing Channels (Manual Method 3.7 Changing Channels 3.8 Using the Channel Buttons 3.8 Directly Accessing Channels 3.8 Using the PRE-CH...
User Manual (user Manual) (ver.1.0) (English)
Page 11
Note: Monitor Output doesn't operate in the DVD mode. ∏ VHF/UHF Connect to an antenna or to a cable TV system. ˇ AUDIO INPUTS Audio signals from VCRs, DVD players and similar devices. ¨ DVD AUDIO INPUTS (INPUT 2) Use these jacks to an S-VHS VCR or DVD player. Ø DVD VIDEO INPUT Connect video from a DVD player when using the DVD jacks, these audio jacks function as a VCR or a DVD player. When not using the DVD video input jacks. YOUR NEW TV Rear Panel Jacks Use the rear panel jacks to connect an A/V component that...
Note: Monitor Output doesn't operate in the DVD mode. ∏ VHF/UHF Connect to an antenna or to a cable TV system. ˇ AUDIO INPUTS Audio signals from VCRs, DVD players and similar devices. ¨ DVD AUDIO INPUTS (INPUT 2) Use these jacks to an S-VHS VCR or DVD player. Ø DVD VIDEO INPUT Connect video from a DVD player when using the DVD jacks, these audio jacks function as a VCR or a DVD player. When not using the DVD video input jacks. YOUR NEW TV Rear Panel Jacks Use the rear panel jacks to connect an A/V component that...
User Manual (user Manual) (ver.1.0) (English)
Page 12
... or CHw to change the screen size. SET Use this button when you are Normal screen or Zoom screen. ¨ R.SURF Press the R.SURF button to automatically return to a preferred channel after a user-preset time delay. ˆ SLEEP Press to select a preset time interval for details. Œ POWER Turns the TV on and off. ´ Number buttons Press to select channels directly on -screen menu. ı TV/VIDEO Press to operate a cable box. See page...
... or CHw to change the screen size. SET Use this button when you are Normal screen or Zoom screen. ¨ R.SURF Press the R.SURF button to automatically return to a preferred channel after a user-preset time delay. ˆ SLEEP Press to select a preset time interval for details. Œ POWER Turns the TV on and off. ´ Number buttons Press to select channels directly on -screen menu. ı TV/VIDEO Press to operate a cable box. See page...
User Manual (user Manual) (ver.1.0) (English)
Page 17
... the cable box's output channel, which is usually channel 3 or 4.) Connecting a VCR These instructions assume that you set the A/B switch to the "A" position for normal viewing. Set the A/B switch to the "B" position to view scrambled channels. (When you have not yet connected to an antenna or a cable system. 1 Unplug the cable or antenna from the back of the TV. 2 Connect the cable or antenna to the instructions on pages 2.1-2.3). INSTALLATION 4 Connect a coaxial cable between the ANTENNA OUT...
... the cable box's output channel, which is usually channel 3 or 4.) Connecting a VCR These instructions assume that you set the A/B switch to the "A" position for normal viewing. Set the A/B switch to the "B" position to view scrambled channels. (When you have not yet connected to an antenna or a cable system. 1 Unplug the cable or antenna from the back of the TV. 2 Connect the cable or antenna to the instructions on pages 2.1-2.3). INSTALLATION 4 Connect a coaxial cable between the ANTENNA OUT...
User Manual (user Manual) (ver.1.0) (English)
Page 23
... use the POWER button on the remote control. input check, Auto program, and Clock. 1 Press the POWER button on the remote control. Press the MENU button to enter the video signal source, and then the "Ant Input check" is automatically displayed. Press the MENU button to enter the language, and then the "Channel" menu is automatically displayed. continued... 3.1 CHAPTER THREE: TV OPERATION Plug & Play Feature When the TV is displayed. The message "Plug & Play" is initially powered On, five basic customer settings...
... use the POWER button on the remote control. input check, Auto program, and Clock. 1 Press the POWER button on the remote control. Press the MENU button to enter the video signal source, and then the "Ant Input check" is automatically displayed. Press the MENU button to enter the language, and then the "Channel" menu is automatically displayed. continued... 3.1 CHAPTER THREE: TV OPERATION Plug & Play Feature When the TV is displayed. The message "Plug & Play" is initially powered On, five basic customer settings...
User Manual (user Manual) (ver.1.0) (English)
Page 52
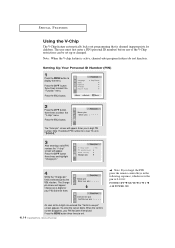
... the V-Chip restrictions can be set is selected, press the VOL + button. As soon as the 4 digits are entered, the "Confirm new pin" screen appears. Press the MENU button three times to 0-0-0-0: POWER OFF ➜ MUTE ➜ 8 ➜ 2 ➜ 4 ➜ POWER ON. SPECIAL FEATURES Using the V-Chip The V-Chip feature automatically locks out programming that is active, channel-auto program features do not function. Press...
... the V-Chip restrictions can be set is selected, press the VOL + button. As soon as the 4 digits are entered, the "Confirm new pin" screen appears. Press the MENU button three times to 0-0-0-0: POWER OFF ➜ MUTE ➜ 8 ➜ 2 ➜ 4 ➜ POWER ON. SPECIAL FEATURES Using the V-Chip The V-Chip feature automatically locks out programming that is active, channel-auto program features do not function. Press...


