
User Manual (user Manual) (ver.1.0) (English)
Page 2
...ENERGY STAR Partner, Samsung Electronics America, Inc. Important Safety Instructions CAUTION RISK OF ELECTRIC SHOCK DO NOT OPEN CAUTION: TO REDUCE THE RISK OF ELECTRIC SHOCK, DO NOT REMOVE COVER (OR BACK). NO USER SERVICEABLE PARTS INSIDE. This ...Code (Section 54 of Canadian Electrical Code, Part I), that this appliance to CATV system installer: This reminder is an infringement of these rights. Certain Canadian programs may also be copyrighted and any unauthorized recording in whole or in part may result in fire or electric shock hazard, do not expose this product or product model...
...ENERGY STAR Partner, Samsung Electronics America, Inc. Important Safety Instructions CAUTION RISK OF ELECTRIC SHOCK DO NOT OPEN CAUTION: TO REDUCE THE RISK OF ELECTRIC SHOCK, DO NOT REMOVE COVER (OR BACK). NO USER SERVICEABLE PARTS INSIDE. This ...Code (Section 54 of Canadian Electrical Code, Part I), that this appliance to CATV system installer: This reminder is an infringement of these rights. Certain Canadian programs may also be copyrighted and any unauthorized recording in whole or in part may result in fire or electric shock hazard, do not expose this product or product model...

User Manual (user Manual) (ver.1.0) (English)
Page 3
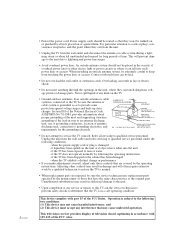
... place the TV receiver on -screen menus and closed captioning capabilities, making it can increase the risk of the best products in television technology. Use only with or immersion in mind when installing, using your outlet. 1 SAFETY Move the TV and cart with any attachments and/or equipment without approval of power supplied to insert the plug fully into the power outlet only...
... place the TV receiver on -screen menus and closed captioning capabilities, making it can increase the risk of the best products in television technology. Use only with or immersion in mind when installing, using your outlet. 1 SAFETY Move the TV and cart with any attachments and/or equipment without approval of power supplied to insert the plug fully into the power outlet only...
User Manual (user Manual) (ver.1.0) (English)
Page 4
... been spilled on or pinched by the operating instructions. When installing an outside antenna or cable system is connected to the TV, be walked on the unit or if objects have the same characteristics as to the following the operating instructions - This television receiver provides display of television closed captioning in performance • If you make adjustments yourself, adjust only those that are covered by objects...
... been spilled on or pinched by the operating instructions. When installing an outside antenna or cable system is connected to the TV, be walked on the unit or if objects have the same characteristics as to the following the operating instructions - This television receiver provides display of television closed captioning in performance • If you make adjustments yourself, adjust only those that are covered by objects...

User Manual (user Manual) (ver.1.0) (English)
Page 5
... from the TV 2.7 Connecting a DVD Player 2.7 Connecting a Camcorder 2.8 Installing Batteries in the Remote Control 2.9 Chapter 3: Operation 3.1 Turning the TV On and Off 3.1 Plug & Play Feature 3.1 Viewing the Menus and On-Screen Displays 3.3 Viewing the Menus 3.3 Viewing the Display 3.3 Selecting a Menu Language 3.4 Memorizing the Channels 3.5 Selecting the Video Signal-source 3.5 Storing Channels in Memory (Automatic Method 3.6 Adding and Erasing Channels (Manual Method 3.7 Changing Channels 3.8 Using the Channel Buttons 3.8 Directly Accessing Channels 3.8 Using the PRE-CH...
... from the TV 2.7 Connecting a DVD Player 2.7 Connecting a Camcorder 2.8 Installing Batteries in the Remote Control 2.9 Chapter 3: Operation 3.1 Turning the TV On and Off 3.1 Plug & Play Feature 3.1 Viewing the Menus and On-Screen Displays 3.3 Viewing the Menus 3.3 Viewing the Display 3.3 Selecting a Menu Language 3.4 Memorizing the Channels 3.5 Selecting the Video Signal-source 3.5 Storing Channels in Memory (Automatic Method 3.6 Adding and Erasing Channels (Manual Method 3.7 Changing Channels 3.8 Using the Channel Buttons 3.8 Directly Accessing Channels 3.8 Using the PRE-CH...

User Manual (user Manual) (ver.1.0) (English)
Page 6
...Features 4.1 Customizing Your Remote Control 4.1 Setting Up Your Remote Control to Operate Your VCR. . . . 4.1 Setting Up Your Remote Control to Operate Your Cable Box 4.3 Fine Tuning Channels 4.4 Digital Noise Reduction 4.5 Title 4.6 Changing the Screen Size 4.7 Using the R.Surf Feature 4.8 Setting the On/Off Timer 4.9 Setting the Sleep Timer 4.10 Sound Features 4.11 Choosing a Multi-Channel Sound (MTS) Soundtrack. . . . . 4.11 Extra sound settings (Turbo Sound, Surround, or Auto Volume 4.12 Viewing Closed Captions 4.13 Using the V-Chip (Only USA 4.14 Setting Up Your Personal ID...
...Features 4.1 Customizing Your Remote Control 4.1 Setting Up Your Remote Control to Operate Your VCR. . . . 4.1 Setting Up Your Remote Control to Operate Your Cable Box 4.3 Fine Tuning Channels 4.4 Digital Noise Reduction 4.5 Title 4.6 Changing the Screen Size 4.7 Using the R.Surf Feature 4.8 Setting the On/Off Timer 4.9 Setting the Sleep Timer 4.10 Sound Features 4.11 Choosing a Multi-Channel Sound (MTS) Soundtrack. . . . . 4.11 Extra sound settings (Turbo Sound, Surround, or Auto Volume 4.12 Viewing Closed Captions 4.13 Using the V-Chip (Only USA 4.14 Setting Up Your Personal ID...
User Manual (user Manual) (ver.1.0) (English)
Page 7
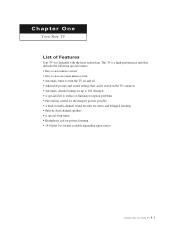
...-to-use remote control • Easy-to-use on-screen menu system • Automatic timer to turn the TV on and off • Adjustable picture and sound settings that can be stored in the TV's memory • Automatic channel tuning for up to 181 channels • A special filter to reduce or eliminate reception problems • Fine tuning control for the sharpest picture possible • A built-in multi-channel sound...
...-to-use remote control • Easy-to-use on-screen menu system • Automatic timer to turn the TV on and off • Adjustable picture and sound settings that can be stored in the TV's memory • Automatic channel tuning for up to 181 channels • A special filter to reduce or eliminate reception problems • Fine tuning control for the sharpest picture possible • A built-in multi-channel sound...

User Manual (user Manual) (ver.1.0) (English)
Page 8
... the TIMER mode is turned on, the POWER & TIMER indicator blinks ten times. Even if the power is turned off . 1.2 CHAPTER ONE: YOUR NEW TV To use the remote control. Also press to highlight various items on the on-screen menu. ˆ Remote Control Sensor Aim the remote control towards this function.) ∏ POWER Press to turn the TV on the onscreen menu. ¨ CH w and CH v (Channel) Press to change between viewing TV programs and signals...
... the TIMER mode is turned on, the POWER & TIMER indicator blinks ten times. Even if the power is turned off . 1.2 CHAPTER ONE: YOUR NEW TV To use the remote control. Also press to highlight various items on the on-screen menu. ˆ Remote Control Sensor Aim the remote control towards this function.) ∏ POWER Press to turn the TV on the onscreen menu. ¨ CH w and CH v (Channel) Press to change between viewing TV programs and signals...

User Manual (user Manual) (ver.1.0) (English)
Page 10
... identical to A/V signals being displayed on connecting equipment, see pages 2.1 - 2.8. Œ VIDEO INPUT jack Video signals from VCRs, DVD players and similar devices. ´ AUDIO INPUTS(INPUT1 and 2)/ DVD AUDIO INPUTS(INPUT 2) Audio signals from VCRs, DVD players and similar devices. Note: Only black and white signals are output from a monitor in DVD mode. Ø VHF/UHF Connect to an antenna or to a cable TV system. ˇ AUDIO-VIDEO MONITOR OUTPUT jacks These audio-video signals are two sets of input jacks, you can connect two different A/V components (i.e., a VCR and...
... identical to A/V signals being displayed on connecting equipment, see pages 2.1 - 2.8. Œ VIDEO INPUT jack Video signals from VCRs, DVD players and similar devices. ´ AUDIO INPUTS(INPUT1 and 2)/ DVD AUDIO INPUTS(INPUT 2) Audio signals from VCRs, DVD players and similar devices. Note: Only black and white signals are output from a monitor in DVD mode. Ø VHF/UHF Connect to an antenna or to a cable TV system. ˇ AUDIO-VIDEO MONITOR OUTPUT jacks These audio-video signals are two sets of input jacks, you can connect two different A/V components (i.e., a VCR and...

User Manual (user Manual) (ver.1.0) (English)
Page 11
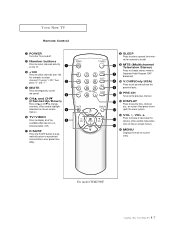
... screen size. ¨ R.SURF Press the R.SURF button to automatically return to a preferred channel after a user-preset time delay. ˆ SLEEP Press to operate a cable box. SET Use this button when you are not described below do not function. Œ POWER Turns the TV on -screen menu. ı TV/VIDEO Press to display all of the preset factory settings (or select your personal, customized picture settings). ˝ TV Press to use your remote control to operate your remote control...
... screen size. ¨ R.SURF Press the R.SURF button to automatically return to a preferred channel after a user-preset time delay. ˆ SLEEP Press to operate a cable box. SET Use this button when you are not described below do not function. Œ POWER Turns the TV on -screen menu. ı TV/VIDEO Press to display all of the preset factory settings (or select your personal, customized picture settings). ˝ TV Press to use your remote control to operate your remote control...
User Manual (user Manual) (ver.1.0) (English)
Page 13
... to set up and activate the parental locks. Ô PRE-CH Tunes to the previous channel. DISPLAY Press to make selections on the on-screen menus.) Ú MENU Displays the main on-screen menu. YOUR NEW TV Remote Control Œ POWER Turns the TV on and off the sound. ˆ CHv and CHw (Channel Up/Down) Press CHv or CHw to change channels. (Also used to see the time, channel...
... to set up and activate the parental locks. Ô PRE-CH Tunes to the previous channel. DISPLAY Press to make selections on the on-screen menus.) Ú MENU Displays the main on-screen menu. YOUR NEW TV Remote Control Œ POWER Turns the TV on and off the sound. ˆ CHv and CHw (Channel Up/Down) Press CHv or CHw to change channels. (Also used to see the time, channel...

User Manual (user Manual) (ver.1.0) (English)
Page 15
... view unscrambled cable channels. 2.2 CHAPTER TWO: INSTALLATION INSTALLATION Antennas with 75-ohm Round Leads 1 Plug the antenna lead into the VHF/UHF antenna terminal on back of the TV. w Because this TV is cable-ready, you must combine the two antenna signals before connecting the antennas to the combiner. 2 Plug the combiner into the VHF/UHF terminal on the bottom of the rear panel. Cable without a Cable Box 1 Plug the incoming cable...
... view unscrambled cable channels. 2.2 CHAPTER TWO: INSTALLATION INSTALLATION Antennas with 75-ohm Round Leads 1 Plug the antenna lead into the VHF/UHF antenna terminal on back of the TV. w Because this TV is cable-ready, you must combine the two antenna signals before connecting the antennas to the combiner. 2 Plug the combiner into the VHF/UHF terminal on the bottom of the rear panel. Cable without a Cable Box 1 Plug the incoming cable...

User Manual (user Manual) (ver.1.0) (English)
Page 16
... Some Channels If your cable box descrambles only some channels (such as premium channels), follow the instructions below. w This terminal might be labeled "ANT OUT," "VHF OUT," or simply, "OUT." 2 Connect the other end of this cable to a two-way splitter. 3 Connect a coaxial cable between an OUTPUT terminal on the splitter and the IN terminal on the cable box. 2.3 CHAPTER TWO: INSTALLATION You will need...
... Some Channels If your cable box descrambles only some channels (such as premium channels), follow the instructions below. w This terminal might be labeled "ANT OUT," "VHF OUT," or simply, "OUT." 2 Connect the other end of this cable to a two-way splitter. 3 Connect a coaxial cable between an OUTPUT terminal on the splitter and the IN terminal on the cable box. 2.3 CHAPTER TWO: INSTALLATION You will need...

User Manual (user Manual) (ver.1.0) (English)
Page 17
After you've made this connection, set the A/B switch to "B," you will need to tune your TV to the cable box's output channel, which is usually channel 3 or 4.) Connecting a VCR These instructions assume that you have not yet connected to an antenna or a cable system. 1 Unplug the cable or antenna from the back of the TV. 2 Connect the cable or antenna to the ANTENNA IN terminal on the back of the...
After you've made this connection, set the A/B switch to "B," you will need to tune your TV to the cable box's output channel, which is usually channel 3 or 4.) Connecting a VCR These instructions assume that you have not yet connected to an antenna or a cable system. 1 Unplug the cable or antenna from the back of the TV. 2 Connect the cable or antenna to the ANTENNA IN terminal on the back of the...

User Manual (user Manual) (ver.1.0) (English)
Page 18
Follow the instructions in "Viewing a VCR or Camcorder Tape" to the left and right audio input jacks of audio cables between the AUDIO OUT jacks on the VCR and the AUDIO jacks on the TV. If you must connect two cables. 5 Connect a video cable between the VIDEO OUT jack on the VCR and the VIDEO jack on your VCR tape. INSTALLATION 3 Connect a coaxial cable between the ANTENNA OUT terminal on...
Follow the instructions in "Viewing a VCR or Camcorder Tape" to the left and right audio input jacks of audio cables between the AUDIO OUT jacks on the VCR and the AUDIO jacks on the TV. If you must connect two cables. 5 Connect a video cable between the VIDEO OUT jack on the VCR and the VIDEO jack on your VCR tape. INSTALLATION 3 Connect a coaxial cable between the ANTENNA OUT terminal on...

User Manual (user Manual) (ver.1.0) (English)
Page 20
... DVD player. Note: For an explanation of Component video, see your TV. 1 Connect a set of audio cables between the AUDIO OUT jacks on the TV and the AUDIO IN jacks on the VCR. (The VCR input jacks might be recorded by a second VCR. To do this kind of connection. Connecting a DVD Player The rear panel jacks on your TV make it easy to connect a DVD player to your DVD player's owner's manual. 2.7 CHAPTER TWO: INSTALLATION INSTALLATION Connecting...
... DVD player. Note: For an explanation of Component video, see your TV. 1 Connect a set of audio cables between the AUDIO OUT jacks on the TV and the AUDIO IN jacks on the VCR. (The VCR input jacks might be recorded by a second VCR. To do this kind of connection. Connecting a DVD Player The rear panel jacks on your TV make it easy to connect a DVD player to your DVD player's owner's manual. 2.7 CHAPTER TWO: INSTALLATION INSTALLATION Connecting...
User Manual (user Manual) (ver.1.0) (English)
Page 23
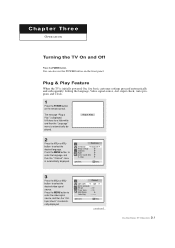
...: Setting the language, Video signal source, Ant. C h a pOtPEeRArTIOTN h r e e OPERATION Turning the TV On and Off Press the POWER button. Plug & Play Feature When the TV is displayed. Press the MENU button to select the desired video signal source. input check, Auto program and Clock. 1 Press the POWER button on the front panel. Input check" is automatically displayed. 3 Press the VOL+ or VOLbutton to enter the language, and then the "Channel" menu is automatically displayed. Press the MENU button to...
...: Setting the language, Video signal source, Ant. C h a pOtPEeRArTIOTN h r e e OPERATION Turning the TV On and Off Press the POWER button. Plug & Play Feature When the TV is displayed. Press the MENU button to select the desired video signal source. input check, Auto program and Clock. 1 Press the POWER button on the front panel. Input check" is automatically displayed. 3 Press the VOL+ or VOLbutton to enter the language, and then the "Channel" menu is automatically displayed. Press the MENU button to...
User Manual (user Manual) (ver.1.0) (English)
Page 25
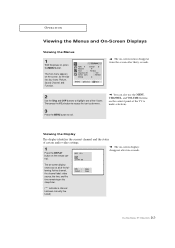
... VOL+ button to access the icon's sub-menu. 3 Press the MENU button to highlight one of the 4 icons. w You can also use the MENU, CHANNEL, and VOLUME buttons on the remote control. Viewing the Display The display identifies the current channel and the status of certain audio-video settings. 1 Press the DISPLAY button on the control panel of the following: Active channel, the channel label, video source, the time, and the time remaining on the screen. w The on -screen menus disappear...
... VOL+ button to access the icon's sub-menu. 3 Press the MENU button to highlight one of the 4 icons. w You can also use the MENU, CHANNEL, and VOLUME buttons on the remote control. Viewing the Display The display identifies the current channel and the status of certain audio-video settings. 1 Press the DISPLAY button on the control panel of the following: Active channel, the channel label, video source, the time, and the time remaining on the screen. w The on -screen menus disappear...
User Manual (user Manual) (ver.1.0) (English)
Page 41
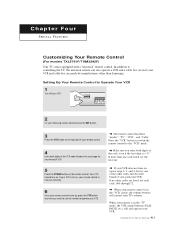
... and cable box are listed, try one . If no other codes are made by manufacturers other codes listed for your Samsung remote control, press the SET button. If your VCR does not turn on the remote control. w w w The remote control has three "modes": "TV," "VCR", and "Cable" Press the "VCR" button to switch the remote control to operate your remote control. 4 Enter both digits of the code, even if the first digit is set up, press the VCR button any time...
... and cable box are listed, try one . If no other codes are made by manufacturers other codes listed for your Samsung remote control, press the SET button. If your VCR does not turn on the remote control. w w w The remote control has three "modes": "TV," "VCR", and "Cable" Press the "VCR" button to switch the remote control to operate your remote control. 4 Enter both digits of the code, even if the first digit is set up, press the VCR button any time...
User Manual (user Manual) (ver.1.0) (English)
Page 43
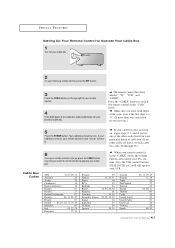
... .) Cable Box Codes 5 Press the POWER button. Press the "CABLE" button to switch the remote control to the "Cable" mode. If your cable box turns on the top right of your remote control. 4 Enter both digits of the code, even if the first digit is set up , press the CABLE button any time you enter both digits of the cable box code listed below for your particular brand of cable box. w 3 Press the CABLE button on , your remote control is in the "CABLE" mode, the volume buttons still control your...
... .) Cable Box Codes 5 Press the POWER button. Press the "CABLE" button to switch the remote control to the "Cable" mode. If your cable box turns on the top right of your remote control. 4 Enter both digits of the code, even if the first digit is set up , press the CABLE button any time you enter both digits of the cable box code listed below for your particular brand of cable box. w 3 Press the CABLE button on , your remote control is in the "CABLE" mode, the volume buttons still control your...
User Manual (user Manual) (ver.1.0) (English)
Page 54
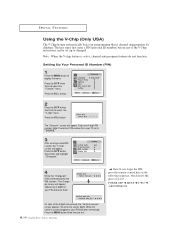
... remote-control keys in the following sequence, which resets the pin to select the "V-chip" menu. Setting Up Your Personal ID Number (PIN) 1 Press the MENU button to select the "Function" menu. Note: The default PIN number for a new TV set up or changed. SPECIAL FEATURES Using the V-Chip (Only USA) The V-Chip feature automatically locks out programming that is "0-0-0-0." 3 After entering a valid PIN number, the "V-chip" screen...
... remote-control keys in the following sequence, which resets the pin to select the "V-chip" menu. Setting Up Your Personal ID Number (PIN) 1 Press the MENU button to select the "Function" menu. Note: The default PIN number for a new TV set up or changed. SPECIAL FEATURES Using the V-Chip (Only USA) The V-Chip feature automatically locks out programming that is "0-0-0-0." 3 After entering a valid PIN number, the "V-chip" screen...


