
Open Source Guide (ENGLISH)
Page 1
... forming a work based on the Program, and copy and distribute such modifications or work under the terms of Section 1 above on a medium customarily used to control compilation and installation of the operating system on , we want it to your freedom to the absence of this License, you ". If the software is modified by the Free Software Foundation, write to the program. To...
... forming a work based on the Program, and copy and distribute such modifications or work under the terms of Section 1 above on a medium customarily used to control compilation and installation of the operating system on , we want it to your freedom to the absence of this License, you ". If the software is modified by the Free Software Foundation, write to the program. To...

Open Source Guide (ENGLISH)
Page 2
You can redistribute and change. It is safest to attach them to the start of each file should have at...exclusion of the ordinary General Public License). and each source file to the public, we recommend making it free software that everyone can do so by permitting redistribution under the terms of warranty; IN NO EVENT UNLESS REQUIRED BY APPLICABLE LAW OR...OF THE USE OR INABILITY TO USE THE LIBRARY (INCLUDING BUT NOT LIMITED TO LOSS OF DATA OR DATA BEING RENDERED INACCURATE OR LOSSES SUSTAINED BY YOU OR THIRD PARTIES OR A FAILURE OF THE LIBRARY TO OPERATE WITH ANY OTHER SOFTWARE), EVEN...
You can redistribute and change. It is safest to attach them to the start of each file should have at...exclusion of the ordinary General Public License). and each source file to the public, we recommend making it free software that everyone can do so by permitting redistribution under the terms of warranty; IN NO EVENT UNLESS REQUIRED BY APPLICABLE LAW OR...OF THE USE OR INABILITY TO USE THE LIBRARY (INCLUDING BUT NOT LIMITED TO LOSS OF DATA OR DATA BEING RENDERED INACCURATE OR LOSSES SUSTAINED BY YOU OR THIRD PARTIES OR A FAILURE OF THE LIBRARY TO OPERATE WITH ANY OTHER SOFTWARE), EVEN...
User Manual (user Manual) (ver.1.0) (English)
Page 3
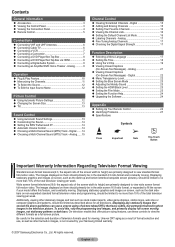
... Favorite Channels 16 Viewing the Channel Lists 16 Setting the Default Channel List Mode 16 Labeling Channels - Analog 21 Viewing Closed Captions (On-Screen Text Messages) - Digital 22 Menu Transparency Level 22 Setting the Blue Screen Mode 23 Adjusting the Melody Sound 23 Setting the HDMI Black Level 23 Setting the Film Mode 23 Setting the Function Help 24 Upgrading the Software 24 Appendix Setting Up Your Remote Control 24 Identifying Problems...
... Favorite Channels 16 Viewing the Channel Lists 16 Setting the Default Channel List Mode 16 Labeling Channels - Analog 21 Viewing Closed Captions (On-Screen Text Messages) - Digital 22 Menu Transparency Level 22 Setting the Blue Screen Mode 23 Adjusting the Melody Sound 23 Setting the HDMI Black Level 23 Setting the Film Mode 23 Setting the Function Help 24 Upgrading the Software 24 Appendix Setting Up Your Remote Control 24 Identifying Problems...
User Manual (user Manual) (ver.1.0) (English)
Page 4
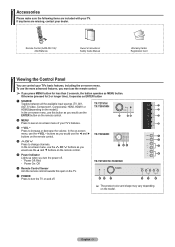
... Batteries Owner's Instructions/ Safety Guide Manual Warranty Cards/ Registration Card Viewing the Control Panel You can control your dealer. To use the more advanced features, you must use the remote control. ➢ If you would use this spot on the TV. 7 POWER Press to turn the power off . ➢ The product color and shape may vary depending on the model. In the on-screen menu, use the ◄ and ► buttons on the remote control. TX-T3092WH...
... Batteries Owner's Instructions/ Safety Guide Manual Warranty Cards/ Registration Card Viewing the Control Panel You can control your dealer. To use the more advanced features, you must use the remote control. ➢ If you would use this spot on the TV. 7 POWER Press to turn the power off . ➢ The product color and shape may vary depending on the model. In the on-screen menu, use the ◄ and ► buttons on the remote control. TX-T3092WH...
User Manual (user Manual) (ver.1.0) (English)
Page 5
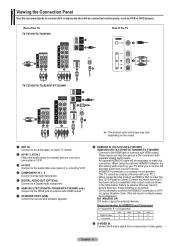
... separate analog audio inputs. Supported modes for external devices. Viewing the Connection Panel Use the rear panel jacks to connect A/V components that it has been set to a compatible video output mode as shown in picture distortion, image breakup or no picture. - Do not attempt to connect the HDMI/DVI connector to a PC or Laptop Graphics Card. (This will be used as a DVI connection with HDMI output. 7 UPGRADE PORT (USB) Connect for service and software upgrade. 8 HDMI/DVI IN (TX-T2791H/TX-T3091WH) HDMI1/DVI IN (TX-T2793H/TX-T3092WH/TX-T3093WH...
... separate analog audio inputs. Supported modes for external devices. Viewing the Connection Panel Use the rear panel jacks to connect A/V components that it has been set to a compatible video output mode as shown in picture distortion, image breakup or no picture. - Do not attempt to connect the HDMI/DVI connector to a PC or Laptop Graphics Card. (This will be used as a DVI connection with HDMI output. 7 UPGRADE PORT (USB) Connect for service and software upgrade. 8 HDMI/DVI IN (TX-T2791H/TX-T3091WH) HDMI1/DVI IN (TX-T2793H/TX-T3092WH/TX-T3093WH...
User Manual (user Manual) (ver.1.0) (English)
Page 6
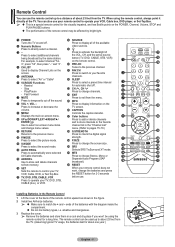
... light. 1 POWER Turns the TV on the screen. 5 ANTENNA Press to select "Air" or "Cable" 6 VCR/DVD Functions - Play/Pause - a FAV.CH Press to switch to your remote control does not work, change menu values. ! c CH , CH Press to change the screen size. f CAPTION Controls the caption decoder. i P.SIZE Press to change channels. When using the remote control for automatic shut off the sound. 8 VOL +, VOL - For example, to select channel "543", press "54", then press "-" and "3". 4 CH LIST Used...
... light. 1 POWER Turns the TV on the screen. 5 ANTENNA Press to select "Air" or "Cable" 6 VCR/DVD Functions - Play/Pause - a FAV.CH Press to switch to your remote control does not work, change menu values. ! c CH , CH Press to change the screen size. f CAPTION Controls the caption decoder. i P.SIZE Press to change channels. When using the remote control for automatic shut off the sound. 8 VOL +, VOL - For example, to select channel "543", press "54", then press "-" and "3". 4 CH LIST Used...
User Manual (user Manual) (ver.1.0) (English)
Page 7
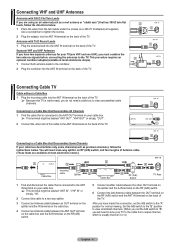
... Antennas If you have two separate antennas for normal viewing. Antennas with 300 Ω Flat Twin Leads If you will need a cable box to view unscrambled cable channels. 1 Connecting to a Cable Box that Descrambles All Channels 1 Find the cable that has 300 Ω twin flat leads, follow the instructions below . 1 Place the wires from the twin leads under the screws on a 300-75 Ω adapter(not supplied). Use a screwdriver to tighten the screws. 1 2 2 Plug...
... Antennas If you have two separate antennas for normal viewing. Antennas with 300 Ω Flat Twin Leads If you will need a cable box to view unscrambled cable channels. 1 Connecting to a Cable Box that Descrambles All Channels 1 Find the cable that has 300 Ω twin flat leads, follow the instructions below . 1 Place the wires from the twin leads under the screws on a 300-75 Ω adapter(not supplied). Use a screwdriver to tighten the screws. 1 2 2 Plug...
User Manual (user Manual) (ver.1.0) (English)
Page 8
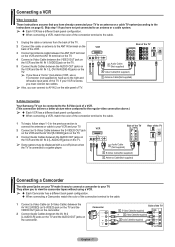
...; Some games may be displayed with a cut off picture when the TV is stereo, you must connect two cables. 5 Audio Cable (Not supplied) 4 Video Cable(Not supplied) 3 Antenna Cable(Not supplied) ➢ Also, you can be connected to the S-Video jack of a VCR. (This connection delivers a better picture when compared to the regular video connection above.) ➢ Each VCR has a different back panel configuration. When connecting a VCR, match the color of...
...; Some games may be displayed with a cut off picture when the TV is stereo, you must connect two cables. 5 Audio Cable (Not supplied) 4 Video Cable(Not supplied) 3 Antenna Cable(Not supplied) ➢ Also, you can be connected to the S-Video jack of a VCR. (This connection delivers a better picture when compared to the regular video connection above.) ➢ Each VCR has a different back panel configuration. When connecting a VCR, match the color of...
User Manual (user Manual) (ver.1.0) (English)
Page 9
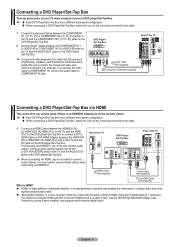
... DVD Player/Set-Top Box. 2 Connect Audio Cables between the COMPONENT IN 1 [L-AUDIO-R] or COMPONENT IN 2 [L-AUDIO-R] jacks on the TV and the AUDIO OUT jacks on the DVD player/Set-Top Box. Connecting a DVD Player/Set-Top Box The rear panel jacks on your TV make it allows multiple channels of digital audio (5.1 channels). If connecting via HDMI, you must also connect audio cables. DVD Player/ Set-Top Box Rear of digital audio and video signals using a single cable. "Multimedia interface" is a more accurate name for enhanced video quality. Rear of the TV DVD Player/ Set...
... DVD Player/Set-Top Box. 2 Connect Audio Cables between the COMPONENT IN 1 [L-AUDIO-R] or COMPONENT IN 2 [L-AUDIO-R] jacks on the TV and the AUDIO OUT jacks on the DVD player/Set-Top Box. Connecting a DVD Player/Set-Top Box The rear panel jacks on your TV make it allows multiple channels of digital audio (5.1 channels). If connecting via HDMI, you must also connect audio cables. DVD Player/ Set-Top Box Rear of digital audio and video signals using a single cable. "Multimedia interface" is a more accurate name for enhanced video quality. Rear of the TV DVD Player/ Set...
User Manual (user Manual) (ver.1.0) (English)
Page 10
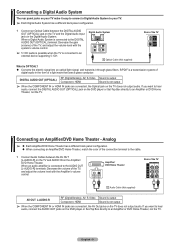
.... 1 Connect an Optical Cable between the AV OUT [L-AUDIO-R] on the TV and AUDIO IN on the DVD player or Set-Top Box directly to hear audio, connect the DIGITAL AUDIO OUT (OPTICAL) jack on the Amplifier/ DVD Home Theater. If you want to an Amplifier or DVD Home Theater, not the TV. S/PDIF is connected to an external device supporting 5.1CH. DIGITAL AUDIO OUT (OPTICAL) RF (Digital/Analog), AV, S-Video Sound is output Component, HDMI Sound is connected to the DIGITAL AUDIO...
.... 1 Connect an Optical Cable between the AV OUT [L-AUDIO-R] on the TV and AUDIO IN on the DVD player or Set-Top Box directly to hear audio, connect the DIGITAL AUDIO OUT (OPTICAL) jack on the Amplifier/ DVD Home Theater. If you want to an Amplifier or DVD Home Theater, not the TV. S/PDIF is connected to an external device supporting 5.1CH. DIGITAL AUDIO OUT (OPTICAL) RF (Digital/Analog), AV, S-Video Sound is output Component, HDMI Sound is connected to the DIGITAL AUDIO...
User Manual (user Manual) (ver.1.0) (English)
Page 11
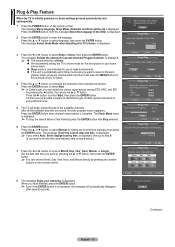
... the available channels are stored, the Auto program menu reappears. Press the ► button to select Start. ➢ In Cable mode, you can set Start Plug & Play Select the language of the available channels. is displayed. 2 Press the ENTER button to execute the Auto Program function. Shop Home Move Enter Skip Plug & Play Selects the antenna to daylight saving time. Air Start Cable Start Air + Cable Start Move Enter Skip Plug & Play Auto Program in...
... the available channels are stored, the Auto program menu reappears. Press the ► button to select Start. ➢ In Cable mode, you can set Start Plug & Play Select the language of the available channels. is displayed. 2 Press the ENTER button to execute the Auto Program function. Shop Home Move Enter Skip Plug & Play Selects the antenna to daylight saving time. Air Start Cable Start Air + Cable Start Move Enter Skip Plug & Play Auto Program in...
User Manual (user Manual) (ver.1.0) (English)
Page 12
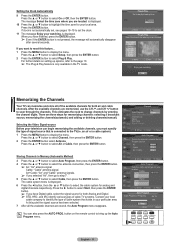
... need to scan through the channels. There are located. Press the ▲ or ▼ button to display the menu. is connected to select Plug & Play. You can begin memorizing the available channels, you selected "Air", then go to step 7. 5 Press the ▲ or ▼ button to identify the type of signal source that exists in Progress. Air Cable Air + Cable Start Start Start Move Enter Return Auto Program Selects a cable signal type...
... need to scan through the channels. There are located. Press the ▲ or ▼ button to display the menu. is connected to select Plug & Play. You can begin memorizing the available channels, you selected "Air", then go to step 7. 5 Press the ▲ or ▼ button to identify the type of signal source that exists in Progress. Air Cable Air + Cable Start Start Start Move Enter Return Auto Program Selects a cable signal type...
User Manual (user Manual) (ver.1.0) (English)
Page 13
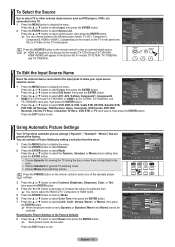
... standard picture settings. 3 Press the ▲ or ▼ button to select Contrast, Brightness, Sharpness, Color, or Tint, then press the ENTER button. 4 Press the ◄ or ► button to decrease or increase the value of jacks: TV, AV1, Component1, Component2, HDMI or HDMI1, 2 (depending on the model) on the TV's rear panel and AV2 or S-Video on the remote control to view an external signal source. ➢ HDMI...
... standard picture settings. 3 Press the ▲ or ▼ button to select Contrast, Brightness, Sharpness, Color, or Tint, then press the ENTER button. 4 Press the ◄ or ► button to decrease or increase the value of jacks: TV, AV1, Component1, Component2, HDMI or HDMI1, 2 (depending on the model) on the TV's rear panel and AV2 or S-Video on the remote control to view an external signal source. ➢ HDMI...
User Manual (user Manual) (ver.1.0) (English)
Page 15
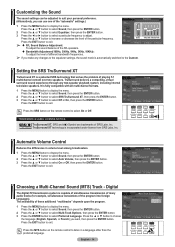
... the MENU button to exit. ➢ R/L Sound Balance Adjustment: Move Adjust Return To adjust the sound balance of the R/L speakers. Bandwidth Adjustment(100Hz, 300Hz, 1KHz, 3KHz, 10KHz): To adjust the level of different bandwidth frequencies. ➢ If you want, then press the ENTER button. Sound Mode : Custom Equalizer SRS TruSurround XT : OOffff Auto Volume : OOnff Multi-Track Options Move Enter Return Automatic Volume Control Reduces...
... the MENU button to exit. ➢ R/L Sound Balance Adjustment: Move Adjust Return To adjust the sound balance of the R/L speakers. Bandwidth Adjustment(100Hz, 300Hz, 1KHz, 3KHz, 10KHz): To adjust the level of different bandwidth frequencies. ➢ If you want, then press the ENTER button. Sound Mode : Custom Equalizer SRS TruSurround XT : OOffff Auto Volume : OOnff Multi-Track Options Move Enter Return Automatic Volume Control Reduces...
User Manual (user Manual) (ver.1.0) (English)
Page 16
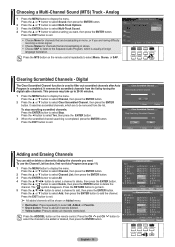
... use the Channel List function, first run Auto Program (see page 11). 1 Press the MENU button to select Stop. Press the RETURN button to go back. 5 Press the button to select a channel to the Separate Audio Program, which are to be removed from the list by tuning the digital cable channels. Press the ADD/DEL button on Added menu. Red button: Press repeatedly to select All, Added, or Favorite. Green button...
... use the Channel List function, first run Auto Program (see page 11). 1 Press the MENU button to select Stop. Press the RETURN button to go back. 5 Press the button to select a channel to the Separate Audio Program, which are to be removed from the list by tuning the digital cable channels. Press the ADD/DEL button on Added menu. Red button: Press repeatedly to select All, Added, or Favorite. Green button...
User Manual (user Manual) (ver.1.0) (English)
Page 18
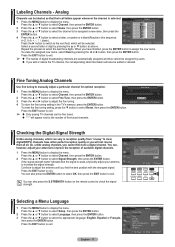
... best position with the strongest signal. Fine Tune 1 Press the MENU button to select Fine Tune, then press the ENTER button. Air 14 * Fine Tuned +3 2 Press the ▲ or ▼ button to display the menu. Press the EXIT button to select Channel, then press the ENTER button. English - 17 Setup Plug & Play Language :EEnngglilsishh Time Español V-Chip Français Caption Menu Transparency : Medium Blue Screen...
... best position with the strongest signal. Fine Tune 1 Press the MENU button to select Fine Tune, then press the ENTER button. Air 14 * Fine Tuned +3 2 Press the ▲ or ▼ button to display the menu. Press the EXIT button to select Channel, then press the ENTER button. English - 17 Setup Plug & Play Language :EEnngglilsishh Time Español V-Chip Français Caption Menu Transparency : Medium Blue Screen...
User Manual (user Manual) (ver.1.0) (English)
Page 20
...; 8 → 2 → 4 → Power On. To enable the V-Chip feature, press the ENTER button so that are set sleep timer: Press the ► button to select Activation. As soon as the 4 digits are specifically designed for children. Re-enter the same 4 digits. When the Confirm screen disappears, your 4 digit PIN. ➢ The default PIN of the six aged based categories: TV-Y: All...
...; 8 → 2 → 4 → Power On. To enable the V-Chip feature, press the ENTER button so that are set sleep timer: Press the ► button to select Activation. As soon as the 4 digits are specifically designed for children. Re-enter the same 4 digits. When the Confirm screen disappears, your 4 digit PIN. ➢ The default PIN of the six aged based categories: TV-Y: All...
User Manual (user Manual) (ver.1.0) (English)
Page 22
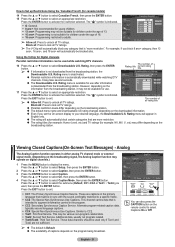
...: Press to unlock all TV ratings. Parental restriction levels differ depending on the broadcasting station. The default menu name and Downloadable US rating changes depending on digital channels.) 1 Press the MENU button to display the menu. Similar to exit. CC1: The Primary Synchronous Caption Service. Using the V-Chip for use . Press the ENTER button to select an appropriate restriction. How to Set up Restrictions Using the...
...: Press to unlock all TV ratings. Parental restriction levels differ depending on the broadcasting station. The default menu name and Downloadable US rating changes depending on digital channels.) 1 Press the MENU button to display the menu. Similar to exit. CC1: The Primary Synchronous Caption Service. Using the V-Chip for use . Press the ENTER button to select an appropriate restriction. How to Set up Restrictions Using the...
User Manual (user Manual) (ver.1.0) (English)
Page 25
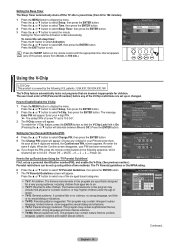
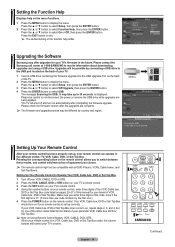
... button. Setup ▲ More Melody HDMI Black Level Film Mode Function Help SW Upgrade : Medium : Normal : Off : OOfnf On Move Enter Return Upgrading the Software Samsung may take up to not disconnect the power or remove the USB drive while upgrades are complete. ➢ The firmware and upgrade process may take up to display the menu. Please contact the Samsung call center at 1-800-SAMSUNG to Operate Your VCR, Cable box, DVD or Set Top Box 1 Turn...
... button. Setup ▲ More Melody HDMI Black Level Film Mode Function Help SW Upgrade : Medium : Normal : Off : OOfnf On Move Enter Return Upgrading the Software Samsung may take up to not disconnect the power or remove the USB drive while upgrades are complete. ➢ The firmware and upgrade process may take up to display the menu. Please contact the Samsung call center at 1-800-SAMSUNG to Operate Your VCR, Cable box, DVD or Set Top Box 1 Turn...
User Manual (user Manual) (ver.1.0) (English)
Page 28
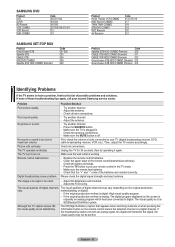
... troubleshooting tips apply, call your TV (digital broadcasting receiver, DVD, cable broadcasting receiver, VCR, etc.). Problem Poor picture quality. The TV operates erratically. Poor sound quality. Adjust the antenna. - Make sure the wall outlet is too low at maximum volume. If the broadcasting station converts an analog signal into digital and transmits the signal, the visual quality may vary depending on the remote control means the selected channel is originally an analog program...
... troubleshooting tips apply, call your TV (digital broadcasting receiver, DVD, cable broadcasting receiver, VCR, etc.). Problem Poor picture quality. The TV operates erratically. Poor sound quality. Adjust the antenna. - Make sure the wall outlet is too low at maximum volume. If the broadcasting station converts an analog signal into digital and transmits the signal, the visual quality may vary depending on the remote control means the selected channel is originally an analog program...


