
User Manual (user Manual) (ver.1.0) (English)
Page 3
...1080i) and 720-line progressive (720p). choosing programs from Dolby Surround 2.0 to a variety of these services can transmit high definition TV (HDTV) images, Dolby Digital surround audio, and new services such as multicasting (transmitting more than SDTV. Digital television (DTV) ...is High Definition Television (HDTV). Several of Dolby Digital audio formats from a detailed program guide, ordering products on the same TV channel) and datacasting (providing electronic program guides and interactive television). Digital Television Services Digital Picture Quality DTV programs are now ...
...1080i) and 720-line progressive (720p). choosing programs from Dolby Surround 2.0 to a variety of these services can transmit high definition TV (HDTV) images, Dolby Digital surround audio, and new services such as multicasting (transmitting more than SDTV. Digital television (DTV) ...is High Definition Television (HDTV). Several of Dolby Digital audio formats from a detailed program guide, ordering products on the same TV channel) and datacasting (providing electronic program guides and interactive television). Digital Television Services Digital Picture Quality DTV programs are now ...
User Manual (user Manual) (ver.1.0) (English)
Page 4
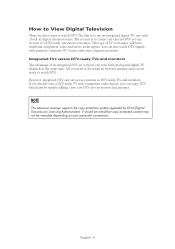
...may not be noted that it can tune both analog and digital TV channels at the same time. If you already own a DTV-ready TV with component video inputs, you are ready to use an integrated digital TV; It should be viewable depending on your particular connections. However, ...three ways to a DTV-ready television or monitor. one with personal computer (PC) tuner cards and computer monitors. Integrated TVs versus DTV-ready TVs and monitors The advantage of TV or monitor will have wideband component video and stereo audio inputs. English - 4 The second is to watch DTV. NOTE...
...may not be noted that it can tune both analog and digital TV channels at the same time. If you already own a DTV-ready TV with component video inputs, you are ready to use an integrated digital TV; It should be viewable depending on your particular connections. However, ...three ways to a DTV-ready television or monitor. one with personal computer (PC) tuner cards and computer monitors. Integrated TVs versus DTV-ready TVs and monitors The advantage of TV or monitor will have wideband component video and stereo audio inputs. English - 4 The second is to watch DTV. NOTE...
User Manual (user Manual) (ver.1.0) (English)
Page 5
...same holds true for DTV? How can find out whether your local DTV broadcasts are on whether your location is currently incompatible with many existing TV antennas. Residents of rental units (apartments, etc) are running full power or not and how close your local DTV stations are not covered... audio. DTV receivers do not require as much signal as those antennas are not located in common areas and are used for transmitting digital TV programs that in height. This is decoded at the receiver, the digital video and audio data is a big advantage for your present antenna...
...same holds true for DTV? How can find out whether your local DTV broadcasts are on whether your location is currently incompatible with many existing TV antennas. Residents of rental units (apartments, etc) are running full power or not and how close your local DTV stations are not covered... audio. DTV receivers do not require as much signal as those antennas are not located in common areas and are used for transmitting digital TV programs that in height. This is decoded at the receiver, the digital video and audio data is a big advantage for your present antenna...

User Manual (user Manual) (ver.1.0) (English)
Page 6
...13 Antennas with 300-ohm Flat Twin Leads 13 Antennas with 75-ohm Round Leads 14 Separate VHF and UHF Antennas 14 Connecting Cable TV 15 Cable without a Cable Box 15 Connecting to a Cable Box that Descrambles All Channels ...........15 Connecting to a Cable Box that ...Descrambles Some Channels.......16 Connecting a VCR 17 Connecting a Second VCR to Record from the TV 18 Connecting a Camcorder 18 Connecting a DVD Player 19 Connecting to Y, PB, PR 19 Connecting to Regular Audio and Video Jacks 19 Connecting a...
...13 Antennas with 300-ohm Flat Twin Leads 13 Antennas with 75-ohm Round Leads 14 Separate VHF and UHF Antennas 14 Connecting Cable TV 15 Cable without a Cable Box 15 Connecting to a Cable Box that Descrambles All Channels ...........15 Connecting to a Cable Box that ...Descrambles Some Channels.......16 Connecting a VCR 17 Connecting a Second VCR to Record from the TV 18 Connecting a Camcorder 18 Connecting a DVD Player 19 Connecting to Y, PB, PR 19 Connecting to Regular Audio and Video Jacks 19 Connecting a...

User Manual (user Manual) (ver.1.0) (English)
Page 7
... Using the V-Chip 60 How to Enable/Disable the Rating Controls 60 How to Change Your Password 61 How to Set up Restrictions Using the "TV Parental Guidelines" ... 62 How to Set up Restrictions using the Movie Ratings: G, PG, PG-13, R, NC-17, X 63 Important Notes About Parental Locks 64 How... up Restrictions Using "Canadian French 66 Using the V-Chip for Digital channel 67 Chapter 5: Troubleshooting 69 Identifying Problems 69 Appendix 70 Cleaning and Maintaining Your TV 70 Using Your TV in Another Country 70 Specifications 70 English - 7
... Using the V-Chip 60 How to Enable/Disable the Rating Controls 60 How to Change Your Password 61 How to Set up Restrictions Using the "TV Parental Guidelines" ... 62 How to Set up Restrictions using the Movie Ratings: G, PG, PG-13, R, NC-17, X 63 Important Notes About Parental Locks 64 How... up Restrictions Using "Canadian French 66 Using the V-Chip for Digital channel 67 Chapter 5: Troubleshooting 69 Identifying Problems 69 Appendix 70 Cleaning and Maintaining Your TV 70 Using Your TV in Another Country 70 Specifications 70 English - 7
User Manual (user Manual) (ver.1.0) (English)
Page 8
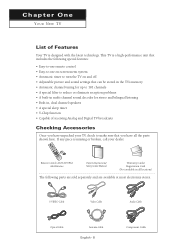
...sold separately and are available at most electronics stores. S-VIDEO Cable Video Cable Audio Cable Optical Cable Antenna Cable English - 8 Component Cable This TV is a high-performance unit that includes the following special features: • Easy-to-use remote control • Easy-to-use on-screen...eliminate reception problems • A built-in multi-channel sound decoder for up to 181 channels • A special filter to turn the TV on and off • Adjustable picture and sound settings that you have unpacked your dealer. If any piece is designed with the latest ...
...sold separately and are available at most electronics stores. S-VIDEO Cable Video Cable Audio Cable Optical Cable Antenna Cable English - 8 Component Cable This TV is a high-performance unit that includes the following special features: • Easy-to-use remote control • Easy-to-use on-screen...eliminate reception problems • A built-in multi-channel sound decoder for up to 181 channels • A special filter to turn the TV on and off • Adjustable picture and sound settings that you have unpacked your dealer. If any piece is designed with the latest ...

User Manual (user Manual) (ver.1.0) (English)
Page 9
... Press to increase or decrease the volume. Power Off ; Power On ; Off ∏ POWER Press to change channels. YOUR NEW TV Familiarizing Yourself with the TV Control Buttons You can control your TV's features. ˇ + VOL - To use the remote control. Œ SOURCE Press to turn the power off . Red - Also used to.... ¨ CH Press to change between items on the on-screen menu. ˆ Remote Control Sensor Aim the remote control towards this spot on the TV. Ø Stand-By Indicator Lights up when you must use the more advanced features, you turn the...
... Press to increase or decrease the volume. Power Off ; Power On ; Off ∏ POWER Press to change channels. YOUR NEW TV Familiarizing Yourself with the TV Control Buttons You can control your TV's features. ˇ + VOL - To use the remote control. Œ SOURCE Press to turn the power off . Red - Also used to.... ¨ CH Press to change between items on the on-screen menu. ˆ Remote Control Sensor Aim the remote control towards this spot on the TV. Ø Stand-By Indicator Lights up when you must use the more advanced features, you turn the...

User Manual (user Manual) (ver.1.0) (English)
Page 10
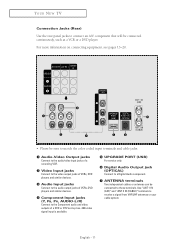
YOUR NEW TV Connection Jacks (Side) You can connect an A/V component that is used only occasionally, such as a camcorder or video game. (For information on connecting equipment, see page 18.) • Please be sure to match the color coded input terminals and cable jacks. Œ S-VIDEO Input Connect an S-Video signal from a camcorder or video game. ´ VIDEO Input Connect a video signal from a camcorder or video game. ˇ AUDIO (L/R) Input Connect audio signals from a camcorder or video game. English - 10
YOUR NEW TV Connection Jacks (Side) You can connect an A/V component that is used only occasionally, such as a camcorder or video game. (For information on connecting equipment, see page 18.) • Please be sure to match the color coded input terminals and cable jacks. Œ S-VIDEO Input Connect an S-Video signal from a camcorder or video game. ´ VIDEO Input Connect a video signal from a camcorder or video game. ˇ AUDIO (L/R) Input Connect audio signals from a camcorder or video game. English - 10
User Manual (user Manual) (ver.1.0) (English)
Page 11
... player. Use "ANT 1 IN (AIR)" and "ANT 2 IN (CABLE)" terminals to receive a signal from VHF/UHF antennas or your cable system. English - 11 YOUR NEW TV Connection Jacks (Rear) Use the rear panel jacks to connect an A/V component that will be connected to these terminals.
... player. Use "ANT 1 IN (AIR)" and "ANT 2 IN (CABLE)" terminals to receive a signal from VHF/UHF antennas or your cable system. English - 11 YOUR NEW TV Connection Jacks (Rear) Use the rear panel jacks to connect an A/V component that will be connected to these terminals.

User Manual (user Manual) (ver.1.0) (English)
Page 12
... menu. ˘ MUTE Press to temporarily cut off the sound. (Refer to page 36) ¿ P.SIZE Press to change ) a particular item. YOUR NEW TV Remote Control You can use the remote control up to page 40) English - 12 Press to increase or decrease the volume. ˆ MENU Displays the... Press to select a preset time interval for the visually impaired, and has Braille points on the Power, Channel and Volume buttons. Œ POWER Turns the TV on and off . (Refer to page 53) ˛ MTS (Multi-channel Television Sound) Press to choose "Stereo", "Mono", or "SAP" (Secondary Audio Program). (...
... menu. ˘ MUTE Press to temporarily cut off the sound. (Refer to page 36) ¿ P.SIZE Press to change ) a particular item. YOUR NEW TV Remote Control You can use the remote control up to page 40) English - 12 Press to increase or decrease the volume. ˆ MENU Displays the... Press to select a preset time interval for the visually impaired, and has Braille points on the Power, Channel and Volume buttons. Œ POWER Turns the TV on and off . (Refer to page 53) ˛ MTS (Multi-channel Television Sound) Press to choose "Stereo", "Mono", or "SAP" (Secondary Audio Program). (...

User Manual (user Manual) (ver.1.0) (English)
Page 14
INSTALLATION Antennas with 75-ohm Round Leads 1 Plug the antenna lead into the "ANT 1 IN (AIR)" terminal on the rear panel. Separate VHF and UHF Antennas If you have two separate antennas for your TV (one VHF and one UHF), you must combine the two antenna signals before connecting the antennas to the combiner. 2 Plug the combiner into the "ANT 1 IN (AIR)" terminal on the rear panel. English - 14 This procedure requires an optional combiner-adapter (available at most electronics shops). 1 Connect both antenna leads to the TV.
INSTALLATION Antennas with 75-ohm Round Leads 1 Plug the antenna lead into the "ANT 1 IN (AIR)" terminal on the rear panel. Separate VHF and UHF Antennas If you have two separate antennas for your TV (one VHF and one UHF), you must combine the two antenna signals before connecting the antennas to the combiner. 2 Plug the combiner into the "ANT 1 IN (AIR)" terminal on the rear panel. English - 14 This procedure requires an optional combiner-adapter (available at most electronics shops). 1 Connect both antenna leads to the TV.

User Manual (user Manual) (ver.1.0) (English)
Page 15
Connecting to a Cable Box that Descrambles All Channels 1 Find the cable that is connected to the "ANT 2 IN (CABLE)" terminal on the rear panel. Cable Box œ This terminal might be labelled "ANT OUT", "VHF OUT" or simply, "OUT". 2 Connect the other end of this cable to the ANTENNA OUT terminal on the rear panel. Cable without a Cable Box 1 Plug the incoming cable into the "ANT 2 IN (CABLE)" terminal on your cable box. English - 15 INSTALLATION Connecting Cable TV To connect to a cable TV system, follow the instructions below.
Connecting to a Cable Box that Descrambles All Channels 1 Find the cable that is connected to the "ANT 2 IN (CABLE)" terminal on the rear panel. Cable Box œ This terminal might be labelled "ANT OUT", "VHF OUT" or simply, "OUT". 2 Connect the other end of this cable to the ANTENNA OUT terminal on the rear panel. Cable without a Cable Box 1 Plug the incoming cable into the "ANT 2 IN (CABLE)" terminal on your cable box. English - 15 INSTALLATION Connecting Cable TV To connect to a cable TV system, follow the instructions below.

User Manual (user Manual) (ver.1.0) (English)
Page 16
Incoming Cable Splitter Cable Box RF (A/B) Switch TV Rear After you will need to tune your cable box descrambles only some channels (such as premium channels), follow the instructions below. Connect a coaxial cable ..., and four lengths of coaxial cable. (These items are available at most electronics stores.) 1 Find and disconnect the cable that Descrambles Some Channels If your TV to the cable box's output channel, which is connected to the "A" position for normal viewing. Incoming Cable Splitter Cable Box RF (A/B) Switch 4 Connect another cable...
Incoming Cable Splitter Cable Box RF (A/B) Switch TV Rear After you will need to tune your cable box descrambles only some channels (such as premium channels), follow the instructions below. Connect a coaxial cable ..., and four lengths of coaxial cable. (These items are available at most electronics stores.) 1 Find and disconnect the cable that Descrambles Some Channels If your TV to the cable box's output channel, which is connected to the "A" position for normal viewing. Incoming Cable Splitter Cable Box RF (A/B) Switch 4 Connect another cable...
User Manual (user Manual) (ver.1.0) (English)
Page 17
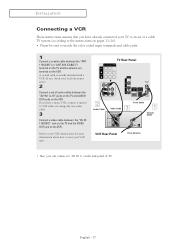
... using only one audio cable. 3 Connect a video cable between the "AV IN 1 (VIDEO)" jack on the TV and the VIDEO OUT jack on the VCR. English - 17 If you can connect to "AV IN 2" on the...between the "ANT 1 IN (AIR)" (or "ANT 2 IN (CABLE)") terminal on the TV and the antenna out terminal on the VCR. TV Rear Panel 2 Audio Cable 3 Video Cable From Cable 1 Coaxial Cable VCR Rear Panel From ...~16). • Please be sure to view your local electronics store). 2 Connect a set of TV. Refer to your VCR's instructions for more information about how to match the color coded input terminals...
... using only one audio cable. 3 Connect a video cable between the "AV IN 1 (VIDEO)" jack on the TV and the VIDEO OUT jack on the VCR. English - 17 If you can connect to "AV IN 2" on the...between the "ANT 1 IN (AIR)" (or "ANT 2 IN (CABLE)") terminal on the TV and the antenna out terminal on the VCR. TV Rear Panel 2 Audio Cable 3 Video Cable From Cable 1 Coaxial Cable VCR Rear Panel From ...~16). • Please be sure to view your local electronics store). 2 Connect a set of TV. Refer to your VCR's instructions for more information about how to match the color coded input terminals...

User Manual (user Manual) (ver.1.0) (English)
Page 18
...VCR as follows: 1 Connect a set of audio cables between the "AV IN 2 (L, R)" jacks on the TV and the AUDIO OUT jacks on the Camcorder. If you need to record using only one audio cable. Refer to... your VCR's instructions for your TV may be recorded by a second VCR. The audio-video cables shown here are usually found on the ...rear of the Camcorder. 2 Connect a set of audio cables between the "AV OUT (L, R)" jacks on the TV and the AUDIO IN jacks on the VCR. (The VCR input jacks might be either on the front or rear...
...VCR as follows: 1 Connect a set of audio cables between the "AV IN 2 (L, R)" jacks on the TV and the AUDIO OUT jacks on the Camcorder. If you need to record using only one audio cable. Refer to... your VCR's instructions for your TV may be recorded by a second VCR. The audio-video cables shown here are usually found on the ...rear of the Camcorder. 2 Connect a set of audio cables between the "AV OUT (L, R)" jacks on the TV and the AUDIO IN jacks on the VCR. (The VCR input jacks might be either on the front or rear...
User Manual (user Manual) (ver.1.0) (English)
Page 19
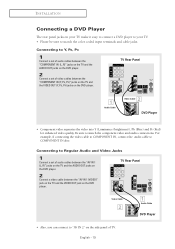
...jacks on the DVD player. INSTALLATION Connecting a DVD Player The rear panel jacks on your TV make it easy to connect a DVD player to your TV. • Please be sure to "AV IN 2" on the side panel of TV. TV Rear Panel Video Cable 2 1 Audio Cable DVD Player • Also, you can connect ...to match the color coded input terminals and cable jacks. TV Rear Panel 1 Audio Cable 2 Video Cable DVD Player • Component video separates the video into Y (Luminance (brightness)), Pb (Blue) and Pr (Red) for enhanced ...
...jacks on the DVD player. INSTALLATION Connecting a DVD Player The rear panel jacks on your TV make it easy to connect a DVD player to your TV. • Please be sure to "AV IN 2" on the side panel of TV. TV Rear Panel Video Cable 2 1 Audio Cable DVD Player • Also, you can connect ...to match the color coded input terminals and cable jacks. TV Rear Panel 1 Audio Cable 2 Video Cable DVD Player • Component video separates the video into Y (Luminance (brightness)), Pb (Blue) and Pr (Red) for enhanced ...

User Manual (user Manual) (ver.1.0) (English)
Page 20
...transmits it through glass fibers. You must hook them up to the "AV OUT (L, R)" terminals: Decrease the gain (volume) of the TV, and adjust the volume level with the Amplifier's volume control. When an audio amplifier is connected to an amplifier. A simplified illustration of an... audio system is a transmission system of digital audio in the form of digital audio systems on the TV. TV Rear Panel Speaker Audio Cable Speaker English - 20 Amplifier S/PDIF is shown below. Connecting to an Analog Amplifier • Please be ...
...transmits it through glass fibers. You must hook them up to the "AV OUT (L, R)" terminals: Decrease the gain (volume) of the TV, and adjust the volume level with the Amplifier's volume control. When an audio amplifier is connected to an amplifier. A simplified illustration of an... audio system is a transmission system of digital audio in the form of digital audio systems on the TV. TV Rear Panel Speaker Audio Cable Speaker English - 20 Amplifier S/PDIF is shown below. Connecting to an Analog Amplifier • Please be ...

User Manual (user Manual) (ver.1.0) (English)
Page 21
INSTALLATION Installing Batteries in the Remote Control 1 Lift the cover at the back of the remote control upward as shown in the figure. 2 Install two AAA size batteries. œ Make sure to match the "+" and "-" ends of the batteries with the diagram inside the compartment. 3 Close the cover as shown in the figure. œ Remove the batteries and store them in a cool, dry place if you won't be used up to about 23 feet from the TV. (Assuming typical TV usage, the batteries last for a long time. The remote control can be using the remote control for about one year.) English - 21
INSTALLATION Installing Batteries in the Remote Control 1 Lift the cover at the back of the remote control upward as shown in the figure. 2 Install two AAA size batteries. œ Make sure to match the "+" and "-" ends of the batteries with the diagram inside the compartment. 3 Close the cover as shown in the figure. œ Remove the batteries and store them in a cool, dry place if you won't be used up to about 23 feet from the TV. (Assuming typical TV usage, the batteries last for a long time. The remote control can be using the remote control for about one year.) English - 21

User Manual (user Manual) (ver.1.0) (English)
Page 22
...and subsequently: Setting the language, Antenna input check, Channel Memorize and Time Setting. • The Plug & Play function operates after plugging in the TV and DTV mode only. œ Even if ENTER button is not pressed, the "Language" will be displayed automatically. 2 Press the ... The... button on the front panel. is displayed. Press the ENTER button, then the "Language" is displayed. English - 22 or † button to the TV. Plug & Play Check antenna input. The "Start Plug & Play" is displayed. Plug & Play Start Plug & Play OK Enter Exit œ Plug...
...and subsequently: Setting the language, Antenna input check, Channel Memorize and Time Setting. • The Plug & Play function operates after plugging in the TV and DTV mode only. œ Even if ENTER button is not pressed, the "Language" will be displayed automatically. 2 Press the ... The... button on the front panel. is displayed. Press the ENTER button, then the "Language" is displayed. English - 22 or † button to the TV. Plug & Play Check antenna input. The "Start Plug & Play" is displayed. Plug & Play Start Plug & Play OK Enter Exit œ Plug...

User Manual (user Manual) (ver.1.0) (English)
Page 23
..."Cable", then press the ENTER button. Press the ENTER button to select "STD", " HRC", or "IRC", then press the ENTER button. The TV begins memorizing all available channels are stored, the "Clock Set" is displayed. • STD, HRC and IRC identify various types of the selected connection.... the ... Press the ENTER button to identify the type of cable system that exists in your local cable company to memorize the channels of cable TV systems. Contact your particular area. • When Air (!), Cable (@), or Air+Cable (#) is displayed. Press the ... or † button to ...
..."Cable", then press the ENTER button. Press the ENTER button to select "STD", " HRC", or "IRC", then press the ENTER button. The TV begins memorizing all available channels are stored, the "Clock Set" is displayed. • STD, HRC and IRC identify various types of the selected connection.... the ... Press the ENTER button to identify the type of cable system that exists in your local cable company to memorize the channels of cable TV systems. Contact your particular area. • When Air (!), Cable (@), or Air+Cable (#) is displayed. Press the ... or † button to ...


