
User Manual (user Manual) (ver.1.0) (English)
Page 6
... Your New TV 8 List of Features 8 Familiarizing Yourself with The TV 9 Front Panel Buttons 9 Side Panel Jacks 10 Rear Panel Jacks 11 Remote Control 12 Chapter 2: Installation 14 Connecting VHF and UHF Antennas 14 Antennas with 300-ohm Flat Twin Leads 14 Antennas with 75-ohm Round Leads 15... Box (480p/1080i 21 Connecting to Y,Pb,Pr 21 Connecting to DVI (Digital Visual Interface 22 Connecting a Camcorder 23 Installing Batteries in the Remote Control 24 Chapter 3: Operation 25 Turning the TV On and Off 25 Plug & Play Feature 25 Viewing the Menus and On-Screen Displays 27 Viewing...
... Your New TV 8 List of Features 8 Familiarizing Yourself with The TV 9 Front Panel Buttons 9 Side Panel Jacks 10 Rear Panel Jacks 11 Remote Control 12 Chapter 2: Installation 14 Connecting VHF and UHF Antennas 14 Antennas with 300-ohm Flat Twin Leads 14 Antennas with 75-ohm Round Leads 15... Box (480p/1080i 21 Connecting to Y,Pb,Pr 21 Connecting to DVI (Digital Visual Interface 22 Connecting a Camcorder 23 Installing Batteries in the Remote Control 24 Chapter 3: Operation 25 Turning the TV On and Off 25 Plug & Play Feature 25 Viewing the Menus and On-Screen Displays 27 Viewing...

User Manual (user Manual) (ver.1.0) (English)
Page 7
CONTENTS Chapter 4: Special Features 42 Customizing Your Remote Control 42 Setting Up Your Remote Control to Operate Your VCR (or DVD) . . 42 Setting Up Your Remote Control to Operate Your Cable Box . . . . . 44 Fine Tuning Channels 45 LNA (Low Noise Amplifier 46 Tilt 47 DNIeTM (Digital Natural Image engine 48 Digital Noise ...
CONTENTS Chapter 4: Special Features 42 Customizing Your Remote Control 42 Setting Up Your Remote Control to Operate Your VCR (or DVD) . . 42 Setting Up Your Remote Control to Operate Your Cable Box . . . . . 44 Fine Tuning Channels 45 LNA (Low Noise Amplifier 46 Tilt 47 DNIeTM (Digital Natural Image engine 48 Digital Noise ...
User Manual (user Manual) (ver.1.0) (English)
Page 8
This TV is a high-performance unit that includes the following special features: • Full Flat Screen • Easy-to-use remote control • Easy-to-use on-screen menu system • Automatic timer to turn the TV on and off • Adjustable picture and sound settings that ... channel speakers • A special sleep timer • Headphone jack for private listening • 16:9 letter box format available depending upon source • Picture in Picture (TX-P2798HF/TX-P3098WHF/TX-P3298HF) 8 Chapter One YOUR NEW TV List of Features Your TV was designed with the latest technology.
This TV is a high-performance unit that includes the following special features: • Full Flat Screen • Easy-to-use remote control • Easy-to-use on-screen menu system • Automatic timer to turn the TV on and off • Adjustable picture and sound settings that ... channel speakers • A special sleep timer • Headphone jack for private listening • 16:9 letter box format available depending upon source • Picture in Picture (TX-P2798HF/TX-P3098WHF/TX-P3298HF) 8 Chapter One YOUR NEW TV List of Features Your TV was designed with the latest technology.
User Manual (user Manual) (ver.1.0) (English)
Page 9
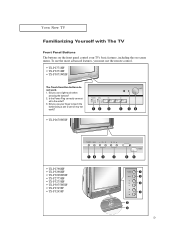
... The TV Front Panel Buttons The buttons on -screen menu. To use the more advanced features, you use the remote control. • TX-P2771HF • TX-P3271HF • TX-P3071WHF The Touch-Sensitive buttons do not work )? • TX-P2670WHF • TX-P2798HF • TX-P3298HF • TX-P3098WHF • TX-P2775HF • TX-P3275HF • TX-P3075WHF • TX-P2745FP • TX-P3245FP 9
... The TV Front Panel Buttons The buttons on -screen menu. To use the more advanced features, you use the remote control. • TX-P2771HF • TX-P3271HF • TX-P3071WHF The Touch-Sensitive buttons do not work )? • TX-P2670WHF • TX-P2798HF • TX-P3298HF • TX-P3098WHF • TX-P2775HF • TX-P3275HF • TX-P3075WHF • TX-P2745FP • TX-P3245FP 9
User Manual (user Manual) (ver.1.0) (English)
Page 10
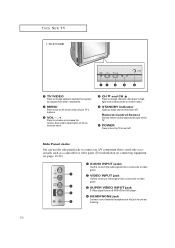
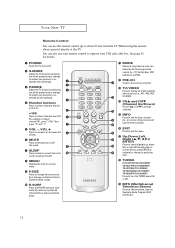
...on-screen menu of external headphones to this spot on the TV. Ø POWER Press to turn the power off . YOUR NEW TV • TX-P3234HF Œ TV/VIDEO Press to change channels. Also press to highlight various items on the on-screen menu. ˆ STANDBY indicator Lights up...VCR or DVD player. ¨ HEADPHONE jack Connect a set of your TV's features. ˇ VOL - , + Press to select items on and off . Remote Control Sensor Aim the remote control towards this jack for private listening. 10 Side Panel Jacks You can use the side panel jacks to connect an A/V component that is used...
...on-screen menu of external headphones to this spot on the TV. Ø POWER Press to turn the power off . YOUR NEW TV • TX-P3234HF Œ TV/VIDEO Press to change channels. Also press to highlight various items on the on-screen menu. ˆ STANDBY indicator Lights up...VCR or DVD player. ¨ HEADPHONE jack Connect a set of your TV's features. ˇ VOL - , + Press to select items on and off . Remote Control Sensor Aim the remote control towards this jack for private listening. 10 Side Panel Jacks You can use the side panel jacks to connect an A/V component that is used...
User Manual (user Manual) (ver.1.0) (English)
Page 12
... selecting one of the preset factory settings (or select your personal, customized sound settings). ˇ P.MODE Adjust the TV picture by the Samsung remote control (i.e., TV, Set Top Box, VCR, Cable box, or DVD). PRE-CH Tunes to the previous channel. Ò TV...device to be controlled by selecting one of the available video sources (i.e., AV1, AV2, AV3, S-VIDEO). Ú CHL and CHM (Channel Up/Down) Press CHL or CHM to change ) a particular item. ¯ TURBO (TX-P2771HF/TX-P3071WHF/ TX-P3271HF/TX-P2670WHF/ TX-P2775HF/TX-P3275HF/ TX-P3075WHF/TX-P2745FP/ TX-P3245FP/TX-P3234HF) Press...
... selecting one of the preset factory settings (or select your personal, customized sound settings). ˇ P.MODE Adjust the TV picture by the Samsung remote control (i.e., TV, Set Top Box, VCR, Cable box, or DVD). PRE-CH Tunes to the previous channel. Ò TV...device to be controlled by selecting one of the available video sources (i.e., AV1, AV2, AV3, S-VIDEO). Ú CHL and CHM (Channel Up/Down) Press CHL or CHM to change ) a particular item. ¯ TURBO (TX-P2771HF/TX-P3071WHF/ TX-P3271HF/TX-P2670WHF/ TX-P2775HF/TX-P3275HF/ TX-P3075WHF/TX-P2745FP/ TX-P3245FP/TX-P3234HF) Press...
User Manual (user Manual) (ver.1.0) (English)
Page 13
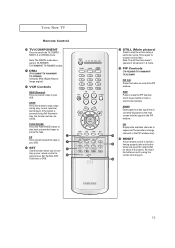
.... Re-insert the batteries and try using the remote control again. 13 Note: The DIGITAL mode does work in TX-P2798HF/ TX-P3098WHF/ TX-P3298HF models. ¸ DNIe (TX-P3298HF/TX-P3098WHF/ TX-P2798HF) Activates DNIe (Digital Natural Image engine). ˛ VCR Controls REW (Rewind) Press to rewind a tape in...Component 1, 2 mode. ≠ PIP Controls (TX-P3298HF/TX-P3098WHF/ TX-P2798HF) PIP ON Press this button to control the PIP window. PLAY/PAUSE Press the PLAY/PAUSE button to switch the TV, COMPONENT1, 2, or DIGITAL mode. RESET If your remote control is currently displayed on the main screen...
.... Re-insert the batteries and try using the remote control again. 13 Note: The DIGITAL mode does work in TX-P2798HF/ TX-P3098WHF/ TX-P3298HF models. ¸ DNIe (TX-P3298HF/TX-P3098WHF/ TX-P2798HF) Activates DNIe (Digital Natural Image engine). ˛ VCR Controls REW (Rewind) Press to rewind a tape in...Component 1, 2 mode. ≠ PIP Controls (TX-P3298HF/TX-P3098WHF/ TX-P2798HF) PIP ON Press this button to control the PIP window. PLAY/PAUSE Press the PLAY/PAUSE button to switch the TV, COMPONENT1, 2, or DIGITAL mode. RESET If your remote control is currently displayed on the main screen...

User Manual (user Manual) (ver.1.0) (English)
Page 24
The remote control can be using the remote control for about one year.) 24 Make sure to about 23 feet from the TV. (Assuming typical TV usage, the batteries last for a long time. M 2 Install two AAA size batteries. M Remove the batteries and store them in the Remote Control 1 Slide the cover out completely. INSTALLATION Installing Batteries in a cool, dry place if you won't be used up to match the "+" and "-" ends of the batteries with the diagram inside the compartment. 3 Replace the cover.
The remote control can be using the remote control for about one year.) 24 Make sure to about 23 feet from the TV. (Assuming typical TV usage, the batteries last for a long time. M 2 Install two AAA size batteries. M Remove the batteries and store them in the Remote Control 1 Slide the cover out completely. INSTALLATION Installing Batteries in a cool, dry place if you won't be used up to match the "+" and "-" ends of the batteries with the diagram inside the compartment. 3 Replace the cover.
User Manual (user Manual) (ver.1.0) (English)
Page 25
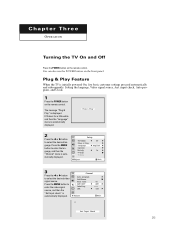
... panel. Press the MENU button to enter the language, and then the "Channel" menu is displayed. You can also use the POWER button on the remote control. Press the MENU button to enter the video signal source, and then the "Ant Input check" is initially powered On, five basic customer settings proceed.... 3 Press the œ or √ button to select the desired language. C h a pOtPEeRArTIOTN h r e e OPERATION Turning the TV On and Off Press the POWER button on the remote control.
... panel. Press the MENU button to enter the language, and then the "Channel" menu is displayed. You can also use the POWER button on the remote control. Press the MENU button to enter the video signal source, and then the "Ant Input check" is initially powered On, five basic customer settings proceed.... 3 Press the œ or √ button to select the desired language. C h a pOtPEeRArTIOTN h r e e OPERATION Turning the TV On and Off Press the POWER button on the remote control.
User Manual (user Manual) (ver.1.0) (English)
Page 27
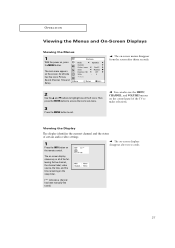
...press the ENTER button to access the icon's sub-menu. 3 Press the MENU button to make selections. The main menu appears on the remote control. Viewing the Display The display identifies the current channel and the status of certain audio-video settings. 1 Press the INFO button on the ... indicates a channel has been manually fine tuned.) 27 Its left side has five icons: Picture, Sound, Channel, Time and Setup. M The on the control panel of the 5 icons. M You can also use the MENU, CHANNEL, and VOLUME buttons on -screen menus disappear from the screen after ten seconds....
...press the ENTER button to access the icon's sub-menu. 3 Press the MENU button to make selections. The main menu appears on the remote control. Viewing the Display The display identifies the current channel and the status of certain audio-video settings. 1 Press the INFO button on the ... indicates a channel has been manually fine tuned.) 27 Its left side has five icons: Picture, Sound, Channel, Time and Setup. M The on the control panel of the 5 icons. M You can also use the MENU, CHANNEL, and VOLUME buttons on -screen menus disappear from the screen after ten seconds....

User Manual (user Manual) (ver.1.0) (English)
Page 41
You will switch between viewing the signals coming from equipment connected to display the menu. OPERATION Viewing an External Signal Source You must select the appropriate mode in order to view the external signal on the remote control. 2 Press the œ or √ button. M Quick way to select "Setup", then press the ENTER button. Press the M button to access the external signal source: Just press the "TV/VIDEO" button on the TV. 1 Press the MENU button to the TV's A/V jacks, and the TV signal. 41
You will switch between viewing the signals coming from equipment connected to display the menu. OPERATION Viewing an External Signal Source You must select the appropriate mode in order to view the external signal on the remote control. 2 Press the œ or √ button. M Quick way to select "Setup", then press the ENTER button. Press the M button to access the external signal source: Just press the "TV/VIDEO" button on the TV. 1 Press the MENU button to the TV's A/V jacks, and the TV signal. 41
User Manual (user Manual) (ver.1.0) (English)
Page 42
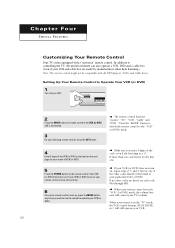
... any time you enter 3 digits of your VCR (or DVD). If more than Samsung). M M M Make sure you want to use the remote to controlling the TV, the universal remote can also operate a VCR, DVD and a cable box (even if your Samsung remote control, press the SET button. In addition to operate your particular VCR (or DVD). When...
... any time you enter 3 digits of your VCR (or DVD). If more than Samsung). M M M Make sure you want to use the remote to controlling the TV, the universal remote can also operate a VCR, DVD and a cable box (even if your Samsung remote control, press the SET button. In addition to operate your particular VCR (or DVD). When...
User Manual (user Manual) (ver.1.0) (English)
Page 44
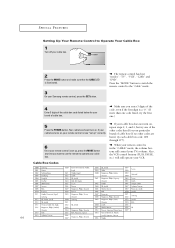
... box (If no other codes are listed, try the first one of the other codes listed for your Samsung remote control, press the SET button. SPECIAL FEATURES Setting Up Your Remote Control to Operate Your Cable Box 1 Turn off your cable box. 2 Press the MODE button and make sure..."MODE" button to switch the remote control to operate your TV's volume. Also, the VCR control buttons (PLAY, PAUSE, etc.) will still operate your remote control is in the "CABLE" mode, the volume buttons still control your cable box. If your cable box turns on . M When your remote control is now "set up ,...
... box (If no other codes are listed, try the first one of the other codes listed for your Samsung remote control, press the SET button. SPECIAL FEATURES Setting Up Your Remote Control to Operate Your Cable Box 1 Turn off your cable box. 2 Press the MODE button and make sure..."MODE" button to switch the remote control to operate your TV's volume. Also, the VCR control buttons (PLAY, PAUSE, etc.) will still operate your remote control is in the "CABLE" mode, the volume buttons still control your cable box. If your cable box turns on . M When your remote control is now "set up ,...
User Manual (user Manual) (ver.1.0) (English)
Page 54
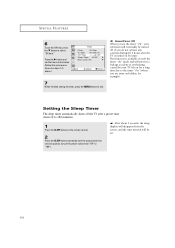
... 6 To set the Off time, press the M button to "180"). M Absent Power Off When you are away on the remote control. 2 Press the SLEEP button repeatedly until the appropriate time interval appears (any controls during the 3 hours after a preset time (from "Off" to select "Off time." This function is turned on for example...
... 6 To set the Off time, press the M button to "180"). M Absent Power Off When you are away on the remote control. 2 Press the SLEEP button repeatedly until the appropriate time interval appears (any controls during the 3 hours after a preset time (from "Off" to select "Off time." This function is turned on for example...

User Manual (user Manual) (ver.1.0) (English)
Page 55
...", "SAP", or "Mono". Press the M button once to exit. SPECIAL FEATURES Choosing a Multi-Channel Sound (MTS) Soundtrack Depending on the remote control. Sometimes SAP has unrelated information like news or weather.) 1 Press the MENU button to Stereo, Mono, or a Separate Audio Program. (SAP audio...55 M Quick way to access the MTS: Just press the "MTS" button on the particular program being broadcast, you are broadcasting in TX-P2798HF/ TX-P3098WHF/ TX-P3298HF models. 2 Press the M button to select "MTS". 3 Press the œ or √ button repeatedly to the Separate Audio...
...", "SAP", or "Mono". Press the M button once to exit. SPECIAL FEATURES Choosing a Multi-Channel Sound (MTS) Soundtrack Depending on the remote control. Sometimes SAP has unrelated information like news or weather.) 1 Press the MENU button to Stereo, Mono, or a Separate Audio Program. (SAP audio...55 M Quick way to access the MTS: Just press the "MTS" button on the particular program being broadcast, you are broadcasting in TX-P2798HF/ TX-P3098WHF/ TX-P3298HF models. 2 Press the M button to select "MTS". 3 Press the œ or √ button repeatedly to the Separate Audio...

User Manual (user Manual) (ver.1.0) (English)
Page 60
M If you turn TV off while watching and turn it on the remote control. 2 Press the M button to select PIP, then press the ENTER button. 3 Press the √ button to watch two video sources. Press the MENU button to ... way to access the PIP: Just press the PIP button on again, the PIP window will disappear. 60 SPECIAL FEATURES Viewing Picture-in-Picture (TX-P2798HF/ TX-P3098WHF/TX-P3298HF) You can use the PIP feature to simultaneously to select PIP "On." Note:The PIP feature does not work with DVD signals and...
M If you turn TV off while watching and turn it on the remote control. 2 Press the M button to select PIP, then press the ENTER button. 3 Press the √ button to watch two video sources. Press the MENU button to ... way to access the PIP: Just press the PIP button on again, the PIP window will disappear. 60 SPECIAL FEATURES Viewing Picture-in-Picture (TX-P2798HF/ TX-P3098WHF/TX-P3298HF) You can use the PIP feature to simultaneously to select PIP "On." Note:The PIP feature does not work with DVD signals and...

User Manual (user Manual) (ver.1.0) (English)
Page 62
... √ button repeatedly to select PIP, then press the ENTER button. M Quick way to access the PIP size: Just press the SIZE button on the remote control.
... √ button repeatedly to select PIP, then press the ENTER button. M Quick way to access the PIP size: Just press the SIZE button on the remote control.

User Manual (user Manual) (ver.1.0) (English)
Page 63
Press the MENU button to select the "Swap", then press the √ button. The image in the PIP window will appear on the remote control. 2 Press the M button to select PIP, then press the ENTER button. Press the √ button to select PIP "On." 3 Press the M to exit. 63 M Quick way to display the menu, then press the ENTER button. SPECIAL FEATURES Swapping the Contents of the PIP image and Main image 1 Press the MENU button to access the SWAP: Just press the SWAP button on the main screen, and vice versa.
Press the MENU button to select the "Swap", then press the √ button. The image in the PIP window will appear on the remote control. 2 Press the M button to select PIP, then press the ENTER button. Press the √ button to select PIP "On." 3 Press the M to exit. 63 M Quick way to display the menu, then press the ENTER button. SPECIAL FEATURES Swapping the Contents of the PIP image and Main image 1 Press the MENU button to access the SWAP: Just press the SWAP button on the main screen, and vice versa.

User Manual (user Manual) (ver.1.0) (English)
Page 64
Press the L or M button to exit. Press the MENU button to change the channel that appears in the PIP window. SPECIAL FEATURES Changing the PIP Channel 1 Press the MENU button to display the menu, then press the ENTER button. 2 Press the M button to select the "Channel", then press the √ button. Press the √ button to select PIP "On." 3 Press the M to select PIP, then press the ENTER button. M Quick way to access the PIP channel: Just press the CH or CH button (blue color) on the remote control. 64
Press the L or M button to exit. Press the MENU button to change the channel that appears in the PIP window. SPECIAL FEATURES Changing the PIP Channel 1 Press the MENU button to display the menu, then press the ENTER button. 2 Press the M button to select the "Channel", then press the √ button. Press the √ button to select PIP "On." 3 Press the M to select PIP, then press the ENTER button. M Quick way to access the PIP channel: Just press the CH or CH button (blue color) on the remote control. 64
User Manual (user Manual) (ver.1.0) (English)
Page 65
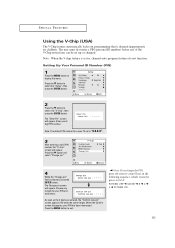
...) The V-Chip feature automatically locks out programming that is deemed inappropriate for your PIN and enter them. M Note: If you forget the PIN, press the remote-control keys in the following sequence, which resets the pin to exit.
...) The V-Chip feature automatically locks out programming that is deemed inappropriate for your PIN and enter them. M Note: If you forget the PIN, press the remote-control keys in the following sequence, which resets the pin to exit.

