

User Manual (user Manual) (ver.1.0) (English)
Page 3
...progressive (480p) video. 480i programs are transmitted in widescreen, and offer much higher picture quality than one program on -line while watching TV, and accessing ancillary data about a program. 3 Interactive Communications and Datacasting DTV will allow you can be combined into a single digital ...HDTV formats are always broadcast in two different formats. Some 480p programs are broadcast in image quality. A Guide to Digital TV What is High Definition Television (HDTV). choosing programs from Dolby Surround 2.0 to progressive-scan DVD movies in widescreen and are now...
...progressive (480p) video. 480i programs are transmitted in widescreen, and offer much higher picture quality than one program on -line while watching TV, and accessing ancillary data about a program. 3 Interactive Communications and Datacasting DTV will allow you can be combined into a single digital ...HDTV formats are always broadcast in two different formats. Some 480p programs are broadcast in image quality. A Guide to Digital TV What is High Definition Television (HDTV). choosing programs from Dolby Surround 2.0 to progressive-scan DVD movies in widescreen and are now...

User Manual (user Manual) (ver.1.0) (English)
Page 4
... will have wideband component video and stereo audio inputs. The most compatible format is 480p, which is to use an integrated digital TV; However, integrated DTV sets are plug-in digital television tuner. How to View Digital Television There are three ways to watch DTV...connect an external DTV set -top receiver and antenna. 2. Using a personal computer and monitor There are not as common as DTV-ready TVs and monitors. NOTE This television receiver supports the copy protection system regulated by DTLA (Digital Transmission Licensing Administrator). The second is that copy...
... will have wideband component video and stereo audio inputs. The most compatible format is 480p, which is to use an integrated digital TV; However, integrated DTV sets are plug-in digital television tuner. How to View Digital Television There are three ways to watch DTV...connect an external DTV set -top receiver and antenna. 2. Using a personal computer and monitor There are not as common as DTV-ready TVs and monitors. NOTE This television receiver supports the copy protection system regulated by DTLA (Digital Transmission Licensing Administrator). The second is that copy...
User Manual (user Manual) (ver.1.0) (English)
Page 5
...are no noise, ghosting, static, or scratchy audio. 3. This depends on UHF and you won't have to use for existing TV reception good enough for DTV over analog TV - Cable TV systems use an outdoor or indoor antenna to enjoy clear, sharp widescreen images and high-quality audio. 5 All you need is...whether your local DTV stations are running full power or not and how close your location is to put up outside antennas for transmitting digital TV programs that you already get good UHF reception, your area by the OTARD rules and will still need to use a different method for ...
...are no noise, ghosting, static, or scratchy audio. 3. This depends on UHF and you won't have to use for existing TV reception good enough for DTV over analog TV - Cable TV systems use an outdoor or indoor antenna to enjoy clear, sharp widescreen images and high-quality audio. 5 All you need is...whether your local DTV stations are running full power or not and how close your location is to put up outside antennas for transmitting digital TV programs that you already get good UHF reception, your area by the OTARD rules and will still need to use a different method for ...

User Manual (user Manual) (ver.1.0) (English)
Page 6
... Antennas 14 Antennas with 300-ohm Flat Twin Leads 14 Antennas with 75-ohm Round Leads 15 Separate VHF and UHF Antennas 15 Connecting Cable TV 15 Cable without a Cable Box 15 Cable with a Cable Box that Descrambles All Channels 16 Connecting to a Cable Box that Descrambles some...Audio System 24 Connecting to an External Amplifier (Variable Audio Output 24 Installing Batteries in the Remote Control 25 Chapter 3: Operation 26 Turning the TV On and Off 26 Viewing the Menus and On-Screen Displays 26 Viewing the Menus 26 Viewing the Display 26 Selecting a Menu Language 27 ...
... Antennas 14 Antennas with 300-ohm Flat Twin Leads 14 Antennas with 75-ohm Round Leads 15 Separate VHF and UHF Antennas 15 Connecting Cable TV 15 Cable without a Cable Box 15 Cable with a Cable Box that Descrambles All Channels 16 Connecting to a Cable Box that Descrambles some...Audio System 24 Connecting to an External Amplifier (Variable Audio Output 24 Installing Batteries in the Remote Control 25 Chapter 3: Operation 26 Turning the TV On and Off 26 Viewing the Menus and On-Screen Displays 26 Viewing the Menus 26 Viewing the Display 26 Selecting a Menu Language 27 ...

User Manual (user Manual) (ver.1.0) (English)
Page 7
... Timer 56 Setting the Sleep Timer 57 Using the V-Chip (USA 58 How to Change Your Password 58 How to Set up Restrictions Using the "TV Parental Guidelines" . . .60 How to Set up Restrictions using the Movie Ratings: G, PG, PG-13, R, NC-17, X 61 Important Notes...To view the Reminder List 74 Customizing Your Remote Control 75 Chapter 5: Troubleshooting 77 Identifying Problems 77 Appendix 78 Cleaning and Maintaining Your TV 78 Using Your TV in Another Country 78 Specifications 78 Manufactured under license from Dolby Laboratories. "Dolby" and the double D-symbol are trademarks of Dolby ...
... Timer 56 Setting the Sleep Timer 57 Using the V-Chip (USA 58 How to Change Your Password 58 How to Set up Restrictions Using the "TV Parental Guidelines" . . .60 How to Set up Restrictions using the Movie Ratings: G, PG, PG-13, R, NC-17, X 61 Important Notes...To view the Reminder List 74 Customizing Your Remote Control 75 Chapter 5: Troubleshooting 77 Identifying Problems 77 Appendix 78 Cleaning and Maintaining Your TV 78 Using Your TV in Another Country 78 Specifications 78 Manufactured under license from Dolby Laboratories. "Dolby" and the double D-symbol are trademarks of Dolby ...

User Manual (user Manual) (ver.1.0) (English)
Page 8
... Once you have all the parts shown here. CYhO UaR NpEtW eD IrG I TOA L nT Ve YOUR NEW DIGITAL TV List of Features Your Samsung TV was designed with detail, contrast and white enhancement and 3D noise reduction. Remote Control(AA59-00356B)/ AAA Batteries(4301-000121)... (3301-001305) Warranty Card; 2EA/ Registration Card 8 This TV is missing or broken, call your TV, check to obtain a sharper image from external sources • DIGITAL INPUT (Digital Visual Interface) jack • OPTICAL OUTPUT • Samsung's New Technology enables an improved image with the latest technology.
... Once you have all the parts shown here. CYhO UaR NpEtW eD IrG I TOA L nT Ve YOUR NEW DIGITAL TV List of Features Your Samsung TV was designed with detail, contrast and white enhancement and 3D noise reduction. Remote Control(AA59-00356B)/ AAA Batteries(4301-000121)... (3301-001305) Warranty Card; 2EA/ Registration Card 8 This TV is missing or broken, call your TV, check to obtain a sharper image from external sources • DIGITAL INPUT (Digital Visual Interface) jack • OPTICAL OUTPUT • Samsung's New Technology enables an improved image with the latest technology.

User Manual (user Manual) (ver.1.0) (English)
Page 9
... Panel Buttons The buttons on and off . Ø POWER Press to change ) a particular item. ´ MENU Press to see an on the TV. TX-P3071WH/TX-P3271WH TX-P2675WH/TX-P3075WH/ TX-P2775WH/TX-P3275WH TX-P2670WH Œ TV/VIDEO & ENTER Press to turn the TV on the front/side panel control your finger to increase or decrease the volume.
... Panel Buttons The buttons on and off . Ø POWER Press to change ) a particular item. ´ MENU Press to see an on the TV. TX-P3071WH/TX-P3271WH TX-P2675WH/TX-P3075WH/ TX-P2775WH/TX-P3275WH TX-P2670WH Œ TV/VIDEO & ENTER Press to turn the TV on the front/side panel control your finger to increase or decrease the volume.
User Manual (user Manual) (ver.1.0) (English)
Page 10
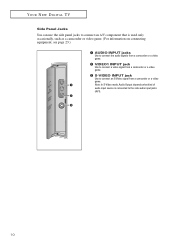
YOUR NEW DIGITAL TV Side Panel Jacks You can use the side panel jacks to connect an A/V component that is connected to connect an S-Video signal from a camcorder or a ...
YOUR NEW DIGITAL TV Side Panel Jacks You can use the side panel jacks to connect an A/V component that is connected to connect an S-Video signal from a camcorder or a ...

User Manual (user Manual) (ver.1.0) (English)
Page 11
Note: In S-Video mode, Audio Output depends what kind of an S-VHS VCR or DVD player. YOUR NEW DIGITAL TV Rear Panel Jacks Use the rear panel jacks to connect an A/V component that will be connected to these terminals. For more information on connecting equipment, ... Connect to S-VIDEO output jacks of audio input source is connected to the side audio input jacks (AV1). ∏ UPGRADE PORT For service only. Your TV has several input jacks, so you can be connected continuously, such as a VCR or a DVD player.
Note: In S-Video mode, Audio Output depends what kind of an S-VHS VCR or DVD player. YOUR NEW DIGITAL TV Rear Panel Jacks Use the rear panel jacks to connect an A/V component that will be connected to these terminals. For more information on connecting equipment, ... Connect to S-VIDEO output jacks of audio input source is connected to the side audio input jacks (AV1). ∏ UPGRADE PORT For service only. Your TV has several input jacks, so you can be connected continuously, such as a VCR or a DVD player.

User Manual (user Manual) (ver.1.0) (English)
Page 12
... also use the remote control up , down, left, or right. Ô P.SIZE Press to change the screen size. P.MODE Adjust the TV picture by the Samsung remote control(i.e., TV, STB, VCR, Cable box or DVD). Ú PRE-CH Tunes to the previous channel. Æ CH and CH (Channel Up/Down) Press CH... or CH to change channels. ı TV/VIDEO Press to display all of the preset factory settings (or select your personal, customized sound ...
... also use the remote control up , down, left, or right. Ô P.SIZE Press to change the screen size. P.MODE Adjust the TV picture by the Samsung remote control(i.e., TV, STB, VCR, Cable box or DVD). Ú PRE-CH Tunes to the previous channel. Æ CH and CH (Channel Up/Down) Press CH... or CH to change channels. ı TV/VIDEO Press to display all of the preset factory settings (or select your personal, customized sound ...

User Manual (user Manual) (ver.1.0) (English)
Page 13
... about 2~3 seconds. FF Press to rewind a tape in your VCR. REW (Rewind) Press to fast forward the tape in your VCR. - STOP Press this Samsung remote control, so that adds clarity, punch and dynamics to a preferred channel after a user-preset time delay. µ DNIe Not available. ¥ RESET If... your remote control is pressed during play back prerecorded tapes or pause the tape. YOUR NEW DIGITAL TV Remote Control (continued) ˛ ADD/DEL Press to add or erase channels in the TV's memory. ◊ AUTO.PROG Press to display the Memorized Channels menu. ± BBE BBE is a ...
... about 2~3 seconds. FF Press to rewind a tape in your VCR. REW (Rewind) Press to fast forward the tape in your VCR. - STOP Press this Samsung remote control, so that adds clarity, punch and dynamics to a preferred channel after a user-preset time delay. µ DNIe Not available. ¥ RESET If... your remote control is pressed during play back prerecorded tapes or pause the tape. YOUR NEW DIGITAL TV Remote Control (continued) ˛ ADD/DEL Press to add or erase channels in the TV's memory. ◊ AUTO.PROG Press to display the Memorized Channels menu. ± BBE BBE is a ...
User Manual (user Manual) (ver.1.0) (English)
Page 15
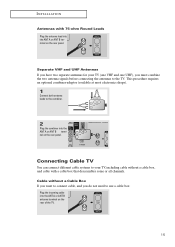
...panel. INSTALLATION Antennas with a cable box that descrambles some or all channels. Separate VHF and UHF Antennas If you have two separate antennas for your TV, including cable without a Cable Box If you want to connect cable, and you must combine the two antenna signals before connecting the antennas to the... combiner. 2 Plug the combiner into the ANT A or ANT B antenna terminal on the rear panel. Connecting Cable TV You can connect different cable systems to your TV (one VHF and one UHF), you do not need to use a cable box: Plug the incoming cable into the ANT A or...
...panel. INSTALLATION Antennas with a cable box that descrambles some or all channels. Separate VHF and UHF Antennas If you have two separate antennas for your TV, including cable without a Cable Box If you want to connect cable, and you must combine the two antenna signals before connecting the antennas to the... combiner. 2 Plug the combiner into the ANT A or ANT B antenna terminal on the rear panel. Connecting Cable TV You can connect different cable systems to your TV (one VHF and one UHF), you do not need to use a cable box: Plug the incoming cable into the ANT A or...
User Manual (user Manual) (ver.1.0) (English)
Page 16
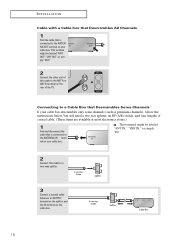
... ANTENNA OUT terminal on your cable box. This terminal might be labeled "ANT OUT", "VHF OUT", or simply, "OUT". 2 Connect the other end of the TV. Connecting to the ANT A or ANT B terminal on the rear of this cable to a two-way splitter. 3 Connect a coaxial cable between an OUTPUT terminal on...
... ANTENNA OUT terminal on your cable box. This terminal might be labeled "ANT OUT", "VHF OUT", or simply, "OUT". 2 Connect the other end of the TV. Connecting to the ANT A or ANT B terminal on the rear of this cable to a two-way splitter. 3 Connect a coaxial cable between an OUTPUT terminal on...
User Manual (user Manual) (ver.1.0) (English)
Page 17
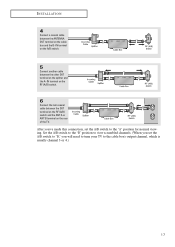
After you will need to tune your TV to the "A" position for normal viewing. INSTALLATION 4 Connect a coaxial cable between the ANTENNA OUT terminal on the cable box and the B-IN terminal on the A/B ... (A/B) switch. 6 Connect the last coaxial cable between the OUT terminal on the RF (A/B) switch and the ANT A or ANT B terminal on the rear of the TV. Set the A/B switch to the "B" position to view scrambled channels. (When you set the A/B switch to "B," you 've made this connection, set the A/B switch to...
After you will need to tune your TV to the "A" position for normal viewing. INSTALLATION 4 Connect a coaxial cable between the ANTENNA OUT terminal on the cable box and the B-IN terminal on the A/B ... (A/B) switch. 6 Connect the last coaxial cable between the OUT terminal on the RF (A/B) switch and the ANT A or ANT B terminal on the rear of the TV. Set the A/B switch to the "B" position to view scrambled channels. (When you set the A/B switch to "B," you 've made this connection, set the A/B switch to...
User Manual (user Manual) (ver.1.0) (English)
Page 18
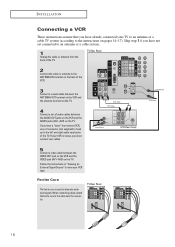
...-stereo) VCR, use a Y-connector (not supplied) to hook up to an antenna or a cable system. 1 Unplug the cable or antenna from the back of the TV. Skip step 1 if you have not yet connected to the left and right audio input jacks of audio cables between the VIDEO OUT jack on... the VCR and the VIDEO jack (AV1~AV3) on the TV. TV Rear Panel 2 Connect the cable or antenna to the instructions on pages 14~17). When connecting cables, attach the ferrite core to attenuate undesired signals...
...-stereo) VCR, use a Y-connector (not supplied) to hook up to an antenna or a cable system. 1 Unplug the cable or antenna from the back of the TV. Skip step 1 if you have not yet connected to the left and right audio input jacks of audio cables between the VIDEO OUT jack on... the VCR and the VIDEO jack (AV1~AV3) on the TV. TV Rear Panel 2 Connect the cable or antenna to the instructions on pages 14~17). When connecting cables, attach the ferrite core to attenuate undesired signals...
User Manual (user Manual) (ver.1.0) (English)
Page 19
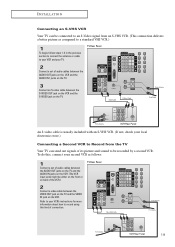
... to a standard VHS VCR.) 1 To begin, follow steps 1-3 in the previous section to connect the antenna or cable to record using this , connect your TV. Refer to your VCR's instructions for more information about how to your VCR and your second VCR as follows: 1 Connect a set of connection. 19 INSTALLATION...An S-video cable is usually included with an S-VHS VCR. (If not, check your local electronics store.) Connecting a Second VCR to Record from the TV Your TV can be recorded by a second VCR. To do this kind of audio cables between the AUDIO OUT jacks on the VCR and the AUDIO IN...
... to a standard VHS VCR.) 1 To begin, follow steps 1-3 in the previous section to connect the antenna or cable to record using this , connect your TV. Refer to your VCR's instructions for more information about how to your VCR and your second VCR as follows: 1 Connect a set of connection. 19 INSTALLATION...An S-video cable is usually included with an S-VHS VCR. (If not, check your local electronics store.) Connecting a Second VCR to Record from the TV Your TV can be recorded by a second VCR. To do this kind of audio cables between the AUDIO OUT jacks on the VCR and the AUDIO IN...

User Manual (user Manual) (ver.1.0) (English)
Page 20
... it easy to connect a DVD player to Regular Audio and Video Jacks 1 Connect a set of Component video, see your DVD player's owner's manual. TV Rear Panel 2 Connect video cables between the VIDEO OUT jack on the DVD player and the VIDEO IN jack(AV1~AV3) on the DVD player. ... DVD OUT (Y, PB, PR) jacks on the DVD player. Connecting to your TV. 1 Connect a set of audio cables between the AUDIO IN jacks(AV1~AV3) on the TV and the AUDIO OUT jacks on the TV. 20 PONENT 2 INPUT (L, R) jacks on the TV and the AUDIO OUT jacks on the DVD player. 2 Connect a video...
... it easy to connect a DVD player to Regular Audio and Video Jacks 1 Connect a set of Component video, see your DVD player's owner's manual. TV Rear Panel 2 Connect video cables between the VIDEO OUT jack on the DVD player and the VIDEO IN jack(AV1~AV3) on the DVD player. ... DVD OUT (Y, PB, PR) jacks on the DVD player. Connecting to your TV. 1 Connect a set of audio cables between the AUDIO IN jacks(AV1~AV3) on the TV and the AUDIO OUT jacks on the TV. 20 PONENT 2 INPUT (L, R) jacks on the TV and the AUDIO OUT jacks on the DVD player. 2 Connect a video...
User Manual (user Manual) (ver.1.0) (English)
Page 21
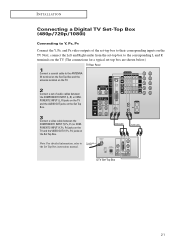
... Y, PB, PR Connect the Y, PB, and PR video outputs of the set of audio cables between the COMPONENT 1 INPUT (L, R) or COMPONENT 2 INPUT (L, R) jacks on the TV and the AUDIO OUT jacks on the Set Top Box. 3 Connect a video cable between the COMPONENT 1 INPUT (Y, PB, PR) or COMPONENT 2 INPUT (Y, PB, PR) jacks.... 21 Next, connect the Left and Right audio from the set-top box to the corresponding L and R terminals on the TV. (The connections for a typical set-top box are shown below.) TV Rear Panel 1 Connect a coaxial cable to the ANTENNA IN terminal on the Set-Top Box and the antenna terminal on...
... Y, PB, PR Connect the Y, PB, and PR video outputs of the set of audio cables between the COMPONENT 1 INPUT (L, R) or COMPONENT 2 INPUT (L, R) jacks on the TV and the AUDIO OUT jacks on the Set Top Box. 3 Connect a video cable between the COMPONENT 1 INPUT (Y, PB, PR) or COMPONENT 2 INPUT (Y, PB, PR) jacks.... 21 Next, connect the Left and Right audio from the set-top box to the corresponding L and R terminals on the TV. (The connections for a typical set-top box are shown below.) TV Rear Panel 1 Connect a coaxial cable to the ANTENNA IN terminal on the Set-Top Box and the antenna terminal on...
User Manual (user Manual) (ver.1.0) (English)
Page 22
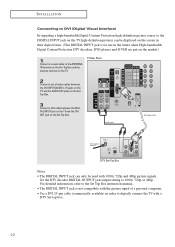
... refer to the Set Top Box instruction manual. • The DIGITAL INPUT jack is for use in order to digitally connect the TV with 1080i, 720p and 480p picture signals. TV Rear Panel 2 Connect a set of a personal computer. • Use a DVI 25-pin cable (commercially available) in the ... to DVI (Digital Visual Interface) By inputting a high-bandwidth Digital Content Protection high-definition picture source to the DIGITAL INPUT jack on the TV, high-definition pictures can only be displayed on the screen in their digital forms. (This DIGITAL INPUT jack is not compatible with the picture...
... refer to the Set Top Box instruction manual. • The DIGITAL INPUT jack is for use in order to digitally connect the TV with 1080i, 720p and 480p picture signals. TV Rear Panel 2 Connect a set of a personal computer. • Use a DVI 25-pin cable (commercially available) in the ... to DVI (Digital Visual Interface) By inputting a high-bandwidth Digital Content Protection high-definition picture source to the DIGITAL INPUT jack on the TV, high-definition pictures can only be displayed on the screen in their digital forms. (This DIGITAL INPUT jack is not compatible with the picture...
User Manual (user Manual) (ver.1.0) (English)
Page 23
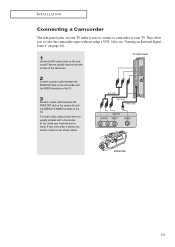
... a camcorder to connect a set of the camcorder. 2 Connect an audio cable between the AUDIO OUT jack on the camcorder and the AUDIO terminals on the TV. 3 Connect a video cable between the VIDEO OUT jack on the camcorder and the VIDEO(or S-VIDEO) terminal on the side or back of two cables.... 23 The audio-video cables shown here are usually found on the TV. They are usually included with a Camcorder. (If not, check your local electronics store.) If your camcorder is stereo, you to view the camcorder tapes without...
... a camcorder to connect a set of the camcorder. 2 Connect an audio cable between the AUDIO OUT jack on the camcorder and the AUDIO terminals on the TV. 3 Connect a video cable between the VIDEO OUT jack on the camcorder and the VIDEO(or S-VIDEO) terminal on the side or back of two cables.... 23 The audio-video cables shown here are usually found on the TV. They are usually included with a Camcorder. (If not, check your local electronics store.) If your camcorder is stereo, you to view the camcorder tapes without...


