
Owners Instructions
Page 2
... programs is provided to call CATV system installer's attention to Article 820 40 of the National Electrical Code (Section 54 of Canadian Electrical Code, Part I), that provides guidelines for proper grounding and, in particular, specifies that any unauthorized recording in whole or in part may result in violation of the building as practical. l Warninq Safety ! NO USER SERVICEABLE PARTS...
... programs is provided to call CATV system installer's attention to Article 820 40 of the National Electrical Code (Section 54 of Canadian Electrical Code, Part I), that provides guidelines for proper grounding and, in particular, specifies that any unauthorized recording in whole or in part may result in violation of the building as practical. l Warninq Safety ! NO USER SERVICEABLE PARTS...

Owners Instructions
Page 4
... rules. Refer all servicing to service the TV yourself. This television receiver provides display of television closed captioning in wire to an antenna discharge unit, size of grounding conductors, location of antenna discharge unit, connection to lightning and power line surges. • Avoid overhead power lines. Unauthorized substitutions may cause undesired operation. 2 s_._ • Protect the power cord. Power supply cords should not be sure the antenna or cable system is damaged if...
... rules. Refer all servicing to service the TV yourself. This television receiver provides display of television closed captioning in wire to an antenna discharge unit, size of grounding conductors, location of antenna discharge unit, connection to lightning and power line surges. • Avoid overhead power lines. Unauthorized substitutions may cause undesired operation. 2 s_._ • Protect the power cord. Power supply cords should not be sure the antenna or cable system is damaged if...

Owners Instructions
Page 5
... Channels (Manual Method) ........ Connecting a DVD Player Connecting a Digital TV Set Tup Box Connecting a Surzound Speakers Connecting a Speakezs (Vaziable Autio output Connecting a Camcorder Installing Battezies in the Remote Control 2.1 2.1 2.1 2.2 2.2 2.2 2.2 2.3 2.3 2.,5 2.6 2.8 2.7 2.7 2.8 2.8 2.9 2.10 Chapter 3: Operation Turning the TV On and Off Plug & Play Featuze Viewing the Menus and On Sczeen Displays Viewing the Menus Viewing the Display Selecting a Menu Language Memozizing the Channels Selecting the Video Signal source Stozing Channels...
... Channels (Manual Method) ........ Connecting a DVD Player Connecting a Digital TV Set Tup Box Connecting a Surzound Speakers Connecting a Speakezs (Vaziable Autio output Connecting a Camcorder Installing Battezies in the Remote Control 2.1 2.1 2.1 2.2 2.2 2.2 2.2 2.3 2.3 2.,5 2.6 2.8 2.7 2.7 2.8 2.8 2.9 2.10 Chapter 3: Operation Turning the TV On and Off Plug & Play Featuze Viewing the Menus and On Sczeen Displays Viewing the Menus Viewing the Display Selecting a Menu Language Memozizing the Channels Selecting the Video Signal source Stozing Channels...

Owners Instructions
Page 6
... Sound 4.12 Auto Volume 4.13 Switching the Internal Speakezs On/Off Setting the On/Off Timez Setting the Steep Timer Viewing Ctosed Captions Viewing Picture in Pictuze 4.14 4.15 4. l@ 4.17 4.18 Activating Pictuze in Picture 4.18 Selecting a Signal Source (External A/V) for PIP ......... 4.19 Swapping the Contents of the PIP image and Main image . 4.19 Changing the PIP Charmer 4.19 Changing the Location (Rotating) the PIP Window ...... 4.19 Changing the Size of the PIP Window 4.19 Scanning...
... Sound 4.12 Auto Volume 4.13 Switching the Internal Speakezs On/Off Setting the On/Off Timez Setting the Steep Timer Viewing Ctosed Captions Viewing Picture in Pictuze 4.14 4.15 4. l@ 4.17 4.18 Activating Pictuze in Picture 4.18 Selecting a Signal Source (External A/V) for PIP ......... 4.19 Swapping the Contents of the PIP image and Main image . 4.19 Changing the PIP Charmer 4.19 Changing the Location (Rotating) the PIP Window ...... 4.19 Changing the Size of the PIP Window 4.19 Scanning...

Owners Instructions
Page 7
... use remote control • Easy tO use on screen _]erlu system • Automatic timer to turn the TV on and off • Adjustable picture and sound settings that can be stored in the TV_ memory • Automatic channel tuning for up to 181 channels • A special filter to reduce or eliminate reception problems • Fine tuning control fur the sharpest picture possible • A built in multi channel sound...
... use remote control • Easy tO use on screen _]erlu system • Automatic timer to turn the TV on and off • Adjustable picture and sound settings that can be stored in the TV_ memory • Automatic channel tuning for up to 181 channels • A special filter to reduce or eliminate reception problems • Fine tuning control fur the sharpest picture possible • A built in multi channel sound...

Owners Instructions
Page 11
... the Samsung remote control (i,e,, TV,VCR, Cable box, or DVD). @ Pre-CH Tunesto the previouschannel @ TV/Video Press to display all of the available video sources (i.e., Antenna/cable, VCR,DVD, Video 1-4 and S Video 1-2). @ Menu Displays the main on screen menus.) 0 Still picture Press to select channels over 100. See page 4.1 for details. Mode Adjust the TV picture by selecting one of the preset factory settings (or select your VCR. O Power Turns the TV on and off the sound...
... the Samsung remote control (i,e,, TV,VCR, Cable box, or DVD). @ Pre-CH Tunesto the previouschannel @ TV/Video Press to display all of the available video sources (i.e., Antenna/cable, VCR,DVD, Video 1-4 and S Video 1-2). @ Menu Displays the main on screen menus.) 0 Still picture Press to select channels over 100. See page 4.1 for details. Mode Adjust the TV picture by selecting one of the preset factory settings (or select your VCR. O Power Turns the TV on and off the sound...

Owners Instructions
Page 12
...) Press to set up and activate the parental locks, _) PiP Controls Locate Press to move the PIP window to any of the four corners of the TV screen, Scan Press to memorize (scan) the available channels, Source Press to select one of this Samsung remote control, so that is currently displayed on the main screen with other devices (VCR,cabie box, etc.) 1_ MTS (Multichannel Television Stereo) Press to...
...) Press to set up and activate the parental locks, _) PiP Controls Locate Press to move the PIP window to any of the four corners of the TV screen, Scan Press to memorize (scan) the available channels, Source Press to select one of this Samsung remote control, so that is currently displayed on the main screen with other devices (VCR,cabie box, etc.) 1_ MTS (Multichannel Television Stereo) Press to...
Owners Instructions
Page 14
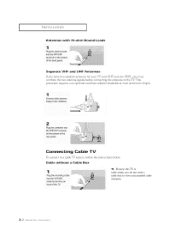
... (available at most electronics shops). INSTALLATION ] Antennas with 75-ohm Round Leads 1 i Plugtheantennalead intotheVHF/UHF terminaolnthe bottom of the back panel. Plugthecombinerinto theVHF/UHF termina! Because this TV is cable_ready, you must combine tile two antenna signals before connecting the antennas to a cable TV system, foBow tbe instructions below. Cable without a Cable Box Plug the incoming cable intotheVHF/UHF antenna terminat 0n back ofthe IV...
... (available at most electronics shops). INSTALLATION ] Antennas with 75-ohm Round Leads 1 i Plugtheantennalead intotheVHF/UHF terminaolnthe bottom of the back panel. Plugthecombinerinto theVHF/UHF termina! Because this TV is cable_ready, you must combine tile two antenna signals before connecting the antennas to a cable TV system, foBow tbe instructions below. Cable without a Cable Box Plug the incoming cable intotheVHF/UHF antenna terminat 0n back ofthe IV...
Owners Instructions
Page 15
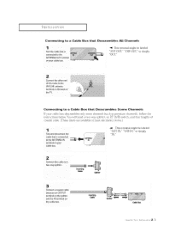
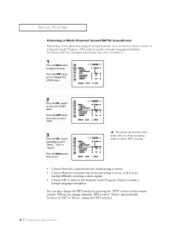
You wilI need a two way splitter, an RF (A/B) switch, and fuur lengths of the TV. INSTALLATION ] Connecting to a Cable Box that H 1 Find the cable that Descrambles Some Channels If"your CaD _ DOX f d'_ IN L_ --4 This terminal might be labeled "ANT IN," "VI [F IN," or simply, "IN." ' 2 Connect this cable [o two-way spit[tel Cable 8platmr 3 Connect a coaxial cable between an OUTPUT termtnat on the spmter...
You wilI need a two way splitter, an RF (A/B) switch, and fuur lengths of the TV. INSTALLATION ] Connecting to a Cable Box that H 1 Find the cable that Descrambles Some Channels If"your CaD _ DOX f d'_ IN L_ --4 This terminal might be labeled "ANT IN," "VI [F IN," or simply, "IN." ' 2 Connect this cable [o two-way spit[tel Cable 8platmr 3 Connect a coaxial cable between an OUTPUT termtnat on the spmter...
Owners Instructions
Page 16
... view scrambled channels. (When you set the A/B switch to "B," you 've made this connection, set the A/B switch to the cable box's output channel, which is usu ally channel 3 or 4.) 2.4 ( ,,A,.,,,_h,o: ]NS,.,,,A,,ON tN terminal on the rear of the TV. Cable Splitter _ GableBox RF (NB) Switch Connect another cable between the other OUT terminal on the splitter and the A* IN terminal on the RF(A/B) switch, Incoming Cable Splitter Cable Box Switoh Connect...
... view scrambled channels. (When you set the A/B switch to "B," you 've made this connection, set the A/B switch to the cable box's output channel, which is usu ally channel 3 or 4.) 2.4 ( ,,A,.,,,_h,o: ]NS,.,,,A,,ON tN terminal on the rear of the TV. Cable Splitter _ GableBox RF (NB) Switch Connect another cable between the other OUT terminal on the splitter and the A* IN terminal on the RF(A/B) switch, Incoming Cable Splitter Cable Box Switoh Connect...
Owners Instructions
Page 17
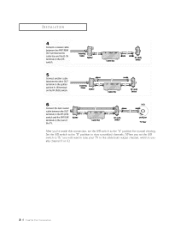
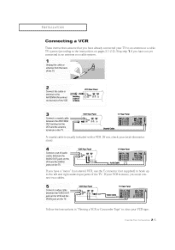
..., VCR Rear Panel TV Rear Panel Video Cable [_ollow the instructions in "Viewing a VCR or Camcorder Tape" to view your local electronics s[oie). Connect a set of the TV] If' your VCR is usuaIiy included with a VCR. (If' not, check your VCR tape. (]]]'kl'll l r\_(): INs],_] [,\]l() 2,5 INSTALLATION ] Connecting a VCR These instructions assume that you have a "mono" (non stereo) VCR, use the _connector (not supplied) to hook up to...
..., VCR Rear Panel TV Rear Panel Video Cable [_ollow the instructions in "Viewing a VCR or Camcorder Tape" to view your local electronics s[oie). Connect a set of the TV] If' your VCR is usuaIiy included with a VCR. (If' not, check your VCR tape. (]]]'kl'll l r\_(): INs],_] [,\]l() 2,5 INSTALLATION ] Connecting a VCR These instructions assume that you have a "mono" (non stereo) VCR, use the _connector (not supplied) to hook up to...

Owners Instructions
Page 18
... TV and the AUDIO !N ,jacksontheVCR. Connect an S-video cable between the AUDIO OUTjacks on th_ VCRand the AUDIO iNPUT 3`jacks on the TV, VCR Rem Panel TV Rear Panel Audio Cable Make sure the jacks you are using are underneath the number "3." VCR InputPanel Video Cable _" !i i I I Connecting an S-VHS VCR Your Samsung TV can send out signals of its picture and sound to a standard VHS VCR.) VCR Rear Panel ]_ Rear Panel 2 Connect a set ofaudio cablesbetweenthe AUDIO OUTjacks on...
... TV and the AUDIO !N ,jacksontheVCR. Connect an S-video cable between the AUDIO OUTjacks on th_ VCRand the AUDIO iNPUT 3`jacks on the TV, VCR Rem Panel TV Rear Panel Audio Cable Make sure the jacks you are using are underneath the number "3." VCR InputPanel Video Cable _" !i i I I Connecting an S-VHS VCR Your Samsung TV can send out signals of its picture and sound to a standard VHS VCR.) VCR Rear Panel ]_ Rear Panel 2 Connect a set ofaudio cablesbetweenthe AUDIO OUTjacks on...

Owners Instructions
Page 19
... Scan DVD Player that outputs 480p (refer to page 3.17). DTV menu mode selection Intended for standard interlaced source material at the same time DVD (or DTV) is connected to the DTV/DVD Component Video input, the external input select menu (On Screen Display) will show both DVD and DTV as the external input, the picture will show a dou ble or skewed image. INSTALLATION ] Connecting a DVD Player The rear paneljacks on your TV make it easy to connect a DVD player to...
... Scan DVD Player that outputs 480p (refer to page 3.17). DTV menu mode selection Intended for standard interlaced source material at the same time DVD (or DTV) is connected to the DTV/DVD Component Video input, the external input select menu (On Screen Display) will show both DVD and DTV as the external input, the picture will show a dou ble or skewed image. INSTALLATION ] Connecting a DVD Player The rear paneljacks on your TV make it easy to connect a DVD player to...
Owners Instructions
Page 24
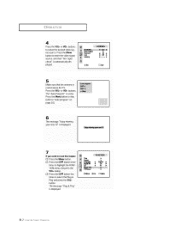
... menu and press the VOL+ button. (3) Press the CIIV button five times to select the desired video sig* aai source. buttons. The message" Plug & Play" is automatically d!s* played, Auto progmm Rnetune ] LNA LJblolno :to8el, > 4 O0 b 4 Off b 4 .... • [_ F:_dt connected to the TV, Press the VOL+or VOL- OPERATION ] Press the VOL+or 90L- Press the Menu button to enter the video signal source, and then _Ant, input check" is displayed...
... menu and press the VOL+ button. (3) Press the CIIV button five times to select the desired video sig* aai source. buttons. The message" Plug & Play" is automatically d!s* played, Auto progmm Rnetune ] LNA LJblolno :to8el, > 4 O0 b 4 Off b 4 .... • [_ F:_dt connected to the TV, Press the VOL+or VOL- OPERATION ] Press the VOL+or 90L- Press the Menu button to enter the video signal source, and then _Ant, input check" is displayed...

Owners Instructions
Page 42
...," "Cable" and "DVD." Press the "MODE" the remote control mode. Also, the VCR control buttons (PLAY, PAUSE, etc.) will still operate your VCR. Enter 3 digits of the cab!e box code !!sted below for your particular brand of the code, even if the first digit is now "set up" correctly, if your cable box does not turn on. If your cable bOx turns on, Yoffr remote contro I is a "0." (If more than one .) Press POWER.Your cable box...
...," "Cable" and "DVD." Press the "MODE" the remote control mode. Also, the VCR control buttons (PLAY, PAUSE, etc.) will still operate your VCR. Enter 3 digits of the cab!e box code !!sted below for your particular brand of the code, even if the first digit is now "set up" correctly, if your cable box does not turn on. If your cable bOx turns on, Yoffr remote contro I is a "0." (If more than one .) Press POWER.Your cable box...
Owners Instructions
Page 49
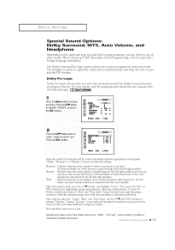
... appropriate mode appears ("Wide," 'Phantom, _ or 'Normal') Some recommended settings: Phantom Normal Wide : Selected when tbe center speaker is especially useful when simultaneously watching the main screen and the PIP window. Dolby Pro Logic Dolby Pro Logic wilt provide you with the following logo: D_I[DOLBYSURROUND] 1 Press th_ Menu button to d splay [he gOL+ button. SPECIAL FEATURES ] Special Sound Options...
... appropriate mode appears ("Wide," 'Phantom, _ or 'Normal') Some recommended settings: Phantom Normal Wide : Selected when tbe center speaker is especially useful when simultaneously watching the main screen and the PIP window. Dolby Pro Logic Dolby Pro Logic wilt provide you with the following logo: D_I[DOLBYSURROUND] 1 Press th_ Menu button to d splay [he gOL+ button. SPECIAL FEATURES ] Special Sound Options...
Owners Instructions
Page 50
... program being broadcast, you can also change the MTS setting by pressing the "MTS" control. (When you change the MTS setting.) button on • threetimestose!ect :MTS" @Me,O:kSol. [_M_. in stereo. P[ess the CHV button once to the Separate language translation. Mono for channels that are SAP to listen to highlight the SOUND menu, _UND Setir_s Equalizer Delby Surround M_8 Auto...
... program being broadcast, you can also change the MTS setting by pressing the "MTS" control. (When you change the MTS setting.) button on • threetimestose!ect :MTS" @Me,O:kSol. [_M_. in stereo. P[ess the CHV button once to the Separate language translation. Mono for channels that are SAP to listen to highlight the SOUND menu, _UND Setir_s Equalizer Delby Surround M_8 Auto...

Owners Instructions
Page 59
... the Menu button to exit -_1 Note: if you tblget the PIN, press the remote-control buttons in the tollowing sequence, which resets the pin to 0-()-0-0: POWER OFF -I, MUTE -,l, 8 -I Using the V-Chip (Option) The VChip feature automatically locks out programming that is selectee. The user must fh-st enter a PIN (personal ID number) before any of the VChip restrictions can be set up...
... the Menu button to exit -_1 Note: if you tblget the PIN, press the remote-control buttons in the tollowing sequence, which resets the pin to 0-()-0-0: POWER OFF -I, MUTE -,l, 8 -I Using the V-Chip (Option) The VChip feature automatically locks out programming that is selectee. The user must fh-st enter a PIN (personal ID number) before any of the VChip restrictions can be set up...

Owners Instructions
Page 62
...buttons aRCmen reueatme 3/ocess. Press the Menu button tOdisplay the menu. £ress the CH • button three times to highlight the _FUNC_ TtON" menu, PresstheVOE+button. _ um_e D_i,gitalNR Ptug&_ • 4 En Ooiol •• • OMo_ ±_. [E3_t Press the CH • button six times to change the sub-rating. Enter your 4-digit PIN number...is on the MPAA codes,, How to set uu ace tionat restrictions based on , the TV wfl] automatically b]ock any programs that are coded with objectionable ratings (either MPAA or TV Ratings). To exit this screen. A bunking letter &#...
...buttons aRCmen reueatme 3/ocess. Press the Menu button tOdisplay the menu. £ress the CH • button three times to highlight the _FUNC_ TtON" menu, PresstheVOE+button. _ um_e D_i,gitalNR Ptug&_ • 4 En Ooiol •• • OMo_ ±_. [E3_t Press the CH • button six times to change the sub-rating. Enter your 4-digit PIN number...is on the MPAA codes,, How to set uu ace tionat restrictions based on , the TV wfl] automatically b]ock any programs that are coded with objectionable ratings (either MPAA or TV Ratings). To exit this screen. A bunking letter &#...

Owners Instructions
Page 64
.../VIDEO button. Press the "MODE" button to have a problem, first try operating it again. Possible Solution Try another channel. Picture roils vertically. Try another channel. Check all wire connections. Adjust the antenna. Unplug the TV for SO seconds, then try this list of these troubleshooting tips apply, then call your nearest service center. TROUBLES}lOOTING If the TV seems to put your remote control in color. Adjust the antenna. Check the antenna connections...
.../VIDEO button. Press the "MODE" button to have a problem, first try operating it again. Possible Solution Try another channel. Picture roils vertically. Try another channel. Check all wire connections. Adjust the antenna. Unplug the TV for SO seconds, then try this list of these troubleshooting tips apply, then call your nearest service center. TROUBLES}lOOTING If the TV seems to put your remote control in color. Adjust the antenna. Check the antenna connections...


