

User Manual
Page 11
Sold separately DVI Cable HDMI Cable Headphones Digital audio optic output cable TV Antenna Cable (Coaxial Cable) Component(PR, PB, Y) Cable Audio cable Others Introduction Remote Control BN59-00678A Batteries (AAA X 2) (Not available in all locations) Cleaning Cloth Cable holding ring Stand Body Stand Base Note Cleaning Cloth is only provided for highly polished black products as a product feature.
Sold separately DVI Cable HDMI Cable Headphones Digital audio optic output cable TV Antenna Cable (Coaxial Cable) Component(PR, PB, Y) Cable Audio cable Others Introduction Remote Control BN59-00678A Batteries (AAA X 2) (Not available in all locations) Cleaning Cloth Cable holding ring Stand Body Stand Base Note Cleaning Cloth is only provided for highly polished black products as a product feature.
User Manual
Page 12
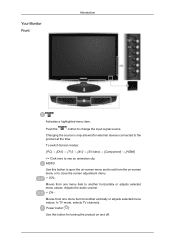
... the screen adjustment menu. + VOL- Moves from one menu item to the product at the time. To switch Screen modes: [PC] → [DVI] → [TV] → [AV] → [S-Video] → [Component] → [HDMI] >> Click here to see an animation clip MENU Use this button for external devices ...from the on and off. Push the ' ', button to another horizontally or adjusts selected menu values. Adjusts the audio volume. + CH - In TV mode, selects TV channels. Power button [ ] Use this button to open the on-screen menu and to exit from one menu item to change the input signal...
... the screen adjustment menu. + VOL- Moves from one menu item to the product at the time. To switch Screen modes: [PC] → [DVI] → [TV] → [AV] → [S-Video] → [Component] → [HDMI] >> Click here to see an animation clip MENU Use this button for external devices ...from the on and off. Push the ' ', button to another horizontally or adjusts selected menu values. Adjusts the audio volume. + CH - In TV mode, selects TV channels. Power button [ ] Use this button to open the on-screen menu and to exit from one menu item to change the input signal...
User Manual
Page 15
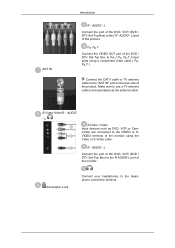
.../Video/R - L, S-Video / Video Input devices such as the antenna cable. AUDIO - AUDIO - Connect the CATV cable or TV antenna cable to the VIDEO or SVIDEO terminal of the product. R - Make sure to use a TV antenna cable (sold separately) as DVD, VCR or Camcorder are connected to the "ANT IN" port on the...
.../Video/R - L, S-Video / Video Input devices such as the antenna cable. AUDIO - AUDIO - Connect the CATV cable or TV antenna cable to the VIDEO or SVIDEO terminal of the product. R - Make sure to use a TV antenna cable (sold separately) as DVD, VCR or Camcorder are connected to the "ANT IN" port on the...

User Manual
Page 17
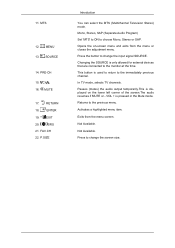
... Buttons 4. - button 5. + VOL - 6. Down-Up Left- Current picture information is used to select MMS (multi-channel) for DTV. POWER 2. Right buttons 8. Selects the TV mode directly. Not Available. TOOLS 7. CC Turns the product On/Off. button + VOL TOOLS Down-Up Left-Right buttons INFO COLOR BUTTONS CC MTS MENU...PRE-CH CH MUTE RETURN ENTER EXIT SRS FAV.CH P.SIZE 1. INFO 9. It is displayed on the upper left corner of the screen. TV 3. The "-" button operates only for a DTV. Introduction POWER TV Number Buttons - Not Available. Adjusts the audio volume.
... Buttons 4. - button 5. + VOL - 6. Down-Up Left- Current picture information is used to select MMS (multi-channel) for DTV. POWER 2. Right buttons 8. Selects the TV mode directly. Not Available. TOOLS 7. CC Turns the product On/Off. button + VOL TOOLS Down-Up Left-Right buttons INFO COLOR BUTTONS CC MTS MENU...PRE-CH CH MUTE RETURN ENTER EXIT SRS FAV.CH P.SIZE 1. INFO 9. It is displayed on the upper left corner of the screen. TV 3. The "-" button operates only for a DTV. Introduction POWER TV Number Buttons - Not Available. Adjusts the audio volume.
User Manual
Page 18
... SOURCE. Not Available. Press to the immediately previous channel. Mono, Stereo, SAP (Separate Audio Program) Set 'MTS' to ON to the previous menu. In TV mode, selects TV channels. Pauses (mutes) the audio output temporarily.This is only allowed for external devices that are connected to change the screen size. CH 16...
... SOURCE. Not Available. Press to the immediately previous channel. Mono, Stereo, SAP (Separate Audio Program) Set 'MTS' to ON to the previous menu. In TV mode, selects TV channels. Pauses (mutes) the audio output temporarily.This is only allowed for external devices that are connected to change the screen size. CH 16...
User Manual
Page 20
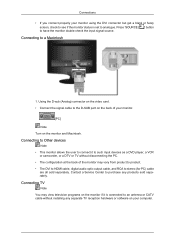
...see if the monitor status is set to such input devices as a DVD player, a VCR or camcorder, or a DTV or TV without installing any products sold separately. Connecting TV Note You may vary from product to product. • The DVI to HDMI cable, digital audio optic output cable, and RCA ...to purchase any separate TV reception hardware or software on the monitor and Macintosh. Connecting to have the monitor double-check the input signal source. Contact a Service Center to ...
...see if the monitor status is set to such input devices as a DVD player, a VCR or camcorder, or a DTV or TV without installing any products sold separately. Connecting TV Note You may vary from product to product. • The DVI to HDMI cable, digital audio optic output cable, and RCA ...to purchase any separate TV reception hardware or software on the monitor and Macintosh. Connecting to have the monitor double-check the input signal source. Contact a Service Center to ...
User Manual
Page 21
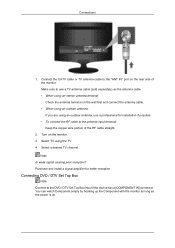
... antenna terminal: Check the antenna terminal on . Note Is weak signal causing poor reception? Connecting DVD / DTV Set Top Box Note Connect to use a TV antenna cable (sold separately) as the power is on the wall first and connect the antenna cable. • When using an outdoor antenna: If you... signal amplifier for installation if possible. • To connect the RF cable to the "ANT IN" port on the monitor. 3. Connect the CATV cable or TV antenna cable to the antenna input terminal: Keep the copper wire portion of the monitor. Make sure to the DVD / DTV Set Top Box input...
... antenna terminal: Check the antenna terminal on . Note Is weak signal causing poor reception? Connecting DVD / DTV Set Top Box Note Connect to use a TV antenna cable (sold separately) as the power is on the wall first and connect the antenna cable. • When using an outdoor antenna: If you... signal amplifier for installation if possible. • To connect the RF cable to the "ANT IN" port on the monitor. 3. Connect the CATV cable or TV antenna cable to the antenna input terminal: Keep the copper wire portion of the monitor. Make sure to the DVD / DTV Set Top Box input...
User Manual
Page 37
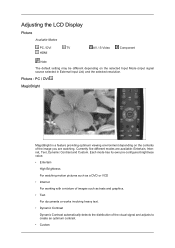
... you are available: Entertain, Internet, Text, Dynamic Contrast and Custom. Currently five different modes are watching. Adjusting the LCD Display Picture Available Modes PC / DVI TV HDMI AV / S-Video Component Note The default setting may be different depending on the contents of the visual signal and adjusts to create an optimum...
... you are available: Entertain, Internet, Text, Dynamic Contrast and Custom. Currently five different modes are watching. Adjusting the LCD Display Picture Available Modes PC / DVI TV HDMI AV / S-Video Component Note The default setting may be different depending on the contents of the visual signal and adjusts to create an optimum...
User Manual
Page 42
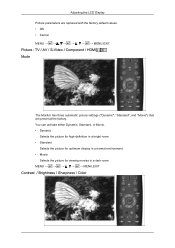
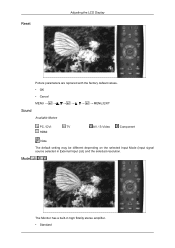
... Contrast / Brightness / Sharpness / Color Adjusting the LCD Display Picture parameters are replaced with the factory default values. • OK • Cancel MENU MENU,EXIT Picture : TV / AV / S-Video / Component / HDMI Mode The Monitor has three automatic picture settings ("Dynamic", "Standard", and "Movie") that are preset at the factory. You can activate...
... Contrast / Brightness / Sharpness / Color Adjusting the LCD Display Picture parameters are replaced with the factory default values. • OK • Cancel MENU MENU,EXIT Picture : TV / AV / S-Video / Component / HDMI Mode The Monitor has three automatic picture settings ("Dynamic", "Standard", and "Movie") that are preset at the factory. You can activate...
User Manual
Page 44
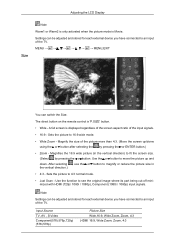
... button to see the original image where its part being cut-off minimized with HDMI (720p/ 1080i / 1080p), Component (1080i / 1080p) input signals. Input Source TV, AV , S-Video Component(576i,576p,720p) (576i,576p) Picture Size Wide,16:9, Wide Zoom, Zoom, 4:3 ,HDMI 16:9, Wide Zoom, Zoom, 4:3 Note Settings ... more than 4:3. (Move the screen up and down. The direct button on the remote control is displayed regardless of the screen aspect ratio of the TV. A full screen is 'P.SIZE' button. • Wide - Use the function to move the picture up /donw using the or button after selecting ...
... button to see the original image where its part being cut-off minimized with HDMI (720p/ 1080i / 1080p), Component (1080i / 1080p) input signals. Input Source TV, AV , S-Video Component(576i,576p,720p) (576i,576p) Picture Size Wide,16:9, Wide Zoom, Zoom, 4:3 ,HDMI 16:9, Wide Zoom, Zoom, 4:3 Note Settings ... more than 4:3. (Move the screen up and down. The direct button on the remote control is displayed regardless of the screen aspect ratio of the TV. A full screen is 'P.SIZE' button. • Wide - Use the function to move the picture up /donw using the or button after selecting ...
User Manual
Page 45
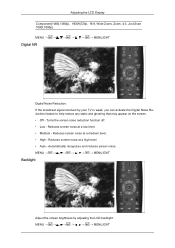
...; High - Reduces screen noise at a high level. • Auto - Automatically recognizes and reduces screen noise. MENU MENU,EXIT Backlight Adjust the screen brightness by your TV is weak, you can activate the Digital Noise Reduction feature to help reduce any static and ghosting that may appear on the screen. • Off...
...; High - Reduces screen noise at a high level. • Auto - Automatically recognizes and reduces screen noise. MENU MENU,EXIT Backlight Adjust the screen brightness by your TV is weak, you can activate the Digital Noise Reduction feature to help reduce any static and ghosting that may appear on the screen. • Off...
User Manual
Page 46
The Monitor has a built-in External Input List) and the selected resolution. Reset Adjusting the LCD Display Picture parameters are replaced with the factory default values. • OK • Cancel MENU → , → → MENU,EXIT Sound Available Modes PC / DVI TV HDMI AV / S-Video Component Mode Note The default setting may be different depending on the selected Input Mode (input signal source selected in high fidelity stereo amplifier. • Standard
The Monitor has a built-in External Input List) and the selected resolution. Reset Adjusting the LCD Display Picture parameters are replaced with the factory default values. • OK • Cancel MENU → , → → MENU,EXIT Sound Available Modes PC / DVI TV HDMI AV / S-Video Component Mode Note The default setting may be different depending on the selected Input Mode (input signal source selected in high fidelity stereo amplifier. • Standard
User Manual
Page 48
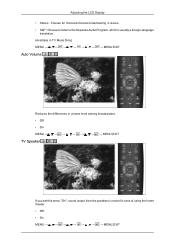
...channels that are broadcasting in stereo. • SAP : Choose to listen to the Separate Audio Program, which is usually a foreign-language translation. (Available in TV Mode Only) MENU → , → → MENU,EXIT Auto Volume Reduces the differences in volume level among broadcasters. • Off • ...On MENU→ , → → , → → , → → MENU,EXIT TV Speaker If you set this menu "On", sound output from the speakers is muted in case of using the home theater. • Off • On...
...channels that are broadcasting in stereo. • SAP : Choose to listen to the Separate Audio Program, which is usually a foreign-language translation. (Available in TV Mode Only) MENU → , → → MENU,EXIT Auto Volume Reduces the differences in volume level among broadcasters. • Off • ...On MENU→ , → → , → → , → → MENU,EXIT TV Speaker If you set this menu "On", sound output from the speakers is muted in case of using the home theater. • Off • On...

User Manual
Page 49
Air / Cable The channel system can be different depending on the selected Input Mode (input signal source selected in External Input List) and the selected resolution. STD, HRC, IRC and Air identify various types of cable TV systems. Contact your local cable company to identify the type of cable system that exists in your particular area. • Air • STD • HRC • IRC MENU MENU,EXIT Adjusting the LCD Display Channel Available Modes PC / DVI TV HDMI AV / S-Video Component Note The default setting may be set in several different ways.
Air / Cable The channel system can be different depending on the selected Input Mode (input signal source selected in External Input List) and the selected resolution. STD, HRC, IRC and Air identify various types of cable TV systems. Contact your local cable company to identify the type of cable system that exists in your particular area. • Air • STD • HRC • IRC MENU MENU,EXIT Adjusting the LCD Display Channel Available Modes PC / DVI TV HDMI AV / S-Video Component Note The default setting may be set in several different ways.
User Manual
Page 50
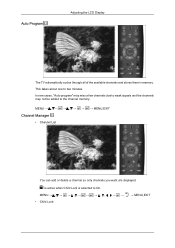
is active when Child Lock is selected to the channel memory. MENU Child Lock → MENU,EXIT Auto Program Adjusting the LCD Display The TV automatically cycles through all of the available channels and stores them in memory. MENU MENU,EXIT Channel Manager • Channel List You can add or delete a channel so only channels you want are displayed. In rare cases, "Auto program" may miss a few channels due to weak signals and the channels may not be added to On. This takes about one to two minutes.
is active when Child Lock is selected to the channel memory. MENU Child Lock → MENU,EXIT Auto Program Adjusting the LCD Display The TV automatically cycles through all of the available channels and stores them in memory. MENU MENU,EXIT Channel Manager • Channel List You can add or delete a channel so only channels you want are displayed. In rare cases, "Auto program" may miss a few channels due to weak signals and the channels may not be added to On. This takes about one to two minutes.
User Manual
Page 52
... the Color System Mode to PAL-M, PAL-N or NTSC. • Auto • PAL-M • PAL-N • NTSC MENU MENU,EXIT Setup Available Modes PC / DVI TV HDMI AV / S-Video Component Note The default setting may be different depending on the selected Input Mode (input signal source selected in the mode Auto...
... the Color System Mode to PAL-M, PAL-N or NTSC. • Auto • PAL-M • PAL-N • NTSC MENU MENU,EXIT Setup Available Modes PC / DVI TV HDMI AV / S-Video Component Note The default setting may be different depending on the selected Input Mode (input signal source selected in the mode Auto...
User Manual
Page 53
When the volume OSD is displayed, press and hold the MENU button on the TV. Note We recommend setting the TV to "Home" (Standard) : Press the Volume button on the TV for 5 seconds. MENU Language You can manage the entire configuration. Plug & Play Adjusting the LCD Display You can choose one of the OSD...
When the volume OSD is displayed, press and hold the MENU button on the TV. Note We recommend setting the TV to "Home" (Standard) : Press the Volume button on the TV for 5 seconds. MENU Language You can manage the entire configuration. Plug & Play Adjusting the LCD Display You can choose one of the OSD...
User Manual
Page 57
MENU → , → → MENU,EXIT Light Level Use to adjust the light level i.e., the brightness of monitor according to the situation. MENU MENU,EXIT Light Effect Adjusting the LCD Display You can turn on/off the LED on . Use it for saving power or when the LED dazzles your eyes. • Off : LED will not come on. • In Standby : Turns the LED on in standby mode. • In Watching TV : Turns the LED on while watching TV. • Always : LED is always on the front of the light.
MENU → , → → MENU,EXIT Light Level Use to adjust the light level i.e., the brightness of monitor according to the situation. MENU MENU,EXIT Light Effect Adjusting the LCD Display You can turn on/off the LED on . Use it for saving power or when the LED dazzles your eyes. • Off : LED will not come on. • In Standby : Turns the LED on in standby mode. • In Watching TV : Turns the LED on while watching TV. • Always : LED is always on the front of the light.

User Manual
Page 58
...., depending on the external device connected. MENU MENU,EXIT HDMI Black Level When a DVD or set the "Energy Saving" mode option to "High" to the TV via HDMI, it may cause a degradation in order to high energy saving mode. This function is active only when the an external device (DVD player..., STB etc.) is connected to your TV by configuring the HDMI Black Level. When watching TV at night, set -top box is connected to reduce eye fatigue as well as an increase in HDMI Mode Only) •...
...., depending on the external device connected. MENU MENU,EXIT HDMI Black Level When a DVD or set the "Energy Saving" mode option to "High" to the TV via HDMI, it may cause a degradation in order to high energy saving mode. This function is active only when the an external device (DVD player..., STB etc.) is connected to your TV by configuring the HDMI Black Level. When watching TV at night, set -top box is connected to reduce eye fatigue as well as an increase in HDMI Mode Only) •...

User Manual
Page 59
...-M, PAL-N or NTSC. (Available in AV / S-Video Mode Only) • Auto • PAL-M • PAL-N • NTSC MENU MENU,EXIT Input Available Modes PC / DVI TV HDMI AV / S-Video Component Note The default setting may be different depending on the selected Input Mode (input signal source selected in the mode Auto...
...-M, PAL-N or NTSC. (Available in AV / S-Video Mode Only) • Auto • PAL-M • PAL-N • NTSC MENU MENU,EXIT Input Available Modes PC / DVI TV HDMI AV / S-Video Component Note The default setting may be different depending on the selected Input Mode (input signal source selected in the mode Auto...


