

User Manual
Page 1
SyncMaster T240M LCD Monitor User Manual
SyncMaster T240M LCD Monitor User Manual
User Manual
Page 3
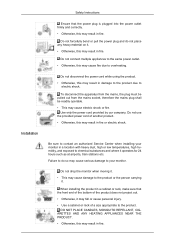
.... • Otherwise, this may result in fire. Do not forcefully bend or pull the power plug and do so may cause serious damage to your monitor in fire. DO NOT PLACE CANDLES, MOSQUITO REPELLANT, CIGARETTES AND ANY HEATING APPLIANCES NEAR THE PRODUCT. • Otherwise, this may cause fire due to..., train stations etc. Failure to do not place any heavy material on it. • Otherwise, this may result in fire. Do not drop the monitor when moving it. • This may cause electric shock or fire. Do not use the provided power cord of a size appropriate to the product. ...
.... • Otherwise, this may result in fire. Do not forcefully bend or pull the power plug and do so may cause serious damage to your monitor in fire. DO NOT PLACE CANDLES, MOSQUITO REPELLANT, CIGARETTES AND ANY HEATING APPLIANCES NEAR THE PRODUCT. • Otherwise, this may cause fire due to..., train stations etc. Failure to do not place any heavy material on it. • Otherwise, this may result in fire. Do not drop the monitor when moving it. • This may cause electric shock or fire. Do not use the provided power cord of a size appropriate to the product. ...
User Manual
Page 4
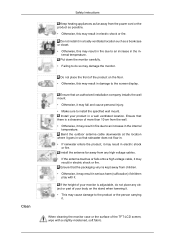
... it may result in fire due to an increase in the internal temperature. Install the antenna far away from any object or part of your monitor is kept away from children. • Otherwise, it may result in serious harm (suffocation) if children play with a slightly moistened, soft ...fabric. If the height of your product in a well ventilated location. Put down the monitor carefully. • Failing to do not place any high voltage cables. • If the antenna touches or falls onto a high voltage cable, it ...
... it may result in fire due to an increase in the internal temperature. Install the antenna far away from any object or part of your monitor is kept away from children. • Otherwise, it may result in serious harm (suffocation) if children play with a slightly moistened, soft ...fabric. If the height of your product in a well ventilated location. Put down the monitor carefully. • Failing to do not place any high voltage cables. • If the antenna touches or falls onto a high voltage cable, it ...
User Manual
Page 5
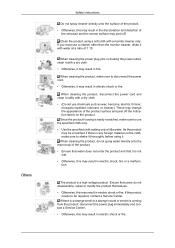
... 1:10. When cleaning the power plug pins or dusting the power outlet, clean it with a dry cloth. • (Do not use a cleaner other than the monitor cleaner, dilute it softly with a dry cloth. • Otherwise, it is a high voltage product. Ensure that users do not spray water directly onto the main... water does not enter the product and that it may result in fire. When cleaning the product, disconnect the power cord and clean it with a monitor cleaner only.
... 1:10. When cleaning the power plug pins or dusting the power outlet, clean it with a dry cloth. • (Do not use a cleaner other than the monitor cleaner, dilute it softly with a dry cloth. • Otherwise, it is a high voltage product. Ensure that users do not spray water directly onto the main... water does not enter the product and that it may result in fire. When cleaning the product, disconnect the power cord and clean it with a monitor cleaner only.
User Manual
Page 6
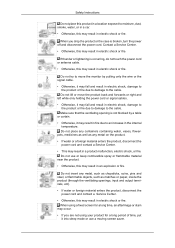
... the product, disconnect the power cord and contact a Service Center. • This may result in electric shock or fire. Do not lift or move the monitor by a table or curtain. • Otherwise, it into sleep mode or use or keep combustible spray or flammable material near the product. • Otherwise, this...
... the product, disconnect the power cord and contact a Service Center. • This may result in electric shock or fire. Do not lift or move the monitor by a table or curtain. • Otherwise, it into sleep mode or use or keep combustible spray or flammable material near the product. • Otherwise, this...

User Manual
Page 7
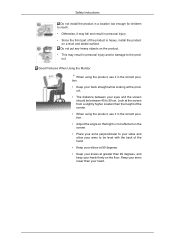
... may result in their mouths, consult your hearing. If you continually move closer to the product screen, your eyesight may be failing. When using the monitor. Safety Instructions Set a resolution and frequency appropriate to the product. • Otherwise, your eyesight may be damaged. Ensure that children or infants cannot reach. •...
... may result in their mouths, consult your hearing. If you continually move closer to the product screen, your eyesight may be failing. When using the monitor. Safety Instructions Set a resolution and frequency appropriate to the product. • Otherwise, your eyesight may be damaged. Ensure that children or infants cannot reach. •...
User Manual
Page 9
... low enough for children to reach. • Otherwise, it may result in personal injury and/or damage to 50 cm. Good Postures When Using the Monitor When using the product, use it in the correct position. • Keep your back straight while looking at greater than the height of the hand...
... low enough for children to reach. • Otherwise, it may result in personal injury and/or damage to 50 cm. Good Postures When Using the Monitor When using the product, use it in the correct position. • Keep your back straight while looking at greater than the height of the hand...
User Manual
Page 10
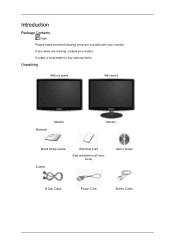
Contact a local dealer to buy optional items. Unpacking Without stand With stand Manuals Monitor Monitor Quick Setup Guide Cables Warranty Card (Not available in all locations) User's Guide D-Sub Cable Power Cord Stereo Cable If any items are included with your dealer. Introduction Package Contents Note Please make sure the following items are missing, contact your monitor.
Contact a local dealer to buy optional items. Unpacking Without stand With stand Manuals Monitor Monitor Quick Setup Guide Cables Warranty Card (Not available in all locations) User's Guide D-Sub Cable Power Cord Stereo Cable If any items are included with your dealer. Introduction Package Contents Note Please make sure the following items are missing, contact your monitor.
User Manual
Page 12
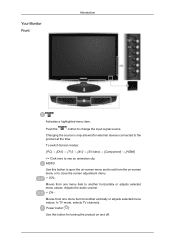
... selected menu values. Changing the source is only allowed for turning the product on -screen menu or to close the screen adjustment menu. + VOL- Your Monitor Front Introduction Activates a highlighted menu item. Power button [ ] Use this button to open the on-screen menu and to exit from one menu item to...
... selected menu values. Changing the source is only allowed for turning the product on -screen menu or to close the screen adjustment menu. + VOL- Your Monitor Front Introduction Activates a highlighted menu item. Power button [ ] Use this button to open the on-screen menu and to exit from one menu item to...
User Manual
Page 13
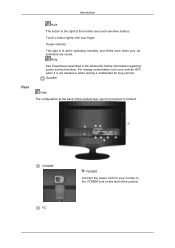
... POWER Connect the power cord for further information regarding power saving functions. Touch a button lightly with your monitor to the POWER port on the back of the monitor are saved. For energy conservation, turn your monitor OFF when it is lit when operating normally, and blinks once when your adjustments are touch-sensitive...
... POWER Connect the power cord for further information regarding power saving functions. Touch a button lightly with your monitor to the POWER port on the back of the monitor are saved. For energy conservation, turn your monitor OFF when it is lit when operating normally, and blinks once when your adjustments are touch-sensitive...
User Manual
Page 14
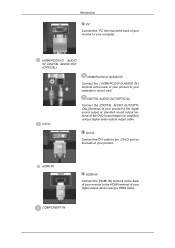
... digital output device using a digital audio optical output cable. COMPONENT IN HDMI IN HDMI IN Connect the [HDMI IN] terminal at the back of your monitor to your computer. DIGITAL AUDIO OUT(OPTICAL) Connect the [DIGITAL AUDIO OUT(OPTICAL)] terminal of your product. DVI-D Connect the DVI cable to the DVI... standard sound output terminal of the DVD home theater (or amplifier) using a HDMI cable. Introduction PC Connect the PC terminal at the back of your monitor to the HDMI terminal of your computer's sound card.
... digital output device using a digital audio optical output cable. COMPONENT IN HDMI IN HDMI IN Connect the [HDMI IN] terminal at the back of your monitor to your computer. DIGITAL AUDIO OUT(OPTICAL) Connect the [DIGITAL AUDIO OUT(OPTICAL)] terminal of your product. DVI-D Connect the DVI cable to the DVI... standard sound output terminal of the DVD home theater (or amplifier) using a HDMI cable. Introduction PC Connect the PC terminal at the back of your monitor to the HDMI terminal of your computer's sound card.
User Manual
Page 15
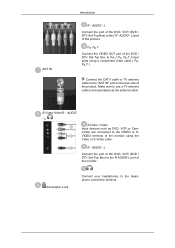
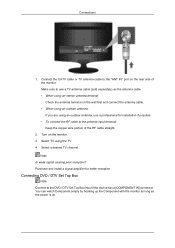
... IN Introduction R - Kensington Lock Connect your headphones to the "ANT IN" port on the rear side of the monitor. L Connect the port of the product. PR, PB,Y Connect the VIDEO OUT port of the monitor using a component video cable ( PR, PB,Y ). L Connect the port of the DVD, VCR (DVD / DTV Set-Top...
... IN Introduction R - Kensington Lock Connect your headphones to the "ANT IN" port on the rear side of the monitor. L Connect the port of the product. PR, PB,Y Connect the VIDEO OUT port of the monitor using a component video cable ( PR, PB,Y ). L Connect the port of the DVD, VCR (DVD / DTV Set-Top...
User Manual
Page 16
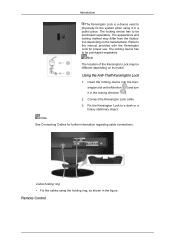
... Connecting Cables for proper use. The locking device has to a desk or a heavy stationary object. Insert the locking device into the Kensington slot on the Monitor ( ) and turn it in the figure.
... Connecting Cables for proper use. The locking device has to a desk or a heavy stationary object. Insert the locking device into the Kensington slot on the Monitor ( ) and turn it in the figure.
User Manual
Page 18
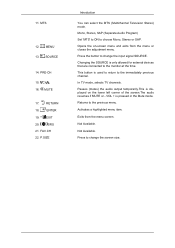
Changing the SOURCE is used to return to the monitor at the time. This button is only allowed for external devices that are connected to the immediately previous channel. Returns to choose Mono, Stereo or ...
Changing the SOURCE is used to return to the monitor at the time. This button is only allowed for external devices that are connected to the immediately previous channel. Returns to choose Mono, Stereo or ...
User Manual
Page 19
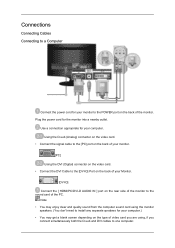
... one computer. Using the D-sub (Analog) connector on the video card. • Connect the signal cable to the [PC] port on the back of your monitor. [PC] Using the DVI (Digital) connector on the video card. • Connect the DVI Cable to the [DVI-D] Port on the rear side of the... monitor to the sound card of your computer. Plug the power cord for your Monitor. [DVI-D] Connect the [ HDMI/PC/DVI-D AUDIO IN ] port on the back of the PC. Use a connection appropriate...
... one computer. Using the D-sub (Analog) connector on the video card. • Connect the signal cable to the [PC] port on the back of your monitor. [PC] Using the DVI (Digital) connector on the video card. • Connect the DVI Cable to the [DVI-D] Port on the rear side of the... monitor to the sound card of your computer. Plug the power cord for your Monitor. [DVI-D] Connect the [ HDMI/PC/DVI-D AUDIO IN ] port on the back of the PC. Use a connection appropriate...
User Manual
Page 20
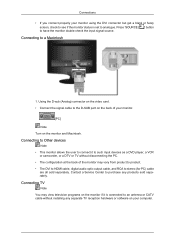
... all sold separately. Contact a Service Center to purchase any separate TV reception hardware or software on your monitor. [PC] Note Turn on the back of the monitor may view television programs on the monitor if it to such input devices as a DVD player, a VCR or camcorder, or a DTV or...Using the D-sub (Analog) connector on the video card. • Connect the signal cable to the D-SUB port on the monitor and Macintosh. Connecting to Other devices Note • This monitor allows the user to connect it is set to analogue. Press 'SOURCE [ ]' button to a Macintosh 1. Connecting to have...
... all sold separately. Contact a Service Center to purchase any separate TV reception hardware or software on your monitor. [PC] Note Turn on the back of the monitor may view television programs on the monitor if it to such input devices as a DVD player, a VCR or camcorder, or a DTV or...Using the D-sub (Analog) connector on the video card. • Connect the signal cable to the D-SUB port on the monitor and Macintosh. Connecting to Other devices Note • This monitor allows the user to connect it is set to analogue. Press 'SOURCE [ ]' button to a Macintosh 1. Connecting to have...
User Manual
Page 21
...antenna cable (sold separately) as the power is on the monitor. 3. Purchase and install a signal amplifier for installation if possible. • To connect the RF cable to the antenna input terminal: Keep the copper wire portion of the monitor. You can watch Component simply by hooking up the Component ...with the monitor as long as the antenna cable. • When using an interior antenna terminal: Check the antenna terminal ...
...antenna cable (sold separately) as the power is on the monitor. 3. Purchase and install a signal amplifier for installation if possible. • To connect the RF cable to the antenna input terminal: Keep the copper wire portion of the monitor. You can watch Component simply by hooking up the Component ...with the monitor as long as the antenna cable. • When using an interior antenna terminal: Check the antenna terminal ...
User Manual
Page 22
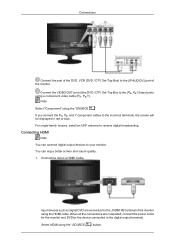
... displayed in red or blue. You can connect digital output devices to your monitor. Connect the VIDEO OUT port of the monitor. When all the connections are connected to the [HDMI IN] terminal of the monitor using the HDMI cable. Connecting HDMI Note You can enjoy better screen and... sound quality. 1. Connecting Using a HDMI Cable Input devices such as digital DVD are completed, connect the power cords for the monitor and DVD(or the device connected to the digital output terminal). Select HDMI using the 'SOURCE [ ]' button. Connections Connect the port of the ...
... displayed in red or blue. You can connect digital output devices to your monitor. Connect the VIDEO OUT port of the monitor. When all the connections are connected to the [HDMI IN] terminal of the monitor using the HDMI cable. Connecting HDMI Note You can enjoy better screen and... sound quality. 1. Connecting Using a HDMI Cable Input devices such as digital DVD are completed, connect the power cords for the monitor and DVD(or the device connected to the digital output terminal). Select HDMI using the 'SOURCE [ ]' button. Connections Connect the port of the ...
User Manual
Page 23
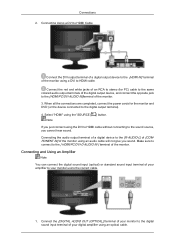
...device to the digital output terminal). 4. Connect the [DIGITAL AUDIO OUT (OPTICAL)] terminal of your monitor using an optical cable. Connect the red and white jacks of an RCA to stereo (for the monitor and DVD (or the device connected to the [R-AUDIO-L] of [COMPONENT IN] of your digital ... correct cable. 1. Connecting and Using an Amplifier Note You can connect the digital sound input (optical) or standard sound input terminal of the monitor. 3. When all the connections are completed, connect the power cords for PC) cable to the same colored audio output terminals of the digital...
...device to the digital output terminal). 4. Connect the [DIGITAL AUDIO OUT (OPTICAL)] terminal of your monitor using an optical cable. Connect the red and white jacks of an RCA to stereo (for the monitor and DVD (or the device connected to the [R-AUDIO-L] of [COMPONENT IN] of your digital ... correct cable. 1. Connecting and Using an Amplifier Note You can connect the digital sound input (optical) or standard sound input terminal of the monitor. 3. When all the connections are completed, connect the power cords for PC) cable to the same colored audio output terminals of the digital...
User Manual
Page 24
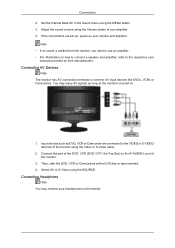
If the connections are connected to the VIDEO or S-VIDEO terminal of the monitor using the Volume button of your headphones to the monitor. Connecting AV Devices Note The monitor has AV connection terminals to the R-AUDIO-L port of the DVD, VCR (DVD / DTV Set-Top Box) ..., refer to use an amplifier. • For information on . 1. Select AV or S-Video using the MENU button. 3. Connect the port of the monitor. 3. Connections 2. You may connect your amplifier 4. Adjust the sound volume using the Video or S-Video cable. 2. Connecting Headphone Note You may enjoy AV...
If the connections are connected to the VIDEO or S-VIDEO terminal of the monitor using the Volume button of your headphones to the monitor. Connecting AV Devices Note The monitor has AV connection terminals to the R-AUDIO-L port of the DVD, VCR (DVD / DTV Set-Top Box) ..., refer to use an amplifier. • For information on . 1. Select AV or S-Video using the MENU button. 3. Connect the port of the monitor. 3. Connections 2. You may connect your amplifier 4. Adjust the sound volume using the Video or S-Video cable. 2. Connecting Headphone Note You may enjoy AV...


