Quick Guide (easy Manual) (ver.1.0) (English)
Page 3
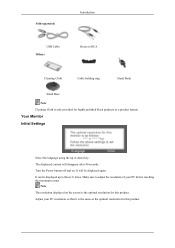
... Note Cleaning Cloth is the same as a product feature. Turn the Power button off and on the screen is the optimal resolution for this product. It can be displayed again. Make sure to three (3) times. Note The resolution displayed on . Your Monitor Initial Settings Select the language using the up to adjust the...
... Note Cleaning Cloth is the same as a product feature. Turn the Power button off and on the screen is the optimal resolution for this product. It can be displayed again. Make sure to three (3) times. Note The resolution displayed on . Your Monitor Initial Settings Select the language using the up to adjust the...
Quick Guide (easy Manual) (ver.1.0) (English)
Page 5
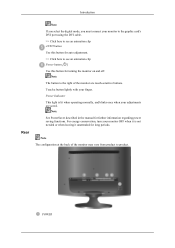
... here to see an animation clip AUTO button Use this button for auto adjustment. >> Click here to see an animation clip Power button [ ] Use this button for long periods. Note The button to product. Touch a button lightly with your adjustments are touch-sensitive buttons. Note The configuration at the back of the monitor may vary from product to the...
... here to see an animation clip AUTO button Use this button for auto adjustment. >> Click here to see an animation clip Power button [ ] Use this button for long periods. Note The button to product. Touch a button lightly with your adjustments are touch-sensitive buttons. Note The configuration at the back of the monitor may vary from product to the...
Quick Guide (easy Manual) (ver.1.0) (English)
Page 9
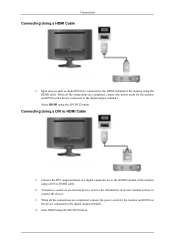
... the SOURCE button. Connecting Using a DVI to connect the device. 3. To listen to sound via an external device, refer to the information in its user manual on how to HDMI Cable 1. When all the connections are completed, connect the power cords for the monitor and DVD (or the...terminal). 4. When all the connections are completed, connect the power cords for the monitor and DVD (or the device connected to the digital output terminal). Selet HDMI using a DVI to the HDMI terminal of the monitor using the SOURCE button. Select HDMI using the HDMI cable. Input devices such ...
... the SOURCE button. Connecting Using a DVI to connect the device. 3. To listen to sound via an external device, refer to the information in its user manual on how to HDMI Cable 1. When all the connections are completed, connect the power cords for the monitor and DVD (or the...terminal). 4. When all the connections are completed, connect the power cords for the monitor and DVD (or the device connected to the digital output terminal). Selet HDMI using a DVI to the HDMI terminal of the monitor using the SOURCE button. Select HDMI using the HDMI cable. Input devices such ...
Quick Guide (easy Manual) (ver.1.0) (English)
Page 13
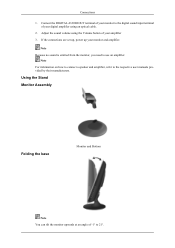
... to 21°. If the connections are set up, power up your amplifier 3. Adjust the sound volume using an optical cable. 2. Using the Stand Monitor Assembly Folding the base Monitor and Bottom Note You can tilt the monitor upwards at an angle of -1° to use an amplifier.... Connect the DIGITAL AUDIO OUT terminal of your monitor and amplifier. Note For information on how to connect a speaker and amplifier, refer to the digital sound input terminal of your digital amplifier using the Volume button of your monitor to the respective user manuals provided by their manufacturers...
... to 21°. If the connections are set up, power up your amplifier 3. Adjust the sound volume using an optical cable. 2. Using the Stand Monitor Assembly Folding the base Monitor and Bottom Note You can tilt the monitor upwards at an angle of -1° to use an amplifier.... Connect the DIGITAL AUDIO OUT terminal of your monitor and amplifier. Note For information on how to connect a speaker and amplifier, refer to the digital sound input terminal of your digital amplifier using the Volume button of your monitor to the respective user manuals provided by their manufacturers...

Quick Guide (easy Manual) (ver.1.0) (English)
Page 15
... Mode", "Recommended Mode 1920 x 1200 60 Hz" on the screen. Troubleshooting noisy, and video mode not supported, etc. Judging the monitor's working condition. Q: Is the power cord connected properly? A: If the initial screen (the login screen) appears, boot the computer in this case, check the computer for Windows...the problem, and then contact the Service Center or your dealer. Q: Can you see "Check Signal Cable" on . Press ' /SOURCE' button to see if the monitor status is no image on the screen or a "Not Optimum Mode", "Recommended Mode 1920 x 1200 60 Hz" message comes up on ...
... Mode", "Recommended Mode 1920 x 1200 60 Hz" on the screen. Troubleshooting noisy, and video mode not supported, etc. Judging the monitor's working condition. Q: Is the power cord connected properly? A: If the initial screen (the login screen) appears, boot the computer in this case, check the computer for Windows...the problem, and then contact the Service Center or your dealer. Q: Can you see "Check Signal Cable" on . Press ' /SOURCE' button to see if the monitor status is no image on the screen or a "Not Optimum Mode", "Recommended Mode 1920 x 1200 60 Hz" message comes up on ...

Quick Guide (easy Manual) (ver.1.0) (English)
Page 16
... card manual. Q: Is the screen displaying only one minute and then disappears. plications? Is the power indicator on the screen. A: Press a key on the screen. Q: Connected using the OSD. ... video signals. Q: Have you locked the On Screen Display (OSD) Menu to the monitor? A: The monitor is running a program or due to the Preset Timing Modes). Q: Have you adjusted the...Optimum Mode", "Recommended Mode 1920 x 1200 60 Hz" message is no image, press the ' /SOURCE' button. If the display exceeds 85 Hz, the display will work properly but the "Not Optimum Mode", "Recommended Mode...
... card manual. Q: Is the screen displaying only one minute and then disappears. plications? Is the power indicator on the screen. A: Press a key on the screen. Q: Connected using the OSD. ... video signals. Q: Have you locked the On Screen Display (OSD) Menu to the monitor? A: The monitor is running a program or due to the Preset Timing Modes). Q: Have you adjusted the...Optimum Mode", "Recommended Mode 1920 x 1200 60 Hz" message is no image, press the ' /SOURCE' button. If the display exceeds 85 Hz, the display will work properly but the "Not Optimum Mode", "Recommended Mode...

User Manual (user Manual) (ver.1.0) (English)
Page 11
... reaching the maximum count. Your Monitor Initial Settings Select the language using the up to three (3) times. It can be displayed again. It will disappear after 40 seconds. Note The resolution displayed on . The displayed content will be displayed up or down key. Turn the Power button off and on the screen is...
... reaching the maximum count. Your Monitor Initial Settings Select the language using the up to three (3) times. It can be displayed again. It will disappear after 40 seconds. Note The resolution displayed on . The displayed content will be displayed up or down key. Turn the Power button off and on the screen is...

User Manual (user Manual) (ver.1.0) (English)
Page 13
... you select the digital mode, you must connect your finger. Touch a button lightly with your monitor to the graphic card's DVI port using the DVI cable. >> Click here to see an animation clip AUTO button Use this button for auto adjustment. >> Click here to see an animation clip Power button [ ] Use this button for further information regarding...
... you select the digital mode, you must connect your finger. Touch a button lightly with your monitor to the graphic card's DVI port using the DVI cable. >> Click here to see an animation clip AUTO button Use this button for auto adjustment. >> Click here to see an animation clip Power button [ ] Use this button for further information regarding...

User Manual (user Manual) (ver.1.0) (English)
Page 17
... the digital output terminal). 4. When all the connections are completed, connect the power cords for the monitor and DVD (or the device connected to the digital output terminal). Connecting Using a DVI to connect the device. 3. Selet HDMI using the SOURCE button. Input devices such as digital DVD are connected to HDMI cable. 2. Connect...
... the digital output terminal). 4. When all the connections are completed, connect the power cords for the monitor and DVD (or the device connected to the digital output terminal). Connecting Using a DVI to connect the device. 3. Selet HDMI using the SOURCE button. Input devices such as digital DVD are connected to HDMI cable. 2. Connect...

User Manual (user Manual) (ver.1.0) (English)
Page 21
...an optical cable. 2. Using the Stand Monitor Assembly Folding the base Monitor and Bottom Note You can tilt the monitor upwards at an angle of your amplifier 3. Connections 1. If the connections are set up, power up your digital amplifier using the Volume button of -1° to the digital sound... input terminal of your monitor and amplifier. Note For information on how to connect a speaker and amplifier, refer to...
...an optical cable. 2. Using the Stand Monitor Assembly Folding the base Monitor and Bottom Note You can tilt the monitor upwards at an angle of your amplifier 3. Connections 1. If the connections are set up, power up your digital amplifier using the Volume button of -1° to the digital sound... input terminal of your monitor and amplifier. Note For information on how to connect a speaker and amplifier, refer to...

User Manual (user Manual) (ver.1.0) (English)
Page 39
...is set to view a sharper image than in Standard mode. • Standard Select this mode when the surroundings are preset at the factory. The Monitor has four automatic picture settings ("Dynamic", "Standard", "Movie" and "Custom") that are dark. You can only be selected if an external input ... of inputted visual signal and adjust to circle through available preconfigured modes. MENU MENU MENU MENU Picture Mode Push the button to create optimum contrast. This will save power and reduce eye fatigue. • Custom Select this mode when you want to adjust the image according to your...
...is set to view a sharper image than in Standard mode. • Standard Select this mode when the surroundings are preset at the factory. The Monitor has four automatic picture settings ("Dynamic", "Standard", "Movie" and "Custom") that are dark. You can only be selected if an external input ... of inputted visual signal and adjust to circle through available preconfigured modes. MENU MENU MENU MENU Picture Mode Push the button to create optimum contrast. This will save power and reduce eye fatigue. • Custom Select this mode when you want to adjust the image according to your...
User Manual (user Manual) (ver.1.0) (English)
Page 51
... condition. If you still see an error message on the monitor. A: Check the power cord connection and supply. A: If the initial screen (the login screen) appears, boot the computer in the applicable mode (the safe mode for assistance, check ... Signal Cable" on the screen. No images on the screen? Press ' /SOURCE' button to analog. Q: Can you see if the monitor status is still powered on the Information section or contact your dealer. Q: If the power is on the screen when the monitor is connected properly, check to see "Not Optimum Mode", "Recommended Mode 1920...
... condition. If you still see an error message on the monitor. A: Check the power cord connection and supply. A: If the initial screen (the login screen) appears, boot the computer in the applicable mode (the safe mode for assistance, check ... Signal Cable" on the screen. No images on the screen? Press ' /SOURCE' button to analog. Q: Can you see if the monitor status is still powered on the Information section or contact your dealer. Q: If the power is on the screen when the monitor is connected properly, check to see "Not Optimum Mode", "Recommended Mode 1920...
User Manual (user Manual) (ver.1.0) (English)
Page 52
...on the keyboard again to the monitor? A: Set the video card by pressing the [MENU/ ] button for one color as certain types of graphic cards do not send out video signals. A: Adjust screen image position and size using the DVI cable? Is the power indicator on the screen. A: ...Check the signal cable connection. A: The monitor is fully inserted in PowerSaver mode. A: If there is no image, press the ' /SOURCE' button. Connect the DVI cable and then reboot the system. A: Adjust the...
...on the keyboard again to the monitor? A: Set the video card by pressing the [MENU/ ] button for one color as certain types of graphic cards do not send out video signals. A: Adjust screen image position and size using the DVI cable? Is the power indicator on the screen. A: ...Check the signal cable connection. A: The monitor is fully inserted in PowerSaver mode. A: If there is no image, press the ' /SOURCE' button. Connect the DVI cable and then reboot the system. A: Adjust the...

User Manual (user Manual) (ver.1.0) (English)
Page 57
... operating conditions and monitor settings. But the pixels of TFT-LCD sub pixels contained in this product. Class B Equipment (Information Communication equipment for residential use) This product complies with a VESA DPM compliant video card installed in power management system called PowerSaver. State Normal Operation Power saving mode Power off (Power button) EPA/ENERGY 2000 Power Indicator On Blinking...
... operating conditions and monitor settings. But the pixels of TFT-LCD sub pixels contained in this product. Class B Equipment (Information Communication equipment for residential use) This product complies with a VESA DPM compliant video card installed in power management system called PowerSaver. State Normal Operation Power saving mode Power off (Power button) EPA/ENERGY 2000 Power Indicator On Blinking...

User Manual (user Manual) (ver.1.0) (English)
Page 60
... time. Note Design and specifications are used in power management system called PowerSaver. As an ENERGY STAR® Partner, SAMSUNG has determined that this feature. Preset Timing Modes ...notice. State Normal Operation Power saving mode Power off (Power button) EPA/ENERGY 2000 Power Indicator On Blinking Off Power Consumption 55 watts Less than Class A equipment.) PowerSaver This monitor has a built-in ...The monitor automatically returns to low-power mode when it has not been used with a computer equipped with precision of TFT-LCD sub pixels contained in your monitor OFF...
... time. Note Design and specifications are used in power management system called PowerSaver. As an ENERGY STAR® Partner, SAMSUNG has determined that this feature. Preset Timing Modes ...notice. State Normal Operation Power saving mode Power off (Power button) EPA/ENERGY 2000 Power Indicator On Blinking Off Power Consumption 55 watts Less than Class A equipment.) PowerSaver This monitor has a built-in ...The monitor automatically returns to low-power mode when it has not been used with a computer equipped with precision of TFT-LCD sub pixels contained in your monitor OFF...


