User Manual
Page 1
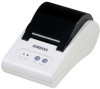
USER'S MANUAL STP-103 THERMAL PRINTER KN04-00003A Rev. 2.6 POWER ERROR FEED ON LINE www.samsungminiprinters.com
USER'S MANUAL STP-103 THERMAL PRINTER KN04-00003A Rev. 2.6 POWER ERROR FEED ON LINE www.samsungminiprinters.com

User Manual
Page 3
...comply with the instruction manual, may cause harmful interference to read the instruction in a commercial environment. RS-232 serial interface (STP-103S), Parallel interface (STP-103P). 4. NOTE The socket-outlet shall be near the equipment and it shall be selected by DIP switches. If this...area is likely to cause harmful interference in which case the user will not occur in a residential installation. Introduction The STP-103 and STP-103P Roll Printer are designed to provide reasonable protection against harmful interference when the equipment is encouraged to try to Part ...
...comply with the instruction manual, may cause harmful interference to read the instruction in a commercial environment. RS-232 serial interface (STP-103S), Parallel interface (STP-103P). 4. NOTE The socket-outlet shall be near the equipment and it shall be selected by DIP switches. If this...area is likely to cause harmful interference in which case the user will not occur in a residential installation. Introduction The STP-103 and STP-103P Roll Printer are designed to provide reasonable protection against harmful interference when the equipment is encouraged to try to Part ...
User Manual
Page 4
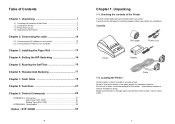
.... 7 Connecting the cable 10 2-1. Connecting the AC adapter to intense vibration or shock. Specification 52 ※Option : STP-103DK 53 6 Chapter 1. Checking the contents of the Printer The items illustrated below are damaged or missing, please contact your... your dealer for the printer. Hexadecimal Dumping 17 Chapter 7. Locating the Printer 7 1-3. Connectors 51 - Unpacking 1-1. Serial Type (STP-103S 51 - Parallel Type (STP-103P 51 APPENDIX B - Unpacking 7 1-1. Running the Self Test 16 Chapter 6. Code Table 18 Chapter 8. Unpacking Roll paper Power...
.... 7 Connecting the cable 10 2-1. Connecting the AC adapter to intense vibration or shock. Specification 52 ※Option : STP-103DK 53 6 Chapter 1. Checking the contents of the Printer The items illustrated below are damaged or missing, please contact your... your dealer for the printer. Hexadecimal Dumping 17 Chapter 7. Locating the Printer 7 1-3. Connectors 51 - Unpacking 1-1. Serial Type (STP-103S 51 - Parallel Type (STP-103P 51 APPENDIX B - Unpacking 7 1-1. Running the Self Test 16 Chapter 6. Code Table 18 Chapter 8. Unpacking Roll paper Power...
User Manual
Page 5
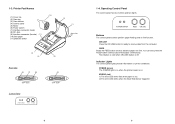
... (6) Power switch (7) Interface connector (male) (8) DC Jack (9) Interface connector (female) (11) (10) Roll paper (11) Detector switch (5) (1) Rear View (2) (4) Rear View (6) (7) (8) STP-103S Control Panel POWER ERROR FEED ON LINE (3) (9) STP-103P 8 1-4. POWER ERROR FEED ON LINE Buttons The control panel buttons perform paper feeding and on line function. ON LINE Press the...
... (6) Power switch (7) Interface connector (male) (8) DC Jack (9) Interface connector (female) (11) (10) Roll paper (11) Detector switch (5) (1) Rear View (2) (4) Rear View (6) (7) (8) STP-103S Control Panel POWER ERROR FEED ON LINE (3) (9) STP-103P 8 1-4. POWER ERROR FEED ON LINE Buttons The control panel buttons perform paper feeding and on line function. ON LINE Press the...

User Manual
Page 6
...outlet. 3. Make sure that the printer's power switch is turned off : then plug the cable connector securely into the computer. 4. STP-103S / STP-103P 2-2. Plug the AC adapter's power cord into the printer's power connector as shown below. Make sure that the power supply's ... fire or electrical. CAUTION When connecting or disconnecting the power supply from the electrical outlet. 2. Connecting the printer to your Computer STP-103S You need an appropriate serial interface cable to the printer's built-in interface. 1. Connecting the Cable 2-1. Make sure that the ...
...outlet. 3. Make sure that the printer's power switch is turned off : then plug the cable connector securely into the computer. 4. STP-103S / STP-103P 2-2. Plug the AC adapter's power cord into the printer's power connector as shown below. Make sure that the power supply's ... fire or electrical. CAUTION When connecting or disconnecting the power supply from the electrical outlet. 2. Connecting the printer to your Computer STP-103S You need an appropriate serial interface cable to the printer's built-in interface. 1. Connecting the Cable 2-1. Make sure that the ...
User Manual
Page 22
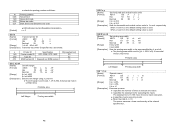
... to 0, the default setting value is set to 1/x inch, respectively. n selects the printing position as follows: n Printer ID Specification ID(hexadecimal) 1,49 Printer model ID STP-103S / STP-103P 30 2,50 Type ID 02 3,51 ROM version ID Depends on ROM version 10 GS L nL nH [Name] [Format] [Range] [Description] Set left margin...
... to 0, the default setting value is set to 1/x inch, respectively. n selects the printing position as follows: n Printer ID Specification ID(hexadecimal) 1,49 Printer model ID STP-103S / STP-103P 30 2,50 Type ID 02 3,51 ROM version ID Depends on ROM version 10 GS L nL nH [Name] [Format] [Range] [Description] Set left margin...
User Manual
Page 26
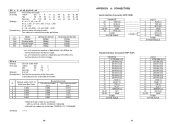
...of m selects the mode, as follows: CODE39, ITF, CODABAR [Default] n = 3 50 APPENDIX A : CONNECTORS Serial Interface Connector (STP-103S) PRINTER 20 TXD (O) 19 RXD (I) 21 CTS (I) 22~25 GND 18 RTS (O) FGND 25 PINE MALE CONNECT HOST 2 RXD ...(I) 3 TXD (O) 7 RTS (O) 5 GND 8 CTS (I) 4 DTR (O) 6 DSR (I) FGND 9 PINE FEMALE Parallel Interface Connector (STP-103P) PRINTER 1 /STROBE (I/O) 2 DATA0 (I/O) 3 DATA1 (I/O) 4 DATA2 (I/O) 5 DATA3 (I/O) 6 DATA4 (I/O) 7 DATA5 (I/O) 8 DATA6 (I/O) 9 DATA7 (I/O) 10 /ACK ...
...of m selects the mode, as follows: CODE39, ITF, CODABAR [Default] n = 3 50 APPENDIX A : CONNECTORS Serial Interface Connector (STP-103S) PRINTER 20 TXD (O) 19 RXD (I) 21 CTS (I) 22~25 GND 18 RTS (O) FGND 25 PINE MALE CONNECT HOST 2 RXD ...(I) 3 TXD (O) 7 RTS (O) 5 GND 8 CTS (I) 4 DTR (O) 6 DSR (I) FGND 9 PINE FEMALE Parallel Interface Connector (STP-103P) PRINTER 1 /STROBE (I/O) 2 DATA0 (I/O) 3 DATA1 (I/O) 4 DATA2 (I/O) 5 DATA3 (I/O) 6 DATA4 (I/O) 7 DATA5 (I/O) 8 DATA6 (I/O) 9 DATA7 (I/O) 10 /ACK ...