User Manual
Page 1
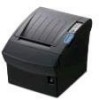
User's Manual SRP-350 Thermal Printer Rev. 1.02 http://www.samsungminiprinters.com
User's Manual SRP-350 Thermal Printer Rev. 1.02 http://www.samsungminiprinters.com

User Manual
Page 2
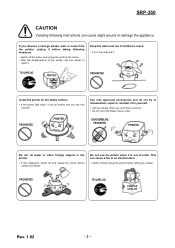
PROHIBITED PROHIBITED Rev. 1.02 - 2 - SRP-350 ■ Safety Precautions In using the present appliance, please keep the following instructions can cause a fire. You must use only standardized multi-outlets. Do not ... in or unplug with the outlet, do not plug in one multi-outlet. • This can be electrocuted. Keep the plastic bag out of the printer. ONLY SUPPLIED ADAPTER PROHIBITED PROHIBITED Do not pull the cable to use only the supplied adapter. • It is wet or dirty, dry or wipe...
PROHIBITED PROHIBITED Rev. 1.02 - 2 - SRP-350 ■ Safety Precautions In using the present appliance, please keep the following instructions can cause a fire. You must use only standardized multi-outlets. Do not ... in or unplug with the outlet, do not plug in one multi-outlet. • This can be electrocuted. Keep the plastic bag out of the printer. ONLY SUPPLIED ADAPTER PROHIBITED PROHIBITED Do not pull the cable to use only the supplied adapter. • It is wet or dirty, dry or wipe...
User Manual
Page 3
...; Do not touch the blade of auto cutter. TO UNPLUG PRINTER PROHIBITED Install the printer on the stable surface. • If the printer falls down, it before taking following instructions can hurt yourself. SRP-350 CAUTION Violating following measures. • Switch off and unplug the printer before calling your dealer. Keep the desiccant out of order...
...; Do not touch the blade of auto cutter. TO UNPLUG PRINTER PROHIBITED Install the printer on the stable surface. • If the printer falls down, it before taking following instructions can hurt yourself. SRP-350 CAUTION Violating following measures. • Switch off and unplug the printer before calling your dealer. Keep the desiccant out of order...
User Manual
Page 4
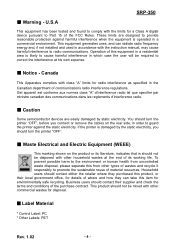
...in order to radio communications. If the printer is operated in accordance with the instruction manual, may cause harmful interference to guard the printer against harmful interference when the equipment is damaged by static electricity. SRP-350 ■ Warning - Canada This Apparatus complies... with the limits for disposal. ■ Label Material * Control Label: PC * Other Labels: PET Rev. 1.02 - 4 - You should turn the printer "OFF". ■ Waste Electrical and ...
...in order to radio communications. If the printer is operated in accordance with the instruction manual, may cause harmful interference to guard the printer against harmful interference when the equipment is damaged by static electricity. SRP-350 ■ Warning - Canada This Apparatus complies... with the limits for disposal. ■ Label Material * Control Label: PC * Other Labels: PET Rev. 1.02 - 4 - You should turn the printer "OFF". ■ Waste Electrical and ...

User Manual
Page 5
...speed printing : 35.5(1/6" Feed) lines per second. 2. Low noise thermal printing. 3. Peripheral units drive circuit enables control of the printer are designed for use with electronic instruments such as system ECR, POS... manual carefully before using a bar code command. 8. Different print densities can be selected by using your new SRP-350. ※ NOTE The socket-outlet shall be near the equipment and it shall be easy accessible. ※...main features of external devices such as cash drawer. 6. ■ Introduction SRP-350 The SRP-350 Roll Printer are as follows: 1.
...speed printing : 35.5(1/6" Feed) lines per second. 2. Low noise thermal printing. 3. Peripheral units drive circuit enables control of the printer are designed for use with electronic instruments such as system ECR, POS... manual carefully before using a bar code command. 8. Different print densities can be selected by using your new SRP-350. ※ NOTE The socket-outlet shall be near the equipment and it shall be easy accessible. ※...main features of external devices such as cash drawer. 6. ■ Introduction SRP-350 The SRP-350 Roll Printer are as follows: 1.

User Manual
Page 6
■ Table of Contents SRP-350 1. Specification ...20 5. Hexadecimal Dumping 19 4. Appendix ...21 5-1 Cleaning Printer ...21 5-2 Printing speed...21 Rev. 1.02 - 6 - Setting Up the Printer 7 1-1 Unpacking...7 1-2 Connecting the Cables 8 1-2-1 Serial Interface (RS-232C 8 1-2-2 Serial Interface (RS-485 9 1-2-3 Parallel Interface (IEEE1284 10 1-2-4 USB... Parallel & USB Interface 13 1-5 Installing or Replacing the Paper Roll 14 1-6 Adjustments and Settings 16 1-7 Using the Printer ...16 1-8 Connecting the computer 17 1-9 Connecting the Power Supply 17 2. Self Test...18 3.
■ Table of Contents SRP-350 1. Specification ...20 5. Hexadecimal Dumping 19 4. Appendix ...21 5-1 Cleaning Printer ...21 5-2 Printing speed...21 Rev. 1.02 - 6 - Setting Up the Printer 7 1-1 Unpacking...7 1-2 Connecting the Cables 8 1-2-1 Serial Interface (RS-232C 8 1-2-2 Serial Interface (RS-485 9 1-2-3 Parallel Interface (IEEE1284 10 1-2-4 USB... Parallel & USB Interface 13 1-5 Installing or Replacing the Paper Roll 14 1-6 Adjustments and Settings 16 1-7 Using the Printer ...16 1-8 Connecting the computer 17 1-9 Connecting the Power Supply 17 2. Self Test...18 3.

User Manual
Page 7
SRP-350 Cover Cable CD Roll Paper Manual AC Adapter Power Cord Rev. 1.02 - 7 - Setting Up the Printer 1-1 Unpacking Your printer box should include these items. If any items are damaged or missing, please contact your dealer for assistance. SRP-350 1.
SRP-350 Cover Cable CD Roll Paper Manual AC Adapter Power Cord Rev. 1.02 - 7 - Setting Up the Printer 1-1 Unpacking Your printer box should include these items. If any items are damaged or missing, please contact your dealer for assistance. SRP-350 1.

User Manual
Page 8
SRP-350 1-2 Connecting the Cables You can connect up the three cables to the connector panel on the back of the printer, which is shown below: ※ NOTE Before connecting any of the cables, make sure that both the printer and the host are turned off. 1-2-1 Serial Interface (RS-232C) IFA-S ... Ready To Send Clear To Send Data Set Ready Signal Ground Data Terminal Ready PRINTER SIDE (25P) HOST SIDE (25P) PRINTER SIDE (25P) HOST SIDE (9P) Pin No. 1 2 3 4 5 6 7 20 Signal name FG TxD RxD RTS CTS DSR SG DTR Direction - Output Input Output Input Input Output Rev. 1.02 - 8 - They ...
SRP-350 1-2 Connecting the Cables You can connect up the three cables to the connector panel on the back of the printer, which is shown below: ※ NOTE Before connecting any of the cables, make sure that both the printer and the host are turned off. 1-2-1 Serial Interface (RS-232C) IFA-S ... Ready To Send Clear To Send Data Set Ready Signal Ground Data Terminal Ready PRINTER SIDE (25P) HOST SIDE (25P) PRINTER SIDE (25P) HOST SIDE (9P) Pin No. 1 2 3 4 5 6 7 20 Signal name FG TxD RxD RTS CTS DSR SG DTR Direction - Output Input Output Input Input Output Rev. 1.02 - 8 - They ...

User Manual
Page 9
Output Output Input Input - Output Input Function Frame Ground Send Data Receive Data Signal Ground Same as DTR(RS-232) Same as DSR(RS-232) Rev. 1.02 - 9 - PRINTER SIDE HOST SIDE Pin No. 1 2 3 4 5 7 8 9 10 11 Signal name FGND SD2 SD1 RD2 RD1 SGND DR2 DR1 CS2 CS1 Direction - 1-2-2 Serial Interface (RS-485) SRP-350 IFA-SF TYPE ON Interface connector Drawer kick-out Power supply connector connector ※ When the Dip Switch is "ON" on the Serial Interface Board, DTR and RTS are connected each other.
Output Output Input Input - Output Input Function Frame Ground Send Data Receive Data Signal Ground Same as DTR(RS-232) Same as DSR(RS-232) Rev. 1.02 - 9 - PRINTER SIDE HOST SIDE Pin No. 1 2 3 4 5 7 8 9 10 11 Signal name FGND SD2 SD1 RD2 RD1 SGND DR2 DR1 CS2 CS1 Direction - 1-2-2 Serial Interface (RS-485) SRP-350 IFA-SF TYPE ON Interface connector Drawer kick-out Power supply connector connector ※ When the Dip Switch is "ON" on the Serial Interface Board, DTR and RTS are connected each other.

User Manual
Page 10
1-2-3 Parallel Interface (IEEE1284) IFA-P TYPE SRP-350 Interface connector Drawer kick-out Power supply connector connector Pin No. 1 2 3 4 5 6 7 8 9 10 11 12 13 14 15 16 17 18 19~30 31 32 33 34 35 36 Source Host Host / Printer Host / Printer Host / Printer Host / Printer Host / Printer Host / Printer Host / Printer Host / Printer Printer Printer Printer Printer Host Printer Host Printer Printer Printer Host Compatibility Mode nStrobe Data 0 (LSB...
1-2-3 Parallel Interface (IEEE1284) IFA-P TYPE SRP-350 Interface connector Drawer kick-out Power supply connector connector Pin No. 1 2 3 4 5 6 7 8 9 10 11 12 13 14 15 16 17 18 19~30 31 32 33 34 35 36 Source Host Host / Printer Host / Printer Host / Printer Host / Printer Host / Printer Host / Printer Host / Printer Host / Printer Printer Printer Printer Printer Host Printer Host Printer Printer Printer Host Compatibility Mode nStrobe Data 0 (LSB...
User Manual
Page 11
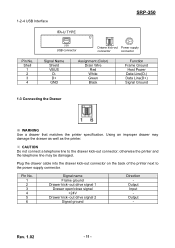
... the drawer kick-out connector; Output Input Output - out drive signal 2 Signal ground Direction - Using an improper drawer may be damaged. Rev. 1.02 - 11 - otherwise the printer and the telephone line may damage the drawer as well as the printer. ※ CAUTION Do not connect a telephone line to the power supply connector. out... Red White Green Black Function Frame Ground Host Power Data Line(D-) Data Line(D+) Signal Ground 1-3 Connecting the Drawer ※ WARNING Use a drawer that matches the printer specification. 1-2-4 USB Interface IFA-U TYPE SRP-350 Pin No.
... the drawer kick-out connector; Output Input Output - out drive signal 2 Signal ground Direction - Using an improper drawer may be damaged. Rev. 1.02 - 11 - otherwise the printer and the telephone line may damage the drawer as well as the printer. ※ CAUTION Do not connect a telephone line to the power supply connector. out... Red White Green Black Function Frame Ground Host Power Data Line(D-) Data Line(D+) Signal Ground 1-3 Connecting the Drawer ※ WARNING Use a drawer that matches the printer specification. 1-2-4 USB Interface IFA-U TYPE SRP-350 Pin No.
User Manual
Page 12
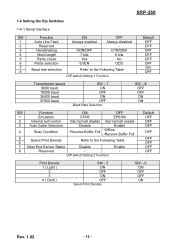
... OFF OFF OFF OFF OFF Print Density 1 ( Light ) 2 3 4 ( Dark ) SW - 5 ON OFF ON OFF Select Print Density SW - 6 ON OFF OFF ON Rev. 1.02 - 12 - SRP-350 1-4 Setting the Dip Switches 1-4-1 Serial Interface SW Function ON OFF 1 Auto Line Feed Always enabled Always disabled 2 Reserved - - 3 Handshaking XON/OFF DTR/DSR 4 Word length...
... OFF OFF OFF OFF OFF Print Density 1 ( Light ) 2 3 4 ( Dark ) SW - 5 ON OFF ON OFF Select Print Density SW - 6 ON OFF OFF ON Rev. 1.02 - 12 - SRP-350 1-4 Setting the Dip Switches 1-4-1 Serial Interface SW Function ON OFF 1 Auto Line Feed Always enabled Always disabled 2 Reserved - - 3 Handshaking XON/OFF DTR/DSR 4 Word length...

User Manual
Page 13
... ON OFF Select Print Density SW - 6 ON OFF OFF ON Rev. 1.02 - 13 - OFF 7 Reserved - - OFF 4 Reserved - - OFF 3 Reserved - - OFF 6 Reserved - - OFF 5 Reserved - - OFF 8 Reserved - - SRP-350 1-4-2 Parallel & USB Interface SW Function ON OFF Default 1 Auto Line Feed Always enabled Always disabled OFF 2 Reserved - -
... ON OFF Select Print Density SW - 6 ON OFF OFF ON Rev. 1.02 - 13 - OFF 7 Reserved - - OFF 4 Reserved - - OFF 3 Reserved - - OFF 6 Reserved - - OFF 5 Reserved - - OFF 8 Reserved - - SRP-350 1-4-2 Parallel & USB Interface SW Function ON OFF Default 1 Auto Line Feed Always enabled Always disabled OFF 2 Reserved - -

User Manual
Page 14
Do not use paper rolls that the printer is not receiving data; otherwise, data may damage the printer. 1-5-3 Remove the used paper roll core if there is operating. Rev. 1.02 - 14 - This may be lost. 1-5-2 Open the paper roll cover by pressing the ...cover-open button. ※ NOTE Do not open the print cover while the printer is one. 1-5-4 Insert the paper roll as shown. SRP-350 1-5 Installing or Replacing the Paper Roll ※ NOTE Be sure to use paper rolls that have the paper glued to the...
Do not use paper rolls that the printer is not receiving data; otherwise, data may damage the printer. 1-5-3 Remove the used paper roll core if there is operating. Rev. 1.02 - 14 - This may be lost. 1-5-2 Open the paper roll cover by pressing the ...cover-open button. ※ NOTE Do not open the print cover while the printer is one. 1-5-4 Insert the paper roll as shown. SRP-350 1-5 Installing or Replacing the Paper Roll ※ NOTE Be sure to use paper rolls that have the paper glued to the...

User Manual
Page 15
SRP-350 1-5-5 Be sure to note the correct direction that the paper comes off the roll. 1-5-6 Pull out a small amount of printer cover firmly to prevent paper miss-loading. 1-5-7 Tear off the paper as shown. Rev. 1.02 - 15 - Then close the cover. ※ NOTE When closing the cover, press the center of paper, as shown.
SRP-350 1-5-5 Be sure to note the correct direction that the paper comes off the roll. 1-5-6 Pull out a small amount of printer cover firmly to prevent paper miss-loading. 1-5-7 Tear off the paper as shown. Rev. 1.02 - 15 - Then close the cover. ※ NOTE When closing the cover, press the center of paper, as shown.
User Manual
Page 16
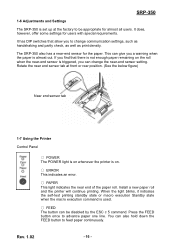
...or rear position. (See the below figure) Near end sensor tab 1-7 Using the Printer Control Panel ○ POWER The POWER light is on whenever the printer is on the roll when the near-end sensor is almost out. The SRP-350 also has a near end of the paper roll. Install a new paper roll ...and the printer will continue printing. This can be appropriate for users with special requirements....
...or rear position. (See the below figure) Near end sensor tab 1-7 Using the Printer Control Panel ○ POWER The POWER light is on whenever the printer is on the roll when the near-end sensor is almost out. The SRP-350 also has a near end of the paper roll. Install a new paper roll ...and the printer will continue printing. This can be appropriate for users with special requirements....

User Manual
Page 17
...unplugged; Otherwise you may damage the power supply or the printer. If the power supply's rated voltage and your outlet's voltage do not match, contact your electrical outlet. 1-9-3 Plug in the power cord. SRP-350 1-8 Connecting the computer You need an appropriate interface cable.... 1-8-1 Plug the cable connector securely into the printer's interface connector. 1-8-2 Tighten the screws on the power supply to the computer. 1-9...
...unplugged; Otherwise you may damage the power supply or the printer. If the power supply's rated voltage and your outlet's voltage do not match, contact your electrical outlet. 1-9-3 Plug in the power cord. SRP-350 1-8 Connecting the computer You need an appropriate interface cable.... 1-8-1 Plug the cable connector securely into the printer's interface connector. 1-8-2 Tighten the screws on the power supply to the computer. 1-9...

User Manual
Page 18
... Turn on the power while holding down the FEED button. Self Test The self-test checks whether the printer has any problems. If the printer does not function properly, contact your dealer. The self-test checks the following , and pause (The ...PAPER LED light blinks). The printer prints a pattern using the built-in character set. 2-6 The self-test automatically ends and cuts the paper after printing the following. *** COMPLETED *** 2-7 The printer is ready to continue printing. SRP-350...
... Turn on the power while holding down the FEED button. Self Test The self-test checks whether the printer has any problems. If the printer does not function properly, contact your dealer. The self-test checks the following , and pause (The ...PAPER LED light blinks). The printer prints a pattern using the built-in character set. 2-6 The self-test automatically ends and cuts the paper after printing the following. *** COMPLETED *** 2-7 The printer is ready to continue printing. SRP-350...
User Manual
Page 19
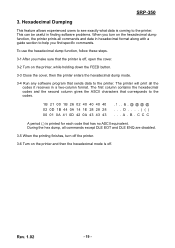
... print all the codes it receives in hexadecimal format along with a guide section to the printer. SRP-350 3. Hexadecimal Dumping This feature allows experienced users to see exactly what data is printed for each code that sends data to help you find specific ... 0D 42 0A 43 43 43 D A . The first column contains the hexadecimal codes and the second column gives the ASCII characters that corresponds to the printer. Rev. 1.02 - 19 - During the hex dump, all commands and data in a two-column format. This can be useful in finding software problems. When you...
... print all the codes it receives in hexadecimal format along with a guide section to the printer. SRP-350 3. Hexadecimal Dumping This feature allows experienced users to see exactly what data is printed for each code that sends data to help you find specific ... 0D 42 0A 43 43 43 D A . The first column contains the hexadecimal codes and the second column gives the ASCII characters that corresponds to the printer. Rev. 1.02 - 19 - During the hex dump, all commands and data in a two-column format. This can be useful in finding software problems. When you...

User Manual
Page 20
... voltage +24 VDC Environmental Conditions Temperature 5 ~ 35 ℃ (Operating) -10 ~ 50 ℃ (Storage) Humidity 30 ~ 80 % RH (Operating) 10 ~ 90 % RH (Storage) ; SRP-350 4. Rev. 1.02 - 20 - Specification Printing method Thermal line printing Dot density 180 X 180 dpi (7dots/mm) Printing width 72.192 ± 0.2mm Paper width 79 ~ 80 mm Characters per...
... voltage +24 VDC Environmental Conditions Temperature 5 ~ 35 ℃ (Operating) -10 ~ 50 ℃ (Storage) Humidity 30 ~ 80 % RH (Operating) 10 ~ 90 % RH (Storage) ; SRP-350 4. Rev. 1.02 - 20 - Specification Printing method Thermal line printing Dot density 180 X 180 dpi (7dots/mm) Printing width 72.192 ± 0.2mm Paper width 79 ~ 80 mm Characters per...


