

Open Source Guide (ENGLISH)
Page 2
16. IN NO EVENT UNLESS REQUIRED BY APPLICABLE LAW OR AGREED TO IN WRITING WILL ANY COPYRIGHT HOLDER, OR ANY OTHER PARTY WHO MAY MODIFY AND/OR REDISTRIBUTE THE LIBRARY AS PERMITTED ABOVE, BE LIABLE TO YOU FOR DAMAGES, INCLUDING ANY GENERAL, SPECIAL, INCIDENTAL OR CONSEQUENTIAL DAMAGES ARISING OUT OF THE USE OR INABILITY TO USE THE LIBRARY (INCLUDING BUT NOT LIMITED TO LOSS OF DATA OR DATA BEING RENDERED INACCURATE OR LOSSES SUSTAINED BY YOU OR THIRD PARTIES OR A FAILURE OF THE LIBRARY TO OPERATE WITH ANY OTHER SOFTWARE), EVEN IF SUCH HOLDER OR OTHER PARTY HAS BEEN ADVISED OF THE POSSIBILITY OF ...
16. IN NO EVENT UNLESS REQUIRED BY APPLICABLE LAW OR AGREED TO IN WRITING WILL ANY COPYRIGHT HOLDER, OR ANY OTHER PARTY WHO MAY MODIFY AND/OR REDISTRIBUTE THE LIBRARY AS PERMITTED ABOVE, BE LIABLE TO YOU FOR DAMAGES, INCLUDING ANY GENERAL, SPECIAL, INCIDENTAL OR CONSEQUENTIAL DAMAGES ARISING OUT OF THE USE OR INABILITY TO USE THE LIBRARY (INCLUDING BUT NOT LIMITED TO LOSS OF DATA OR DATA BEING RENDERED INACCURATE OR LOSSES SUSTAINED BY YOU OR THIRD PARTIES OR A FAILURE OF THE LIBRARY TO OPERATE WITH ANY OTHER SOFTWARE), EVEN IF SUCH HOLDER OR OTHER PARTY HAS BEEN ADVISED OF THE POSSIBILITY OF ...
User Manual (ENGLISH)
Page 5
... will still need is decoded at the same quality it to receive DTV broadcasts. This depends on whether your local DTV stations are running full power or not and how close your DTV channels are on VHF (channels 2-13) or UHF (channels 14-69) to see if you need to use...
... will still need is decoded at the same quality it to receive DTV broadcasts. This depends on whether your local DTV stations are running full power or not and how close your DTV channels are on VHF (channels 2-13) or UHF (channels 14-69) to see if you need to use...
User Manual (ENGLISH)
Page 10
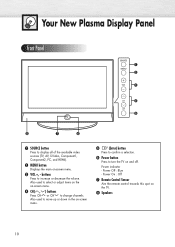
... used to move up or down in the on-screen menu. ˆ (Enter) button Press to confirm a selection. Ø Power button Press to turn the TV on -screen menu. ˇ VOL +, - Power indicator - buttons Press to select or adjust items on the on the TV. Your New Plasma Display Panel Front Panel... (TV, AV, S-Video, Component1, Component2, PC, and HDMI). ´ MENU button Displays the main on and off. Also used to increase or decrease the volume. Power Off : Blue - " Speakers 10
... used to move up or down in the on-screen menu. ˆ (Enter) button Press to confirm a selection. Ø Power button Press to turn the TV on -screen menu. ˇ VOL +, - Power indicator - buttons Press to select or adjust items on the on the TV. Your New Plasma Display Panel Front Panel... (TV, AV, S-Video, Component1, Component2, PC, and HDMI). ´ MENU button Displays the main on and off. Also used to increase or decrease the volume. Power Off : Blue - " Speakers 10
User Manual (ENGLISH)
Page 11
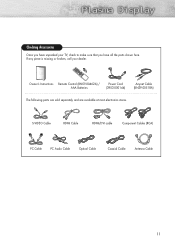
If any piece is missing or broken, call your TV, check to make sure that you have all the parts shown here. Owner's Instructions Remote Control (BN59-00462A) / AAA Batteries Power Cord (3903-000144) Anynet Cable (BN39-00518A) The following parts are sold separately and are available at most electronics stores. S-VIDEO Cable HDMI Cable HDMI/DVI cable Component Cables (RCA) PC Cable PC Audio Cable Optical Cable Coaxial Cable Antenna Cable 11 Checking Accessories Once you have unpacked your dealer.
If any piece is missing or broken, call your TV, check to make sure that you have all the parts shown here. Owner's Instructions Remote Control (BN59-00462A) / AAA Batteries Power Cord (3903-000144) Anynet Cable (BN39-00518A) The following parts are sold separately and are available at most electronics stores. S-VIDEO Cable HDMI Cable HDMI/DVI cable Component Cables (RCA) PC Cable PC Audio Cable Optical Cable Coaxial Cable Antenna Cable 11 Checking Accessories Once you have unpacked your dealer.
User Manual (ENGLISH)
Page 12
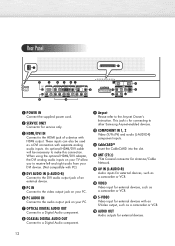
" COAXIAL DIGITAL AUDIO OUT Connect to a Digital Audio component. ' Anynet Please refer to make this connection. Rear Panel Œ POWER IN Connect the supplied power cord. ´ SERVICE ONLY Connector for service only. ˇ HDMI/DVI IN Connect to the HDMI jack of a device with PC) ¨ DVI ... to the video output jack on your PC. Ø PC AUDIO IN Connect to the audio output jack on your TV allow you to other Samsung Anynet-enabled devices. ˝ COMPONENT IN 1, 2 Video (Y/PB/PR) and audio (L-AUDIO-R) component inputs. Ô CableCARDTM Insert the CableCARD into the slot. ...
" COAXIAL DIGITAL AUDIO OUT Connect to a Digital Audio component. ' Anynet Please refer to make this connection. Rear Panel Œ POWER IN Connect the supplied power cord. ´ SERVICE ONLY Connector for service only. ˇ HDMI/DVI IN Connect to the HDMI jack of a device with PC) ¨ DVI ... to the video output jack on your PC. Ø PC AUDIO IN Connect to the audio output jack on your TV allow you to other Samsung Anynet-enabled devices. ˝ COMPONENT IN 1, 2 Video (Y/PB/PR) and audio (L-AUDIO-R) component inputs. Ô CableCARDTM Insert the CableCARD into the slot. ...

User Manual (ENGLISH)
Page 13
button Press to select additional channels (digital and analog) being broadcast by the Samsung remote control (i.e., TV, STB, VCR, CABLE, or DVD). Ú PRE-CH button Tunes to the previous channel. Æ SOURCE button Press to display all of ... on -screen Electronic Program Guide (EPG). ˇ ANTENNA button Press to select "Air" or "Cable". ¨ Number buttons ˆ - Remote Control Buttons Remote Control Œ POWER button Turns the TV on and off. ´ GUIDE button Press to display the on -screen menu. ˝ ENTER button Confirms a selection. Ô FAV.CH...
button Press to select additional channels (digital and analog) being broadcast by the Samsung remote control (i.e., TV, STB, VCR, CABLE, or DVD). Ú PRE-CH button Tunes to the previous channel. Æ SOURCE button Press to display all of ... on -screen Electronic Program Guide (EPG). ˇ ANTENNA button Press to select "Air" or "Cable". ¨ Number buttons ˆ - Remote Control Buttons Remote Control Œ POWER button Turns the TV on and off. ´ GUIDE button Press to display the on -screen menu. ˝ ENTER button Confirms a selection. Ô FAV.CH...
User Manual (ENGLISH)
Page 25
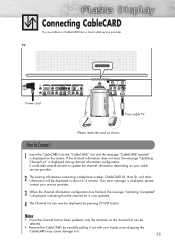
... the channel list is displayed during channel information configuration. Notes • Once the channel list has been updated, only the channels on the screen. TV Power cord From cable TV Please insert the card as shown. If the channel information does not exist, the message "Updating Channel List" is now updated...
... the channel list is displayed during channel information configuration. Notes • Once the channel list has been updated, only the channels on the screen. TV Power cord From cable TV Please insert the card as shown. If the channel information does not exist, the message "Updating Channel List" is now updated...
User Manual (ENGLISH)
Page 26
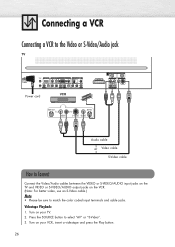
Turn on your VCR, insert a videotape and press the Play button. 26 Press the SOURCE button to match the color coded input terminals and cable jacks. Turn on your TV. 2. Videotape Playback: 1. Connecting a VCR Connecting a VCR to the Video or S-Video/Audio jack TV Power cord VCR Audio cable Video cable S-Video cable How to Connect Connect the Video/Audio cables between the VIDEO or S-VIDEO/AUDIO input jacks on the TV and VIDEO or S-VIDEO/AUDIO output jacks on the VCR. (Note: For better video, use an S-Video cable.) Note • Please be sure to select "AV" or "S-Video". 3.
Turn on your VCR, insert a videotape and press the Play button. 26 Press the SOURCE button to match the color coded input terminals and cable jacks. Turn on your TV. 2. Videotape Playback: 1. Connecting a VCR Connecting a VCR to the Video or S-Video/Audio jack TV Power cord VCR Audio cable Video cable S-Video cable How to Connect Connect the Video/Audio cables between the VIDEO or S-VIDEO/AUDIO input jacks on the TV and VIDEO or S-VIDEO/AUDIO output jacks on the VCR. (Note: For better video, use an S-Video cable.) Note • Please be sure to select "AV" or "S-Video". 3.

User Manual (ENGLISH)
Page 27
... jacks. Turn on your camcorder and set it to video mode. (For details, refer to select "AV" or "S-Video". 3. Connecting a Camcorder Viewing camcorder tapes TV Power cord Camcorder Audio cable Video cable S-Video cable How to Connect Connect a Video/Audio cable between the VIDEO or S-VIDEO/AUDIO input jacks on the...
... jacks. Turn on your camcorder and set it to video mode. (For details, refer to select "AV" or "S-Video". 3. Connecting a Camcorder Viewing camcorder tapes TV Power cord Camcorder Audio cable Video cable S-Video cable How to Connect Connect a Video/Audio cable between the VIDEO or S-VIDEO/AUDIO input jacks on the...
User Manual (ENGLISH)
Page 28
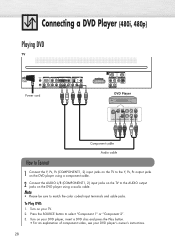
... match the color coded input terminals and cable jacks. Turn on the DVD player using a audio cable. Connecting a DVD Player (480i, 480p) Playing DVD TV Power cord DVD Player Component cable Audio cable How to Connect 1 Connect the Y, PB, PR (COMPONENT1, 2) input jacks on the TV to the Y, PB, PR output...
... match the color coded input terminals and cable jacks. Turn on the DVD player using a audio cable. Connecting a DVD Player (480i, 480p) Playing DVD TV Power cord DVD Player Component cable Audio cable How to Connect 1 Connect the Y, PB, PR (COMPONENT1, 2) input jacks on the TV to the Y, PB, PR output...
User Manual (ENGLISH)
Page 29
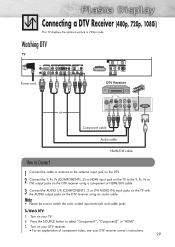
... with the AUDIO output jacks on your DTV receiver. • For an explanation of component video, see your TV. 2. To Watch DTV: 1. Watching DTV TV Power cord DTV Receiver Component cable Audio cable HDMI/DVI cable How to Connect 1 Connect the cable or antenna to the antenna input jack on the...
... with the AUDIO output jacks on your DTV receiver. • For an explanation of component video, see your TV. 2. To Watch DTV: 1. Watching DTV TV Power cord DTV Receiver Component cable Audio cable HDMI/DVI cable How to Connect 1 Connect the cable or antenna to the antenna input jack on the...

User Manual (ENGLISH)
Page 30
... on your DTV receiver. • For an explanation of HDMI video, see your TV. 2. To Watch DTV: 1. Note • Please make sure the HDMI source's power is on before selecting HDMI from the "Source List" on the DTV Set-Top Box using an HDMI cable. Press the SOURCE button to the... jack on the TV with the HDMI output jack on the TV. Connecting to HDMI (High Definition Multimedia Interface) (480p, 720p, 1080i) Watching DTV TV Power cord HDMI cable DTV Set-Top Box How to Connect 1 Connect the cable or antenna to select "HDMI". 3. Turn on your DTV receiver owner's instructions...
... on your DTV receiver. • For an explanation of HDMI video, see your TV. 2. To Watch DTV: 1. Note • Please make sure the HDMI source's power is on before selecting HDMI from the "Source List" on the DTV Set-Top Box using an HDMI cable. Press the SOURCE button to the... jack on the TV with the HDMI output jack on the TV. Connecting to HDMI (High Definition Multimedia Interface) (480p, 720p, 1080i) Watching DTV TV Power cord HDMI cable DTV Set-Top Box How to Connect 1 Connect the cable or antenna to select "HDMI". 3. Turn on your DTV receiver owner's instructions...
User Manual (ENGLISH)
Page 31
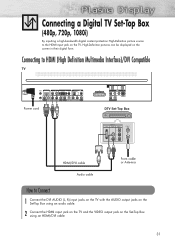
Connecting to HDMI (High Definition Multimedia Interface)/DVI Compatible TV Power cord DTV Set-Top Box HDMI/DVI cable Audio cable From cable or Antenna How to the HDMI input jack on the TV, High-Definition ...
Connecting to HDMI (High Definition Multimedia Interface)/DVI Compatible TV Power cord DTV Set-Top Box HDMI/DVI cable Audio cable From cable or Antenna How to the HDMI input jack on the TV, High-Definition ...
User Manual (ENGLISH)
Page 32
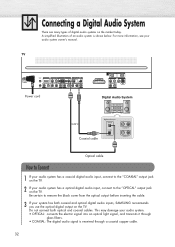
... Audio System There are many types of an audio system is received through glass fibers. • COAXIAL: The digital audio signal is shown below. TV Power cord Digital Audio System Coaxial cable Optical cable How to Connect 1 If your audio system has a coaxial digital audio input, connect to the "OPTICAL" output... electric signal into an optical light signal, and transmits it through a coaxial copper cable. 32 Do not connect both coaxial and optical digital audio inputs, SAMSUNG recommends you use the optical digital output on the TV.
... Audio System There are many types of an audio system is received through glass fibers. • COAXIAL: The digital audio signal is shown below. TV Power cord Digital Audio System Coaxial cable Optical cable How to Connect 1 If your audio system has a coaxial digital audio input, connect to the "OPTICAL" output... electric signal into an optical light signal, and transmits it through a coaxial copper cable. 32 Do not connect both coaxial and optical digital audio inputs, SAMSUNG recommends you use the optical digital output on the TV.

User Manual (ENGLISH)
Page 33
Connecting to an Analog Amplifier TV Power cord Audio cable Analog Amplifier How to the "AUDIO OUT (AUDIO L/R)" terminals: Decrease the gain (volume) of the audio amplifier, and adjust the volume level with the volume control on the TV. 33 When an audio amplifier is connected to Connect 1 The "AUDIO OUT (AUDIO L/R)" terminals cannot be used for external speakers. You must hook them up to an amplifier.
Connecting to an Analog Amplifier TV Power cord Audio cable Analog Amplifier How to the "AUDIO OUT (AUDIO L/R)" terminals: Decrease the gain (volume) of the audio amplifier, and adjust the volume level with the volume control on the TV. 33 When an audio amplifier is connected to Connect 1 The "AUDIO OUT (AUDIO L/R)" terminals cannot be used for external speakers. You must hook them up to an amplifier.
User Manual (ENGLISH)
Page 36
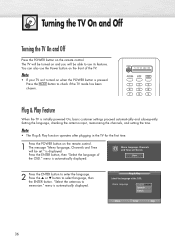
...." Menu Language : EEnngglilsishh Spanish French Move Enter Skip 36 Turning the TV On and Off Turning the TV On and Off Press the POWER button on when the POWER button is pressed: Press the MODE button to check if the TV mode has been chosen. The TV will be turned on and... you will be set ." Plug & Play Feature When the TV is displayed. Start 2 Press the ENTER button to use the Power button on the remote control. menu is automatically displayed. Press the ENTER button, then "Select the language of the OSD. Note • If your TV...
...." Menu Language : EEnngglilsishh Spanish French Move Enter Skip 36 Turning the TV On and Off Turning the TV On and Off Press the POWER button on when the POWER button is pressed: Press the MODE button to check if the TV mode has been chosen. The TV will be turned on and... you will be set ." Plug & Play Feature When the TV is displayed. Start 2 Press the ENTER button to use the Power button on the remote control. menu is automatically displayed. Press the ENTER button, then "Select the language of the OSD. Note • If your TV...
User Manual (ENGLISH)
Page 40
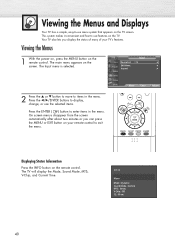
..., V-Chip, and Current Time. Your TV also lets you can press the MENU or EXIT button on the TV screen. Viewing the Menus 1 With the power on, press the MENU button on the remote control. Move Enter Return Displaying Status Information Press the INFO button on the remote control. Press the...
..., V-Chip, and Current Time. Your TV also lets you can press the MENU or EXIT button on the TV screen. Viewing the Menus 1 With the power on, press the MENU button on the remote control. Move Enter Return Displaying Status Information Press the INFO button on the remote control. Press the...
User Manual (ENGLISH)
Page 47
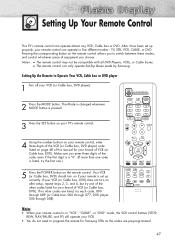
..., your brand of VCR (or Cable box, DVD). If no other codes listed for your remote control can only operate Set-Top Boxes made by Samsung. The Mode is changed whenever MODE button is in five different modes : TV, STB, VCR, CABLE, or DVD. Notes : ● The remote control may not..., enter three digits of the VCR (or Cable box, DVD player) code listed on page 48 of this manual for Samsung STBs as the codes are listed, try one .) 5 Press the POWER button on the remote control allows you choose. Notes • When your remote control is pressed. 3 Press the SET button...
..., your brand of VCR (or Cable box, DVD). If no other codes listed for your remote control can only operate Set-Top Boxes made by Samsung. The Mode is changed whenever MODE button is in five different modes : TV, STB, VCR, CABLE, or DVD. Notes : ● The remote control may not..., enter three digits of the VCR (or Cable box, DVD player) code listed on page 48 of this manual for Samsung STBs as the codes are listed, try one .) 5 Press the POWER button on the remote control allows you choose. Notes • When your remote control is pressed. 3 Press the SET button...

User Manual (ENGLISH)
Page 77
... exit. Move Enter Return 77 More Digital Output Melody Sound Select : PCM : OOnff : MOanin 3 Press the MENU button to come on when the TV is powered On or Off. 1 Press the MENU button.
... exit. Move Enter Return 77 More Digital Output Melody Sound Select : PCM : OOnff : MOanin 3 Press the MENU button to come on when the TV is powered On or Off. 1 Press the MENU button.
User Manual (ENGLISH)
Page 90
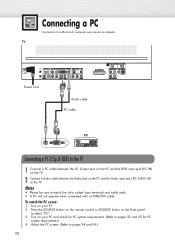
... PC screen. (Refer to match the color coded input terminals and cable jacks. • A PC will not operate when connected with a HDMI/DVI cable. TV Power cord Audio cable PC cable PC Connecting a PC (15p D-SUB) to the TV 1 Connect a PC cable between the PC Output jack on the PC and...
... PC screen. (Refer to match the color coded input terminals and cable jacks. • A PC will not operate when connected with a HDMI/DVI cable. TV Power cord Audio cable PC cable PC Connecting a PC (15p D-SUB) to the TV 1 Connect a PC cable between the PC Output jack on the PC and...


