User Manual
Page 1
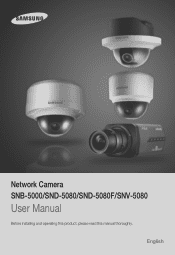
Network Camera SNB-5000/SND-5080/SND-5080F/SNV-5080 User Manual Before installing and operating this product, please read this manual thoroughly. English
Network Camera SNB-5000/SND-5080/SND-5080F/SNV-5080 User Manual Before installing and operating this product, please read this manual thoroughly. English

User Manual
Page 5
Do not install on the product. Do not install near . User's Manual is a guidance book how to use the products The meaning of the using of goods and keep it is following recommend safety precautions carefully. ages y ... not place a glass of product's us- Do not place this apparatus near any ventilation openings. Do not block any magnetic sources. M OVERVIEW Please read this manual for helping of water on a surface where it in the book is exposed to direct sunlight, near heating equipment or heavy cold area. Do not...
Do not install on the product. Do not install near . User's Manual is a guidance book how to use the products The meaning of the using of goods and keep it is following recommend safety precautions carefully. ages y ... not place a glass of product's us- Do not place this apparatus near any ventilation openings. Do not block any magnetic sources. M OVERVIEW Please read this manual for helping of water on a surface where it in the book is exposed to direct sunlight, near heating equipment or heavy cold area. Do not...

User Manual
Page 6
... where they can radiate radio frequency energy and, if not installed and used in a commercial environment. The Eco mark represents Samsung Techwin's devotion to creating environmentally friendly products, and indicates that the product and its electronic accessories should not be mixed with ...other types of with other European countries with the instruction manual, may cause harmful interference to provide customers with the limits for disposal. 6_ overview charger, headset, USB cable) should not...
... where they can radiate radio frequency energy and, if not installed and used in a commercial environment. The Eco mark represents Samsung Techwin's devotion to creating environmentally friendly products, and indicates that the product and its electronic accessories should not be mixed with ...other types of with other European countries with the instruction manual, may cause harmful interference to provide customers with the limits for disposal. 6_ overview charger, headset, USB cable) should not...
User Manual
Page 10
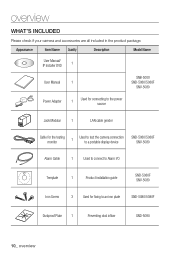
... check if your camera and accessories are all included in the product package. Appearance Item Name Quantity Description Model Name User Manual/ IP Installer DVD 1 User Manual 1 SNB-5000 SND-5080/5080F SNV-5080 Power Adapter 1 Used for connecting to the power source Jack Modular 1 LAN cable gender Cable for the testing monitor 1 Used to...
... check if your camera and accessories are all included in the product package. Appearance Item Name Quantity Description Model Name User Manual/ IP Installer DVD 1 User Manual 1 SNB-5000 SND-5080/5080F SNV-5080 Power Adapter 1 Used for connecting to the power source Jack Modular 1 LAN cable gender Cable for the testing monitor 1 Used to...

User Manual
Page 47
...checked. DDNS URL address enabling access from the external Internet. However, this button will be displayed. You should configure the network settings manually. M For cameras found with the IPv4 setting. However, this function. 1. Select a camera in the search list. Both the [Auto..._47 Scans for cameras that are currently connected to display the camera search list. At the initial startup, both [Auto Set] and [Manual Set] will automatically configure the network settings for cameras with the IPv6 setting, these buttons will be grayed out as the cameras do...
...checked. DDNS URL address enabling access from the external Internet. However, this button will be displayed. You should configure the network settings manually. M For cameras found with the IPv4 setting. However, this function. 1. Select a camera in the search list. Both the [Auto..._47 Scans for cameras that are currently connected to display the camera search list. At the initial startup, both [Auto Set] and [Manual Set] will automatically configure the network settings for cameras with the IPv6 setting, these buttons will be grayed out as the cameras do...
User Manual
Page 48
... signal transfer, defaulted to 80. The default password is completed, the camera will be set automatically so you don't need to input it manually. When the manual setup including is "4321". 6. In the pane, provide the necessary information. MAC (Ethernet) Address : The MAC (Ethernet) address of the... camera. y HTTP Port : Used to access the camera using the Internet browser, defaulted to 4520. 5. Click [OK]. Manual network setup will be completed. 7. If not using an IP router y IP Address : Enter an address falling in the IP range provided by the...
... signal transfer, defaulted to 80. The default password is completed, the camera will be set automatically so you don't need to input it manually. When the manual setup including is "4321". 6. In the pane, provide the necessary information. MAC (Ethernet) Address : The MAC (Ethernet) address of the... camera. y HTTP Port : Used to access the camera using the Internet browser, defaulted to 4520. 5. Click [OK]. Manual network setup will be completed. 7. If not using an IP router y IP Address : Enter an address falling in the IP range provided by the...

User Manual
Page 49
... Internet browser before you must provide the number in the search list. The , , and will be activated. 2. Enter the password. Both the [Auto Set] and [Manual Set] buttons will be set other . This is "4321". 4. Auto network setup will be grayed out as the cameras do not support this function. 1. English... : HTTP Port http://192.168.1.201:10000 Auto Network Setup Run to display the camera search list. At the initial startup, both [Auto Set] and [Manual Set] will automatically complete the network setting and restart. The Auto Setting dialog appears.
... Internet browser before you must provide the number in the search list. The , , and will be activated. 2. Enter the password. Both the [Auto Set] and [Manual Set] buttons will be set other . This is "4321". 4. Auto network setup will be grayed out as the cameras do not support this function. 1. English... : HTTP Port http://192.168.1.201:10000 Auto Network Setup Run to display the camera search list. At the initial startup, both [Auto Set] and [Manual Set] will automatically complete the network setting and restart. The Auto Setting dialog appears.

User Manual
Page 50
Select a camera in the list, and click [Manual Set] to modem using the DHCP protocols - If connecting the camera directly to check the of the camera. If an IP router, with cameras connected, ...
Select a camera in the list, and click [Manual Set] to modem using the DHCP protocols - If connecting the camera directly to check the of the camera. If an IP router, with cameras connected, ...
User Manual
Page 51
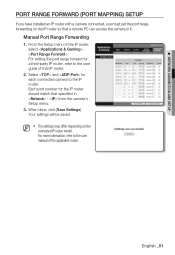
Manual Port Range Forwarding 1. Each port number for the IP router should match that specified in it. from the camera's Setup menu. 3. M The ... to the IP router. From the Setup menu of the applicable router. For setting the port range forward for each connected camera to the user manual of the IP router, select .
Manual Port Range Forwarding 1. Each port number for the IP router should match that specified in it. from the camera's Setup menu. 3. M The ... to the IP router. From the Setup menu of the applicable router. For setting the port range forward for each connected camera to the user manual of the IP router, select .

User Manual
Page 54
..., select to return to a white paper and press the [Enter ( )] button. ENTER ENTER 1. Put the focus of the camera video manually. Specify the and values as necessary. y SSDR : Adjust the level of the camera SSDR ON video automatically. SSDR SETUP SSDR D-RANGE RETURN...as necessary. 4. y OUTDOOR : Automatically corrects the video colors of the camera to be optimized to the previous screen. WHITE BAL ATW y MANUAL : You can correct the image colors based on white under any lighting conditions. You may need readjustment if the lighting condition is changed. ...
..., select to return to a white paper and press the [Enter ( )] button. ENTER ENTER 1. Put the focus of the camera video manually. Specify the and values as necessary. y SSDR : Adjust the level of the camera SSDR ON video automatically. SSDR SETUP SSDR D-RANGE RETURN...as necessary. 4. y OUTDOOR : Automatically corrects the video colors of the camera to be optimized to the previous screen. WHITE BAL ATW y MANUAL : You can correct the image colors based on white under any lighting conditions. You may need readjustment if the lighting condition is changed. ...

User Manual
Page 55
Move to specify the target area. 5. Set the BLC . MAIN SETUP SSDR WHITE BAL BACKLIGHT EXPOSURE SPECIAL EXIT ON ATW BLC 3. Set the levels to . 2. M CAMERA SETUP Custom Backlight Setup You can change the level to adjust the brightness of the monitoring area. 4. When completed, select to return to be displayed more clearly. ENTER ENTER 1. Select . You can specify a desired area on the video manually and set the area to the previous screen. BLC SETUP LEVEL TOP BOTTOM LEFT RIGHT RETURN LOW 30 75 30 70 English _55
Move to specify the target area. 5. Set the BLC . MAIN SETUP SSDR WHITE BAL BACKLIGHT EXPOSURE SPECIAL EXIT ON ATW BLC 3. Set the levels to . 2. M CAMERA SETUP Custom Backlight Setup You can change the level to adjust the brightness of the monitoring area. 4. When completed, select to return to be displayed more clearly. ENTER ENTER 1. Select . You can specify a desired area on the video manually and set the area to the previous screen. BLC SETUP LEVEL TOP BOTTOM LEFT RIGHT RETURN LOW 30 75 30 70 English _55

User Manual
Page 57
...: This will prevent the screen from flickering. Select each item and set to , you can adjust the exposure level of the camera manually. y BRIGHTNESS : Adjust the screen brightness. SSNR3 LEVEL SETUP LEVEL RETURN 12 English _57 y SSNR3 : Adjust the noise reduction level. y ...ON ATW OFF 2. y SHUTTER : Adjust the electronic shutter of the camera manually. y AGC : Specify how to adjust the level according to and select a setting value. MANUAL : Adjust the screen brightness manually. Move to the luminance. - M CAMERA SETUP Exposure Setup You can adjust...
...: This will prevent the screen from flickering. Select each item and set to , you can adjust the exposure level of the camera manually. y BRIGHTNESS : Adjust the screen brightness. SSNR3 LEVEL SETUP LEVEL RETURN 12 English _57 y SSNR3 : Adjust the noise reduction level. y ...ON ATW OFF 2. y SHUTTER : Adjust the electronic shutter of the camera manually. y AGC : Specify how to adjust the level according to and select a setting value. MANUAL : Adjust the screen brightness manually. Move to the luminance. - M CAMERA SETUP Exposure Setup You can adjust...

User Manual
Page 58
... Auto mode in a low contrast scene and extends the accumulation time accordingly for a bright and sharp image. If you set the shutter mode to MANUAL/ FLICKERLESS, SENS-UP mode will be deactivated. Select . SENS-UP LIMIT SETUP LIMIT 2X RETURN The greater the video accumulation factor is, the brighter...
... Auto mode in a low contrast scene and extends the accumulation time accordingly for a bright and sharp image. If you set the shutter mode to MANUAL/ FLICKERLESS, SENS-UP mode will be deactivated. Select . SENS-UP LIMIT SETUP LIMIT 2X RETURN The greater the video accumulation factor is, the brighter...
User Manual
Page 73
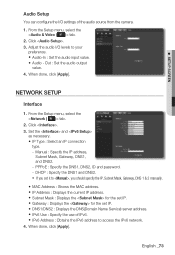
Set the and as necessary. DHCP : Specify the DNS1 and DNS2. If you should specify the IP, Subnet Mask, Gateway, DNS 1 & 2 manually. y Subnet Mask : Displays the for the set IP. y IP Type : Select an IP connection type. - PPPoE : Specify the DNS1, DNS2, ID and ...y Audio - When done, click [Apply]. y MAC Address : Shows the MAC address. y IPv6 Address : Obtains the IPv6 address to access the IPv6 network. 4. Manual : Specify the IP address, Subnet Mask, Gateway, DNS1, and DNS2. - y DNS1/DNS2 : Displays the DNS(Domain Name Service) server address. Out : Set the ...
Set the and as necessary. DHCP : Specify the DNS1 and DNS2. If you should specify the IP, Subnet Mask, Gateway, DNS 1 & 2 manually. y Subnet Mask : Displays the for the set IP. y IP Type : Select an IP connection type. - PPPoE : Specify the DNS1, DNS2, ID and ...y Audio - When done, click [Apply]. y MAC Address : Shows the MAC address. y IPv6 Address : Obtains the IPv6 address to access the IPv6 network. 4. Manual : Specify the IP address, Subnet Mask, Gateway, DNS1, and DNS2. - y DNS1/DNS2 : Displays the DNS(Domain Name Service) server address. Out : Set the ...
User Manual
Page 84
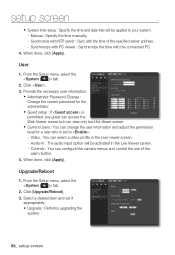
... the necessary user information. Video : You can configure the camera menus and control the use of the specified server address. - Manual : Specify the time manually. - Synchronize with PC viewer : Synchronize the time with the time of the alarm button. 4. User 1. From the Setup menu, select the tab. 2. Audio...
... the necessary user information. Video : You can configure the camera menus and control the use of the specified server address. - Manual : Specify the time manually. - Synchronize with PC viewer : Synchronize the time with the time of the alarm button. 4. User 1. From the Setup menu, select the tab. 2. Audio...
User Manual
Page 87
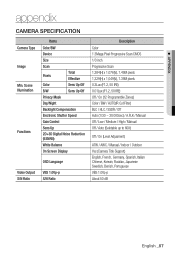
... Programmble Zones) Color / BW / AUTO(IR Cut Filter) BLC / HLC / SSDR / Off Auto (1/30 ~ 30,000sec) / A.FLK / Manual Off / Low / Medium / High / Manual Off / Auto (Seletable up to 60X) Off / On (Level Adjusment) ATW / AWC / Manual / Indoor / Outdoor Yes (Camera Title Support) English, French, Germany, Spanish, Italian Chinese, Korean, Russian, Japanese Swedish, Denish...
... Programmble Zones) Color / BW / AUTO(IR Cut Filter) BLC / HLC / SSDR / Off Auto (1/30 ~ 30,000sec) / A.FLK / Manual Off / Low / Medium / High / Manual Off / Auto (Seletable up to 60X) Off / On (Level Adjusment) ATW / AWC / Manual / Indoor / Outdoor Yes (Camera Title Support) English, French, Germany, Spanish, Italian Chinese, Korean, Russian, Japanese Swedish, Denish...
User Manual
Page 88
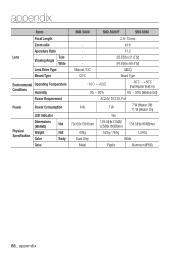
Viewing Angle Wide - Lens Drive Type Manual / DC x3.6 F1.2 28.8˚(H) x 21.6˚(V) 94.6˚(H) x 68.4˚(V) AI(DC) Mount Type CS/C Board Type Environmental Operating Temperature Conditions Humidity -10˚C ~ +...;)mm Net 438g 525g / 765g 1,340g Body Dark Grey White Case Metal Plastic Aluminum (IP66) 88_ appendix Aperature Ratio - Lens Tele - appendix Items SNB-5000 SND-5080/F SNV-5080 Focal Length - 2.8~10mm Zoom ratio -
Viewing Angle Wide - Lens Drive Type Manual / DC x3.6 F1.2 28.8˚(H) x 21.6˚(V) 94.6˚(H) x 68.4˚(V) AI(DC) Mount Type CS/C Board Type Environmental Operating Temperature Conditions Humidity -10˚C ~ +...;)mm Net 438g 525g / 765g 1,340g Body Dark Grey White Case Metal Plastic Aluminum (IP66) 88_ appendix Aperature Ratio - Lens Tele - appendix Items SNB-5000 SND-5080/F SNV-5080 Focal Length - 2.8~10mm Zoom ratio -

