
Brochure
Page 1
...-image retention mode • Signal balance function for weak RGB signal Dimensions (unit : mm) SMT-3222 SMT-4022 Specifications Model General Feature Screen Size Resolution (HxV) Pixel Pitch (mm) Brightness(cd/m2) Contrast Ratio Response Time (ms) Viewing Angle (H/V) Panel Lamp Life Display Colors Horizontal Frequency Vertical Frequency Horizontal Resolution Comb Filter Sync Format Screen Aspect Ratio Language Front Pannel Control Speaker Output Indicator VESA Mount Input Video Interface PC Audio Power Requirement Power Consumption Weight Dimensions Without Stand With Stand Accessories...
...-image retention mode • Signal balance function for weak RGB signal Dimensions (unit : mm) SMT-3222 SMT-4022 Specifications Model General Feature Screen Size Resolution (HxV) Pixel Pitch (mm) Brightness(cd/m2) Contrast Ratio Response Time (ms) Viewing Angle (H/V) Panel Lamp Life Display Colors Horizontal Frequency Vertical Frequency Horizontal Resolution Comb Filter Sync Format Screen Aspect Ratio Language Front Pannel Control Speaker Output Indicator VESA Mount Input Video Interface PC Audio Power Requirement Power Consumption Weight Dimensions Without Stand With Stand Accessories...
User Manual
Page 9
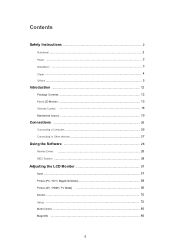
Contents Safety Instructions 2 Notational ...2 Power ...2 Installation ...3 Clean ...4 Others ...5 Introduction ...12 Package Contents 12 Your LCD Monitor 13 Remote Control 16 Machanical Layout 19 Connections ...26 Connecting a Computer 26 Connecting to Other devices 27 Using the Software 26 Monitor Driver 26 MDC System ...38 Adjusting the LCD Monitor 57 Input ...57 Picture [PC / DVI / MagicInfo Mode 58 Picture [AV / HDMI / TV Mode 65 Sound...70 Setup ...72 Multi Control ...85 MagicInfo ...86 9
Contents Safety Instructions 2 Notational ...2 Power ...2 Installation ...3 Clean ...4 Others ...5 Introduction ...12 Package Contents 12 Your LCD Monitor 13 Remote Control 16 Machanical Layout 19 Connections ...26 Connecting a Computer 26 Connecting to Other devices 27 Using the Software 26 Monitor Driver 26 MDC System ...38 Adjusting the LCD Monitor 57 Input ...57 Picture [PC / DVI / MagicInfo Mode 58 Picture [AV / HDMI / TV Mode 65 Sound...70 Setup ...72 Multi Control ...85 MagicInfo ...86 9
User Manual
Page 18
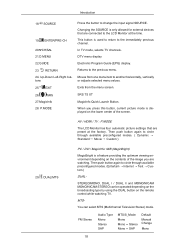
... Guide (EPG) display. Exits from one menu item to the LCD Monitor at the factory. SRS TS XT MagicInfo Quick Launch Button. STEREO/MONO, DUAL l / DUAL ll and MONO/NICAM MONO/NICAM STEREO can select MTS (Multichannel Television Stereo) mode. Up-Down Left-Right buttons 25. Returns to change the input signal SOURCE. AV / HDMI / TV : P.MODE The LCD Monitor has four automatic picture settings that are connected to another horizontally, vertically or adjusts...
... Guide (EPG) display. Exits from one menu item to the LCD Monitor at the factory. SRS TS XT MagicInfo Quick Launch Button. STEREO/MONO, DUAL l / DUAL ll and MONO/NICAM MONO/NICAM STEREO can select MTS (Multichannel Television Stereo) mode. Up-Down Left-Right buttons 25. Returns to change the input signal SOURCE. AV / HDMI / TV : P.MODE The LCD Monitor has four automatic picture settings that are connected to another horizontally, vertically or adjusts...

User Manual
Page 30
... with this monitor. Choose your monitor model in the model list, then click the "OK" button. ( Please select SyncMaster 400MX if the monitor you can see following message window, then click the "Continue Anyway" button. Internet web site : http://www.samsung.com/ (Worldwide) Installing the Monitor Driver (Automatic) 1. If you are using is slightly different from one operating system to another. Click "Windows". 3. Driver installation is SMT-4022.) 4. Insert...
... with this monitor. Choose your monitor model in the model list, then click the "OK" button. ( Please select SyncMaster 400MX if the monitor you can see following message window, then click the "Continue Anyway" button. Internet web site : http://www.samsung.com/ (Worldwide) Installing the Monitor Driver (Automatic) 1. If you are using is slightly different from one operating system to another. Click "Windows". 3. Driver installation is SMT-4022.) 4. Insert...

User Manual
Page 31
... configuration for your monitor is . 31 Click "Personalization" and then "Display Settings". 4. Click (Start) and "Control Panel". Then, double-click on Samsung Monitor homepage. Click "Properties" in the "Monitor" tab. Click "Advanced Settings...". 5. The monitor can be posted on "Appearance and Personal- Insert your Manual CD into your system. The certified driver will be used as is completed. Using the Software Note This monitor driver is under certifying...
... configuration for your monitor is . 31 Click "Personalization" and then "Display Settings". 4. Click (Start) and "Control Panel". Then, double-click on Samsung Monitor homepage. Click "Properties" in the "Monitor" tab. Click "Advanced Settings...". 5. The monitor can be posted on "Appearance and Personal- Insert your Manual CD into your system. The certified driver will be used as is completed. Using the Software Note This monitor driver is under certifying...

User Manual
Page 32
Note This monitor driver is displayed, as shown in the "Driver" tab. 7. in the figure below, click "Continue". and select the folder (for driver software" checkbox and click "Let me pick from a list of device drivers on Samsung Monitor homepage. 6. Using the Software If the message "Windows needs..." Click "Update Driver..." The certified driver will be posted on my computer". 8. Click "Have Disk..." Check the "Browse my computer...
Note This monitor driver is displayed, as shown in the "Driver" tab. 7. in the figure below, click "Continue". and select the folder (for driver software" checkbox and click "Let me pick from a list of device drivers on Samsung Monitor homepage. 6. Using the Software If the message "Windows needs..." Click "Update Driver..." The certified driver will be posted on my computer". 8. Click "Have Disk..." Check the "Browse my computer...

User Manual
Page 34
then click "Next" button. 6. Select "Don't search, I will..." Click "Start" "Control Panel" then click the "Appearance and Themes" icon. 3. and select "Install from a list or..." Click "Update Driver..." Click the "Properties" button on the "Monitor" tab and select "Driver" tab. 5. then click "Next" and then click "Have disk". 34 Click "Display" icon and choose the "Settings" tab then click "Advanced...". 4. Insert CD into the CD-ROM drive. 2. Using the Software Microsoft® Windows® XP Operating System 1.
then click "Next" button. 6. Select "Don't search, I will..." Click "Start" "Control Panel" then click the "Appearance and Themes" icon. 3. and select "Install from a list or..." Click "Update Driver..." Click the "Properties" button on the "Monitor" tab and select "Driver" tab. 5. then click "Next" and then click "Have disk". 34 Click "Display" icon and choose the "Settings" tab then click "Advanced...". 4. Insert CD into the CD-ROM drive. 2. Using the Software Microsoft® Windows® XP Operating System 1.

User Manual
Page 36
... "Finish" button then the "Close" button. If you are using is properly configured. Double click the "Display" icon. 3. Click "Start", "Setting", "Control Panel". 2. Select the "Settings" tab and click "Advanced Properties" button. 36 Click the "Open" button, then click "OK" button. 9. Choose "Display a list of the known drivers for this device so that I can see "Digital Signature Not Found" on "Update Driver..." Choose your monitor is SMT-4022.) 10. Click "Driver" and...
... "Finish" button then the "Close" button. If you are using is properly configured. Double click the "Display" icon. 3. Click "Start", "Setting", "Control Panel". 2. Select the "Settings" tab and click "Advanced Properties" button. 36 Click the "Open" button, then click "OK" button. 9. Choose "Display a list of the known drivers for this device so that I can see "Digital Signature Not Found" on "Update Driver..." Choose your monitor is SMT-4022.) 10. Click "Driver" and...

User Manual
Page 37
..." button until you need to use (Resolution, Number of system setting file. 1. Press "Enter" at All Display Modes, select the level of resolution and vertical frequency by referring to the Preset Timing Modes in the user guide. The next screen is SMT-4022.) 11. Choose "Specify the location of X-Window. 10. Choose "Display a list of all devices" and choose the monitor that you connected to a different mode (lower mode of your monitor. Specify A:\(D:\driver) then...
..." button until you need to use (Resolution, Number of system setting file. 1. Press "Enter" at All Display Modes, select the level of resolution and vertical frequency by referring to the Preset Timing Modes in the user guide. The next screen is SMT-4022.) 11. Choose "Specify the location of X-Window. 10. Choose "Display a list of all devices" and choose the monitor that you connected to a different mode (lower mode of your monitor. Specify A:\(D:\driver) then...
User Manual
Page 55
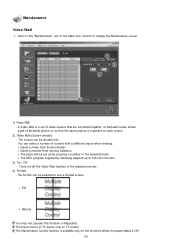
... program supplied by Samsung supports up by pressing a number in the selected mode. Turns on/off the Video Wall function of TV works only on each screen. 2) Video Wall (Screen divider) - The Maintenance Control function is available only for the monitors where the power status is a set up to display the Maintenance screen. 1) Video Wall - The screen can select a number of the whole picture or so that the same picture is repeated on TV model. The Input source...
... program supplied by Samsung supports up by pressing a number in the selected mode. Turns on/off the Video Wall function of TV works only on each screen. 2) Video Wall (Screen divider) - The Maintenance Control function is available only for the monitors where the power status is a set up to display the Maintenance screen. 1) Video Wall - The screen can select a number of the whole picture or so that the same picture is repeated on TV model. The Input source...

User Manual
Page 66
....) Contrast MENU → → ENTER ENTER → → ENTER → → ENTER→ Adjusts the Contrast. Dynamic, Standard, Movie, or Custom can be activated. (Not available in Dynamic Contrast mode of On.) 1. Custom By using the on the remote control is the 'P.MODE' button. Dynamic 2. Custom Note The direct button on -screen menus, the contrast and brightness can be changed to your personal preference. Standard 3. Adjusting the LCD Monitor...
....) Contrast MENU → → ENTER ENTER → → ENTER → → ENTER→ Adjusts the Contrast. Dynamic, Standard, Movie, or Custom can be activated. (Not available in Dynamic Contrast mode of On.) 1. Custom By using the on the remote control is the 'P.MODE' button. Dynamic 2. Custom Note The direct button on -screen menus, the contrast and brightness can be changed to your personal preference. Standard 3. Adjusting the LCD Monitor...
User Manual
Page 86
... Window screen. z Do not unplug the LAN cable used for MagicInfo. z To access other sources, press the SOURCE button in the Enable state, to turn off . Please make sure not to the MagicInfo Server Help. z For pivoted LCD Monitors, a screen resolution of Setup have been changed when EWF is highly recommended not to save the changes in Device mode, moving external devices while booting may stop . Available Modes z PC / DVI z AV z HDMI...
... Window screen. z Do not unplug the LAN cable used for MagicInfo. z To access other sources, press the SOURCE button in the Enable state, to turn off . Please make sure not to the MagicInfo Server Help. z For pivoted LCD Monitors, a screen resolution of Setup have been changed when EWF is highly recommended not to save the changes in Device mode, moving external devices while booting may stop . Available Modes z PC / DVI z AV z HDMI...

User Manual
Page 88
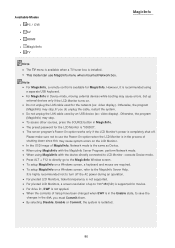
... resolutions or frequencies supported by yourself. Note Refer to change the screen resolution or stay in the Self-Test mode, the LED power indicator remains green and the figure moves around on the LCD Monitor. However, you cannot solve by the LCD Monitor. Maintenance and Cleaning 1) Maintaining the LCD Monitor Case. Self-Test Feature Check 1. Turn off your LCD Monitor and reconnect the video cable;then turn on both your computer and the LCD Monitor. Contact a Service...
... resolutions or frequencies supported by yourself. Note Refer to change the screen resolution or stay in the Self-Test mode, the LED power indicator remains green and the figure moves around on the LCD Monitor. However, you cannot solve by the LCD Monitor. Maintenance and Cleaning 1) Maintaining the LCD Monitor Case. Self-Test Feature Check 1. Turn off your LCD Monitor and reconnect the video cable;then turn on both your computer and the LCD Monitor. Contact a Service...
User Manual
Page 89
... when using the maximum resolution.) 5. If you have problems in installing the Adaptor (video) driver, boot the computer in Safe Mode, remove the Display Adaptor in this case, first check the source of the video screen is used to prevent damage to reinstall the Adaptor (video) driver. Q: The LCD Monitor screen flickers. 89 Problems related to the Installation (PC Mode) Note Problems related to become blank, have poor coloring, become noisy, and video mode not supported, etc. Troubleshooting •...
... when using the maximum resolution.) 5. If you have problems in installing the Adaptor (video) driver, boot the computer in Safe Mode, remove the Display Adaptor in this case, first check the source of the video screen is used to prevent damage to reinstall the Adaptor (video) driver. Q: The LCD Monitor screen flickers. 89 Problems related to the Installation (PC Mode) Note Problems related to become blank, have poor coloring, become noisy, and video mode not supported, etc. Troubleshooting •...
User Manual
Page 90
... LCD Monitor. A: Adjusts the brightness and contrast. (Refer to the Brightness, Contrast) 90 A: Check the maximum resolution and the frequency of the video Adaptor. Q: The picture rolls vertically. If not, reset them referring to the current Information under the LCD Monitor menu and Preset Timing Modes. A: Ensure that the PC or video sources are turned on. A: Turn on . (Refer to the Connecting a Computer) Q: "Check Signal Cable" message. A: Run Frequency Coarse and Fine tuning. Q: The picture image is off. Q: The screen...
... LCD Monitor. A: Adjusts the brightness and contrast. (Refer to the Brightness, Contrast) 90 A: Check the maximum resolution and the frequency of the video Adaptor. Q: The picture rolls vertically. If not, reset them referring to the current Information under the LCD Monitor menu and Preset Timing Modes. A: Ensure that the PC or video sources are turned on. A: Turn on . (Refer to the Connecting a Computer) Q: "Check Signal Cable" message. A: Run Frequency Coarse and Fine tuning. Q: The picture image is off. Q: The screen...

User Manual
Page 91
... color white is blinking. Q: The Power Indicator blinks. Q: The remote control buttons do not respond. 91 Problems related to Audio Note Problems related to ensure that the audio cable is still too low after turning the control to the OSD memory. A: If the volume is firmly connected to both the audio-in the settings to its power management system. Q: No sound. A: Ensure that the connector is currently saving the changes made in port on your LCD Monitor and...
... color white is blinking. Q: The Power Indicator blinks. Q: The remote control buttons do not respond. 91 Problems related to Audio Note Problems related to ensure that the audio cable is still too low after turning the control to the OSD memory. A: If the volume is firmly connected to both the audio-in the settings to its power management system. Q: No sound. A: Ensure that the connector is currently saving the changes made in port on your LCD Monitor and...

User Manual
Page 92
.... (Refer to the Windows / Computer Manual). A: Check if the power cord is on the case. A: The frequency can I Adjusts the resolution? Note That video card support can I set the Power Saving function? A: Windows ME/2000: Set the resolution at the Control Panel → Display → Screen Saver. Do not leave any water enter the LCD Monitor. 92 Do not let any detergent or scratches on in the BIOS-SETUP of the batteries. Troubleshooting A: Check the polarities...
.... (Refer to the Windows / Computer Manual). A: Check if the power cord is on the case. A: The frequency can I Adjusts the resolution? Note That video card support can I set the Power Saving function? A: Windows ME/2000: Set the resolution at the Control Panel → Display → Screen Saver. Do not leave any water enter the LCD Monitor. 92 Do not let any detergent or scratches on in the BIOS-SETUP of the batteries. Troubleshooting A: Check the polarities...
User Manual
Page 98
... black pixels could be seen when the pattern is pressed. But the pixels of RED, GREEN, BLUE and WHITE color seem to polish. If you can have an uneven picture quality on the computer as described below to lean. The voltage difference between electrodes that is not from the monitor for TFTLCD. • Resolution: 1920 x 1080 • Vertical frequency (refresh rate): 60 Hz TFT-LCD panels manufactured by using...
... black pixels could be seen when the pattern is pressed. But the pixels of RED, GREEN, BLUE and WHITE color seem to polish. If you can have an uneven picture quality on the computer as described below to lean. The voltage difference between electrodes that is not from the monitor for TFTLCD. • Resolution: 1920 x 1080 • Vertical frequency (refresh rate): 60 Hz TFT-LCD panels manufactured by using...
User Manual
Page 100
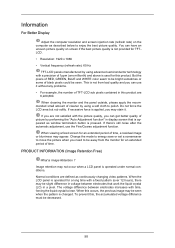
... Warranty service will be limited based on Product • Apply the Screen Scroll function - Information • Avoid using a combination of characters and background color with Black Color move up and down. - Avoid using Grey colors, which can cause Image retention easily. Avoid: Colors with big difference in luminance (Black & White, Grey) Change the characters color periodically • Use Bright colors with little difference in luminance. Select method • Instruction Guide : OSD Menu -> Set...
... Warranty service will be limited based on Product • Apply the Screen Scroll function - Information • Avoid using a combination of characters and background color with Black Color move up and down. - Avoid using Grey colors, which can cause Image retention easily. Avoid: Colors with big difference in luminance (Black & White, Grey) Change the characters color periodically • Use Bright colors with little difference in luminance. Select method • Instruction Guide : OSD Menu -> Set...

User Manual
Page 102
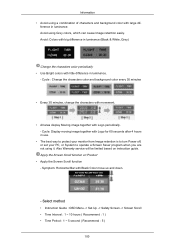
Information - Select method • Instruction Guide : OSD Menu -> Set Up -> Safety Screen -> Eraser • Time Interval : 1 ~ 10 hours ( Recommend : 1 ) • Time Period : 10 ~ 50 second ( Recommend : 50 ) Note ( Please check CD's User Guide at "OSD Function", some model's will not available ) 102
Information - Select method • Instruction Guide : OSD Menu -> Set Up -> Safety Screen -> Eraser • Time Interval : 1 ~ 10 hours ( Recommend : 1 ) • Time Period : 10 ~ 50 second ( Recommend : 50 ) Note ( Please check CD's User Guide at "OSD Function", some model's will not available ) 102


