User Manual
Page 3
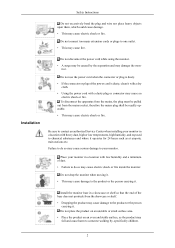
... walking by, specifically children. 2 Failure to one outlet. • This may cause electric shock or fire inside the monitor. Safety Instructions Do not excessively bend the plug and wire nor place heavy objects upon them, which could cause damage. • This may cause electric shock or fire. Installation Do not disconnect the power cord while using the monitor. •...
... walking by, specifically children. 2 Failure to one outlet. • This may cause electric shock or fire inside the monitor. Safety Instructions Do not excessively bend the plug and wire nor place heavy objects upon them, which could cause damage. • This may cause electric shock or fire. Installation Do not disconnect the power cord while using the monitor. •...
User Manual
Page 5
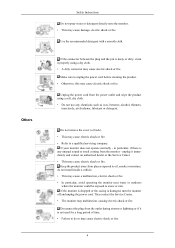
... the plug and the pin is damaged, turn the monitor off and unplug the power cord. Make sure to unplug the power cord before cleaning the product. • Otherwise, this may malfunction, causing electric shock or fire. Unplug the power cord from the power outlet and wipe the product using a dry cloth. • A dirty connector may cause electric shock or fire. Do not remove the cover...
... the plug and the pin is damaged, turn the monitor off and unplug the power cord. Make sure to unplug the power cord before cleaning the product. • Otherwise, this may malfunction, causing electric shock or fire. Unplug the power cord from the power outlet and wipe the product using a dry cloth. • A dirty connector may cause electric shock or fire. Do not remove the cover...

User Manual
Page 6
... to damage to the cable. Viewing the monitor continuously at a too close angle may cause undesirable picture quality. Adjusts the resolution and frequency to the level appropriate for an extended period of time, residual image or blurriness may appear. • Change the mode to energy saving mode or set a screensaver to a changing picture when away from the monitor for the model. • An inappropriate resolution may result in...
... to damage to the cable. Viewing the monitor continuously at a too close angle may cause undesirable picture quality. Adjusts the resolution and frequency to the level appropriate for an extended period of time, residual image or blurriness may appear. • Change the mode to energy saving mode or set a screensaver to a changing picture when away from the monitor for the model. • An inappropriate resolution may result in...

User Manual
Page 12
... unattended for further information regarding cable connections. 11 RGB IN port Connect the D-sub cable to the 15-pin, RGB IN port on the back of the monitor. Kensington Lock The Kensington lock is not needed or when leaving it . Power Indicator This light glows blue during normal operation, and blinking blue once as the monitor saves your monitor. Rear Introduction Power button [ ] Use this button for your monitor to the POWER port on the back of...
... unattended for further information regarding cable connections. 11 RGB IN port Connect the D-sub cable to the 15-pin, RGB IN port on the back of the monitor. Kensington Lock The Kensington lock is not needed or when leaving it . Power Indicator This light glows blue during normal operation, and blinking blue once as the monitor saves your monitor. Rear Introduction Power button [ ] Use this button for your monitor to the POWER port on the back of...

User Manual
Page 16
... the rear cover mounting pad and secure it to the International standards. 15 Do not fasten the screws too tightly, as they may differ depending on their specifications. • Do not use Wall Mount according to protect the screen. 3. Lay the LCD monitor face-down on a wall, you to follow the product installation instructions. • To mount the monitor on a flat surface with the VESA standard screw specifications. Connections A B A. Samsung is...
... the rear cover mounting pad and secure it to the International standards. 15 Do not fasten the screws too tightly, as they may differ depending on their specifications. • Do not use Wall Mount according to protect the screen. 3. Lay the LCD monitor face-down on a wall, you to follow the product installation instructions. • To mount the monitor on a flat surface with the VESA standard screw specifications. Connections A B A. Samsung is...

User Manual
Page 17
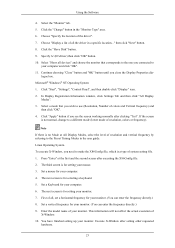
... : http://www.samsung.com/ (Worldwide) Installing the Monitor Driver (Automatic) 1. Choose your monitor model in the model list, then click the "OK" button. 4. If you have. Click "Windows". 3. Follow the directions appropriate for the monitor driver, insert the CD-ROM included with this monitor. Prepare a blank disk and download the driver program file at the Internet web site shown here. Using the Software Monitor Driver Note When prompted...
... : http://www.samsung.com/ (Worldwide) Installing the Monitor Driver (Automatic) 1. Choose your monitor model in the model list, then click the "OK" button. 4. If you have. Click "Windows". 3. Follow the directions appropriate for the monitor driver, insert the CD-ROM included with this monitor. Prepare a blank disk and download the driver program file at the Internet web site shown here. Using the Software Monitor Driver Note When prompted...

User Manual
Page 18
... Samsung Monitor homepage. If the "Properties" button is . is displayed, as is deactivated, it means the configuration for your system. Insert your Manual CD into your CD-ROM drive. 2. Click (Start) and "Control Panel". The certified driver will be used as shown in the "Monitor" tab. Click "Personalization" and then "Display Settings". 4. Click "Advanced Settings...". 5. If the message "Windows needs..." http://www.samsung.com/ Installing the Monitor Driver (Manual) Microsoft® Windows...
... Samsung Monitor homepage. If the "Properties" button is . is displayed, as is deactivated, it means the configuration for your system. Insert your Manual CD into your CD-ROM drive. 2. Click (Start) and "Control Panel". The certified driver will be used as shown in the "Monitor" tab. Click "Personalization" and then "Display Settings". 4. Click "Advanced Settings...". 5. If the message "Windows needs..." http://www.samsung.com/ Installing the Monitor Driver (Manual) Microsoft® Windows...

User Manual
Page 19
Check the "Browse my computer for example, D:\Drive) where the driver setup file is under certifying MS logo, and this installation doesn't damage your system. Click "Have Disk..." The certified driver will be posted on my computer". 8. in the "Driver" tab. 7. Click "Update Driver..." and select the folder (for driver software" checkbox and click "Let me pick from a list of device drivers on Samsung Monitor homepage. 6. Using the Software Note This monitor driver is located, and click "OK". 18
Check the "Browse my computer for example, D:\Drive) where the driver setup file is under certifying MS logo, and this installation doesn't damage your system. Click "Have Disk..." The certified driver will be posted on my computer". 8. in the "Driver" tab. 7. Click "Update Driver..." and select the folder (for driver software" checkbox and click "Let me pick from a list of device drivers on Samsung Monitor homepage. 6. Using the Software Note This monitor driver is located, and click "OK". 18

User Manual
Page 21
Insert CD into the CD-ROM drive. 2. Click "Display" icon and choose the "Settings" tab then click "Advanced...". 4. Select "Don't search, I will..." and select "Install from a list or..." Click the "Properties" button on the "Monitor" tab and select "Driver" tab. 5. Click "Update Driver..." Click "Start" → "Control Panel" then click the "Appearance and Themes" icon. 3. then click "Next" and then click "Have disk". 20 Using the Software 1. then click "Next" button. 6.
Insert CD into the CD-ROM drive. 2. Click "Display" icon and choose the "Settings" tab then click "Advanced...". 4. Select "Don't search, I will..." and select "Install from a list or..." Click the "Properties" button on the "Monitor" tab and select "Driver" tab. 5. Click "Update Driver..." Click "Start" → "Control Panel" then click the "Appearance and Themes" icon. 3. then click "Next" and then click "Have disk". 20 Using the Software 1. then click "Next" button. 6.

User Manual
Page 23
... "Browse" button on the "Next" button. 6. Click "Start", "Setting", "Control Panel". 2. Double click the "Display" icon. 3. Choose "Monitor". then click on the "File Needed" window. 3. Click the "Open" button, then click "OK" button. 9. Click the "Finish" button then the "Close" button. Microsoft® Windows® Millennium Operating System 1. Using the Software 10. Click "Driver" and then click on the "Insert disk" window. 2. Click the "Browse" button then choose A:(D:\Driver). 8. Choose "Display a list of...
... "Browse" button on the "Next" button. 6. Click "Start", "Setting", "Control Panel". 2. Double click the "Display" icon. 3. Choose "Monitor". then click on the "File Needed" window. 3. Click the "Open" button, then click "OK" button. 9. Click the "Finish" button then the "Close" button. Microsoft® Windows® Millennium Operating System 1. Using the Software 10. Click "Driver" and then click on the "Insert disk" window. 2. Click the "Browse" button then choose A:(D:\Driver). 8. Choose "Display a list of...
User Manual
Page 24
... X-Window, you connected to the Preset Timing Modes in the user guide. Set a vertical frequency for setting your computer and click "OK". 11. Continue choosing "Close" button and "OK" button until you see the screen working normally after clicking "Test". In Display Registration Information window, click Settings Tab and then click "All Display Modes". 3. Press "Enter" at All Display Modes, select the level of resolution, colors or frequency). The third screen is for your monitor...
... X-Window, you connected to the Preset Timing Modes in the user guide. Set a vertical frequency for setting your computer and click "OK". 11. Continue choosing "Close" button and "OK" button until you see the screen working normally after clicking "Test". In Display Registration Information window, click Settings Tab and then click "All Display Modes". 3. Press "Enter" at All Display Modes, select the level of resolution, colors or frequency). The third screen is for your monitor...

User Manual
Page 51
..., you will see a box in the illustration below. If the monitor is functioning properly. Warning Messages If there is something wrong with the computer or the video card, this case, first check the source of the monitor. Therefore, if there is a problem with the input signal, a message appears on the screen or the screen goes blank although the power indicator LED is functioning properly.
..., you will see a box in the illustration below. If the monitor is functioning properly. Warning Messages If there is something wrong with the computer or the video card, this case, first check the source of the monitor. Therefore, if there is a problem with the input signal, a message appears on the screen or the screen goes blank although the power indicator LED is functioning properly.
User Manual
Page 52
... Service Center or your dealer. A: Check the power cord connection and supply. Q: Can you do need assistance, please call the phone number on the screen. A: The monitor is still powered on the screen? Troubleshooting Judging the monitor's working condition. If you see this one minute and then disappears. Q: Is the power cord connected properly? I cannot turn on the screen? A: You can see "Check Signal Cable" on . In this section to see "Not Optimum Mode...
... Service Center or your dealer. A: Check the power cord connection and supply. Q: Can you do need assistance, please call the phone number on the screen. A: The monitor is still powered on the screen? Troubleshooting Judging the monitor's working condition. If you see this one minute and then disappears. Q: Is the power cord connected properly? I cannot turn on the screen? A: You can see "Check Signal Cable" on . In this section to see "Not Optimum Mode...
User Manual
Page 53
... no images on the screen. Q: Has the video card been set properly? A: Adjust the resolution and frequency of the video card signals. Q: Is the frequency properly adjusted when checking the Display Timing on the monitor? A: If there is fully inserted in its slot. I cannot see the On Screen Display. A: Set the video card by pressing the [MENU/ ] button for at least 5 seconds. The screen shows strange colors or just black and white. Q: Have you changed the video card or the driver? Troubleshooting...
... no images on the screen. Q: Has the video card been set properly? A: Adjust the resolution and frequency of the video card signals. Q: Is the frequency properly adjusted when checking the Display Timing on the monitor? A: If there is fully inserted in its slot. I cannot see the On Screen Display. A: Set the video card by pressing the [MENU/ ] button for at least 5 seconds. The screen shows strange colors or just black and white. Q: Have you changed the video card or the driver? Troubleshooting...

User Manual
Page 54
... Windows colors been set properly? A: Windows ME/2000 : Set the resolution at the Control Panel → Appearance and Themes → Display → Settings. There is already installed, remove it to the video card manual. Q: See the video card manual to check the compatible graphic card list provided. A: To check whether your monitor. Q: Have you have changed your PC or video graphic card? If a copy of the program is a message that supports Plug and Play. A: Windows XP : Set the resolution at the Control Panel...
... Windows colors been set properly? A: Windows ME/2000 : Set the resolution at the Control Panel → Appearance and Themes → Display → Settings. There is already installed, remove it to the video card manual. Q: See the video card manual to check the compatible graphic card list provided. A: To check whether your monitor. Q: Have you have changed your PC or video graphic card? If a copy of the program is a message that supports Plug and Play. A: Windows XP : Set the resolution at the Control Panel...

User Manual
Page 55
... the Windows / Computer Manual). Q & A Q: How can I clean the outer case/LCD Panel? 52 Q: How can I set to the computer or the video card manual for details.) Q: How can I change the frequency? Note If problems repeatedly occur, contact an authorized service center. A: Windows XP: Set the resolution in the Control Panel → Appearance and Themes → Display → Settings. Check if the power cord and the video cables are properly connected to reinstall the adapter (video) driver. A: Note that video card support can...
... the Windows / Computer Manual). Q & A Q: How can I clean the outer case/LCD Panel? 52 Q: How can I set to the computer or the video card manual for details.) Q: How can I change the frequency? Note If problems repeatedly occur, contact an authorized service center. A: Windows XP: Set the resolution in the Control Panel → Appearance and Themes → Display → Settings. Check if the power cord and the video cables are properly connected to reinstall the adapter (video) driver. A: Note that video card support can...

User Manual
Page 58
... precision of RED, GREEN, BLUE and WHITE color appear to normal operation when you can use it unattended for a certain amount of TFT-LCD sub pixels contained in this product. This is not needed, or when leaving it without prior notice. The monitor automatically returns to be bright sometimes or some black pixels may be installed on any problems. For example, the number of time. Specifications VESA Mounting Interface 75...
... precision of RED, GREEN, BLUE and WHITE color appear to normal operation when you can use it unattended for a certain amount of TFT-LCD sub pixels contained in this product. This is not needed, or when leaving it without prior notice. The monitor automatically returns to be bright sometimes or some black pixels may be installed on any problems. For example, the number of time. Specifications VESA Mounting Interface 75...

User Manual
Page 61
... settings. State Normal Operation Power saving mode Power off (Power button) EPA/ENERGY 2000 Power Indicator Blue Blue blinking Off Power Consumption 35 watts 1 watts 1 watts 61 Class B Equipment (Information Communication equipment for residential use) This product complies with a VESA DPM compliant video card installed in this product are 3,932,160. The interaction of time. But the pixels of RED, GREEN, BLUE and WHITE color appear to be bright sometimes or some black pixels may be installed...
... settings. State Normal Operation Power saving mode Power off (Power button) EPA/ENERGY 2000 Power Indicator Blue Blue blinking Off Power Consumption 35 watts 1 watts 1 watts 61 Class B Equipment (Information Communication equipment for residential use) This product complies with a VESA DPM compliant video card installed in this product are 3,932,160. The interaction of time. But the pixels of RED, GREEN, BLUE and WHITE color appear to be bright sometimes or some black pixels may be installed...

User Manual
Page 63
.... Information For Better Display Adjust the computer resolution and screen injection rate (refresh rate) on screen if the best picture quality is not provided for an extended period of black pixels could be seen. Change the mode to energy save or set a screensaver to move the picture when you may have an uneven picture quality on the computer as window termination button is pressed. But the pixels of a LCD panel, pixel image retention doesn't occur...
.... Information For Better Display Adjust the computer resolution and screen injection rate (refresh rate) on screen if the best picture quality is not provided for an extended period of black pixels could be seen. Change the mode to energy save or set a screensaver to move the picture when you may have an uneven picture quality on the computer as window termination button is pressed. But the pixels of a LCD panel, pixel image retention doesn't occur...

Brochure
Page 2
... RoHS Directive. 17" TFT LCD Monitor SMT-1712/1722/1723 19¨/ 17¨ 1000:1 1280x1024 5ms Specifications Display Screen Size Max. R esolution Brightness Contrast Ratio Aspect Ratio Viewing Angle (H/V) Display Color Response Time Video System Panel Life Filter Type Interface Video Connector S-Video Connector Connector Input signal RGB Available Format HDMI Connector Available Format Audio Connector Output signal Application Support On Screen Display Functions Language General Electrical Input Voltage Power consumption Environmental Operating...
... RoHS Directive. 17" TFT LCD Monitor SMT-1712/1722/1723 19¨/ 17¨ 1000:1 1280x1024 5ms Specifications Display Screen Size Max. R esolution Brightness Contrast Ratio Aspect Ratio Viewing Angle (H/V) Display Color Response Time Video System Panel Life Filter Type Interface Video Connector S-Video Connector Connector Input signal RGB Available Format HDMI Connector Available Format Audio Connector Output signal Application Support On Screen Display Functions Language General Electrical Input Voltage Power consumption Environmental Operating...


