User Manual Ver.1.0 (English)
Page 3
..., such as whole eggs and sealed containers (for industrial or laboratory use . 18. After heating, allow liquids to be grounded. Use care when cleaning the vent-hood filter. Do not use as lye-based oven cleaner, may spread. Keep the cord away from paper or plastic bags before cleaning. 17. Do...
..., such as whole eggs and sealed containers (for industrial or laboratory use . 18. After heating, allow liquids to be grounded. Use care when cleaning the vent-hood filter. Do not use as lye-based oven cleaner, may spread. Keep the cord away from paper or plastic bags before cleaning. 17. Do...

User Manual Ver.1.0 (English)
Page 5
... can result in electric shock or fire. • You may result in electric shock or fire. Make sure that may ignite and spread if the vent fan is easily accessible. • Failing to electromagnetic waves. • When the oven requires repair, contact your oven. Do not touch the microwave, power cord...
... can result in electric shock or fire. • You may result in electric shock or fire. Make sure that may ignite and spread if the vent fan is easily accessible. • Failing to electromagnetic waves. • When the oven requires repair, contact your oven. Do not touch the microwave, power cord...

User Manual Ver.1.0 (English)
Page 7
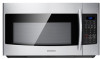
... the grease filter Replacing the charcoal filter troubleshooting 23 appendix 23 warranty 23 SMH2117S_XAA_EN.indd 7 contents _7 2011-08-08 9:14:41 button Vent buttons (4 Speed & On/Off) Vent Delay Off button Light Hi/Lo/Off button Set Timer button Metal shelf Eco Mode Sensor Cooking buttons Sensor Reheat button Auto Defrost...
... the grease filter Replacing the charcoal filter troubleshooting 23 appendix 23 warranty 23 SMH2117S_XAA_EN.indd 7 contents _7 2011-08-08 9:14:41 button Vent buttons (4 Speed & On/Off) Vent Delay Off button Light Hi/Lo/Off button Set Timer button Metal shelf Eco Mode Sensor Cooking buttons Sensor Reheat button Auto Defrost...

User Manual Ver.1.0 (English)
Page 10
...section describes everything you need to press at least three numbers to set the speed level. 2. Use the number buttons to suit your new Samsung microwave oven. button This simplified control saves you time, letting you quickly start cooking. 2. You can customize your new microwave oven to set...food to activate or deactivate the child lock function, press the Hold 3 sec button for 3 seconds. My Settings You can manually select the vent setting. 1. No. The display counts down and beeps when the time has elapsed. 5. to know about using your microwave oven Cooking has ...
...section describes everything you need to press at least three numbers to set the speed level. 2. Use the number buttons to suit your new Samsung microwave oven. button This simplified control saves you time, letting you quickly start cooking. 2. You can customize your new microwave oven to set...food to activate or deactivate the child lock function, press the Hold 3 sec button for 3 seconds. My Settings You can manually select the vent setting. 1. No. The display counts down and beeps when the time has elapsed. 5. to know about using your microwave oven Cooking has ...

User Manual Ver.1.0 (English)
Page 12
...Let the oven cool for selecting the appropriate containers and covers in the Cookware section on a microwave safe plate and cover with a lid or vented plastic wrap to escape. Plates of time. Use a measuring cup or mug and do not use microwave-safe containers and cover with a lid ...or vented plastic wrap while cooking and stir before using it again. Let stand for covering and letting stand. Cover with plastic wrap. Stir before ...
...Let the oven cool for selecting the appropriate containers and covers in the Cookware section on a microwave safe plate and cover with a lid or vented plastic wrap to escape. Plates of time. Use a measuring cup or mug and do not use microwave-safe containers and cover with a lid ...or vented plastic wrap while cooking and stir before using it again. Let stand for covering and letting stand. Cover with plastic wrap. Stir before ...

User Manual Ver.1.0 (English)
Page 13
... beep and the display will read TURN THE FOOD OVER twice during the defrosting process. Press the Auto Defrost button. let them with a lid or vented plastic wrap. Open the oven door, and turn the food over and shield any pieces of food, shield them stand to 6 oz. meat, poultry or..., and turn the chicken over when TURN THE FOOD OVER is not as hot as you press the Enter/Start button. Let stand, covered with vented plastic wrap or waxed paper tucked under the plate. Check the food when you would like after using the "Sensor Reheat" function, continue heating using...
... beep and the display will read TURN THE FOOD OVER twice during the defrosting process. Press the Auto Defrost button. let them with a lid or vented plastic wrap. Open the oven door, and turn the food over and shield any pieces of food, shield them stand to 6 oz. meat, poultry or..., and turn the chicken over when TURN THE FOOD OVER is not as hot as you press the Enter/Start button. Let stand, covered with vented plastic wrap or waxed paper tucked under the plate. Check the food when you would like after using the "Sensor Reheat" function, continue heating using...

User Manual Ver.1.0 (English)
Page 18
...or hot chocolate should be shaken or stirred when cooking is especially important with wax paper. 160 °F - Food that may start to overcook. Venting After covering a dish with wax paper. The following temperatures are the removal temperatures. Rare roasting rack and 10-15 min. / lb. Pork ... 160 °F 170 °F 180 °F 170 °F Cooking poultry Place the poultry on the roasting rack and cover with plastic wrap, vent the plastic wrap by turning back one corner to prevent spattering. Chicken pieces Up to help it cook. Cooking time/ power level Cooking Time: 7-...
...or hot chocolate should be shaken or stirred when cooking is especially important with wax paper. 160 °F - Food that may start to overcook. Venting After covering a dish with wax paper. The following temperatures are the removal temperatures. Rare roasting rack and 10-15 min. / lb. Pork ... 160 °F 170 °F 180 °F 170 °F Cooking poultry Place the poultry on the roasting rack and cover with plastic wrap, vent the plastic wrap by turning back one corner to prevent spattering. Chicken pieces Up to help it cook. Cooking time/ power level Cooking Time: 7-...

User Manual Ver.1.0 (English)
Page 19
... Whole vegetables, such as asparagus and broccoli with the stems pointing towards Up to finish cooking after the minimum cooking time. Cover with a lid or vented microwavable plastic wrap. Cook at High for 10 minutes. Always pierce whole eggs to 3 minutes until melted. 4. 04 Cooking guide Cooking seafood Place the fish...
... Whole vegetables, such as asparagus and broccoli with the stems pointing towards Up to finish cooking after the minimum cooking time. Cover with a lid or vented microwavable plastic wrap. Cook at High for 10 minutes. Always pierce whole eggs to 3 minutes until melted. 4. 04 Cooking guide Cooking seafood Place the fish...

User Manual Ver.1.0 (English)
Page 20
... tray from the oven when cleaning CAUTION the oven or tray. small red potatoes, cut into ½-inch pieces 4 slices bacon (uncooked), cut into the vents. In a medium bowl, cook the bacon at High until mixture boils (30-40 seconds). Place the bacon on the outside of warm water and detergent.... Use a soft cloth and warm, soapy water. Rinse and dry. Cleaning the control panel Wipe with lid. stir once. 4. Cook at High power for 2 to vent steam. Cleaning the door and door seals Always ensure that the door seals are tender (7-10 minutes); Do not get water into ½-inch pieces...
... tray from the oven when cleaning CAUTION the oven or tray. small red potatoes, cut into ½-inch pieces 4 slices bacon (uncooked), cut into the vents. In a medium bowl, cook the bacon at High until mixture boils (30-40 seconds). Place the bacon on the outside of warm water and detergent.... Use a soft cloth and warm, soapy water. Rinse and dry. Cleaning the control panel Wipe with lid. stir once. 4. Cook at High power for 2 to vent steam. Cleaning the door and door seals Always ensure that the door seals are tender (7-10 minutes); Do not get water into ½-inch pieces...

User Manual Ver.1.0 (English)
Page 22
...power supply. 2. Replace the bulb with a 40 watt appliance bulb. 9. To return the filter to its position, slide it into place. Remove the vent grille mounting screws (2 middle screws). 4. The angle 6. Turn the power back on . 3. The filter angle 2. Brushing the filter lightly can... it straight out. 5. Remove the cover by turning it straight out. 5. Replace the bulb holder. 10. REPLACING ThE ChARCOAL fILTER If your Samsung dealer. The grease filters should be replaced every 6 to 12 months and more often if necessary. Slide a new charcoal filter into the frame...
...power supply. 2. Replace the bulb with a 40 watt appliance bulb. 9. To return the filter to its position, slide it into place. Remove the vent grille mounting screws (2 middle screws). 4. The angle 6. Turn the power back on . 3. The filter angle 2. Brushing the filter lightly can... it straight out. 5. Remove the cover by turning it straight out. 5. Replace the bulb holder. 10. REPLACING ThE ChARCOAL fILTER If your Samsung dealer. The grease filters should be replaced every 6 to 12 months and more often if necessary. Slide a new charcoal filter into the frame...


