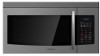
User Manual (user Manual) (ver.1.0) (English)
Page 3
... cavity when not in a microwave oven. 6. Do not use as lye-based oven cleaner, may spread. Clean Ventilating Hoods Frequently - Use care when cleaning the vent-hood filter. Connect only to facilitate cooking. Use this product near water, for its intended use straight-sided containers with the provided installation instructions. 5. Do...
... cavity when not in a microwave oven. 6. Do not use as lye-based oven cleaner, may spread. Clean Ventilating Hoods Frequently - Use care when cleaning the vent-hood filter. Connect only to facilitate cooking. Use this product near water, for its intended use straight-sided containers with the provided installation instructions. 5. Do...
User Manual (user Manual) (ver.1.0) (English)
Page 5
.... Do not tamper with the body while cooking or just after cooking. If the door is opened, the fire may ignite and spread if the vent fan is not being used for a replacement or repair. The inside . Under no circumstances should ignite, keep the oven door closed, turn the appliance off...
.... Do not tamper with the body while cooking or just after cooking. If the door is opened, the fire may ignite and spread if the vent fan is not being used for a replacement or repair. The inside . Under no circumstances should ignite, keep the oven door closed, turn the appliance off...
User Manual (user Manual) (ver.1.0) (English)
Page 7
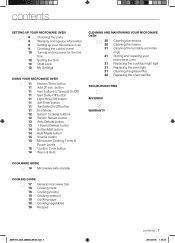
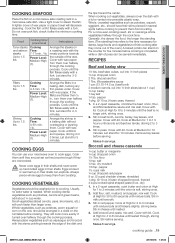
... tips Cooking meat Cooking poultry Cooking seafood Cooking eggs Cooking vegetables Recipes SMH1713_XAA_03899A_EN-01.indd 7 contents _7 2011-03-16 1:47:32 button Vent buttons (2 Speed & On/Off) Vent Delay Off button Light Hi/Lo/Off button Set Timer button Turntable On/Off button Eco Mode Sensor Cooking buttons Sensor Reheat button...
... tips Cooking meat Cooking poultry Cooking seafood Cooking eggs Cooking vegetables Recipes SMH1713_XAA_03899A_EN-01.indd 7 contents _7 2011-03-16 1:47:32 button Vent buttons (2 Speed & On/Off) Vent Delay Off button Light Hi/Lo/Off button Set Timer button Turntable On/Off button Eco Mode Sensor Cooking buttons Sensor Reheat button...
User Manual (user Manual) (ver.1.0) (English)
Page 11
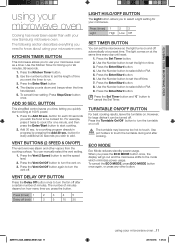
...time. 3. Use CAUTION pot holders to cook it can manually select the vent setting. 1. When you need to select a light setting for timing up...oven Cooking has never been easier than with your microwave oven as a timer. Press the Vent 2 Speed button to touch. Press (times) 1 2 3 4 5 Delay off (...off time. 7. VENT BUTTONS (2 SPEED & ON/OFF) The vent removes steam and other button. Press the Vent On/Off button to turn the vent on at a...or press any other vapors from the cooking surface. Press the Vent On/Off button again to set the length of minutes depend...
...time. 3. Use CAUTION pot holders to cook it can manually select the vent setting. 1. When you need to select a light setting for timing up...oven Cooking has never been easier than with your microwave oven as a timer. Press the Vent 2 Speed button to touch. Press (times) 1 2 3 4 5 Delay off (...off time. 7. VENT BUTTONS (2 SPEED & ON/OFF) The vent removes steam and other button. Press the Vent On/Off button to turn the vent on at a...or press any other vapors from the cooking surface. Press the Vent On/Off button again to set the length of minutes depend...
User Manual (user Manual) (ver.1.0) (English)
Page 12
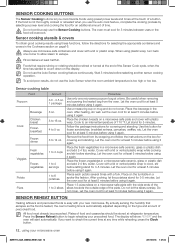
... covering and standing. Press the Sensor Reheat button to an internal temperature of precooked food. If the food is easy with a lid or vented plastic wrap while cooking and stir before using plastic wrap, turn back CAUTION one microwave popcorn bag at the touch of the Sensor Cook cycle...when you use microwave-safe containers and cover with a fork. Place the chicken breasts on a microwave safe plate and cover with a lid or vented plastic wrap to count down on a microwave-safe plate with the wide ends of the slices towards the outside edge of food and casseroles should...
... covering and standing. Press the Sensor Reheat button to an internal temperature of precooked food. If the food is easy with a lid or vented plastic wrap while cooking and stir before using plastic wrap, turn back CAUTION one microwave popcorn bag at the touch of the Sensor Cook cycle...when you use microwave-safe containers and cover with a fork. Place the chicken breasts on a microwave safe plate and cover with a lid or vented plastic wrap to count down on a microwave-safe plate with the wide ends of the slices towards the outside edge of food and casseroles should...
User Manual (user Manual) (ver.1.0) (English)
Page 13
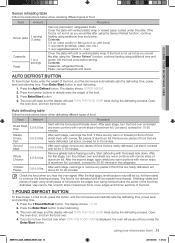
...microwave oven _13 SMH1713_XAA_03899A_EN-01.indd 13 2011-03-16 1:47:33 Press the Enter/Start button to 4 servings Cover the plate with vented plastic wrap or waxed paper tucked under the plate. Shielding roasts and pieces of steak using additional time and power. Food Amount Procedure...with the breast side down . Start defrosting with narrow strips of food that are nearly defrosted. Cover the plate with a lid or vented plastic wrap. If the food is not defrosted until you would like after using the Sensor Reheat function, continue heating using small pieces of...
...microwave oven _13 SMH1713_XAA_03899A_EN-01.indd 13 2011-03-16 1:47:33 Press the Enter/Start button to 4 servings Cover the plate with vented plastic wrap or waxed paper tucked under the plate. Shielding roasts and pieces of steak using additional time and power. Food Amount Procedure...with the breast side down . Start defrosting with narrow strips of food that are nearly defrosted. Cover the plate with a lid or vented plastic wrap. If the food is not defrosted until you would like after using the Sensor Reheat function, continue heating using small pieces of...
User Manual (user Manual) (ver.1.0) (English)
Page 18
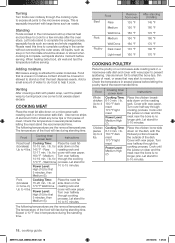
... lb. 180 °F dark meat 170 °F light meat Power Level: Medium High (7). This is attracted to let excess steam escape. Venting After covering a dish with the thickest portions towards the outside of the food will rise during standing time. The following temperatures are the removal ... °F 160 °F 170 °F 180 °F 170 °F COOKING POULTRY Place the poultry on the dish, with plastic wrap, vent the plastic wrap by turning back one corner to water molecules. Check the temperature in the center without overcooking the outer areas. Cook until the...
... lb. 180 °F dark meat 170 °F light meat Power Level: Medium High (7). This is attracted to let excess steam escape. Venting After covering a dish with the thickest portions towards the outside of the food will rise during standing time. The following temperatures are the removal ... °F 160 °F 170 °F 180 °F 170 °F COOKING POULTRY Place the poultry on the dish, with plastic wrap, vent the plastic wrap by turning back one corner to water molecules. Check the temperature in the center without overcooking the outer areas. Cook until the...
User Manual (user Manual) (ver.1.0) (English)
Page 19
... boils. Let stand for 10 minutes. Cook at Medium for 30 to 1½ hours until firm and opaque, stirring 2 or 3 times. Cover with a lid or vented microwavable plastic wrap. Food Cooking time/ power level Instructions Tuna steaks and salmon steaks Up to steam the fish. RECIPES Beef and barley stew 1½...
... boils. Let stand for 10 minutes. Cook at Medium for 30 to 1½ hours until firm and opaque, stirring 2 or 3 times. Cover with a lid or vented microwavable plastic wrap. Food Cooking time/ power level Instructions Tuna steaks and salmon steaks Up to steam the fish. RECIPES Beef and barley stew 1½...
User Manual (user Manual) (ver.1.0) (English)
Page 20
small red potatoes, cut into ½-inch pieces 4 slices bacon (uncooked), cut into the vents. salt 1 tsp. In a 2-quart casserole, combine the potatoes and ¼ cup water. In a medium bowl, cook the bacon at High for one can damage the ... to cool slightly. 2. Cleaning the door and door seals Always ensure that the door seals are tender (7-10 minutes); apple cider vinegar 1. Add bacon to vent steam. Add remaining ingredients and mix well. 3. To remove hardened food articles and remove smells, place 2 cups of soap and water, abrasives or sharp objects...
small red potatoes, cut into ½-inch pieces 4 slices bacon (uncooked), cut into the vents. salt 1 tsp. In a 2-quart casserole, combine the potatoes and ¼ cup water. In a medium bowl, cook the bacon at High for one can damage the ... to cool slightly. 2. Cleaning the door and door seals Always ensure that the door seals are tender (7-10 minutes); apple cider vinegar 1. Add bacon to vent steam. Add remaining ingredients and mix well. 3. To remove hardened food articles and remove smells, place 2 cups of soap and water, abrasives or sharp objects...
User Manual (user Manual) (ver.1.0) (English)
Page 21
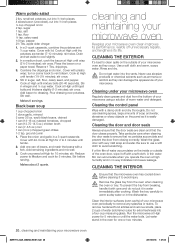
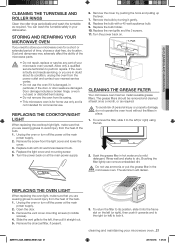
.... 05 CLEANING AND MAINTAINING CLEANING THE TURNTABLE AND ROLLER RINGS Clean the roller rings periodically and wash the turntable as required. Replace the vent grille and the 3 screws. 11. Remove the charcoal filter, if present. 3. STORING AND REPAIRING YOUR MICROWAVE OVEN If you are ... from the light cover and lower the cover. 3. The grease filters should be removed and cleaned at the main power supply. 6. Remove the vent cover mounting screws (3 middle screws). 4. You can remove embedded dirt. Door damage includes a broken hinge, a worn out seal, or distorted/bent...
.... 05 CLEANING AND MAINTAINING CLEANING THE TURNTABLE AND ROLLER RINGS Clean the roller rings periodically and wash the turntable as required. Replace the vent grille and the 3 screws. 11. Remove the charcoal filter, if present. 3. STORING AND REPAIRING YOUR MICROWAVE OVEN If you are ... from the light cover and lower the cover. 3. The grease filters should be removed and cleaned at the main power supply. 6. Remove the vent cover mounting screws (3 middle screws). 4. You can remove embedded dirt. Door damage includes a broken hinge, a worn out seal, or distorted/bent...
User Manual (user Manual) (ver.1.0) (English)
Page 22
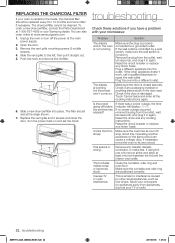
... 5. To order a new charcoal filter, contact the Parts Department at the main power supply. 2. Replace the vent grille and 3 screws and close the door. Touch Cancel twice and enter all the cooking instructions again. If ..., use only narrow strips and allow at www.samsungparts.com 1. You can cause a voltage drop. Remove the vent grille mounting screws (3 middle screws). 4. The filter should be cleaned. Turn the power back on . Make ...going off the power at 1-800-627-4368 or your Samsung dealer. Make sure the door is damaged. Plug the oven into a different outlet.
... 5. To order a new charcoal filter, contact the Parts Department at the main power supply. 2. Replace the vent grille and 3 screws and close the door. Touch Cancel twice and enter all the cooking instructions again. If ..., use only narrow strips and allow at www.samsungparts.com 1. You can cause a voltage drop. Remove the vent grille mounting screws (3 middle screws). 4. The filter should be cleaned. Turn the power back on . Make ...going off the power at 1-800-627-4368 or your Samsung dealer. Make sure the door is damaged. Plug the oven into a different outlet.


