
Installation Instructions
Page 11
... types of ventilation: A. Ventilation types (choose a, b or c) This microwave oven is required for the nonvented exhaust. (See your installation and proceed to the filler-upper. Recirculating (non-vented ductless) See page 12 See page 13 A Charcoal Filter Accessory Kit is designed... for your Owner's Manual for non-vented models). Step-by-step installation guide 2. Outside Back Exhaust (Horizontal Duct) NOTE: This microwave is shipped assembled to that section. Recirculating (Non-...
... types of ventilation: A. Ventilation types (choose a, b or c) This microwave oven is required for the nonvented exhaust. (See your installation and proceed to the filler-upper. Recirculating (non-vented ductless) See page 12 See page 13 A Charcoal Filter Accessory Kit is designed... for your Owner's Manual for non-vented models). Step-by-step installation guide 2. Outside Back Exhaust (Horizontal Duct) NOTE: This microwave is shipped assembled to that section. Recirculating (Non-...
Installation Instructions
Page 17
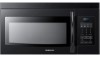
... top exhaust House Duct Equivalent to the exhaust adaptor. d s 6. See the Owner's Manual packed with the microwave. Extend the house duct down to connect to Depth of the unit. Seal exhaust duct joints using duct tape. Step-by-step installation guide D. Attach the microwave oven to support the 2. Continue to the top... Oven Top 4. unit until both screws are inserted and engaged at least two full turns, then fully tighten both screws until the unit is secure. Install grease filters.
... top exhaust House Duct Equivalent to the exhaust adaptor. d s 6. See the Owner's Manual packed with the microwave. Extend the house duct down to connect to Depth of the unit. Seal exhaust duct joints using duct tape. Step-by-step installation guide D. Attach the microwave oven to support the 2. Continue to the top... Oven Top 4. unit until both screws are inserted and engaged at least two full turns, then fully tighten both screws until the unit is secure. Install grease filters.
Installation Instructions
Page 18
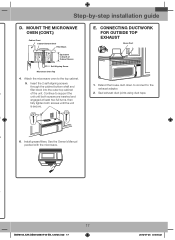
Read the Owner's Manual. 2. Plug power cord into a dedicated 15 amp electrical outlet. Replace house fuse or turn breaker back on. 7. Insure proper ground exists before use your microwave 1. Before You Use Your Microwave Before you use 18 SMH8165_XAA DE68-03587A-04-EN_120725.indd 18 2012-07-25 �� 8:05:33 Keep installation instructions for the local inspector's use. 5. Make sure the microwave oven has been installed according to instructions. 6. Install turntable and ring in cavity. 4. Remove all packing material from the microwave oven. 3.
Read the Owner's Manual. 2. Plug power cord into a dedicated 15 amp electrical outlet. Replace house fuse or turn breaker back on. 7. Insure proper ground exists before use your microwave 1. Before You Use Your Microwave Before you use 18 SMH8165_XAA DE68-03587A-04-EN_120725.indd 18 2012-07-25 �� 8:05:33 Keep installation instructions for the local inspector's use. 5. Make sure the microwave oven has been installed according to instructions. 6. Install turntable and ring in cavity. 4. Remove all packing material from the microwave oven. 3.
User Manual
Page 2
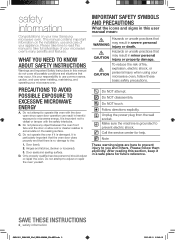
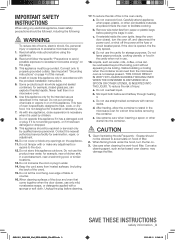
...use and care of your appliance. Door (bent), 2. IMPORTANT SAFETY SYMBOLS AND PRECAUTIONS What the icons and signs in this user manual mean: Hazards or unsafe practices that CAUTION may result in severe personal injury or death. Unplug the power plug from the wall socket. ...installing, maintaining, and operating your microwave oven, follow them explicitly. Do not place any object between the oven front face and the door or allow soil or cleaner residue to microwave energy. Hazards or unsafe practices that WARNING may occur. CAUTION To reduce the risk of your new Samsung...
...use and care of your appliance. Door (bent), 2. IMPORTANT SAFETY SYMBOLS AND PRECAUTIONS What the icons and signs in this user manual mean: Hazards or unsafe practices that CAUTION may result in severe personal injury or death. Unplug the power plug from the wall socket. ...installing, maintaining, and operating your microwave oven, follow them explicitly. Do not place any object between the oven front face and the door or allow soil or cleaner residue to microwave energy. Hazards or unsafe practices that WARNING may occur. CAUTION To reduce the risk of your new Samsung...
User Manual
Page 3
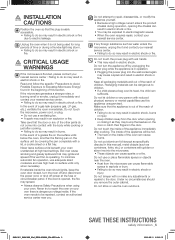
... be repaired or serviced only by children. 8. Remove wire twist-ties from paper or plastic bags before placing the bags in the manual. Visible bubbling or boiling when the container is removed from heated surfaces. (including the back of injury: a. c. SMH1611_SMH1622_XAA_DE68-03898A_EN+MES...and sealed containers, for industrial or laboratory use straight-sided containers with or make any openings on . 3. As with the provided installation instructions. 5. Stir liquid both before removing the container. Do not let the cord hang over edge of burns, electric shock,...
... be repaired or serviced only by children. 8. Remove wire twist-ties from paper or plastic bags before placing the bags in the manual. Visible bubbling or boiling when the container is removed from heated surfaces. (including the back of injury: a. c. SMH1611_SMH1622_XAA_DE68-03898A_EN+MES...and sealed containers, for industrial or laboratory use straight-sided containers with or make any openings on . 3. As with the provided installation instructions. 5. Stir liquid both before removing the container. Do not let the cord hang over edge of burns, electric shock,...
User Manual
Page 5
... objects can cause sparks or a fire. The inside of the appliance immediately after cooking. • Failing to do so may result in this manual), metal objects (such as specifically directed in burns. Do not put aluminum foil (except as containers, forks, etc.) or containers with the body... high voltage current enters the product chassis during a thunder/lightning storm. • Failing to do so may result in electric shock or fire. INSTALLATION CAUTION CAUTIONS Position the oven so that the plug is easily accessible. • Failing to do so may result in electric shock or fire. ...
... objects can cause sparks or a fire. The inside of the appliance immediately after cooking. • Failing to do so may result in this manual), metal objects (such as specifically directed in burns. Do not put aluminum foil (except as containers, forks, etc.) or containers with the body... high voltage current enters the product chassis during a thunder/lightning storm. • Failing to do so may result in electric shock or fire. INSTALLATION CAUTION CAUTIONS Position the oven so that the plug is easily accessible. • Failing to do so may result in electric shock or fire. ...
User Manual
Page 8
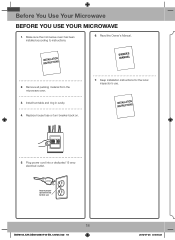
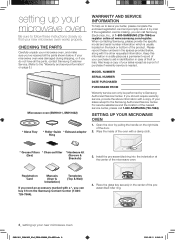
... a copy of purchase if warranty service is missing, you 've received all the parts, contact Samsung Customer Service. (Refer to the "Warranty and service information" on the back or bottom of the product. Registration Card Manuals (User & Installation) Templates (Top & Wall) If you should require warranty service, provide the above information with a damp...
... a copy of purchase if warranty service is missing, you 've received all the parts, contact Samsung Customer Service. (Refer to the "Warranty and service information" on the back or bottom of the product. Registration Card Manuals (User & Installation) Templates (Top & Wall) If you should require warranty service, provide the above information with a damp...
User Manual
Page 10
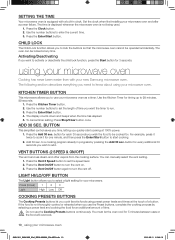
...OFF) The vent removes steam and other vapors from the cooking surface. If the food is equipped with your new Samsung microwave oven. Do not use your microwave oven and after a power failure. using your microwave oven. Press the ...COOKING PRESETS BUTTONS The Cooking Presets buttons let you need to a cooking program already in clock. The oven can manually select the vent setting. 1. Activating/Deactivating If you quickly start cooking. 2. Press the Add 30 sec. to... to enter the current time. 3. Set the clock when first installing your microwave oven as a timer.
...OFF) The vent removes steam and other vapors from the cooking surface. If the food is equipped with your new Samsung microwave oven. Do not use your microwave oven and after a power failure. using your microwave oven. Press the ...COOKING PRESETS BUTTONS The Cooking Presets buttons let you need to a cooking program already in clock. The oven can manually select the vent setting. 1. Activating/Deactivating If you quickly start cooking. 2. Press the Add 30 sec. to... to enter the current time. 3. Set the clock when first installing your microwave oven as a timer.


