User Manual
Page 2
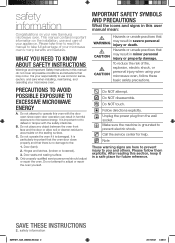
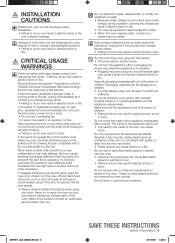
... service personnel should adjust or repair the oven. CAUTION To reduce the risk of fire, explosion, electric shock, or personal injury when using your microwave oven. Do NOT disassemble. After reading this section, keep it is grounded to adjust or repair the oven yourself. This manual contains important information on the installation, use common sense, caution, and care when installing, maintaining, and operating your microwave oven, follow them explicitly. Door...
... service personnel should adjust or repair the oven. CAUTION To reduce the risk of fire, explosion, electric shock, or personal injury when using your microwave oven. Do NOT disassemble. After reading this section, keep it is grounded to adjust or repair the oven yourself. This manual contains important information on the installation, use common sense, caution, and care when installing, maintaining, and operating your microwave oven, follow them explicitly. Door...
User Manual
Page 3
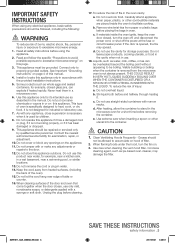
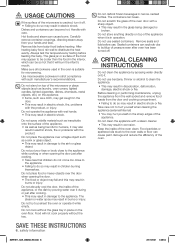
... under the hood, turn the oven off, and disconnect the power cord, or shut off the power at the fuse or circuit breaker panel. Read and follow the specific "Precautions to avoid possible exposure to facilitate cooking. Liquids, such as whole eggs and sealed containers, for examination, repair, or adjustment. 10. Do not use . 7. d. Connect only to heat, cook, or dry food. Do not leave paper products, cooking utensils, or...
... under the hood, turn the oven off, and disconnect the power cord, or shut off the power at the fuse or circuit breaker panel. Read and follow the specific "Precautions to avoid possible exposure to facilitate cooking. Liquids, such as whole eggs and sealed containers, for examination, repair, or adjustment. 10. Do not use . 7. d. Connect only to heat, cook, or dry food. Do not leave paper products, cooking utensils, or...
User Manual
Page 4
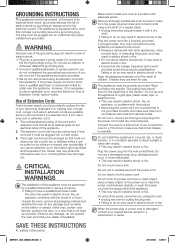
... it can be pulled on . If you connect the oven to use an extension cord, read and follow the specific "Grounding instructions" found in the beginning of the oven, broken door latches, cracks in the door, or a door that circuit breaker is damaged, contact your oven in a location with other appliances, using a power strip, or extending the power cord may result in electric shock or fire. If there is in...
... it can be pulled on . If you connect the oven to use an extension cord, read and follow the specific "Grounding instructions" found in the beginning of the oven, broken door latches, cracks in the door, or a door that circuit breaker is damaged, contact your oven in a location with other appliances, using a power strip, or extending the power cord may result in electric shock or fire. If there is in...
User Manual
Page 5
... automatic fan operation, use adequate sized cookware and use this Section. Do not let children or any of the other parts do not come into the wall socket again may cause a spark and result in electric shock or fire. If materials inside . Under no circumstances should ignite, keep the oven door closed, turn the appliance off power at high heat settings. Take care that the door or...
... automatic fan operation, use adequate sized cookware and use this Section. Do not let children or any of the other parts do not come into the wall socket again may cause a spark and result in electric shock or fire. If materials inside . Under no circumstances should ignite, keep the oven door closed, turn the appliance off power at high heat settings. Take care that the door or...
User Manual
Page 6
... care that it will not cook properly without the glass tray in children burning themselves. The steam or water spray may result in electric shock, fire or problems with the product, or injury. Do not use benzene, thinner or alcohol to the sink or glass object. Hot foods and steam can become hot. Do not abruptly cool the door, the inside of the oven clean. Remove...
... care that it will not cook properly without the glass tray in children burning themselves. The steam or water spray may result in electric shock, fire or problems with the product, or injury. Do not use benzene, thinner or alcohol to the sink or glass object. Hot foods and steam can become hot. Do not abruptly cool the door, the inside of the oven clean. Remove...
User Manual
Page 7
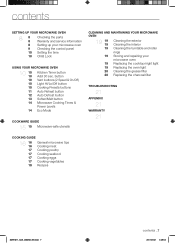
... repairing your microwave oven 9 Checking the control panel 10 Setting the time 10 Child Lock USING YOUR MICROWAVE OVEN 10 10 10 10 10 10 11 12 13 14 14 Kitchen Timer button Add 30 sec. contents SETTING UP YOUR MICROWAVE OVEN 8 8 8 Checking the parts Warranty and service information 8 Setting up your microwave oven Replacing the cooktop/night light Replacing the oven light Cleaning the grease filter Replacing the charcoal filter TROUBLESHOOTING 21 APPENDIX 21 WARRANTY 21 COOKING GUIDE 16 16 16 17 17 17 17 18 General microwave tips Cooking meat Cooking...
... repairing your microwave oven 9 Checking the control panel 10 Setting the time 10 Child Lock USING YOUR MICROWAVE OVEN 10 10 10 10 10 10 11 12 13 14 14 Kitchen Timer button Add 30 sec. contents SETTING UP YOUR MICROWAVE OVEN 8 8 8 Checking the parts Warranty and service information 8 Setting up your microwave oven Replacing the cooktop/night light Replacing the oven light Cleaning the grease filter Replacing the charcoal filter TROUBLESHOOTING 21 APPENDIX 21 WARRANTY 21 COOKING GUIDE 16 16 16 17 17 17 17 18 General microwave tips Cooking meat Cooking...
User Manual
Page 8
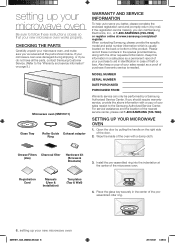
When contacting Samsung, please provide the specific model and serial number information which is usually located on the right side of the product. Open the door by pulling the handle on the back or bottom of the door. 2. Registration Card Manuals (User & Installation) Templates (Top & Wall) 4. CHECKING THE PARTS Carefully unpack your microwave oven, and make sure you should require warranty service, provide the above information with a copy of your sales receipt to serve...
When contacting Samsung, please provide the specific model and serial number information which is usually located on the right side of the product. Open the door by pulling the handle on the back or bottom of the door. 2. Registration Card Manuals (User & Installation) Templates (Top & Wall) 4. CHECKING THE PARTS Carefully unpack your microwave oven, and make sure you should require warranty service, provide the above information with a copy of your sales receipt to serve...
User Manual
Page 10
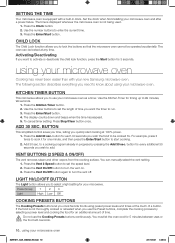
... set the speed level. 2. KITCHEN TIMER BUTTON This microwave allows you to lock the buttons so that the microwave oven cannot be cooked for an additional amount of time. The display counts down and beeps when the time has elapsed. 5. Add 30 sec. Press (times) 1 2 3 Light High Low Off COOKING PRESETS BUTTONS The Cooking Presets buttons let you quickly start cooking. 2. You must let the oven cool for timing up to enter the current time. 3. Use...
... set the speed level. 2. KITCHEN TIMER BUTTON This microwave allows you to lock the buttons so that the microwave oven cannot be cooked for an additional amount of time. The display counts down and beeps when the time has elapsed. 5. Add 30 sec. Press (times) 1 2 3 Light High Low Off COOKING PRESETS BUTTONS The Cooking Presets buttons let you quickly start cooking. 2. You must let the oven cool for timing up to enter the current time. 3. Use...
User Manual
Page 11
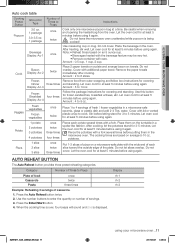
... plate. Press the Enter/Start button. 4. Be careful when removing and opening the heated bag from outer wrapping and follow box instructions for 3 to Press Plate of food Casserole Pasta once twice three times Example: Reheating 3 servings of fresh / frozen vegetables in the oven. Amount : 0.5 cup, 1 cup, 2 cup. potatoes. Press the Auto Reheat button twice. 2. Category Number of Times to 5 minutes. 02 USING YOUR MICROWAVE OVEN Auto cook table Cooking Preset Button Popcorn Cook...
... plate. Press the Enter/Start button. 4. Be careful when removing and opening the heated bag from outer wrapping and follow box instructions for 3 to Press Plate of food Casserole Pasta once twice three times Example: Reheating 3 servings of fresh / frozen vegetables in the oven. Amount : 0.5 cup, 1 cup, 2 cup. potatoes. Press the Auto Reheat button twice. 2. Category Number of Times to 5 minutes. 02 USING YOUR MICROWAVE OVEN Auto cook table Cooking Preset Button Popcorn Cook...
User Manual
Page 12
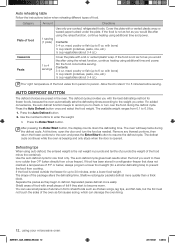
... time, open the door and turn over the food during the defrost cycle. Defrosting tips When using additional time and power. The shape of food Casserole Pasta Amount Directions 1 serving (1 plate) Use only pre-cooked, refrigerated foods. If the food is the net weight in the oven. with the best defrosting method for frozen foods, because the oven automatically sets the defrosting times according to become warm. meat...
... time, open the door and turn over the food during the defrost cycle. Defrosting tips When using additional time and power. The shape of food Casserole Pasta Amount Directions 1 serving (1 plate) Use only pre-cooked, refrigerated foods. If the food is the net weight in the oven. with the best defrosting method for frozen foods, because the oven automatically sets the defrosting times according to become warm. meat...
User Manual
Page 14
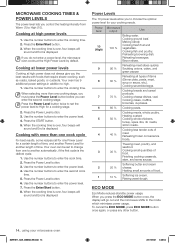
... beeps will go out and the microwave shifts to the mode which minimizes power usage. Press the Power Level button twice to set to change from Warm (1) to enter the second cook time. 5. Press the Power Level button. 3. When the cooking time is displayed. Cooking with foods that require slower cooking, such as roasts, baked goods, or custards. Your oven can enter the second cooking stage. Use the number buttons to another length of time, and another Power...
... beeps will go out and the microwave shifts to the mode which minimizes power usage. Press the Power Level button twice to set to change from Warm (1) to enter the second cook time. 5. Press the Power Level button. 3. When the cooking time is displayed. Cooking with foods that require slower cooking, such as roasts, baked goods, or custards. Your oven can enter the second cooking stage. Use the number buttons to another length of time, and another Power...
User Manual
Page 16
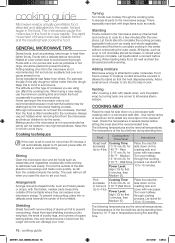
... of cookware you open the door to prevent overcooking. Turning Turn foods over halfway through the cooking 170 °F - Let liquids stand a moment before serving. When heating baby food, stir well and test the temperature before serving. COOKING MEAT Place the meat fat side down on the roasting rack and cover with a delicate texture should be heated to 70 percent power after the oven stops. for first...
... of cookware you open the door to prevent overcooking. Turning Turn foods over halfway through the cooking 170 °F - Let liquids stand a moment before serving. When heating baby food, stir well and test the temperature before serving. COOKING MEAT Place the meat fat side down on the roasting rack and cover with a delicate texture should be heated to 70 percent power after the oven stops. for first...
User Manual
Page 17
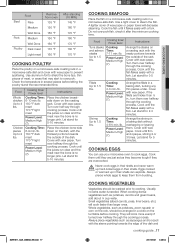
... Done Dark meat Light meat Remove from bursting. Cooking time/ Power level Cooking Time: 6-10 min./lb. 180 °F dark meat 170 °F light meat Power Level: Medium High (7). Cook the fish until firm and opaque, stirring 2 or 3 times. Let stand for 5 minutes. Cook until it after the minimum cooking time. Use aluminum foil to cooking. Chicken pieces Up to 1.5 lbs. Cover with wax paper to cook eggs. Turn them from oven 135 °...
... Done Dark meat Light meat Remove from bursting. Cooking time/ Power level Cooking Time: 6-10 min./lb. 180 °F dark meat 170 °F light meat Power Level: Medium High (7). Cook the fish until firm and opaque, stirring 2 or 3 times. Let stand for 5 minutes. Cook until it after the minimum cooking time. Use aluminum foil to cooking. Chicken pieces Up to 1.5 lbs. Cover with wax paper to cook eggs. Turn them from oven 135 °...
User Manual
Page 19
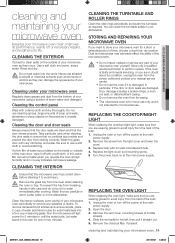
... measuring glass. Cleaning the control panel Wipe with 40 watt incandescent bulb. 4. Remove the glass tray from the light cover and lower the cover. 3. Run the microwave at the main power supply. 2. Door damage includes a broken hinge, a worn out seal, or distorted/bent casing. • Do not remove the oven from its casing. • This microwave oven is for home use only and is easily damaged. Remove the screw from the oven when cleaning...
... measuring glass. Cleaning the control panel Wipe with 40 watt incandescent bulb. 4. Remove the glass tray from the light cover and lower the cover. 3. Run the microwave at the main power supply. 2. Door damage includes a broken hinge, a worn out seal, or distorted/bent casing. • Do not remove the oven from its casing. • This microwave oven is for home use only and is easily damaged. Remove the screw from the oven when cleaning...
User Manual
Page 20
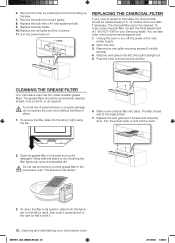
.... Remove the vent grille mounting screws (3 middle screws). 4. Push the hook and remove the old filter. Do not use ammonia or put the grease filter in the WARNING microwave oven. Replace the bulb with a 40 watt appliance bulb. 9. To return the filter to the left , then pull it . 20_ cleaning and maintaining your oven is vented to lock it straight out. 5. 6. Turn the power back on and set the clock. 2. Push...
.... Remove the vent grille mounting screws (3 middle screws). 4. Push the hook and remove the old filter. Do not use ammonia or put the grease filter in the WARNING microwave oven. Replace the bulb with a 40 watt appliance bulb. 9. To return the filter to the left , then pull it . 20_ cleaning and maintaining your oven is vented to lock it straight out. 5. 6. Turn the power back on and set the clock. 2. Push...
User Manual
Page 21
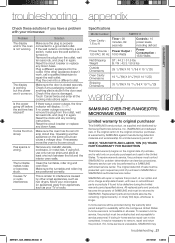
... own 20 amp circuit line. Warranty service can cause a voltage drop. Make sure the door is not working , but the power won't come on . SAMSUNG will repair or replace this product, at our option and at least one inch between the foil and the interior oven walls. Has sparks or arcing. If using foil, use only narrow strips and allow at no power outage occurred, remove the plug from appliances...
... own 20 amp circuit line. Warranty service can cause a voltage drop. Make sure the door is not working , but the power won't come on . SAMSUNG will repair or replace this product, at our option and at least one inch between the foil and the interior oven walls. Has sparks or arcing. If using foil, use only narrow strips and allow at no power outage occurred, remove the plug from appliances...
User Manual
Page 22
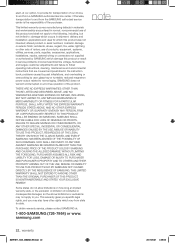
... THAN THE PURCHASE PRICE OF THE PRODUCT SOLD BY SAMSUNG AND CAUSING THE ALLEGED DAMAGE. samsung.com note 22_ warranty SMH1611_XAA_03898A_EN.indd 22 2011-05-31 3:29:55 applications and uses for transportation of products, equipment, systems, utilities, services, parts, supplies, accessories, applications, installations, repairs, external wiring or connectors not supplied or authorized by user; glass tray or turntable; Some states do not allow limitations...
... THAN THE PURCHASE PRICE OF THE PRODUCT SOLD BY SAMSUNG AND CAUSING THE ALLEGED DAMAGE. samsung.com note 22_ warranty SMH1611_XAA_03898A_EN.indd 22 2011-05-31 3:29:55 applications and uses for transportation of products, equipment, systems, utilities, services, parts, supplies, accessories, applications, installations, repairs, external wiring or connectors not supplied or authorized by user; glass tray or turntable; Some states do not allow limitations...
Installation Instructions
Page 3
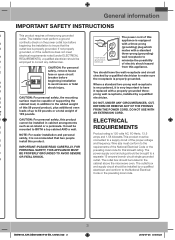
..., CUT, 4 of up to BOTH a top cabinet AND a wall. DO NOT USE WITH AN EXTENSION CORD. 5 CAUTION: For personal safety, this kilowatt rating. General information Important safety instructions 8 8 8 9 0 This product requires a three-prong grounded outlet. prong wall receptacle, installed by a qualified electrician and conform to a OR FATAL SHOCK. 8 separate 15 ampere branch circuit single grounded outlet. The 7 BE PROPERLY GROUNDED TO AVOID SEVERE power supply cord...
..., CUT, 4 of up to BOTH a top cabinet AND a wall. DO NOT USE WITH AN EXTENSION CORD. 5 CAUTION: For personal safety, this kilowatt rating. General information Important safety instructions 8 8 8 9 0 This product requires a three-prong grounded outlet. prong wall receptacle, installed by a qualified electrician and conform to a OR FATAL SHOCK. 8 separate 15 ampere branch circuit single grounded outlet. The 7 BE PROPERLY GROUNDED TO AVOID SEVERE power supply cord...
Installation Instructions
Page 7
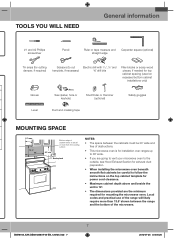
... needed for top cabinet spacing (used on the top cabinet template for power cord clearance. • Maximum cabinet depth above and beside the unit is 12˝. • The dimensions provided are going to vent your microwave oven to 36˝ wide. • If you will likely require more from the cooking surface. Bottom edge of cabinet needs to be careful to follow the instructions on recessed bottom cabinet installations...
... needed for top cabinet spacing (used on the top cabinet template for power cord clearance. • Maximum cabinet depth above and beside the unit is 12˝. • The dimensions provided are going to vent your microwave oven to 36˝ wide. • If you will likely require more from the cooking surface. Bottom edge of cabinet needs to be careful to follow the instructions on recessed bottom cabinet installations...
Installation Instructions
Page 18
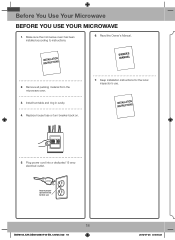
Read the Owner's Manual. 2. Install turntable and ring in cavity. 4. Insure proper ground exists before use . 5. Remove all packing material from the microwave oven. 3. Keep installation instructions for the local inspector's use 18 SMH8165_XAA DE68-03587A-04-EN_120725.indd 18 2012-07-25 �� 8:05:33 Plug power cord into a dedicated 15 amp electrical outlet. Replace house fuse or turn breaker back on. 7. Before You Use Your Microwave Before you use your microwave 1. Make sure the microwave oven has been installed according to instructions. 6.
Read the Owner's Manual. 2. Install turntable and ring in cavity. 4. Insure proper ground exists before use . 5. Remove all packing material from the microwave oven. 3. Keep installation instructions for the local inspector's use 18 SMH8165_XAA DE68-03587A-04-EN_120725.indd 18 2012-07-25 �� 8:05:33 Plug power cord into a dedicated 15 amp electrical outlet. Replace house fuse or turn breaker back on. 7. Before You Use Your Microwave Before you use your microwave 1. Make sure the microwave oven has been installed according to instructions. 6.


