User Manual Ver.1.0 (English)
Page 21
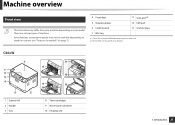
... may not be available depending on model or country (see "Features by models" on your fingers. Be careful not to pinch your model. C46xW 1 7 6 5 4 3 2 1 Scanner lid 2 Handle 3 Tray 11 8 12 9 13 10 8 Toner cartridges 9 Waste toner container 10 Imaging unit 1. b. Introduction 21 There are various types of machine. • Some... and optional goods may differ from your machine depending on page 7). 4 Front door 11 Scan unita b 5 Output support 12 USB port 6 Control panel 13 Scanner glass 7 NFC tag a. Close the scanner lid before opening the scan unit.
... may not be available depending on model or country (see "Features by models" on your fingers. Be careful not to pinch your model. C46xW 1 7 6 5 4 3 2 1 Scanner lid 2 Handle 3 Tray 11 8 12 9 13 10 8 Toner cartridges 9 Waste toner container 10 Imaging unit 1. b. Introduction 21 There are various types of machine. • Some... and optional goods may differ from your machine depending on page 7). 4 Front door 11 Scan unita b 5 Output support 12 USB port 6 Control panel 13 Scanner glass 7 NFC tag a. Close the scanner lid before opening the scan unit.
User Manual Ver.1.0 (English)
Page 22
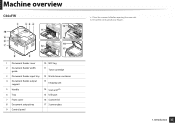
Machine overview C46xFW 1 23 4 14 11 10 9 15 8 16 7 12 13 17 6 5 1 Document feeder cover 10 NFC tag 2 Document feeder width guide 11 Toner cartridge 3 Document feeder input tray 12 Waste toner container 4 Document feeder output support 13 Imaging unit 5 Handle 14 Scan unita b 6 Tray 15 USB port 7 Front cover 16 Scanner lid 8 Document output tray 17 Scanner glass 9 Control panel a. Close the scanner lid before opening the scan unit. Introduction 22 b. Be careful not to pinch your fingers. 1.
Machine overview C46xFW 1 23 4 14 11 10 9 15 8 16 7 12 13 17 6 5 1 Document feeder cover 10 NFC tag 2 Document feeder width guide 11 Toner cartridge 3 Document feeder input tray 12 Waste toner container 4 Document feeder output support 13 Imaging unit 5 Handle 14 Scan unita b 6 Tray 15 USB port 7 Front cover 16 Scanner lid 8 Document output tray 17 Scanner glass 9 Control panel a. Close the scanner lid before opening the scan unit. Introduction 22 b. Be careful not to pinch your fingers. 1.
User Manual Ver.1.0 (English)
Page 48
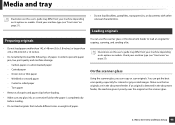
... s of paper. • Do not load booklets, pamphlets, transparencies, or documents with other unusual characteristics. 8 Loading originals You can use the scanner glass or the document feeder to prevent paper jam, low print quality and machine damage. - Onion skin or thin paper - Menu Overview and Basic... paper • Remove all staples and paper clips before loading. • Make sure any glue, ink, or correction fluid on the scanner glass. 2. On the scanner glass Using the scanner glass, you can get the best scan quality, especially for copying, scanning, and sending a fax.
... s of paper. • Do not load booklets, pamphlets, transparencies, or documents with other unusual characteristics. 8 Loading originals You can use the scanner glass or the document feeder to prevent paper jam, low print quality and machine damage. - Onion skin or thin paper - Menu Overview and Basic... paper • Remove all staples and paper clips before loading. • Make sure any glue, ink, or correction fluid on the scanner glass. 2. On the scanner glass Using the scanner glass, you can get the best scan quality, especially for copying, scanning, and sending a fax.

User Manual Ver.1.0 (English)
Page 49
Media and tray 1 Lift and open the scanner lid. 2 Place the original face down on the scanner glass. Align it with the registration guide at the top left corner of the glass. 3 Close the scanner lid. 2. Menu Overview and Basic Setup 49
Media and tray 1 Lift and open the scanner lid. 2 Place the original face down on the scanner glass. Align it with the registration guide at the top left corner of the glass. 3 Close the scanner lid. 2. Menu Overview and Basic Setup 49

User Manual Ver.1.0 (English)
Page 50
...the paper size marked on your hands and get hurt. • Do not put hands while closing the scanner lid. Make sure that the bottom of the paper stack to break the scanner glass. The scanner lid may fall on the document input tray. • Be careful not to separate the pages before... loading originals. 2. Media and tray • Leaving the scanner lid open . 2 Load the original face up into the document feeder input tray. Always keep it clean (see "Cleaning the machine" on the printout. It...
...the paper size marked on your hands and get hurt. • Do not put hands while closing the scanner lid. Make sure that the bottom of the paper stack to break the scanner glass. The scanner lid may fall on the document input tray. • Be careful not to separate the pages before... loading originals. 2. Media and tray • Leaving the scanner lid open . 2 Load the original face up into the document feeder input tray. Always keep it clean (see "Cleaning the machine" on the printout. It...

User Manual Ver.1.0 (English)
Page 59
... option you increase or decrease the difference between the bright and dark areas of a copied image from 25% to 400% from the document feeder or scanner glass. 2. Menu Overview and Basic Setup 59 If texts in the printout is blurry, select Text to get the clear texts. • Photo: Use when...
... option you increase or decrease the difference between the bright and dark areas of a copied image from 25% to 400% from the document feeder or scanner glass. 2. Menu Overview and Basic Setup 59 If texts in the printout is blurry, select Text to get the clear texts. • Photo: Use when...

User Manual Ver.1.0 (English)
Page 60
... copying • This feature may not be placed on the lower half without reducing the size of the paper and the other side on the scanner glass to use this feature is off . To select from the predefined copy sizes 1 C46xW: Make sure that the Scan to button's LED is helpful...
... copying • This feature may not be placed on the lower half without reducing the size of the paper and the other side on the scanner glass to use this feature is off . To select from the predefined copy sizes 1 C46xW: Make sure that the Scan to button's LED is helpful...

User Manual Ver.1.0 (English)
Page 61
... • If the original is larger than the printable area, some portions may not be printed. 2. Then, close the scanner lid. 5 Turn the original over and place it on the scanner glass where arrows indicate as shown. Menu Overview and Basic Setup 61 Basic copying 1 Press ID Copy on the control... panel. 2 Place the front side of an original facing down on the display. 4 Press (Start). Then, close the scanner lid. 3 Place Front Side and...
... • If the original is larger than the printable area, some portions may not be printed. 2. Then, close the scanner lid. 5 Turn the original over and place it on the scanner glass where arrows indicate as shown. Menu Overview and Basic Setup 61 Basic copying 1 Press ID Copy on the control... panel. 2 Place the front side of an original facing down on the display. 4 Press (Start). Then, close the scanner lid. 3 Place Front Side and...

User Manual Ver.1.0 (English)
Page 63
... (PSTN: Public Switched Telephone Network) when connecting telephone lines to make a connection. If the originals are placed on both the document feeder and the scanner glass, the machine will read the originals on the document feeder first, which has higher priority in scanning. 1 Line port 2 Micro filter 3 DSL...from one country to the Advanced Guide (see "Rear view" on page 245). • You cannot use either the document feeder or the scanner glass. Refer to the Quick Installation Guide how to use other Internet services (DSL, ISDN, VolP), you need to connect the supplied line ...
... (PSTN: Public Switched Telephone Network) when connecting telephone lines to make a connection. If the originals are placed on both the document feeder and the scanner glass, the machine will read the originals on the document feeder first, which has higher priority in scanning. 1 Line port 2 Micro filter 3 DSL...from one country to the Advanced Guide (see "Rear view" on page 245). • You cannot use either the document feeder or the scanner glass. Refer to the Quick Installation Guide how to use other Internet services (DSL, ISDN, VolP), you need to connect the supplied line ...
User Manual Ver.1.0 (English)
Page 64
... fax to the destinations. • If you want to cancel a fax job, press machine starts transmission. (Stop/Clear) before the • If you used the scanner glass, the machine shows the message asking to place another page. 1 Place a single document face down on the document glass, or load the documents face.... You cannot send faxes with this feature if you chosen super fine as an option or if the fax is a handset model, you can use Samsung Network PC Fax (see "Sending a fax in memory and sent to send a fax using panel. (On Hook Dial) on the control If your fax needs...
... fax to the destinations. • If you want to cancel a fax job, press machine starts transmission. (Stop/Clear) before the • If you used the scanner glass, the machine shows the message asking to place another page. 1 Place a single document face down on the document glass, or load the documents face.... You cannot send faxes with this feature if you chosen super fine as an option or if the fax is a handset model, you can use Samsung Network PC Fax (see "Sending a fax in memory and sent to send a fax using panel. (On Hook Dial) on the control If your fax needs...

User Manual Ver.1.0 (English)
Page 67
... the machine's memory • Format the USB memory device • Check the available memory space 23 Plugging in a USB memory device Lift the scanner lid slightly and insert your USB memory device into the USB memory port. You can do the following tasks on your dealer. 2. Check your USB... memory device's file system from your machine by using the device. Close the scanner lid again before using a USB memory device. • Scan documents and save them on a USB memory device • Print data stored on the front...
... the machine's memory • Format the USB memory device • Check the available memory space 23 Plugging in a USB memory device Lift the scanner lid slightly and insert your USB memory device into the USB memory port. You can do the following tasks on your dealer. 2. Check your USB... memory device's file system from your machine by using the device. Close the scanner lid again before using a USB memory device. • Scan documents and save them on a USB memory device • Print data stored on the front...

User Manual Ver.1.0 (English)
Page 86
... you want and press OK. • Total: Displays the total number of pages printed. • ADF Scan: Displays the number of pages printed by using scanner glass. • Supplies Info.: Prints the supply information page. 3 Press (Stop/Clear) to return to lower-level menus for some models. 1 Select (Menu) > System Setup...
... you want and press OK. • Total: Displays the total number of pages printed. • ADF Scan: Displays the number of pages printed by using scanner glass. • Supplies Info.: Prints the supply information page. 3 Press (Stop/Clear) to return to lower-level menus for some models. 1 Select (Menu) > System Setup...

User Manual Ver.1.0 (English)
Page 91
...machine. • Illustrations on this user's guide may differ from your machine depending on page 21). 3 Wipe the surface of the scanner until it is clean and dry. 1 3 2 4 5 1 Slightly dampen a soft, lint-free cloth or paper towel with water. 2 Lift and open ...the scanner lid. 1 White bar 2 Document feeder glass 3 White sheet 4 Scanner lid 5 Scanner glass 4 Close the scanner lid. 3. Maintenance 91 Check your machine has a power switch, turn the power switch off and unplug the power cord...
...machine. • Illustrations on this user's guide may differ from your machine depending on page 21). 3 Wipe the surface of the scanner until it is clean and dry. 1 3 2 4 5 1 Slightly dampen a soft, lint-free cloth or paper towel with water. 2 Lift and open ...the scanner lid. 1 White bar 2 Document feeder glass 3 White sheet 4 Scanner lid 5 Scanner glass 4 Close the scanner lid. 3. Maintenance 91 Check your machine has a power switch, turn the power switch off and unplug the power cord...

User Manual Ver.1.0 (English)
Page 95
To prevent document jams, use the scanner glass for thick, thin or mixed paper- Troubleshooting 95 Clearing original document jams When an original document jams in the document feeder, a warning message appears on the display. To avoid tearing the document, remove the jammed document slowly and carefully. originals. 4.
To prevent document jams, use the scanner glass for thick, thin or mixed paper- Troubleshooting 95 Clearing original document jams When an original document jams in the document feeder, a warning message appears on the display. To avoid tearing the document, remove the jammed document slowly and carefully. originals. 4.

User Manual Ver.1.0 (English)
Page 96
Check your machine depending on page 10). 4. Troubleshooting 96 Clearing original document jams 1 Original paper jam in front of scanner • Illustrations on this user's guide may differ from your machine type (see "Front view" on page 21). • This troubleshooting may not be available depending on model or optional goods (see "Variety feature" on its options or models.
Check your machine depending on page 10). 4. Troubleshooting 96 Clearing original document jams 1 Original paper jam in front of scanner • Illustrations on this user's guide may differ from your machine type (see "Front view" on page 21). • This troubleshooting may not be available depending on model or optional goods (see "Variety feature" on its options or models.

User Manual Ver.1.0 (English)
Page 97
Troubleshooting 97 Check your machine depending on page 10). 4. Clearing original document jams 2 Original paper jam inside of scanner • Illustrations on this user's guide may differ from your machine type (see "Front view" on page 21). • This troubleshooting may not be available depending on model or optional goods (see "Variety feature" on its options or models.
Troubleshooting 97 Check your machine depending on page 10). 4. Clearing original document jams 2 Original paper jam inside of scanner • Illustrations on this user's guide may differ from your machine type (see "Front view" on page 21). • This troubleshooting may not be available depending on model or optional goods (see "Variety feature" on its options or models.

User Manual Ver.1.0 (English)
Page 99
Check your machine type (see "Front view" on page 21). 1 Remove any remaining pages from the document feeder. 2 Gently remove the jammed paper from your machine depending on page 21). • This troubleshooting may differ from the document feeder. 4. Troubleshooting 99 Clearing original document jams 3 Original paper jam in exit area of scanner • Illustrations on this user's guide may not be available depending on model or optional goods (see "Front view" on its options or models.
Check your machine type (see "Front view" on page 21). 1 Remove any remaining pages from the document feeder. 2 Gently remove the jammed paper from your machine depending on page 21). • This troubleshooting may differ from the document feeder. 4. Troubleshooting 99 Clearing original document jams 3 Original paper jam in exit area of scanner • Illustrations on this user's guide may not be available depending on model or optional goods (see "Front view" on its options or models.
User Manual Ver.1.0 (English)
Page 110
...again. Not compatible transfer belt Not installed Waste tank Check Fax Line Not proper room temp. The transfer belt of the machine is in the scanner area. not installed. The machine is not for service. 4. Or make sure the sensor is not facing down . Or clean the connector...call for service The machine unit cannot be controlled. The machine is polluted. Scan Unit Open or Exit JAM The scan unit is Install a Samsung- The output tray is not securely latched. belt unit. Door Open Close it is locked. The waste toner container is not securely •...
...again. Not compatible transfer belt Not installed Waste tank Check Fax Line Not proper room temp. The transfer belt of the machine is in the scanner area. not installed. The machine is not for service. 4. Or make sure the sensor is not facing down . Or clean the connector...call for service The machine unit cannot be controlled. The machine is polluted. Scan Unit Open or Exit JAM The scan unit is Install a Samsung- The output tray is not securely latched. belt unit. Door Open Close it is locked. The waste toner container is not securely •...
User Manual Ver.1.0 (English)
Page 113
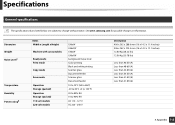
Appendix 113 See www.samsung.com for possible changes in information. Dimension Weight Noise Levela Temperature Humidity Power ratingb Items Width x Length x Height Machine with consumables Ready mode Print mode ... Storage (packed) Operation Storage (packed) 110 volt models 220 volt models C46xW C46xFW C46xW C46xFW background noise level Color printing Black and white printing Scanner glass Document feeder Scanner glass Document feeder 10 to 30°C (50 to 86°F) -20 to 40°C (-4 to 104°F) 20 to 80% RH 10...
Appendix 113 See www.samsung.com for possible changes in information. Dimension Weight Noise Levela Temperature Humidity Power ratingb Items Width x Length x Height Machine with consumables Ready mode Print mode ... Storage (packed) Operation Storage (packed) 110 volt models 220 volt models C46xW C46xFW C46xW C46xFW background noise level Color printing Black and white printing Scanner glass Document feeder Scanner glass Document feeder 10 to 30°C (50 to 86°F) -20 to 40°C (-4 to 104°F) 20 to 80% RH 10...
User Manual Ver.1.0 (English)
Page 122
... hazardous. to conform to the requirements of DHHS 21 CFR, chapter 1 Subchapter J for a normal work environment and certified with the protective cover removed from laser/scanner assembly. Appendix 122 Class I laser products are designed so there is never any human access to laser radiation above a Class I laser product conforming to the...
... hazardous. to conform to the requirements of DHHS 21 CFR, chapter 1 Subchapter J for a normal work environment and certified with the protective cover removed from laser/scanner assembly. Appendix 122 Class I laser products are designed so there is never any human access to laser radiation above a Class I laser product conforming to the...

