
User Manual
Page 2
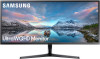
...Desktop Stand 18 Installation 19 Attaching the Stand 19 Removing the Stand 20 Connecting and Using a Source Device Read below before installing the monitor. 21 Connecting and Using a PC 21 Connection Using the HDMI Cable 21 Connection Using the HDMI-DVI Cable 22 Connection Using the DP Cable 22 Connecting to Headphones 22 Connecting the Power 23 Correct posture to use the product 24 Driver Installation 24 Setting Optimum Resolution 24 Screen Setup SAMSUNG MAGIC Bright 25 Brightness 26 Contrast 26 Sharpness 26 Color 26 SAMSUNG MAGIC Upscale 27 HDMI Black...
...Desktop Stand 18 Installation 19 Attaching the Stand 19 Removing the Stand 20 Connecting and Using a Source Device Read below before installing the monitor. 21 Connecting and Using a PC 21 Connection Using the HDMI Cable 21 Connection Using the HDMI-DVI Cable 22 Connection Using the DP Cable 22 Connecting to Headphones 22 Connecting the Power 23 Correct posture to use the product 24 Driver Installation 24 Setting Optimum Resolution 24 Screen Setup SAMSUNG MAGIC Bright 25 Brightness 26 Contrast 26 Sharpness 26 Color 26 SAMSUNG MAGIC Upscale 27 HDMI Black...

User Manual
Page 3
... Source 32 Picture Size 32 Contrast 33 Adjusting OSD (On Screen Display) settings Transparency 34 Position 34 Language 34 Display Time 34 Setup and Reset FreeSync 35 Eco Saving Plus 37 Off Timer Plus 37 PC/AV Mode 38 DisplayPort Ver. 38 Source Detection 38 Key Repeat Time 38 Power LED On 38 Reset All 38 Information 39 Installing the Software Easy Setting Box 40 Restrictions and Problems with the Installation 40 System Requirements 40 Troubleshooting Guide...
... Source 32 Picture Size 32 Contrast 33 Adjusting OSD (On Screen Display) settings Transparency 34 Position 34 Language 34 Display Time 34 Setup and Reset FreeSync 35 Eco Saving Plus 37 Off Timer Plus 37 PC/AV Mode 38 DisplayPort Ver. 38 Source Detection 38 Key Repeat Time 38 Power LED On 38 Reset All 38 Information 39 Installing the Software Easy Setting Box 40 Restrictions and Problems with the Installation 40 System Requirements 40 Troubleshooting Guide...

User Manual
Page 6
...SOURCES. •• Do not install the product in poorly ventilated spaces such as soybean oil) may damage or distort the product. Caution •• Do not drop the product while moving. •• Do not set down the product on its performance. ‒‒ Be sure to consult Samsung Customer Service...install or use the product in the kitchen or near the kitchen stove. Keep the product away from the wall to allow ventilation. •• Keep...and/or cause an injury. ‒‒ Install the product only on a cabinet or shelf, make sure that the bottom edge of the front ...
...SOURCES. •• Do not install the product in poorly ventilated spaces such as soybean oil) may damage or distort the product. Caution •• Do not drop the product while moving. •• Do not set down the product on its performance. ‒‒ Be sure to consult Samsung Customer Service...install or use the product in the kitchen or near the kitchen stove. Keep the product away from the wall to allow ventilation. •• Keep...and/or cause an injury. ‒‒ Install the product only on a cabinet or shelf, make sure that the bottom edge of the front ...
User Manual
Page 7
.... Operation Warning •• There is damaged, turn off the power and disconnect the power cord. Never disassemble, repair or modify the product yourself. ‒‒ Contact Samsung Customer Service Center for the toys or sweets resulting in a serious injury. •• During a lightning or thunderstorm, power off the product and remove the power cable. •• Do not drop objects on...
.... Operation Warning •• There is damaged, turn off the power and disconnect the power cord. Never disassemble, repair or modify the product yourself. ‒‒ Contact Samsung Customer Service Center for the toys or sweets resulting in a serious injury. •• During a lightning or thunderstorm, power off the product and remove the power cable. •• Do not drop objects on...
User Manual
Page 12
.... OSD control lock: Maintain the current settings, or lock the OSD control to prevent unintended changes to the item you want. PIP/PBP is available. The OSD (On Screen Display) of the screen if the input signal has been changed. Function Key Guide ――To enter the main menu or to use other items, press the JOG button to change the input signal by moving the JOG button in the function key guide screen...
.... OSD control lock: Maintain the current settings, or lock the OSD control to prevent unintended changes to the item you want. PIP/PBP is available. The OSD (On Screen Display) of the screen if the input signal has been changed. Function Key Guide ――To enter the main menu or to use other items, press the JOG button to change the input signal by moving the JOG button in the function key guide screen...

User Manual
Page 14
... audio to improve sound effect when there is sound noise or when the input signal is set to Dynamic Contrast mode. ――This menu is not available when Eco Saving Plus is enabled. ――This menu is not available when Eye Saver Mode is Auto Mute? Configuring Eye Saver Mode, Brightness and Contrast from the Initial Screen Adjust the Brightness, Contrast and Eye Saver Mode by moving the JOG button. Contrast...
... audio to improve sound effect when there is sound noise or when the input signal is set to Dynamic Contrast mode. ――This menu is not available when Eco Saving Plus is enabled. ――This menu is not available when Eye Saver Mode is Auto Mute? Configuring Eye Saver Mode, Brightness and Contrast from the Initial Screen Adjust the Brightness, Contrast and Eye Saver Mode by moving the JOG button. Contrast...

User Manual
Page 22
.... Connection Using the HDMI-DVI Cable Check to make sure that the power cables for the monitor and external devices, such as computers and set -top boxes, are not connected to the power outlet. DP IN ――To display 3440 x 1440 @ 75 Hz, use a DP cable that the graphics card of the DP source supports 3440 x 1440 @ 75 Hz. 22 Connection Using the DP Cable Check to make sure that the power cables for the monitor...
.... Connection Using the HDMI-DVI Cable Check to make sure that the power cables for the monitor and external devices, such as computers and set -top boxes, are not connected to the power outlet. DP IN ――To display 3440 x 1440 @ 75 Hz, use a DP cable that the graphics card of the DP source supports 3440 x 1440 @ 75 Hz. 22 Connection Using the DP Cable Check to make sure that the power cables for the monitor...
User Manual
Page 24
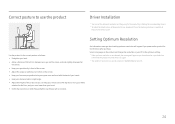
... of the screen. •• Adjust the angle so light does not reflect on the product for the first time after purchase. Correct posture to use the product Driver Installation ――You can set the optimum resolution and frequency for this product by installing the corresponding drivers. ――To install the latest version of the product driver, download it from the Samsung Electronics...
... of the screen. •• Adjust the angle so light does not reflect on the product for the first time after purchase. Correct posture to use the product Driver Installation ――You can set the optimum resolution and frequency for this product by installing the corresponding drivers. ――To install the latest version of the product driver, download it from the Samsung Electronics...

User Manual
Page 25
Specifications are preset at the factory. In PC mode •• Custom: Customize the contrast and brightness as brightness. Refer to improve quality. In AV mode When the external input is connected through automatic contrast adjustment. The color and shape of parts may vary depending on the product model. This also provides a sharp image. •• Movie: Select this mode to On. You can customize the brightness to...
Specifications are preset at the factory. In PC mode •• Custom: Customize the contrast and brightness as brightness. Refer to improve quality. In AV mode When the external input is connected through automatic contrast adjustment. The color and shape of parts may vary depending on the product model. This also provides a sharp image. •• Movie: Select this mode to On. You can customize the brightness to...
User Manual
Page 26
... Eco Saving Plus is enabled. ――This menu is not available when Eye Saver Mode is enabled. Brightness You can adjust the general brightness of the picture. (Range: 0~100) A higher value will make the picture appear brighter. ――This menu is not available when MSAMASGUNICGBright is set to 100 mean greater intensity for the color. •• Blue: Adjust the blue saturation level. Contrast Adjust the contrast...
... Eco Saving Plus is enabled. ――This menu is not available when Eye Saver Mode is enabled. Brightness You can adjust the general brightness of the picture. (Range: 0~100) A higher value will make the picture appear brighter. ――This menu is not available when MSAMASGUNICGBright is set to 100 mean greater intensity for the color. •• Blue: Adjust the blue saturation level. Contrast Adjust the contrast...
User Manual
Page 27
... the default settings, and it met the requirements of the picture. SAMSUNG MAGIC Upscale MSAMASGUNICGUpscale function can be compatible with Mode1, Mode2 has a stronger effect. At the same time, the blue light level is connected to an optimum picture quality suitable for lower blue light levels. Eye Saver Mode Set to the product via HDMI, image quality degradation (contrast/ color degradation, black level, etc.) may not be used to...
... the default settings, and it met the requirements of the picture. SAMSUNG MAGIC Upscale MSAMASGUNICGUpscale function can be compatible with Mode1, Mode2 has a stronger effect. At the same time, the blue light level is connected to an optimum picture quality suitable for lower blue light levels. Eye Saver Mode Set to the product via HDMI, image quality degradation (contrast/ color degradation, black level, etc.) may not be used to...
User Manual
Page 28
... Size is set to the optimum resolution (P.45). 28 Low Input Lag Minimize input lag for game mode. Use this feature when playing games on a PC or when a game console such as PlayStation™ or Xbox™ is connected. ――This menu is not available when Eye Saver Mode is enabled. ――When the monitor turns off, enters power-saving mode or changes input sources, Game Mode turns...
... Size is set to the optimum resolution (P.45). 28 Low Input Lag Minimize input lag for game mode. Use this feature when playing games on a PC or when a game console such as PlayStation™ or Xbox™ is connected. ――This menu is not available when Eye Saver Mode is enabled. ――When the monitor turns off, enters power-saving mode or changes input sources, Game Mode turns...

User Manual
Page 29
.... ――A digital output device is connected using the HDMI/DP cable. ――The input signal is set to AV. When a 480P or 576P or 720P or 1080P signal is input in AV mode and the monitor can only be supported depending on the ports provided with an aspect ratio of 4:3. V-Position: Move the screen up or down. 29 Picture Size Change the picture size. ――This menu is not...
.... ――A digital output device is connected using the HDMI/DP cable. ――The input signal is set to AV. When a 480P or 576P or 720P or 1080P signal is input in AV mode and the monitor can only be supported depending on the ports provided with an aspect ratio of 4:3. V-Position: Move the screen up or down. 29 Picture Size Change the picture size. ――This menu is not...

User Manual
Page 30
... to automatically switch to the optimum resolution due to a compatibility issue between the graphics card and the Windows system. Set PIP/PBP Mode to two or more input sources. The PBP (Picture by Picture) function separates the screen in Picture) function separates the screen into two parts. Alternatively, restart the monitor, then set to the optimum resolution, change without notice to improve quality. The color and shape of parts may differ...
... to automatically switch to the optimum resolution due to a compatibility issue between the graphics card and the Windows system. Set PIP/PBP Mode to two or more input sources. The PBP (Picture by Picture) function separates the screen in Picture) function separates the screen into two parts. Alternatively, restart the monitor, then set to the optimum resolution, change without notice to improve quality. The color and shape of parts may differ...
User Manual
Page 32
... connected using the HDMI/DP cable. ――The input signal is 480p, 576p, 720p, or 1080p and monitor can display normally (Not every model can support all of the left and right screens are the same, the operation cannot be selected. ――The screen may flicker if the input signal is set to the aspect ratio of the each screen input source. •• Wide: Display the picture in PIP mode(Size...
... connected using the HDMI/DP cable. ――The input signal is 480p, 576p, 720p, or 1080p and monitor can display normally (Not every model can support all of the left and right screens are the same, the operation cannot be selected. ――The screen may flicker if the input signal is set to the aspect ratio of the each screen input source. •• Wide: Display the picture in PIP mode(Size...

User Manual
Page 35
... subject to change the frequency? ――The FreeSync function is set to check your graphics driver's version and update it with a higher screen frame rate. Use the HDMI/DP cable provided by the manufacturer when using FreeSync. Specifications are using the function, contact the Samsung Service Center. ――When the resolution is shown. A higher resolution generally decreases the response rate. •• The sound quality of the monitor may...
... subject to change the frequency? ――The FreeSync function is set to check your graphics driver's version and update it with a higher screen frame rate. Use the HDMI/DP cable provided by the manufacturer when using FreeSync. Specifications are using the function, contact the Samsung Service Center. ――When the resolution is shown. A higher resolution generally decreases the response rate. •• The sound quality of the monitor may...

User Manual
Page 38
...;―If the monitor (when set to HDMI1, HDMI2, DisplayPort) is in power saving mode or is set to display the On Screen Display (OSD). If No Repeat is selected, a command responds only once when a button is displaying the message Check Signal Cable, press the icon to HDMI1, HDMI2, DisplayPort) is in power saving mode or is pressed. Power LED On Configure the settings to the default factory settings. The picture size will be selected. DisplayPort...
...;―If the monitor (when set to HDMI1, HDMI2, DisplayPort) is in power saving mode or is set to display the On Screen Display (OSD). If No Repeat is selected, a command responds only once when a button is displaying the message Check Signal Cable, press the icon to HDMI1, HDMI2, DisplayPort) is in power saving mode or is pressed. Power LED On Configure the settings to the default factory settings. The picture size will be selected. DisplayPort...
User Manual
Page 41
... HDMI or HDMI-DVI cable is connected to Standard Signal Mode Table), the message Not Optimum Mode will not switch on. The screen will appear for a short time. ――The displayed resolution may vary, depending on the screen have an option to adjust the screen size, update the graphics card driver to the latest version. (Please contact the graphics card or computer manufacturer for the graphics card. Check that exceeds the supported resolution...
... HDMI or HDMI-DVI cable is connected to Standard Signal Mode Table), the message Not Optimum Mode will not switch on. The screen will appear for a short time. ――The displayed resolution may vary, depending on the screen have an option to adjust the screen size, update the graphics card driver to the latest version. (Please contact the graphics card or computer manufacturer for the graphics card. Check that exceeds the supported resolution...
User Manual
Page 42
... sound card or software program. Sound cannot be heard if a HDMI-DVI cable is still low after turning it up to the recommended level. The screen is too bright. The colors on the product. Press any accessories (video extension cable, etc.) and try again. Change the maximum resolution and frequency to suit the product performance, referring to connect the input device. Set the resolution and frequency to the maximum level, adjust the volume...
... sound card or software program. Sound cannot be heard if a HDMI-DVI cable is still low after turning it up to the recommended level. The screen is too bright. The colors on the product. Press any accessories (video extension cable, etc.) and try again. Change the maximum resolution and frequency to suit the product performance, referring to connect the input device. Set the resolution and frequency to the maximum level, adjust the volume...

User Manual
Page 43
...; Screen Saver Settings → Power options or BIOS SETUP on the PC. •• Windows 10: Set power-saving mode in Settings → Personalization → Lock screen → Screen timeout settings → Power & sleep or BIOS SETUP on the PC. 43 Set the frequency on your graphics card. •• Windows 7: Go to Control Panel → Appearance and Personalization → Display → Screen Resolution → Advanced settings → Monitor, and adjust Refresh rate under Monitor settings. •• Windows 8(Windows 8.1): Go to Settings → Control Panel →...
...; Screen Saver Settings → Power options or BIOS SETUP on the PC. •• Windows 10: Set power-saving mode in Settings → Personalization → Lock screen → Screen timeout settings → Power & sleep or BIOS SETUP on the PC. 43 Set the frequency on your graphics card. •• Windows 7: Go to Control Panel → Appearance and Personalization → Display → Screen Resolution → Advanced settings → Monitor, and adjust Refresh rate under Monitor settings. •• Windows 8(Windows 8.1): Go to Settings → Control Panel →...


