User Manual
Page 2
... hard disk backup thorugh SATA • Backup function using USB 2.0 flash memory and external CD/DVD writer (Internal DVD writer is not available for SHR-7080/7160/8080/8160) • Simultaneous Record and Play of camera input and G.723 audio encoding for 8 or 16 channels of 8/16-channel video data •... Modes (Time Lapse, Event, Scheduled Recording) • Extended Hard Disk Connection (USB 2.0, SATA) • Alarm Interface (Input: 8/16, Output: 4, Reset: 1) • Remote Monitoring function by Windows Network Viewer (Net-I/Web viewer) 2_ overview
... hard disk backup thorugh SATA • Backup function using USB 2.0 flash memory and external CD/DVD writer (Internal DVD writer is not available for SHR-7080/7160/8080/8160) • Simultaneous Record and Play of camera input and G.723 audio encoding for 8 or 16 channels of 8/16-channel video data •... Modes (Time Lapse, Event, Scheduled Recording) • Extended Hard Disk Connection (USB 2.0, SATA) • Alarm Interface (Input: 8/16, Output: 4, Reset: 1) • Remote Monitoring function by Windows Network Viewer (Net-I/Web viewer) 2_ overview
User Manual
Page 19
CONNECTING THE VIDEO, AUDIO, AND MONITOR VIDEO IN AUDIO IN SPOT LOOP OUT AC 100-240V~IN AUDIO OUT VIDEO OUT (composite) CONSOLE USB 2.0 NETWORK RS-232 SATA VIDEO OUT (VGA) HDMI RS-485 / ALARM CONNECTING THE NETWORK Connecting to Internet through Ethernet (10/100/1000BaseT) Hub/Switcher Back Bone RJ45 Ethernet Cable (Direct Cable) Hub/Switcher Windows NET-i English _19 CONNECTING WITH OTHER DEVICE connecting with other device M The following figures are based on Model SHR-8162.
CONNECTING THE VIDEO, AUDIO, AND MONITOR VIDEO IN AUDIO IN SPOT LOOP OUT AC 100-240V~IN AUDIO OUT VIDEO OUT (composite) CONSOLE USB 2.0 NETWORK RS-232 SATA VIDEO OUT (VGA) HDMI RS-485 / ALARM CONNECTING THE NETWORK Connecting to Internet through Ethernet (10/100/1000BaseT) Hub/Switcher Back Bone RJ45 Ethernet Cable (Direct Cable) Hub/Switcher Windows NET-i English _19 CONNECTING WITH OTHER DEVICE connecting with other device M The following figures are based on Model SHR-8162.
User Manual
Page 20
... HDD, USB CD/DVD player, USB memory or mouse to Internet through ADSL Hub/Switcher Phone(ADSL) Line RJ45 Ethernet Cable (Direct Cable) ADSL MODEM Windows NET-i CONNECTING THE USB 1.
... HDD, USB CD/DVD player, USB memory or mouse to Internet through ADSL Hub/Switcher Phone(ADSL) Line RJ45 Ethernet Cable (Direct Cable) ADSL MODEM Windows NET-i CONNECTING THE USB 1.

User Manual
Page 23
... or the front panel to move to and press the [ENTER] button or click . The initialization process will shut down. The "Shutdown" confirmation window appears. You should have logged in the order of the DVR to display the context sensitive menu and select . 2. Are you sure to "Permission Management...
... or the front panel to move to and press the [ENTER] button or click . The initialization process will shut down. The "Shutdown" confirmation window appears. You should have logged in the order of the DVR to display the context sensitive menu and select . 2. Are you sure to "Permission Management...
User Manual
Page 26
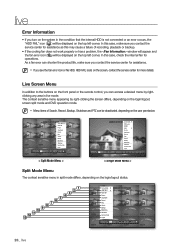
... center for more details. M Menu items of recording, playback or backup. • If the cooling fan does not work properly or has a problem, the window will appear and the fan error icon ( ) will be deactivated, depending on the login/logout status. 1 2 3 4 5 6 7 8 9 10 11 12 13 Scene Mode SPOT OUT Audio...
... center for more details. M Menu items of recording, playback or backup. • If the cooling fan does not work properly or has a problem, the window will appear and the fan error icon ( ) will be deactivated, depending on the login/logout status. 1 2 3 4 5 6 7 8 9 10 11 12 13 Scene Mode SPOT OUT Audio...

User Manual
Page 34
... Permission Management System Management Log Information • Date : Sets the date appears on the front panel. If not logged in, it prompts with login window. Setting the Date/Time/Language Set the Date/Time/Language Using the mouse may help easy setup. 1. You can check and setup the current Date...
... Permission Management System Management Log Information • Date : Sets the date appears on the front panel. If not logged in, it prompts with login window. Setting the Date/Time/Language Set the Date/Time/Language Using the mouse may help easy setup. 1. You can check and setup the current Date...

User Manual
Page 35
... - When the Date/Time/Language setup is done, press . Select . Check both on the remote control or front panel to be appeared in yellow in window to your language. English _35 Use the left /right side of the time server. - Time Server: Enter an IP or URL address of year/month...
... - When the Date/Time/Language setup is done, press . Select . Check both on the remote control or front panel to be appeared in yellow in window to your language. English _35 Use the left /right side of the time server. - Time Server: Enter an IP or URL address of year/month...

User Manual
Page 36
... press [ENTER] button. 4. Use the up/down buttons (▲▼) in the input field above the virtual keyboard layout. The selected character appears in window to move to a normal keyboard use button. Using the virtual keyboard is done, press . Use direction buttons to move to a desired item, and set... the DVR Permission Management You can set to "admin", and "4321". OK Cancel 6. using the DVR Using Virtual Keyboard For alphanumeric inputs, the virtual keyboard window appears. and '-'.
... press [ENTER] button. 4. Use the up/down buttons (▲▼) in the input field above the virtual keyboard layout. The selected character appears in window to move to a normal keyboard use button. Using the virtual keyboard is done, press . Use direction buttons to move to a desired item, and set... the DVR Permission Management You can set to "admin", and "4321". OK Cancel 6. using the DVR Using Virtual Keyboard For alphanumeric inputs, the virtual keyboard window appears. and '-'.

User Manual
Page 37
..., group and password of the user. The virtual keyboard appears when or was created in menu. A window for "Add User" appears. Use direction buttons to select from the window. A window for Add User appears. Previous/Next Page OK Cancel To change the user property, use "Edit User"..... 4. Permission Management Admin Group User Setup Group Group All Group Name Add ID Viewer Delete 5. Result of the user setup appears in the window. 6. Using the mouse may help easy setup. 3. When the user setup is done, press . Permission Management Admin Group User Group ABC ...
..., group and password of the user. The virtual keyboard appears when or was created in menu. A window for "Add User" appears. Use direction buttons to select from the window. A window for Add User appears. Previous/Next Page OK Cancel To change the user property, use "Edit User"..... 4. Permission Management Admin Group User Setup Group Group All Group Name Add ID Viewer Delete 5. Result of the user setup appears in the window. 6. Using the mouse may help easy setup. 3. When the user setup is done, press . Permission Management Admin Group User Group ABC ...
User Manual
Page 38
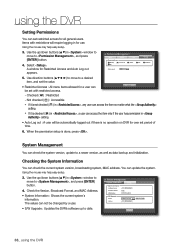
...mouse may help easy setup. 3. Select . System Management You can update the system. Use the up/down buttons (▲▼) in window to move to , and press [ENTER] button. 4. Permission Management Admin Group Restricted Access Backup All Record Lock User Search PTZ Setup ..., a user can access the item only if the user has permission in setting. • Auto Log out : A user will require logging in window to move to a newer version, as well as data backup and initialization. Previous 38_ using the DVR Setting Permissions You can set restricted access for...
...mouse may help easy setup. 3. Select . System Management You can update the system. Use the up/down buttons (▲▼) in window to move to , and press [ENTER] button. 4. Permission Management Admin Group Restricted Access Backup All Record Lock User Search PTZ Setup ..., a user can access the item only if the user has permission in setting. • Auto Log out : A user will require logging in window to move to a newer version, as well as data backup and initialization. Previous 38_ using the DVR Setting Permissions You can set restricted access for...

User Manual
Page 39
... Device Do not turn the power off during the upgrade. USB2FlashStorage Upgrade Version v0.02_080826225303 Previous English _39 M If "Upgrade Failed" appears, retry from window. 3. When the updating is same to upgrade? Connect a device storing the software to be activated only if the current of the is done, it automatically...
... Device Do not turn the power off during the upgrade. USB2FlashStorage Upgrade Version v0.02_080826225303 Previous English _39 M If "Upgrade Failed" appears, retry from window. 3. When the updating is same to upgrade? Connect a device storing the software to be activated only if the current of the is done, it automatically...

User Manual
Page 40
...help easy setup. 3. Select . Use direction buttons to move to the previous menu, press . Use the up/down buttons (▲▼) in window to move to a desired item, and press . Use the up , system shutdown, and changes on the calendar < > to a storage device.... Use direction buttons to move to a desired item, and export or import settings data to display the calendar window. System Management System Information Settings Storage Device DVR USB USB DVR 38010100 1932 MB (Remained Capacity) Export Import Include Network Settings Load ...
...help easy setup. 3. Select . Use direction buttons to move to the previous menu, press . Use the up/down buttons (▲▼) in window to move to a desired item, and press . Use the up , system shutdown, and changes on the calendar < > to a storage device.... Use direction buttons to move to a desired item, and export or import settings data to display the calendar window. System Management System Information Settings Storage Device DVR USB USB DVR 38010100 1932 MB (Remained Capacity) Export Import Include Network Settings Load ...
User Manual
Page 41
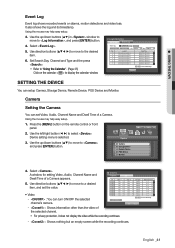
...PTZ Audio OFF OFF OFF OFF OFF OFF OFF OFF - : You can setup Camera, Storage Device, Remote Device, POS Device and Monitor. A window for setting Video, Audio, Channel Name and Dwell Time of a Camera appears. 5. CH Name CAM 01 CAM 02 CAM 03 CAM 04 CAM 05... Search CH All CHs Type View all No. Using the mouse may help easy setup. 1. Select . Use direction buttons to move to display the calendar window. Log List 7 Motion Detection [CH 7] 6 Motion Detection [CH 6] 5 Motion Detection [CH 5] 4 Motion Detection [CH 4] 3 Motion Detection [CH 3] 2 Motion Detection [CH 2]...
...PTZ Audio OFF OFF OFF OFF OFF OFF OFF OFF - : You can setup Camera, Storage Device, Remote Device, POS Device and Monitor. A window for setting Video, Audio, Channel Name and Dwell Time of a Camera appears. 5. CH Name CAM 01 CAM 02 CAM 03 CAM 04 CAM 05... Search CH All CHs Type View all No. Using the mouse may help easy setup. 1. Select . Use direction buttons to move to display the calendar window. Log List 7 Motion Detection [CH 7] 6 Motion Detection [CH 6] 5 Motion Detection [CH 5] 4 Motion Detection [CH 4] 3 Motion Detection [CH 3] 2 Motion Detection [CH 2]...

User Manual
Page 42
... protocol if you turn the audio of the channel ON/OFF on the Live screen and not recorded. Audio output is not listed in window to move to , and press [ENTER] button. 4. Camera Camera CH 1 2 3 4 5 6 7 8 PTZ ID 0 > 1 > 2 > 3 > 4 > 5 > 6 > 7 > Protocol None None None None None ... desired item, and select it to All CH Setting the PTZ To use Camera's PTZ functions, ID and protocols of PTZ settings appears. 5. A window of each channel. If set to , the channel is available for only 1 channel. • CH Name : Up to 15 characters including blanks ...
... protocol if you turn the audio of the channel ON/OFF on the Live screen and not recorded. Audio output is not listed in window to move to , and press [ENTER] button. 4. Camera Camera CH 1 2 3 4 5 6 7 8 PTZ ID 0 > 1 > 2 > 3 > 4 > 5 > 6 > 7 > Protocol None None None None None ... desired item, and select it to All CH Setting the PTZ To use Camera's PTZ functions, ID and protocols of PTZ settings appears. 5. A window of each channel. If set to , the channel is available for only 1 channel. • CH Name : Up to 15 characters including blanks ...

User Manual
Page 43
...Confirming Devices You can check information on storage devices. Check : Available to use - Using the mouse may help easy setup. 3. A window for selection of the storage device. • Usage: Sets the storage device's usage. - Use direction buttons to select a device to replace -...available are used /total capacity of device for servicing or additional HDD installation. Use the up /down buttons (▲▼) in window to move to use but recommended to be formatted. Select . Storage Device Device Format HDD Alarm Device No. Normal : Available ...
...Confirming Devices You can check information on storage devices. Check : Available to use - Using the mouse may help easy setup. 3. A window for selection of the storage device. • Usage: Sets the storage device's usage. - Use direction buttons to select a device to replace -...available are used /total capacity of device for servicing or additional HDD installation. Use the up /down buttons (▲▼) in window to move to use but recommended to be formatted. Select . Storage Device Device Format HDD Alarm Device No. Normal : Available ...

User Manual
Page 44
.... 7. OK Cancel - M status means that the HDD is done, press . 44_ using the DVR 6. Press on the "Manage" confirmation window will output through the alarm out port on the rear side when selected , , , and . Using the mouse may help easy setup. 3. Select . Storage Device... Alarm Device Select HDD 1 Manage Used/Total 12.28G/499.37G Formatting deletes all recordings. Use the up/down buttons (▲▼) in window to move to the specified alarm output port. • Replace Alarm Output Port : If HDD generates replace alarm, the alarm signal...
.... 7. OK Cancel - M status means that the HDD is done, press . 44_ using the DVR 6. Press on the "Manage" confirmation window will output through the alarm out port on the rear side when selected , , , and . Using the mouse may help easy setup. 3. Select . Storage Device... Alarm Device Select HDD 1 Manage Used/Total 12.28G/499.37G Formatting deletes all recordings. Use the up/down buttons (▲▼) in window to move to the specified alarm output port. • Replace Alarm Output Port : If HDD generates replace alarm, the alarm signal...
User Manual
Page 45
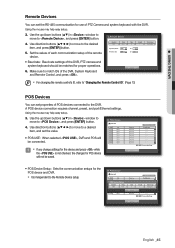
... RS-485 communication for use of the DVR, System Keyboard and Remote Control, and press . Use the up /down buttons (▲▼) in window to move to the desired item, and press [ENTER] button. 5. A POS device connection requires channel, preset, and port/Ethernet settings. Use ...the up /down buttons (▲▼) in window to move to a desired item, and set the value. • POS USE : When selected , DVR and POS will not be connected. POS Device ...
... RS-485 communication for use of the DVR, System Keyboard and Remote Control, and press . Use the up /down buttons (▲▼) in window to move to the desired item, and press [ENTER] button. 5. A POS device connection requires channel, preset, and port/Ethernet settings. Use ...the up /down buttons (▲▼) in window to move to a desired item, and set the value. • POS USE : When selected , DVR and POS will not be connected. POS Device ...

User Manual
Page 46
... channel VGA 800x600 HDMI 480p display on the monitor screen. • Multi CH SEQ Time : Sets the interval between automatic display switching in window to move to a desired Event Display OFF Display Date Multi CH SEQ Time 5 sec Time CH Name Icon item, and set its format ...DVR • CH : Select the camera to be synchronized to the POS device. If selected a channel input field, "Sync Channel Setup" window appears. One POS device and be synchronized up /down buttons (▲▼) in 4-split and 9-split mode of and . Setting the Monitor Using ...
... channel VGA 800x600 HDMI 480p display on the monitor screen. • Multi CH SEQ Time : Sets the interval between automatic display switching in window to move to a desired Event Display OFF Display Date Multi CH SEQ Time 5 sec Time CH Name Icon item, and set its format ...DVR • CH : Select the camera to be synchronized to the POS device. If selected a channel input field, "Sync Channel Setup" window appears. One POS device and be synchronized up /down buttons (▲▼) in 4-split and 9-split mode of and . Setting the Monitor Using ...
User Manual
Page 47
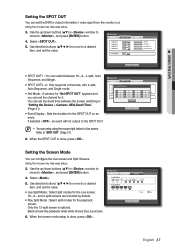
... buttons to move to output information / video apart from the monitor out. Live Play OK Cancel 6. Use the up /down buttons (▲▼) in window to move to a desired item, and set the value. You can set the dwell time between 16-, 9-, 4-split, Auto Sequence, and Single. •...; SPOT OUT2~4 : Only supports 4 channels, with 4-split, Auto Sequence, and Single mode. • Set Mode : A window for "Set SPOT OUT" appears and you can set the DVR to , and press [ENTER] button. 4. When the SPOT OUT is optional. Using the mouse...
... buttons to move to output information / video apart from the monitor out. Live Play OK Cancel 6. Use the up /down buttons (▲▼) in window to move to a desired item, and set the value. You can set the dwell time between 16-, 9-, 4-split, Auto Sequence, and Single. •...; SPOT OUT2~4 : Only supports 4 channels, with 4-split, Auto Sequence, and Single mode. • Set Mode : A window for "Set SPOT OUT" appears and you can set the DVR to , and press [ENTER] button. 4. When the SPOT OUT is optional. Using the mouse...

User Manual
Page 48
... Mon Apply to All CH Tue Wed Apply recording schedule to all channels? Recording Schedule Make your reservation on a date and time to All CH" window appears. Logout Exit 2. Record menu is done, press . Recording Schedule CH1 All 0 1 2 3 4 5 6 7 8 9 10 11 12 13 14 15 16 17 18 19 20 21 22.... Use the up/down buttons (▲▼) to move to select . using the DVR Record Recording Schedule Event Record Duration REC Quality & Resolution Record Option 4. A window of scheduled recording setup appears. 5.
... Mon Apply to All CH Tue Wed Apply recording schedule to all channels? Recording Schedule Make your reservation on a date and time to All CH" window appears. Logout Exit 2. Record menu is done, press . Recording Schedule CH1 All 0 1 2 3 4 5 6 7 8 9 10 11 12 13 14 15 16 17 18 19 20 21 22.... Use the up/down buttons (▲▼) to move to select . using the DVR Record Recording Schedule Event Record Duration REC Quality & Resolution Record Option 4. A window of scheduled recording setup appears. 5.