

User Manual (user Manual) (ver.1.0) (English)
Page 2
...Safety Precautions During Installation During Operating Others RoHS & WEEE Select Languages English Features Exterior System Requirements Features Installing DVD Writer and Connecting Cables Installing Drive Connecting Cables Installing Device Driver and Confirming The Installation Firmware Update Confirming the ...Installation of Device Driver Installing the MS-DOS device driver How To Use The DVD Writer How to Use the Drive How to Use DVD±R/RW and Other Discs MAGIC SPEED Deleting Utilities Troubleshooting Troubleshooting Caution: Possible Errors Product Specifications...
...Safety Precautions During Installation During Operating Others RoHS & WEEE Select Languages English Features Exterior System Requirements Features Installing DVD Writer and Connecting Cables Installing Drive Connecting Cables Installing Device Driver and Confirming The Installation Firmware Update Confirming the ...Installation of Device Driver Installing the MS-DOS device driver How To Use The DVD Writer How to Use the Drive How to Use DVD±R/RW and Other Discs MAGIC SPEED Deleting Utilities Troubleshooting Troubleshooting Caution: Possible Errors Product Specifications...

User Manual (user Manual) (ver.1.0) (English)
Page 8
Master/Slave Selection Port 2. Interface Port 4. Power Port DVD Writer 40-pin interface cable four screws to install the drive drive installation instruction sheets software programs (Software: Nero Express 6, In CD 4, Nero Vision Express, Nero ...
Master/Slave Selection Port 2. Interface Port 4. Power Port DVD Writer 40-pin interface cable four screws to install the drive drive installation instruction sheets software programs (Software: Nero Express 6, In CD 4, Nero Vision Express, Nero ...

User Manual (user Manual) (ver.1.0) (English)
Page 12
Purchase a pair if necessary. (SCREW : M3 X 6 X 4 ) 4. If necessary, attach the support devices on both sides of noise. Insert the DVD Writer after removing the plate as shown in the picture. Loosely tightened screws may cause malfunction. Be sure that the screws are PC accessories. The support devices are tightened securely in an increased level of the drive - Open the cover as below Be sure to use the screws (M3x6) provided with the product. - Select Languages English 3. 1. Using screws other than M3x6 may result in place. Turn the PC off. 2.
Purchase a pair if necessary. (SCREW : M3 X 6 X 4 ) 4. If necessary, attach the support devices on both sides of noise. Insert the DVD Writer after removing the plate as shown in the picture. Loosely tightened screws may cause malfunction. Be sure that the screws are PC accessories. The support devices are tightened securely in an increased level of the drive - Open the cover as below Be sure to use the screws (M3x6) provided with the product. - Select Languages English 3. 1. Using screws other than M3x6 may result in place. Turn the PC off. 2.
User Manual (user Manual) (ver.1.0) (English)
Page 13
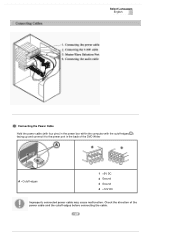
Check the direction of the DVD Writer A - Select Languages English Connecting the Power Cable Hold the power cable (with four pins) in the power box within the computer with the cutoff edges( ) facing up and connect it to the power port in the back of the power cable and the cutoff edges before connecting the cable. Cutoff edges 1 +5V DC 2 Ground 3 Ground 4 +12V DC Improperly connected power cable may cause malfunction.
Check the direction of the DVD Writer A - Select Languages English Connecting the Power Cable Hold the power cable (with four pins) in the power box within the computer with the cutoff edges( ) facing up and connect it to the power port in the back of the power cable and the cutoff edges before connecting the cable. Cutoff edges 1 +5V DC 2 Ground 3 Ground 4 +12V DC Improperly connected power cable may cause malfunction.

User Manual (user Manual) (ver.1.0) (English)
Page 14
a : Slave Drive (Select the SL jumper) b : HDD c : MotherBoard When you use one DVD Writer and the other ODD products: Set it to MA (Master) a : Master Drive (Select the MA jumper) c : Motherboard e : Secondary 1 b : HDD d : Primary 1 When you have one DVD Writer: Set it to MA (Master) / SL (Slave), Connecting E-IDE Cable When you use two E-IDE cables Set the jumper to SL (slave) in the Master/Slave port in the back of the DVD±R/RW Drive. When you have one E-IDE cable Set the jumper to MA (Master) in the Master/Slave port in the back of the DVD Writer.
a : Slave Drive (Select the SL jumper) b : HDD c : MotherBoard When you use one DVD Writer and the other ODD products: Set it to MA (Master) a : Master Drive (Select the MA jumper) c : Motherboard e : Secondary 1 b : HDD d : Primary 1 When you have one DVD Writer: Set it to MA (Master) / SL (Slave), Connecting E-IDE Cable When you use two E-IDE cables Set the jumper to SL (slave) in the Master/Slave port in the back of the DVD±R/RW Drive. When you have one E-IDE cable Set the jumper to MA (Master) in the Master/Slave port in the back of the DVD Writer.

User Manual (user Manual) (ver.1.0) (English)
Page 15
When you connect the jumper to MA (Master), the drive runs as the master, and when you can control the device using the host interface signal CSEL. (Connection to SL (Slave), the drive runs as the slave. When you connect it to CS (CSEL), you connect it to MA is recommended.) MA : Master SL : Slave CS : Cable Select(CSEL) a : Master Drive (Select the MA jumper) c : HDD e : Primary 1 b : Slave Drive (Select the SL jumper) d : Motherboard f : Secondary 1 Connecting the Jumper to the Master/Slave Port Connect the jumper to the slot in the back of the DVD Writer.
When you connect the jumper to MA (Master), the drive runs as the master, and when you can control the device using the host interface signal CSEL. (Connection to SL (Slave), the drive runs as the slave. When you connect it to CS (CSEL), you connect it to MA is recommended.) MA : Master SL : Slave CS : Cable Select(CSEL) a : Master Drive (Select the MA jumper) c : HDD e : Primary 1 b : Slave Drive (Select the SL jumper) d : Motherboard f : Secondary 1 Connecting the Jumper to the Master/Slave Port Connect the jumper to the slot in the back of the DVD Writer.

User Manual (user Manual) (ver.1.0) (English)
Page 16
For clearer sound, use the sound card. Digital output terminal is only available with the Sound card which support Digital output. Connecting the Digital output terminal. Connecting the Audio Cable (When Connected to the Sound Card) To listen to the sound from the drive in Analog mode, connect the audio output on the DVD Writer to the audio input of the sound card using Digital output terminal, recommend to buy & use a digital output terminal. For using an audio cable (4-pin).
For clearer sound, use the sound card. Digital output terminal is only available with the Sound card which support Digital output. Connecting the Digital output terminal. Connecting the Audio Cable (When Connected to the Sound Card) To listen to the sound from the drive in Analog mode, connect the audio output on the DVD Writer to the audio input of the sound card using Digital output terminal, recommend to buy & use a digital output terminal. For using an audio cable (4-pin).

User Manual (user Manual) (ver.1.0) (English)
Page 19
... the case of the CD which is provided with the DVD Writer to the C:\SAMSUNG directory. Make the C:\SAMSUNG directory. 2. Copy the files from the CD provided with the DVD Writer 1. Reboot the computer. Add the DEVICE=C:\SAMSUNG\SSCDROM.SYS \D:SSCD000 /UDMA entry. 4. Select Languages English...button or press the 'Enter' key. 4. Manual Setup 1. Insert the CD provided with the DVD Writer and open the 'Dos_driver' folder. 2. Edit the 'CONFIG.SYS' file. Reboot the computer. Add the C:\SAMSUNG\MSCDEX/D:SSCD000 entry. 5. Edit the 'AUTOEXEC.BAT' file. Run the CDSETUP.EXE file in the...
... the case of the CD which is provided with the DVD Writer to the C:\SAMSUNG directory. Make the C:\SAMSUNG directory. 2. Copy the files from the CD provided with the DVD Writer 1. Reboot the computer. Add the DEVICE=C:\SAMSUNG\SSCDROM.SYS \D:SSCD000 /UDMA entry. 4. Select Languages English...button or press the 'Enter' key. 4. Manual Setup 1. Insert the CD provided with the DVD Writer and open the 'Dos_driver' folder. 2. Edit the 'CONFIG.SYS' file. Reboot the computer. Add the C:\SAMSUNG\MSCDEX/D:SSCD000 entry. 5. Edit the 'AUTOEXEC.BAT' file. Run the CDSETUP.EXE file in the...
User Manual (user Manual) (ver.1.0) (English)
Page 20
... line. The drive cannot read the disc properly if any part of the disc is orange, do not turn the PC off or remove the DVD Writer as it may cause damage in the drive.
... line. The drive cannot read the disc properly if any part of the disc is orange, do not turn the PC off or remove the DVD Writer as it may cause damage in the drive.

User Manual (user Manual) (ver.1.0) (English)
Page 21
... localcode can be held responsible for the SH-S182D(TS-H652D) DVD Writer. Select Languages English The DVD Writer allows writing DVD RW discs using Nero Express and enables "packet writing" (high-speed recording) using Nero Express. If your dealer or local SAMSUNG representative if you wish tochange the local ...the motion picture industry releasesmovies. You can change the region code of the world inwhich they are being sold. The SH-S182D(TS-H652D) DVD Writer supports RPCphase II. Please contact your computer recognizes the [CD-ROM] icon designated to change the region code up ...
... localcode can be held responsible for the SH-S182D(TS-H652D) DVD Writer. Select Languages English The DVD Writer allows writing DVD RW discs using Nero Express and enables "packet writing" (high-speed recording) using Nero Express. If your dealer or local SAMSUNG representative if you wish tochange the local ...the motion picture industry releasesmovies. You can change the region code of the world inwhich they are being sold. The SH-S182D(TS-H652D) DVD Writer supports RPCphase II. Please contact your computer recognizes the [CD-ROM] icon designated to change the region code up ...

User Manual (user Manual) (ver.1.0) (English)
Page 29
... system first . (The Windows operating system may occur if you write a large number of smallsized files. If discs from 32X disc s . Samsung' s Standards for Write Speed Restriction Standards 1 Write speed is often impossible to respond to Start Settings Control Panel System Hardware Device Manger CD- ...ID with different properties available under the same ID. Use a regulation-length (46cm) or shorter E-IDE cable. Select Languages English DVD Writers record data on your hard disc , as low-speed An error may occur if another drive connected to eliminate the following settings ...
... system first . (The Windows operating system may occur if you write a large number of smallsized files. If discs from 32X disc s . Samsung' s Standards for Write Speed Restriction Standards 1 Write speed is often impossible to respond to Start Settings Control Panel System Hardware Device Manger CD- ...ID with different properties available under the same ID. Use a regulation-length (46cm) or shorter E-IDE cable. Select Languages English DVD Writers record data on your hard disc , as low-speed An error may occur if another drive connected to eliminate the following settings ...

User Manual (user Manual) (ver.1.0) (English)
Page 31
... of disk identification error message, thoroughly clean the surface of printed images. Select Languages English Category SH-S182D(TS-H652D) DVD Writer DVD : DVD-R, DVD-RW, DVD+R, DVD+RW, DVD-ROM, DVD-Video, DVD+R (Dual), DVD-R (Dual), DVD-RAM DISC Usable Discs CD : CD-ROM, CD-R, CD-RW, CD-DA, CD+E(G) CD...80%(RH) Size(Width x Height x Length) 5.34 X 1.65 X 7.24 Inch (148.2 X 42 X 184mm) Weight 760g Note Does not support DVD-R for a class B digital device. For more information on the condition of the disc and the recording format of a two-sided disc simultaneously. The quality...
... of disk identification error message, thoroughly clean the surface of printed images. Select Languages English Category SH-S182D(TS-H652D) DVD Writer DVD : DVD-R, DVD-RW, DVD+R, DVD+RW, DVD-ROM, DVD-Video, DVD+R (Dual), DVD-R (Dual), DVD-RAM DISC Usable Discs CD : CD-ROM, CD-R, CD-RW, CD-DA, CD+E(G) CD...80%(RH) Size(Width x Height x Length) 5.34 X 1.65 X 7.24 Inch (148.2 X 42 X 184mm) Weight 760g Note Does not support DVD-R for a class B digital device. For more information on the condition of the disc and the recording format of a two-sided disc simultaneously. The quality...

User Manual (user Manual) (ver.1.0) (English)
Page 2
...Safety Precautions During Installation During Operating Others RoHS & WEEE Select Languages English Features Exterior System Requirements Features Installing DVD Writer and Connecting Cables Installing Drive Connecting Cables Installing Device Driver and Confirming The Installation Firmware Update Confirming the ...Installation of Device Driver Installing the MS-DOS device driver How To Use The DVD Writer How to Use the Drive How to Use DVD±R/RW and Other Discs MAGIC SPEED Deleting Utilities Troubleshooting Troubleshooting Caution: Possible Errors Product Specifications...
...Safety Precautions During Installation During Operating Others RoHS & WEEE Select Languages English Features Exterior System Requirements Features Installing DVD Writer and Connecting Cables Installing Drive Connecting Cables Installing Device Driver and Confirming The Installation Firmware Update Confirming the ...Installation of Device Driver Installing the MS-DOS device driver How To Use The DVD Writer How to Use the Drive How to Use DVD±R/RW and Other Discs MAGIC SPEED Deleting Utilities Troubleshooting Troubleshooting Caution: Possible Errors Product Specifications...

User Manual (user Manual) (ver.1.0) (English)
Page 8
Emergency Hole 3. Power Port DVD Writer 40-pin interface cable four screws to install the drive drive installation instruction sheets software programs (Software: Nero Express 6, In CD 4, Nero Vision Express, Nero ...
Emergency Hole 3. Power Port DVD Writer 40-pin interface cable four screws to install the drive drive installation instruction sheets software programs (Software: Nero Express 6, In CD 4, Nero Vision Express, Nero ...

User Manual (user Manual) (ver.1.0) (English)
Page 12
Open the cover as below Be sure to use the screws (M3x6) provided with the product. - Insert the DVD Writer after removing the plate as shown in the picture. If necessary, attach the support devices on both sides of noise. Loosely tightened screws may cause malfunction. The support devices are tightened securely in an increased level of the drive - Select Languages English 3. Using screws other than M3x6 may result in place. Turn the PC off. 2. Be sure that the screws are PC accessories. Purchase a pair if necessary. (SCREW : M3 X 6 X 4 ) 4. 1.
Open the cover as below Be sure to use the screws (M3x6) provided with the product. - Insert the DVD Writer after removing the plate as shown in the picture. If necessary, attach the support devices on both sides of noise. Loosely tightened screws may cause malfunction. The support devices are tightened securely in an increased level of the drive - Select Languages English 3. Using screws other than M3x6 may result in place. Turn the PC off. 2. Be sure that the screws are PC accessories. Purchase a pair if necessary. (SCREW : M3 X 6 X 4 ) 4. 1.

User Manual (user Manual) (ver.1.0) (English)
Page 13
Cutoff edges 1 +5V DC 2 Ground 3 Ground 4 +12V DC Improperly connected power cable may cause malfunction. Select Languages English Connecting the Power Cable Hold the power cable (with four pins) in the power box within the computer with the cutoff edges( ) facing up and connect it to the power port in the back of the power cable and the cutoff edges before connecting the cable. Check the direction of the DVD Writer A -
Cutoff edges 1 +5V DC 2 Ground 3 Ground 4 +12V DC Improperly connected power cable may cause malfunction. Select Languages English Connecting the Power Cable Hold the power cable (with four pins) in the power box within the computer with the cutoff edges( ) facing up and connect it to the power port in the back of the power cable and the cutoff edges before connecting the cable. Check the direction of the DVD Writer A -

User Manual (user Manual) (ver.1.0) (English)
Page 14
When you have one DVD Writer: Set it to SL (slave) in the Master/Slave port in the back of the DVD Writer a : Slave Drive (Select the SL jumper) b : HDD c : MotherBoard When you have one E-IDE cable Set the jumper to MA (Master) / SL (Slave), Connecting E-IDE Cable When you use one DVD Writer and the other ODD products: Set it to MA (Master) a : Master Drive (Select the MA jumper) c : Motherboard e : Secondary 1 b : HDD d : Primary 1 When you use two E-IDE cables Set the jumper to MA (Master) in the Master/Slave port in the back of the DVD Writer.
When you have one DVD Writer: Set it to SL (slave) in the Master/Slave port in the back of the DVD Writer a : Slave Drive (Select the SL jumper) b : HDD c : MotherBoard When you have one E-IDE cable Set the jumper to MA (Master) / SL (Slave), Connecting E-IDE Cable When you use one DVD Writer and the other ODD products: Set it to MA (Master) a : Master Drive (Select the MA jumper) c : Motherboard e : Secondary 1 b : HDD d : Primary 1 When you use two E-IDE cables Set the jumper to MA (Master) in the Master/Slave port in the back of the DVD Writer.

User Manual (user Manual) (ver.1.0) (English)
Page 15
a : Master Drive (Select the MA jumper) c : HDD e : Primary 1 b : Slave Drive (Select the SL jumper) d : Motherboard f : Secondary 1 Connecting the Jumper to the Master/Slave Port Connect the jumper to MA is recommended.) MA : Master SL : Slave CS : Cable Select(CSEL) When you connect it to CS (CSEL), you connect it to SL (Slave), the drive runs as the slave. When you connect the jumper to MA (Master), the drive runs as the master, and when you can control the device using the host interface signal CSEL. (Connection to the slot in the back of the DVD Writer.
a : Master Drive (Select the MA jumper) c : HDD e : Primary 1 b : Slave Drive (Select the SL jumper) d : Motherboard f : Secondary 1 Connecting the Jumper to the Master/Slave Port Connect the jumper to MA is recommended.) MA : Master SL : Slave CS : Cable Select(CSEL) When you connect it to CS (CSEL), you connect it to SL (Slave), the drive runs as the slave. When you connect the jumper to MA (Master), the drive runs as the master, and when you can control the device using the host interface signal CSEL. (Connection to the slot in the back of the DVD Writer.

User Manual (user Manual) (ver.1.0) (English)
Page 16
Connecting the Audio Cable (When Connected to the Sound Card) To listen to the sound from the drive in Analog mode, connect the audio output on the DVD Writer to buy & use a digital output terminal. Connecting the Digital output terminal. For clearer sound, use the sound card. For using Digital output terminal, recommend to the audio input of the sound card using an audio cable (4-pin). Digital output terminal is only available with the Sound card which support Digital output.
Connecting the Audio Cable (When Connected to the Sound Card) To listen to the sound from the drive in Analog mode, connect the audio output on the DVD Writer to buy & use a digital output terminal. Connecting the Digital output terminal. For clearer sound, use the sound card. For using Digital output terminal, recommend to the audio input of the sound card using an audio cable (4-pin). Digital output terminal is only available with the Sound card which support Digital output.

User Manual (user Manual) (ver.1.0) (English)
Page 19
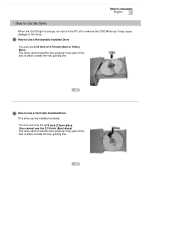
...) discs. The drive cannot read the disc properly if any part of the disc is orange, do not turn the PC off or remove the DVD Writer as it may cause damage in the drive. Select Languages English When the On/Off light is place outside the tray guiding line.
...) discs. The drive cannot read the disc properly if any part of the disc is orange, do not turn the PC off or remove the DVD Writer as it may cause damage in the drive. Select Languages English When the On/Off light is place outside the tray guiding line.


