
User Manual (ENGLISH)
Page 1
UCGB4_WB_i607_ATT_032007_F6 SGH-i607 Smart Device User Guide Please read this manual before operating your phone, and keep it for future reference.
UCGB4_WB_i607_ATT_032007_F6 SGH-i607 Smart Device User Guide Please read this manual before operating your phone, and keep it for future reference.

User Manual (ENGLISH)
Page 2
... Intellectual Property, as defined below, owned by the Intellectual Property. Samsung Telecommunications America (STA), LLC Headquarters: 1301 E. Plano, TX 75074 Toll Free Tel: 1.888.987.HELP (4357) Internet Address: http://www.samsungusa.com ©2007 Samsung Telecommunications America, LLC is a registered trademark of Samsung or its related entities. Do you will not (and will...
... Intellectual Property, as defined below, owned by the Intellectual Property. Samsung Telecommunications America (STA), LLC Headquarters: 1301 E. Plano, TX 75074 Toll Free Tel: 1.888.987.HELP (4357) Internet Address: http://www.samsungusa.com ©2007 Samsung Telecommunications America, LLC is a registered trademark of Samsung or its related entities. Do you will not (and will...

User Manual (ENGLISH)
Page 3
... LAW, RULE, SPECIFICATION OR CONTRACT PERTAINING THERETO. UCGB4_WB_i607_ATT_032007_F6 THE DESIGN, CONDITION OR QUALITY OF THE PRODUCT; THE PERFORMANCE OF THE PRODUCT; OR USE; IN ADDITION, SAMSUNG SHALL NOT BE LIABLE FOR ANY DAMAGES OF ANY KIND RESULTING FROM THE PURCHASE OR USE OF THE PRODUCT OR ARISING FROM THE BREACH OF...
... LAW, RULE, SPECIFICATION OR CONTRACT PERTAINING THERETO. UCGB4_WB_i607_ATT_032007_F6 THE DESIGN, CONDITION OR QUALITY OF THE PRODUCT; THE PERFORMANCE OF THE PRODUCT; OR USE; IN ADDITION, SAMSUNG SHALL NOT BE LIABLE FOR ANY DAMAGES OF ANY KIND RESULTING FROM THE PURCHASE OR USE OF THE PRODUCT OR ARISING FROM THE BREACH OF...

User Manual (ENGLISH)
Page 4
Table of Contents Section 1: Getting Started 7 Activating Your Phone ...7 Powering On or Off the Phone 14 The Home Screen ...14 Section 2: Understanding Your Phone 17 Basics ...18 Front View of Your Phone ...18 Rear View of Your Phone ...21 Display Layout ...24 Customizing the Home Screen 27 Start menu screen ...28 Entering text ...29 Customizing Your Phone ...30 Power Settings ...32 Security Settings ...35 Using an Optional microSD Memory Card 40 Resetting your Phone ...44 Using Online Help ...45 Section 3: Synchronization 47 Installing Microsoft® ActiveSync 48 Customizing ...
Table of Contents Section 1: Getting Started 7 Activating Your Phone ...7 Powering On or Off the Phone 14 The Home Screen ...14 Section 2: Understanding Your Phone 17 Basics ...18 Front View of Your Phone ...18 Rear View of Your Phone ...21 Display Layout ...24 Customizing the Home Screen 27 Start menu screen ...28 Entering text ...29 Customizing Your Phone ...30 Power Settings ...32 Security Settings ...35 Using an Optional microSD Memory Card 40 Resetting your Phone ...44 Using Online Help ...45 Section 3: Synchronization 47 Installing Microsoft® ActiveSync 48 Customizing ...

User Manual (ENGLISH)
Page 5
Section 7: My Stuff 83 My Pictures ...84 My Videos ...85 Notes ...86 My Documents ...86 My Device ...88 Storage Card ...89 Section 8: AT&T Music 91 Windows Media Player® ...92 Shop Music ...98 MusicID ...99 Streaming Music ...101 Music Videos ...101 The Buzz ...103 Music Community ...104 Music Apps ...104 Section 9: Cellular Video 105 Media Clip Options ...106 Using the Video Categories ...109 Customizing Cellular Video ...110 My Purchases ...111 Parental Controls ...112 Section 8: AT&T Mall 115 Shop Tones ...115 Shop Games ...116 Shop Graphics ...117 Shop Multimedia ...117 Shop ...
Section 7: My Stuff 83 My Pictures ...84 My Videos ...85 Notes ...86 My Documents ...86 My Device ...88 Storage Card ...89 Section 8: AT&T Music 91 Windows Media Player® ...92 Shop Music ...98 MusicID ...99 Streaming Music ...101 Music Videos ...101 The Buzz ...103 Music Community ...104 Music Apps ...104 Section 9: Cellular Video 105 Media Clip Options ...106 Using the Video Categories ...109 Customizing Cellular Video ...110 My Purchases ...111 Parental Controls ...112 Section 8: AT&T Mall 115 Shop Tones ...115 Shop Games ...116 Shop Graphics ...117 Shop Multimedia ...117 Shop ...
User Manual (ENGLISH)
Page 6
... Problems ...182 Call Problems ...186 Power and Charging Problems 188 Program Problems ...190 Section 18: Health and Safety Information 196 Health and Safety Information 196 Samsung Mobile Products and Recycling 197 UL Certified Travel Adapter ...198 Consumer Information on Wireless Phones 198 Road Safety ...204 Operating Environment ...206 Using Your Phone...
... Problems ...182 Call Problems ...186 Power and Charging Problems 188 Program Problems ...190 Section 18: Health and Safety Information 196 Health and Safety Information 196 Samsung Mobile Products and Recycling 197 UL Certified Travel Adapter ...198 Consumer Information on Wireless Phones 198 Road Safety ...204 Operating Environment ...206 Using Your Phone...

User Manual (ENGLISH)
Page 7
Section 1: Getting Started Topics Covered • Activating Your Phone • Powering On or Off the Phone • The Home Screen Activating Your Phone This section describes how to a cellular network, a plug-in Subscriber Identity Module (SIM) card is provided loaded with your subscription details, such as your PIN and other optional services. If necessary, power-off the phone by activating your phone, inserting your handset) until the power-off image displays. Removing the Battery 1. Section 1: Getting Started 7 Activating Your Phone When you subscribe to start using your ...
Section 1: Getting Started Topics Covered • Activating Your Phone • Powering On or Off the Phone • The Home Screen Activating Your Phone This section describes how to a cellular network, a plug-in Subscriber Identity Module (SIM) card is provided loaded with your subscription details, such as your PIN and other optional services. If necessary, power-off the phone by activating your phone, inserting your handset) until the power-off image displays. Removing the Battery 1. Section 1: Getting Started 7 Activating Your Phone When you subscribe to start using your ...

User Manual (ENGLISH)
Page 8
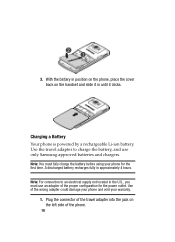
Use caution when inserting or removing the card and keep all SIM cards out of reach of the phone. Installing the SIM Card Important! The plug-in SIM card and its contacts can be easily damaged by pressing the battery lock down and slide the battery cover away, as shown. 3. Lift the battery from the bottom up and out of children. Make sure the gold contacts of the card face into the phone, then slide the SIM card into the socket. 8 Remove the battery cover by scratches or bending. 2.
Use caution when inserting or removing the card and keep all SIM cards out of reach of the phone. Installing the SIM Card Important! The plug-in SIM card and its contacts can be easily damaged by pressing the battery lock down and slide the battery cover away, as shown. 3. Lift the battery from the bottom up and out of children. Make sure the gold contacts of the card face into the phone, then slide the SIM card into the socket. 8 Remove the battery cover by scratches or bending. 2.

User Manual (ENGLISH)
Page 9
Section 1: Getting Started 9 Press the battery down until it away from socket. Align the battery tabs with the slots at the bottom of the phone. 2. Make sure that the battery is properly installed before switching on the phone. See the following illustration. Activating Your Phone Removing the SIM Card To remove the SIM card, slide it clicks into place. Installing the Battery 1.
Section 1: Getting Started 9 Press the battery down until it away from socket. Align the battery tabs with the slots at the bottom of the phone. 2. Make sure that the battery is properly installed before switching on the phone. See the following illustration. Activating Your Phone Removing the SIM Card To remove the SIM card, slide it clicks into place. Installing the Battery 1.
User Manual (ENGLISH)
Page 10
... on the left side of the wrong adapter could damage your phone and void your phone for the power outlet. 3. Note: You must use only Samsung approved batteries and chargers. Note: For connection to charge the battery, and use an adapter of the proper configuration for the first time. Charging a Battery...
... on the left side of the wrong adapter could damage your phone and void your phone for the power outlet. 3. Note: You must use only Samsung approved batteries and chargers. Note: For connection to charge the battery, and use an adapter of the proper configuration for the first time. Charging a Battery...

User Manual (ENGLISH)
Page 11
Activating Your Phone Note: The following illustration shows the correct and incorrect method for a correct connection. Plug the adapter into a standard AC wall outlet. When charging is not, damage to the handset for connecting the charger. Section 1: Getting Started 11 If it is finished, unplug the adapter from the power outlet. Verify the arrow on the adapter is showing and pointing to the accessory port will occur therefore voiding the phones warranty. 2.
Activating Your Phone Note: The following illustration shows the correct and incorrect method for a correct connection. Plug the adapter into a standard AC wall outlet. When charging is not, damage to the handset for connecting the charger. Section 1: Getting Started 11 If it is finished, unplug the adapter from the power outlet. Verify the arrow on the adapter is showing and pointing to the accessory port will occur therefore voiding the phones warranty. 2.

User Manual (ENGLISH)
Page 12
The backlight turns off . 12 Note: You must unplug the adapter before removing the battery from the phone during charging to conserve the remaining battery power. Low Battery Indicator When the battery is weak and only a few minutes of talk time remain, a warning tone sounds and the "Main Battery very low" message repeats at regular intervals on the display and the battery icon displays. When the battery level becomes too low, the phone automatically turns off to avoid damage.
The backlight turns off . 12 Note: You must unplug the adapter before removing the battery from the phone during charging to conserve the remaining battery power. Low Battery Indicator When the battery is weak and only a few minutes of talk time remain, a warning tone sounds and the "Main Battery very low" message repeats at regular intervals on the display and the battery icon displays. When the battery level becomes too low, the phone automatically turns off to avoid damage.
User Manual (ENGLISH)
Page 13
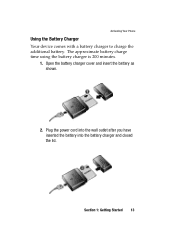
Plug the power cord into the wall outlet after you have inserted the battery into the battery charger and closed the lid. The approximate battery charge time using the battery charger is 200 minutes. 1. Activating Your Phone Using the Battery Charger Your device comes with a battery charger to charge the additional battery. Open the battery charger cover and insert the battery as shown. 2. Section 1: Getting Started 13
Plug the power cord into the wall outlet after you have inserted the battery into the battery charger and closed the lid. The approximate battery charge time using the battery charger is 200 minutes. 1. Activating Your Phone Using the Battery Charger Your device comes with a battery charger to charge the additional battery. Open the battery charger cover and insert the battery as shown. 2. Section 1: Getting Started 13
User Manual (ENGLISH)
Page 14
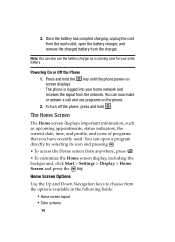
You can open the battery charger, and remove the charged battery from anywhere, press . • To customize the Home screen display, including the background, click Start > Settings > Display > Home Screen and press the key. 3. Once the battery has compled charging, unplug the cord from the wall outlet, open a program directly by selecting its icon and pressing . • To access the Home screen from the charger. Press and hold . Home Screen Options Use the Up and Down Navigation keys to choose from the network. Note: You can now make or answer a call and use the battery charger ...
You can open the battery charger, and remove the charged battery from anywhere, press . • To customize the Home screen display, including the background, click Start > Settings > Display > Home Screen and press the key. 3. Once the battery has compled charging, unplug the cord from the wall outlet, open a program directly by selecting its icon and pressing . • To access the Home screen from the charger. Press and hold . Home Screen Options Use the Up and Down Navigation keys to choose from the network. Note: You can now make or answer a call and use the battery charger ...

User Manual (ENGLISH)
Page 15
The Home Screen • Background image • Time out Start Menu Style Use the Left and Right Navigation keys to choose from the Grid or List display options. Dialer Use the Left and Right Navigation keys to choose from the MS default and Samsung dialer style display options. Section 1: Getting Started 15
The Home Screen • Background image • Time out Start Menu Style Use the Left and Right Navigation keys to choose from the Grid or List display options. Dialer Use the Left and Right Navigation keys to choose from the MS default and Samsung dialer style display options. Section 1: Getting Started 15

User Manual (ENGLISH)
Page 17
It also displays the screen and the icons that will are displayed when the phone is in use. Section 2: Understanding Your Phone 17 Section 2: Understanding Your Phone Topics Covered • Basics • Front View of Your Phone • Rear View of Your Phone • Display Layout • Customizing the Home Screen • Start menu screen • Entering text • Customizing Your Phone • Power Settings • Inserting the microSD memory card This section outlines some key features of your phone.
It also displays the screen and the icons that will are displayed when the phone is in use. Section 2: Understanding Your Phone 17 Section 2: Understanding Your Phone Topics Covered • Basics • Front View of Your Phone • Rear View of Your Phone • Display Layout • Customizing the Home Screen • Start menu screen • Entering text • Customizing Your Phone • Power Settings • Inserting the microSD memory card This section outlines some key features of your phone.

User Manual (ENGLISH)
Page 18
You can also access this screen by pressing from any program. Front View of Your Phone The following illustrations show the main elements of your phone, the Home screen, the phone's idle screen, appears. You can also quickly switch to the programs you recently accessed. On the Home screen, you turn on your phone: 18 Home Screen When you can view important information for the day or messages at a glance. Basics This chapter explains basic information about using your phone, such as customizing your phone and using online help.
You can also access this screen by pressing from any program. Front View of Your Phone The following illustrations show the main elements of your phone, the Home screen, the phone's idle screen, appears. You can also quickly switch to the programs you recently accessed. On the Home screen, you turn on your phone: 18 Home Screen When you can view important information for the day or messages at a glance. Basics This chapter explains basic information about using your phone, such as customizing your phone and using online help.

User Manual (ENGLISH)
Page 19
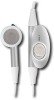
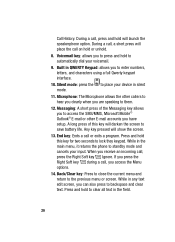
... and hold to plug in profile mode or adjust the voice volume during an incoming call . When the device is on the display screen. 6. Headset/Power adapter jack/USB or data cable: Allows you to the bottom left line on , a short press displays the Quick List screen. 2. A... Soft key (LSK): Allows you to adjust the ringer volume in the travel adapter (power), PC connection cable (data transfer), and optional headset for safe, convenient, hands-free conversations. 4. Power ON/OFF Button/Quick List key: Press and hold the up or down volume key. Volume keys: Adjusts the earpiece ...
... and hold to plug in profile mode or adjust the voice volume during an incoming call . When the device is on the display screen. 6. Headset/Power adapter jack/USB or data cable: Allows you to the bottom left line on , a short press displays the Quick List screen. 2. A... Soft key (LSK): Allows you to adjust the ringer volume in the travel adapter (power), PC connection cable (data transfer), and optional headset for safe, convenient, hands-free conversations. 4. Power ON/OFF Button/Quick List key: Press and hold the up or down volume key. Volume keys: Adjusts the earpiece ...
User Manual (ENGLISH)
Page 20
During a call, press and hold will show the screen. 13. Press and hold to clear all text in the field. 20 While in silent mode. 11. Silent mode: press the to place your device in any text edit screen, you can also press to press and hold or unhold. 8. Any key pressed will launch the speakerphone option. Call History. Voicemail key: allows you to save battery life. While in QWERTY Keypad: allows you to backspace and clear text. During a call , press the Right Soft key Ignore. Microphone: The Microphone allows the other callers to hear you clearly when you are ...
During a call, press and hold will show the screen. 13. Press and hold to clear all text in the field. 20 While in silent mode. 11. Silent mode: press the to place your device in any text edit screen, you can also press to press and hold or unhold. 8. Any key pressed will launch the speakerphone option. Call History. Voicemail key: allows you to save battery life. While in QWERTY Keypad: allows you to backspace and clear text. During a call , press the Right Soft key Ignore. Microphone: The Microphone allows the other callers to hear you clearly when you are ...

User Manual (ENGLISH)
Page 21
Rear View of Your Phone 15. Section 2: Understanding Your Phone 21 Right Soft key (RSK): allows you to select softkey actions or menu items corresponding to the bottom right line on the display screen. 16. 4-Way Navigation keys: This key allows you to scroll through phone menu options and provides a shortcut to the rear view illustration. 1. microSD™ card slot: Your phone has an external memory port for a microSD card. Display: This screen displays all the information needed to audio from standby mode. 17. Earpiece: Used to listen to operate your phone. Rear View of Your...
Rear View of Your Phone 15. Section 2: Understanding Your Phone 21 Right Soft key (RSK): allows you to select softkey actions or menu items corresponding to the bottom right line on the display screen. 16. 4-Way Navigation keys: This key allows you to scroll through phone menu options and provides a shortcut to the rear view illustration. 1. microSD™ card slot: Your phone has an external memory port for a microSD card. Display: This screen displays all the information needed to audio from standby mode. 17. Earpiece: Used to listen to operate your phone. Rear View of Your...
