User Manual
Page 2
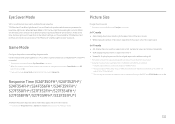
...Removing the Stand (S24F356FH*/S27F358FW*) 22 Connecting and Using a Source Device Pre-connection Checkpoints 23 Connecting and Using a PC 23 Connection Using the D-SUB Cable (Analog Type) 23 Connection Using the HDMI or HDMI-DVI Cable 24 Connection Using an DP Cable 24 Connecting the Power 25 Correct posture to use the product 26 Driver Installation 26 Setting Optimum Resolution 26 Screen Setup SAMSUNG MAGIC Bright 27 Brightness 28 Contrast 28 Sharpness 28 Color 28 SAMSUNG MAGIC Angle (S22F350FH*/ S22F352FH*/S22F354FH*) 29 SAMSUNG MAGIC Upscale 29 HDMI Black...
...Removing the Stand (S24F356FH*/S27F358FW*) 22 Connecting and Using a Source Device Pre-connection Checkpoints 23 Connecting and Using a PC 23 Connection Using the D-SUB Cable (Analog Type) 23 Connection Using the HDMI or HDMI-DVI Cable 24 Connection Using an DP Cable 24 Connecting the Power 25 Correct posture to use the product 26 Driver Installation 26 Setting Optimum Resolution 26 Screen Setup SAMSUNG MAGIC Bright 27 Brightness 28 Contrast 28 Sharpness 28 Color 28 SAMSUNG MAGIC Angle (S22F350FH*/ S22F352FH*/S22F354FH*) 29 SAMSUNG MAGIC Upscale 29 HDMI Black...

User Manual
Page 3
...*/S27F359FH*) 33 Eco Saving Plus 35 Off Timer 35 PC/AV Mode 35 Source Detection 35 Key Repeat Time 35 Power LED On 36 Reset All 36 Information 36 Installing the Software Easy Setting Box 37 Troubleshooting Guide Requirements Before Contacting Samsung Customer Service Center 38 Testing the Product 38 Checking the Resolution and Frequency 38 Check the following. 38 Q & A 40 Specifications General 41 Standard Signal Mode Table 42 Appendix...
...*/S27F359FH*) 33 Eco Saving Plus 35 Off Timer 35 PC/AV Mode 35 Source Detection 35 Key Repeat Time 35 Power LED On 36 Reset All 36 Information 36 Installing the Software Easy Setting Box 37 Troubleshooting Guide Requirements Before Contacting Samsung Customer Service Center 38 Testing the Product 38 Checking the Resolution and Frequency 38 Check the following. 38 Q & A 40 Specifications General 41 Standard Signal Mode Table 42 Appendix...
User Manual
Page 4
... OF ELECTRIC SHOCK, DO NOT REMOVE COVER. (OR BACK) THERE ARE NO USER SERVICEABLE PARTS INSIDE. Personal injury or damage to properties may differ depending on the surface if an ultrasonic wave humidifier is used nearby. ――Contact your nearest Samsung Customer Service Center if you that high voltage is dangerous to clean the inside . It is present...
... OF ELECTRIC SHOCK, DO NOT REMOVE COVER. (OR BACK) THERE ARE NO USER SERVICEABLE PARTS INSIDE. Personal injury or damage to properties may differ depending on the surface if an ultrasonic wave humidifier is used nearby. ――Contact your nearest Samsung Customer Service Center if you that high voltage is dangerous to clean the inside . It is present...
User Manual
Page 5
...; Keep the power socket where the power cord is being used. •• Only use the power cord provided with your product by the plug and do not touch the cable with force. Do not use multiple products with a single power socket. •• Do not touch the power plug with wet hands. •• Insert the power plug all the way in water and wring thoroughly to clean...
...; Keep the power socket where the power cord is being used. •• Only use the power cord provided with your product by the plug and do not touch the cable with force. Do not use multiple products with a single power socket. •• Do not touch the power plug with wet hands. •• Insert the power plug all the way in water and wring thoroughly to clean...
User Manual
Page 6
...wall to allow ventilation. •• Keep the plastic packaging out of the reach of time) may seriously affect its performance. ‒‒ Be sure to consult Samsung Customer Service Center if you want to install the product at least 10 cm away from oil pollution. And do not install or use...set down the product on its front. •• When installing the product on a cabinet or shelf, make ...Installation Warning •• DO NOT PLACE CANDLES, INSECT REPELLANTS OR CIGARETTES ON TOP OF THE PRODUCT. DO NOT INSTALL THE PRODUCT NEAR HEAT SOURCES. •• Do not install...
...wall to allow ventilation. •• Keep the plastic packaging out of the reach of time) may seriously affect its performance. ‒‒ Be sure to consult Samsung Customer Service Center if you want to install the product at least 10 cm away from oil pollution. And do not install or use...set down the product on its front. •• When installing the product on a cabinet or shelf, make ...Installation Warning •• DO NOT PLACE CANDLES, INSECT REPELLANTS OR CIGARETTES ON TOP OF THE PRODUCT. DO NOT INSTALL THE PRODUCT NEAR HEAT SOURCES. •• Do not install...
User Manual
Page 7
... use or keep combustible spray or an inflammable substance near the product. •• Ensure the vents are not blocked by pulling the power cord or any cable. •• If a gas leakage is found, do not touch the product or power plug. Operation Warning •• There is damaged, turn off the power and disconnect the power cord. Then contact Samsung Customer Service...
... use or keep combustible spray or an inflammable substance near the product. •• Ensure the vents are not blocked by pulling the power cord or any cable. •• If a gas leakage is found, do not touch the product or power plug. Operation Warning •• There is damaged, turn off the power and disconnect the power cord. Then contact Samsung Customer Service...
User Manual
Page 8
... to malfunction. Caution •• Leaving the screen fixed on a stationary image for an extended period of time may cause afterimage burn-in or defective pixels. ‒‒ Activate power-saving mode or a moving-picture screen saver if you will become damaged or cause an injury. •• Looking at the recommended resolution and frequency. ‒‒ Your eyesight may result. 8
... to malfunction. Caution •• Leaving the screen fixed on a stationary image for an extended period of time may cause afterimage burn-in or defective pixels. ‒‒ Activate power-saving mode or a moving-picture screen saver if you will become damaged or cause an injury. •• Looking at the recommended resolution and frequency. ‒‒ Your eyesight may result. 8

User Manual
Page 11
... OSD control is enable. •• Picture MSAMASGUNICGBright, Brightness, Color, Game Mode •• System Eco Saving Plus Selects to change the input signal by moving the JOG button in the function key guide screen. ――Actual models because of your Monitor's feature appears. OSD control lock: Maintain the current settings, or lock the OSD control to prevent unintended changes to display the Function Key Guide. Selects by pressing the JOG button again. The OSD (On Screen Display...
... OSD control is enable. •• Picture MSAMASGUNICGBright, Brightness, Color, Game Mode •• System Eco Saving Plus Selects to change the input signal by moving the JOG button in the function key guide screen. ――Actual models because of your Monitor's feature appears. OSD control lock: Maintain the current settings, or lock the OSD control to prevent unintended changes to display the Function Key Guide. Selects by pressing the JOG button again. The OSD (On Screen Display...
User Manual
Page 12
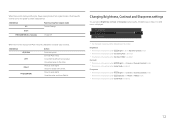
... Move the option Exit the Main menu. Changing Brightness, Contrast and Sharpness settings You can adjust Brightness, Contrast or Sharpness by moving the JOG button up or down, if no OSD menu is enabled. 12 Sharpness Brightness 100 Contrast ――The displayed image may differ depending on the model. JOG Button UP Power saving/Non-signal mode Source Change Down PRESS(ENTER) for control source and power could be used as below . Sharpness ――This...
... Move the option Exit the Main menu. Changing Brightness, Contrast and Sharpness settings You can adjust Brightness, Contrast or Sharpness by moving the JOG button up or down, if no OSD menu is enabled. 12 Sharpness Brightness 100 Contrast ――The displayed image may differ depending on the model. JOG Button UP Power saving/Non-signal mode Source Change Down PRESS(ENTER) for control source and power could be used as below . Sharpness ――This...
User Manual
Page 13
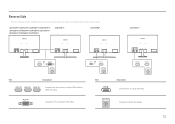
Connects to a PC using an HDMI cable or HDMI-DVI cable. S22F350FH*/S22F352FH*/S22F354FH*/S24F350FH*/ S24F352FH*/S24F354FH*/S24F359FH*/S27F350FH*/ S27F352FH*/S27F354FH*/S27F359FH* S24F356FH* S27F358FW* S32F351FU* Port Description Port Description Connects to the AC/DC adapter. 13 Specifications are subject to change without notice to a PC using the D-SUB cable. Connect to improve quality. Connects to a source device using a DP cable. Reverse Side ――The color and shape of parts may differ from what is shown.
Connects to a PC using an HDMI cable or HDMI-DVI cable. S22F350FH*/S22F352FH*/S22F354FH*/S24F350FH*/ S24F352FH*/S24F354FH*/S24F359FH*/S27F350FH*/ S27F352FH*/S27F354FH*/S27F359FH* S24F356FH* S27F358FW* S32F351FU* Port Description Port Description Connects to the AC/DC adapter. 13 Specifications are subject to change without notice to a PC using the D-SUB cable. Connect to improve quality. Connects to a source device using a DP cable. Reverse Side ――The color and shape of parts may differ from what is shown.
User Manual
Page 26
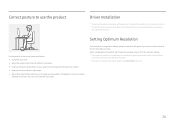
... use the product Driver Installation ――You can set the optimum resolution and frequency for this product by installing the corresponding drivers. ――To install the latest version of the product so you power on the screen. •• Keep your forearms perpendicular to your upper arms and level with the back of your hands. •• Keep your PC. 26 Setting...
... use the product Driver Installation ――You can set the optimum resolution and frequency for this product by installing the corresponding drivers. ――To install the latest version of the product so you power on the screen. •• Keep your forearms perpendicular to your upper arms and level with the back of your hands. •• Keep your PC. 26 Setting...
User Manual
Page 27
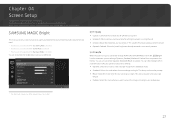
... available on the monitor may differ depending on the model. Picture SAMSUNG MAGIC Bright Brightness Contrast Sharpness Color SAMSUNG MAGIC Angle SMAMASGUNI CG Upscale Custom 100 75 60 Set to AV, MSAMASGUNICGBright has four automatic picture settings (Dynamic, Standard, Movie and Custom) that are dark. In AV mode When the external input is connected through automatic contrast adjustment. This will be used. ――This menu is not available...
... available on the monitor may differ depending on the model. Picture SAMSUNG MAGIC Bright Brightness Contrast Sharpness Color SAMSUNG MAGIC Angle SMAMASGUNI CG Upscale Custom 100 75 60 Set to AV, MSAMASGUNICGBright has four automatic picture settings (Dynamic, Standard, Movie and Custom) that are dark. In AV mode When the external input is connected through automatic contrast adjustment. This will be used. ――This menu is not available...
User Manual
Page 28
... color tone. ――When the external input is connected through HDMI/DP and PC/AV Mode is set to Dynamic Contrast mode. ――This menu is not available when Eco Saving Plus is enabled. ――This menu is not available when Eye Saver Mode is enabled. Sharpness Make the outline of objects more clear or blurry. (Range: 0~100) A higher value will make...
... color tone. ――When the external input is connected through HDMI/DP and PC/AV Mode is set to Dynamic Contrast mode. ――This menu is not available when Eco Saving Plus is enabled. ――This menu is not available when Eye Saver Mode is enabled. Sharpness Make the outline of objects more clear or blurry. (Range: 0~100) A higher value will make...
User Manual
Page 30
...;―If you are satisfied. ――A digital output device is connected using the HDMI/DP cable. ――The input signal is 480p, 576p, 720p, or 1080p and monitor can display normally (Not every model can only be set when the external input is connected through HDMI/DP and PC/AV Mode is set to AV. TÜV Rheinland "Low Blue Light Content" is a certification for products which...
...;―If you are satisfied. ――A digital output device is connected using the HDMI/DP cable. ――The input signal is 480p, 576p, 720p, or 1080p and monitor can display normally (Not every model can only be set when the external input is connected through HDMI/DP and PC/AV Mode is set to AV. TÜV Rheinland "Low Blue Light Content" is a certification for products which...
User Manual
Page 33
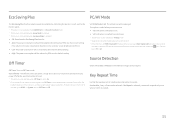
... model. The refresh rate setting method please refer to your gaming experience. FreeSync can I change the frequency? ――When using the function, contact the Samsung Service Center. 33 This feature will eliminate screen tearing and lag during game play games depending on the model. System FreeSync Eco Saving Plus Off Timer PC/AV Mode Source Detection Key Repeat Time Power LED On Off Off Auto Acceleration Stand...
... model. The refresh rate setting method please refer to your gaming experience. FreeSync can I change the frequency? ――When using the function, contact the Samsung Service Center. 33 This feature will eliminate screen tearing and lag during game play games depending on the model. System FreeSync Eco Saving Plus Off Timer PC/AV Mode Source Detection Key Repeat Time Power LED On Off Off Auto Acceleration Stand...
User Manual
Page 35
... the wide models only such as the method to AV. Turn Off After: The off after the product powers on. Source Detection Select either Auto or Manual as 16:9 or 16:10. ――If the monitor is set to display the function-button screen and then select the icon. This is pressed. Set PC/AV Mode to recognize input signal. The product will automatically power off...
... the wide models only such as the method to AV. Turn Off After: The off after the product powers on. Source Detection Select either Auto or Manual as 16:9 or 16:10. ――If the monitor is set to display the function-button screen and then select the icon. This is pressed. Set PC/AV Mode to recognize input signal. The product will automatically power off...
User Manual
Page 36
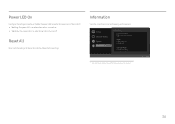
... Configure the settings to the default factory settings. View the current input source, frequency and resolution. Picture OnScreen Display System Information Information LS S/N HDMI **kHz **Hz ** ****x**** Optimal Mode ****x**** **Hz Exit ――The displayed image may differ depending on when the product is turned off. Reset All Return all the settings for the product to enable or disable the power LED located at the lower part of the product. •• Working: The power LED is...
... Configure the settings to the default factory settings. View the current input source, frequency and resolution. Picture OnScreen Display System Information Information LS S/N HDMI **kHz **Hz ** ****x**** Optimal Mode ****x**** **Hz Exit ――The displayed image may differ depending on when the product is turned off. Reset All Return all the settings for the product to enable or disable the power LED located at the lower part of the product. •• Working: The power LED is...
User Manual
Page 38
... the connectors are found on . 38 Blank spaces are locked. If the graphics card settings menu does not have nothing to adjust the screen settings.) Screen issue The power LED is off . The screen will appear for the graphics card. The message Check Signal Cable appears. Installation issue (PC mode) The screen keeps switching on . Check that the cable is properly connected to the product and PC. Check that exceeds the supported resolution(refer to Standard Signal Mode Table...
... the connectors are found on . 38 Blank spaces are locked. If the graphics card settings menu does not have nothing to adjust the screen settings.) Screen issue The power LED is off . The screen will appear for the graphics card. The message Check Signal Cable appears. Installation issue (PC mode) The screen keeps switching on . Check that the cable is properly connected to the product and PC. Check that exceeds the supported resolution(refer to Standard Signal Mode Table...
User Manual
Page 39
... performance. If using a Windows OS (e.g. Playback of high-definition large video files can be seen depending on ClearType. The light is safe to Control Panel Fonts Adjust ClearType text and change the settings, referring to Standard Signal Mode Table (P.42). Check the cable connection to the recommended level. Remove any key on another video player. The screen is inconsistent. Adjust Brightness and Contrast. Screen color is too bright. Source device issue A beeping sound is heard...
... performance. If using a Windows OS (e.g. Playback of high-definition large video files can be seen depending on ClearType. The light is safe to Control Panel Fonts Adjust ClearType text and change the settings, referring to Standard Signal Mode Table (P.42). Check the cable connection to the recommended level. Remove any key on another video player. The screen is inconsistent. Adjust Brightness and Contrast. Screen color is too bright. Source device issue A beeping sound is heard...
User Manual
Page 40
... Windows 8(Windows 8.1): Set power-saving mode in Settings Control Panel Appearance and Personalization Personalize Screen Saver Settings Power options or BIOS SETUP on the PC. •• Windows 10: Set power-saving mode in Settings Personalization Lock screen Screen timeout settings Power & sleep or BIOS SETUP on your PC or graphics card for your graphics card. •• Windows XP: Go to Control Panel Appearance and Themes Display Settings Advanced Monitor, and adjust Refresh rate under Monitor settings. •• Windows ME/2000: Go to Control Panel Display Settings...
... Windows 8(Windows 8.1): Set power-saving mode in Settings Control Panel Appearance and Personalization Personalize Screen Saver Settings Power options or BIOS SETUP on the PC. •• Windows 10: Set power-saving mode in Settings Personalization Lock screen Screen timeout settings Power & sleep or BIOS SETUP on your PC or graphics card for your graphics card. •• Windows XP: Go to Control Panel Appearance and Themes Display Settings Advanced Monitor, and adjust Refresh rate under Monitor settings. •• Windows ME/2000: Go to Control Panel Display Settings...


