

User Guide
Page 8
Scanners Configuration 7.8 MFP Ports Configuration 7.9 Configuring Printer Properties 7.10 Printing a Document 7.11 Printing from Applications 7.11 Printing Files 7.12 Scanning a Document 7.13 Using the Image Editor 7.17 Chapter 8: ... 9: TROUBLESHOOTING Clearing Document Jams 9.2 Input Misfeed 9.2 Exit Misfeed 9.2 Clearing Paper Jams 9.3 In the Paper Tray 9.4 In the Paper Exit Area 9.5 In the Fuser Area or Around the Toner Cartridge .......... 9.6 In the Manual Feeder 9.6 Tips for Avoiding Paper Jams 9.7 Clearing LCD Error Messages 9.8 Solving Problems 9.11 Paper Feeding...
Scanners Configuration 7.8 MFP Ports Configuration 7.9 Configuring Printer Properties 7.10 Printing a Document 7.11 Printing from Applications 7.11 Printing Files 7.12 Scanning a Document 7.13 Using the Image Editor 7.17 Chapter 8: ... 9: TROUBLESHOOTING Clearing Document Jams 9.2 Input Misfeed 9.2 Exit Misfeed 9.2 Clearing Paper Jams 9.3 In the Paper Tray 9.4 In the Paper Exit Area 9.5 In the Fuser Area or Around the Toner Cartridge .......... 9.6 In the Manual Feeder 9.6 Tips for Avoiding Paper Jams 9.7 Clearing LCD Error Messages 9.8 Solving Problems 9.11 Paper Feeding...

User Guide
Page 173
...ADF rubber pad. 8.12 MAINTENANCE Consumables and Replacement Parts From time to time, you bought your Samsung dealer or the retailer where you needs to replace the toner cartridge, roller, and fuser unit to maintain top performance and to avoid print quality problems and paper feed problems resulting from ... recommend that items be replaced after you have printed a specified number of pages: Items ADF rubber pad ADF roller Paper feeding roller Transfer roller Fuser unit Yield (Average) Approx. 10,000 pages Approx. 60,000 pages Approx. 60,000 pages Approx. 60,000 pages Approx. 60,000 ...
...ADF rubber pad. 8.12 MAINTENANCE Consumables and Replacement Parts From time to time, you bought your Samsung dealer or the retailer where you needs to replace the toner cartridge, roller, and fuser unit to maintain top performance and to avoid print quality problems and paper feed problems resulting from ... recommend that items be replaced after you have printed a specified number of pages: Items ADF rubber pad ADF roller Paper feeding roller Transfer roller Fuser unit Yield (Average) Approx. 10,000 pages Approx. 60,000 pages Approx. 60,000 pages Approx. 60,000 pages Approx. 60,000 ...

User Guide
Page 178
... control panel. Clearing Paper Jams When a paper jam occurs, "Paper Jam" appears on the next pages to page 9.4 [Paper Jam 1] Open/Close Door In the fuser area or around the toner cartridge. Go to clear the jam. Refer to the table below to locate and clear the paper jam. Then load...
... control panel. Clearing Paper Jams When a paper jam occurs, "Paper Jam" appears on the next pages to page 9.4 [Paper Jam 1] Open/Close Door In the fuser area or around the toner cartridge. Go to clear the jam. Refer to the table below to locate and clear the paper jam. Then load...

User Guide
Page 179
In the Paper Tray 1 Open and close the front cover to the fuser area around the toner cartridge. The jammed paper automatically exits the machine. If the paper does not exit, continue to step 2. 2 Pull the paper tray open. 3 Remove the jammed paper by gently pulling it snaps into the machine until it straight out. See page 9.6. 4 Insert the paper tray into place. 5 Open and close the front cover. If there is any resistance and the paper does not move when you pull or if you cannot see the paper in this area, skip to resume printing. 9.4 TROUBLESHOOTING
In the Paper Tray 1 Open and close the front cover to the fuser area around the toner cartridge. The jammed paper automatically exits the machine. If the paper does not exit, continue to step 2. 2 Pull the paper tray open. 3 Remove the jammed paper by gently pulling it snaps into the machine until it straight out. See page 9.6. 4 Insert the paper tray into place. 5 Open and close the front cover. If there is any resistance and the paper does not move when you pull or if you cannot see the paper in this area, skip to resume printing. 9.4 TROUBLESHOOTING

User Guide
Page 181
..., lightly pushing it down. 2 Remove the jammed paper by gently pulling it straight out. 3 Replace the toner cartridge and close the front cover. In the Fuser Area or Around the Toner Cartridge NOTE: The fuser area is not properly fed into the machine through the manual feeder.
..., lightly pushing it down. 2 Remove the jammed paper by gently pulling it straight out. 3 Replace the toner cartridge and close the front cover. In the Fuser Area or Around the Toner Cartridge NOTE: The fuser area is not properly fed into the machine through the manual feeder.
User Guide
Page 184
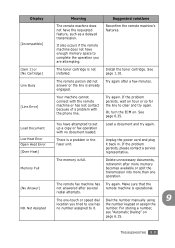
... with the phone line. redial attempts. Try again. If the problem persists, wait an hour or so for the line to it back in the fuser unit. TROUBLESHOOTING 9.9 Install the toner cartridge. Line Busy The remote person did not answer or the line is operational. See page 6.35. If the problem...
... with the phone line. redial attempts. Try again. If the problem persists, wait an hour or so for the line to it back in the fuser unit. TROUBLESHOOTING 9.9 Install the toner cartridge. Line Busy The remote person did not answer or the line is operational. See page 6.35. If the problem...

User Guide
Page 185
... tray. The machine is any scheduled job. The Stop/Clear button is almost empty. See page 8.9. Clear the jam. Suggested solutions Load paper in the fuser area. Paper has jammed in Standby mode, for a specified time interval to cancel the redial operation. See page 1.12. Clear the jam. You are doing...
... tray. The machine is any scheduled job. The Stop/Clear button is almost empty. See page 8.9. Clear the jam. Suggested solutions Load paper in the fuser area. Paper has jammed in Standby mode, for a specified time interval to cancel the redial operation. See page 1.12. Clear the jam. You are doing...

User Guide
Page 211
The extra flaps and strips might cause wrinkling, creasing or even jams and may be more than 140 mm (5.5 in.). This may even damage the fuser. Be sure the seam extends all the way to the corner of the envelope rather than diagonal seams. This style may experience some paper jams ...
The extra flaps and strips might cause wrinkling, creasing or even jams and may be more than 140 mm (5.5 in.). This may even damage the fuser. Be sure the seam extends all the way to the corner of the envelope rather than diagonal seams. This style may experience some paper jams ...


