

User Guide
Page 2
...you need for any direct or indirect damages, arising from or related to use of this manual. © 2007 Samsung Electronics Co., Ltd. All rights reserved. • SF-565PR and Samsung logo are trademarks of Samsung Electronics Co., Ltd. • PCL and PCL 6 are trademarks of hewlett-packard Company... user's guides: This Laser MFP User's Guide provides information you to scan and edit images, and to scan for information purposes only. It also provides all of their respective companies or organizations. You can also find a brief description on your machine as a printer, a scanner, a ...
...you need for any direct or indirect damages, arising from or related to use of this manual. © 2007 Samsung Electronics Co., Ltd. All rights reserved. • SF-565PR and Samsung logo are trademarks of Samsung Electronics Co., Ltd. • PCL and PCL 6 are trademarks of hewlett-packard Company... user's guides: This Laser MFP User's Guide provides information you to scan and edit images, and to scan for information purposes only. It also provides all of their respective companies or organizations. You can also find a brief description on your machine as a printer, a scanner, a ...

User Guide
Page 6
Loading Paper in the Paper Tray 2.7 Using the Manual Feeder 2.8 Setting the Paper Type and Size for the Manual Feeder 2.10 Chapter 3: PRINTING Printing a Document ...Page Overlay 3.18 Using a Page Overlay 3.20 Deleting a Page Overlay 3.21 Setting Up the Locally Shared Printer 3.22 In Windows 2000/XP 3.22 Chapter 4: COPYING Loading Paper for Copying 4.2 Preparing a Document 4.2 ...Copying 4.8 Chapter 5: SCANNING Scanning Basics 5.2 Scanning Using Samsung SmarThru 5.2 Scanning Process with TWAIN-enabled Software 5.6 Chapter 6: FAXING Changing the Fax Setup options 6.2 Available Fax Setup ...
Loading Paper in the Paper Tray 2.7 Using the Manual Feeder 2.8 Setting the Paper Type and Size for the Manual Feeder 2.10 Chapter 3: PRINTING Printing a Document ...Page Overlay 3.18 Using a Page Overlay 3.20 Deleting a Page Overlay 3.21 Setting Up the Locally Shared Printer 3.22 In Windows 2000/XP 3.22 Chapter 4: COPYING Loading Paper for Copying 4.2 Preparing a Document 4.2 ...Copying 4.8 Chapter 5: SCANNING Scanning Basics 5.2 Scanning Using Samsung SmarThru 5.2 Scanning Process with TWAIN-enabled Software 5.6 Chapter 6: FAXING Changing the Fax Setup options 6.2 Available Fax Setup ...

User Guide
Page 7
...Modes 6.10 Loading Paper for Receiving Faxes 6.11 Receiving Automatically in Fax Mode 6.11 Receiving Manually in Tel Mode 6.11 Receiving Automatically in Ans/Fax Mode 6.12 Receiving Manually Using an Extension Telephone 6.13 Receiving Faxes Using the DRPD Mode 6.13 Receiving Faxes in... Fax Settings 6.33 Changing Setting Options 6.33 Advanced Fax Setting Options 6.34 Using the Remote Control Panel 6.36 Chapter 7: USING YOUR PRINTER IN LINUX Getting Started 7.2 Installing the MFP Driver 7.3 System Requirements 7.3 Installing the MFP Driver 7.4 Uninstalling the MFP Driver 7.5 Using ...
...Modes 6.10 Loading Paper for Receiving Faxes 6.11 Receiving Automatically in Fax Mode 6.11 Receiving Manually in Tel Mode 6.11 Receiving Automatically in Ans/Fax Mode 6.12 Receiving Manually Using an Extension Telephone 6.13 Receiving Faxes Using the DRPD Mode 6.13 Receiving Faxes in... Fax Settings 6.33 Changing Setting Options 6.33 Advanced Fax Setting Options 6.34 Using the Remote Control Panel 6.36 Chapter 7: USING YOUR PRINTER IN LINUX Getting Started 7.2 Installing the MFP Driver 7.3 System Requirements 7.3 Installing the MFP Driver 7.4 Uninstalling the MFP Driver 7.5 Using ...

User Guide
Page 8
Scanners Configuration 7.8 MFP Ports Configuration 7.9 Configuring Printer Properties 7.10 Printing a Document 7.11 Printing from Applications 7.11 Printing Files 7.12 Scanning a Document 7.13 Using the Image Editor 7.17 Chapter 8: MAINTENANCE ... 9.2 Clearing Paper Jams 9.3 In the Paper Tray 9.4 In the Paper Exit Area 9.5 In the Fuser Area or Around the Toner Cartridge .......... 9.6 In the Manual Feeder 9.6 Tips for Avoiding Paper Jams 9.7 Clearing LCD Error Messages 9.8 Solving Problems 9.11 Paper Feeding Problems 9.11 Printing Problems 9.12 Printing Quality Problems 9.15 ...
Scanners Configuration 7.8 MFP Ports Configuration 7.9 Configuring Printer Properties 7.10 Printing a Document 7.11 Printing from Applications 7.11 Printing Files 7.12 Scanning a Document 7.13 Using the Image Editor 7.17 Chapter 8: MAINTENANCE ... 9.2 Clearing Paper Jams 9.3 In the Paper Tray 9.4 In the Paper Exit Area 9.5 In the Fuser Area or Around the Toner Cartridge .......... 9.6 In the Manual Feeder 9.6 Tips for Avoiding Paper Jams 9.7 Clearing LCD Error Messages 9.8 Solving Problems 9.11 Paper Feeding Problems 9.11 Printing Problems 9.12 Printing Quality Problems 9.15 ...

User Guide
Page 22
... Automatic Document Feeder Document Guides Control Panel (See page 1.6) Document Output Tray Front Output Tray (Face down) Front Cover Paper Output Extension Handset Manual Feeder Guides Paper Level Indicator Manual Feeder Paper Tray Toner Cartridge Rear View Rear Cover 1 EXT Jack* Rear Output Slot (Face up) Line Jack Power Switch USB Connector...
... Automatic Document Feeder Document Guides Control Panel (See page 1.6) Document Output Tray Front Output Tray (Face down) Front Cover Paper Output Extension Handset Manual Feeder Guides Paper Level Indicator Manual Feeder Paper Tray Toner Cartridge Rear View Rear Cover 1 EXT Jack* Rear Output Slot (Face up) Line Jack Power Switch USB Connector...

User Guide
Page 46
... to install the Stand Alone configuration over the SmarThru Networking. GETTING STARTED 1.29 Be careful while using this case, uninstall Samsung SmarThru having the Leave intact option set and install the SmarThru Stand Alone configuration. 4 After selecting the uninstall option, click...is uninstalled. 1 From the Start menu, select Programs. 2 Select Samsung SmarThru, and then select SmarThru 3 Uninstall. 3 When your selection, click Ok. Click OK. 6 Click Finish. When your computer doesn't shut down manually and restart it before the changes are closed on your computer. ...
... to install the Stand Alone configuration over the SmarThru Networking. GETTING STARTED 1.29 Be careful while using this case, uninstall Samsung SmarThru having the Leave intact option set and install the SmarThru Stand Alone configuration. 4 After selecting the uninstall option, click...is uninstalled. 1 From the Start menu, select Programs. 2 Select Samsung SmarThru, and then select SmarThru 3 Uninstall. 3 When your selection, click Ok. Click OK. 6 Click Finish. When your computer doesn't shut down manually and restart it before the changes are closed on your computer. ...

User Guide
Page 58
This chapter includes: • Selecting Print Materials • Selecting an Output Location • Loading Paper in the Paper Tray • Using the Manual Feeder 2 PAPER HANDLING This chapter introduces you to the basics of selecting print materials and loading them into your machine.
This chapter includes: • Selecting Print Materials • Selecting an Output Location • Loading Paper in the Paper Tray • Using the Manual Feeder 2 PAPER HANDLING This chapter introduces you to the basics of selecting print materials and loading them into your machine.
User Guide
Page 59
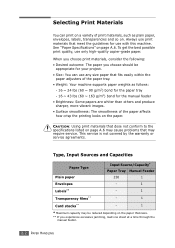
...on a variety of the paper affects how crisp the printing looks on page A.6. Type, Input Sources and Capacities Paper Type Input Source/Capacity* Paper Tray Manual Feeder Plain paper 250 1 Envelopes - 1 Labels** - 1 Transparency films** - 1 Card stocks** - 1 * Maximum capacity may require service. See... print materials that dose not conform to the specifications listed on page A.6 may cause problems that meet the guidelines for the manual feeder • Brightness: Some papers are whiter than others and produce sharper, more vibrant images. • Surface smoothness: The...
...on a variety of the paper affects how crisp the printing looks on page A.6. Type, Input Sources and Capacities Paper Type Input Source/Capacity* Paper Tray Manual Feeder Plain paper 250 1 Envelopes - 1 Labels** - 1 Transparency films** - 1 Card stocks** - 1 * Maximum capacity may require service. See... print materials that dose not conform to the specifications listed on page A.6 may cause problems that meet the guidelines for the manual feeder • Brightness: Some papers are whiter than others and produce sharper, more vibrant images. • Surface smoothness: The...

User Guide
Page 62
Using the rear output slot might improve the output quality with the following: • envelopes • labels • small custom-sized paper • postcards • transparencies PAPER HANDLING 2.5 Printing from the manual feeder to the Rear Output Slot (Face up) Using the rear output slot, paper comes out of the machine face up. The tray should be used for most print jobs. 2 Printing to the rear output slot provides the straight paper path. Printing to the Front Output Tray (Face down) The front output tray collects printed paper face-down in correct order.
Using the rear output slot might improve the output quality with the following: • envelopes • labels • small custom-sized paper • postcards • transparencies PAPER HANDLING 2.5 Printing from the manual feeder to the Rear Output Slot (Face up) Using the rear output slot, paper comes out of the machine face up. The tray should be used for most print jobs. 2 Printing to the rear output slot provides the straight paper path. Printing to the Front Output Tray (Face down) The front output tray collects printed paper face-down in correct order.

User Guide
Page 64
... details about loading paper in the paper tray, see page A.6. For faxing and copying, you experience problems with paper feed, place the paper in the manual feeder. • You can load up with the print side face down . You can use many 2 different sizes of previously printed paper. If you can...
... details about loading paper in the paper tray, see page A.6. For faxing and copying, you experience problems with paper feed, place the paper in the manual feeder. • You can load up with the print side face down . You can use many 2 different sizes of previously printed paper. If you can...

User Guide
Page 65
... you print on transparencies. For envelopes, load a sheet with the flap side face down and with this printer. Postcards, 3.5 by the edges and avoid touching the print side. For transparencies, hold them into the manual feeder. • When you print on 76 mm X 127 mm (3 X 5 in.) sized media with loading .... Oils from your fingers can be printed with the stamp area on the top left side. Using the Manual Feeder Use the manual feeder to print transparencies, labels, envelopes or postcards in addition to Legal, 216 x 356 mm (8.5 x 14 in.), the largest size acceptable, and weighing ...
... you print on transparencies. For envelopes, load a sheet with the flap side face down and with this printer. Postcards, 3.5 by the edges and avoid touching the print side. For transparencies, hold them into the manual feeder. • When you print on 76 mm X 127 mm (3 X 5 in.) sized media with loading .... Oils from your fingers can be printed with the stamp area on the top left side. Using the Manual Feeder Use the manual feeder to print transparencies, labels, envelopes or postcards in addition to Legal, 216 x 356 mm (8.5 x 14 in.), the largest size acceptable, and weighing ...

User Guide
Page 66
If you experience problems with an uncurled edge to use the rear output slot. 4 After printing, close the rear cover. 2 Adjust the paper guide to the width of the print material. 2 NOTE: When printing on previously printed paper from the manual feeder, the printed side should be facing down with paper feed, turn the paper around. 3 Open the rear cover to the machine. PAPER HANDLING 2.9
If you experience problems with an uncurled edge to use the rear output slot. 4 After printing, close the rear cover. 2 Adjust the paper guide to the width of the print material. 2 NOTE: When printing on previously printed paper from the manual feeder, the printed side should be facing down with paper feed, turn the paper around. 3 Open the rear cover to the machine. PAPER HANDLING 2.9

User Guide
Page 67
... find the paper type you are using and press Enter to save it . 7 To return to display "Manual Feed" on the bottom line. These settings will apply to set the paper size for the Manual Feeder After loading paper in the application program you need to Copy mode. For PC-printing, you... need to select the paper size in the manual feeder, you use. Setting the Paper Type and Size for the...
... find the paper type you are using and press Enter to save it . 7 To return to display "Manual Feed" on the bottom line. These settings will apply to set the paper size for the Manual Feeder After loading paper in the application program you need to Copy mode. For PC-printing, you... need to select the paper size in the manual feeder, you use. Setting the Paper Type and Size for the...

User Guide
Page 75
...a different type of print material, select the corresponding paper type. Click the Graphics tab to load one sheet at a time into the manual feeder. For more information about print materials, see Chapter 2, Paper Handling. See page 2.8. Make sure that Source is set to the ...paper tray. Setting Graphic Properties Use the following order: the manual feeder and the paper tray. If the paper source is set to Printer Default. See page 3.2 for more information about accessing printer properties. Use the Manual Feed source when printing to special material. If you use ...
...a different type of print material, select the corresponding paper type. Click the Graphics tab to load one sheet at a time into the manual feeder. For more information about print materials, see Chapter 2, Paper Handling. See page 2.8. Make sure that Source is set to the ...paper tray. Setting Graphic Properties Use the following order: the manual feeder and the paper tray. If the paper source is set to Printer Default. See page 3.2 for more information about accessing printer properties. Use the Manual Feed source when printing to special material. If you use ...

User Guide
Page 93
... paper. • Do not load booklet, pamphlet, transparencies or documents having other unusual characteristics. 4.2 COPYING For further details, see page 1.12 for loading in the manual feeder.
... paper. • Do not load booklet, pamphlet, transparencies or documents having other unusual characteristics. 4.2 COPYING For further details, see page 1.12 for loading in the manual feeder.

User Guide
Page 113
... the Last Number To redial the last number you need to change the darkness, see page 6.5. 2 Adjust the document resolution to send. 6.8 FAXING Sending a Fax Manually 1 Load the document(s) face down into the ADF. You hear a dial tone. 4 Enter the remote fax machine's fax number using the number keypad.
... the Last Number To redial the last number you need to change the darkness, see page 6.5. 2 Adjust the document resolution to send. 6.8 FAXING Sending a Fax Manually 1 Load the document(s) face down into the ADF. You hear a dial tone. 4 Enter the remote fax machine's fax number using the number keypad.

User Guide
Page 116
... once or twice, depending on the mode you're in. 3 When you have to Fax mode at the factory. or Legal-sized plain paper. Receiving Manually in Tel Mode You can hear a fax tone or voice from the remote machine. You may have changed the receiving mode, take the following steps...
... once or twice, depending on the mode you're in. 3 When you have to Fax mode at the factory. or Legal-sized plain paper. Receiving Manually in Tel Mode You can hear a fax tone or voice from the remote machine. You may have changed the receiving mode, take the following steps...

User Guide
Page 117
... machine has a "user-selectable ring counter," set it to answer incoming calls within 1 ring. • If you are in Tel mode, which is receiving faxes manually, when the answering machine is connected to repeat this action once or twice, depending on the bottom line.
... machine has a "user-selectable ring counter," set it to answer incoming calls within 1 ring. • If you are in Tel mode, which is receiving faxes manually, when the answering machine is connected to repeat this action once or twice, depending on the bottom line.

User Guide
Page 118
... page 6.4. jack. To set up Distinctive Ring Pattern Detection, you will be forwarded to the extension telephone or answering machine plugged into the EXT. Receiving Manually Using an Extension Telephone You can receive a fax from someone you are fixed, but you can change the middle number to whatever you choose. This...
... page 6.4. jack. To set up Distinctive Ring Pattern Detection, you will be forwarded to the extension telephone or answering machine plugged into the EXT. Receiving Manually Using an Extension Telephone You can receive a fax from someone you are fixed, but you can change the middle number to whatever you choose. This...

User Guide
Page 158
... the color composition and the scan resolution for the scan options by clicking Default. 8 When you have finished, press Scan to start scanning. USING YOUR PRINTER IN LINUX 7.15 For further details about the preset Job Type settings, see page 7.17. 10 When you are finished, click Save on the bottom... default setting for the image. • Scan Area: allows you to select the page size. The Advanced button enables you to set the page size manually.
... the color composition and the scan resolution for the scan options by clicking Default. 8 When you have finished, press Scan to start scanning. USING YOUR PRINTER IN LINUX 7.15 For further details about the preset Job Type settings, see page 7.17. 10 When you are finished, click Save on the bottom... default setting for the image. • Scan Area: allows you to select the page size. The Advanced button enables you to set the page size manually.


