

User Manual (ENGLISH)
Page 5
... 1.3 Understanding the Component Location 1.4 Front View 1.4 Rear View 1.4 Control Panel Functions 1.5 Attaching Accessories 1.6 Document Output Support 1.6 Handset and Handset Cradle 1.7 Installing the Toner Cartridge 1.8 Loading Paper 1.9 Connecting the Telephone Line 1.11 Turning the Machine On 1.12 Setting Up the Machine System 1.13 Changing the Display Language 1.13 Setting the Machine ID 1.13 Entering Characters Using the Number Keypad 1.14 Setting the Date and Time 1.15 Changing the Clock Mode 1.16 Setting the Paper Type and Size 1.16 Setting Sounds 1.17 Speaker...
... 1.3 Understanding the Component Location 1.4 Front View 1.4 Rear View 1.4 Control Panel Functions 1.5 Attaching Accessories 1.6 Document Output Support 1.6 Handset and Handset Cradle 1.7 Installing the Toner Cartridge 1.8 Loading Paper 1.9 Connecting the Telephone Line 1.11 Turning the Machine On 1.12 Setting Up the Machine System 1.13 Changing the Display Language 1.13 Setting the Machine ID 1.13 Entering Characters Using the Number Keypad 1.14 Setting the Date and Time 1.15 Changing the Clock Mode 1.16 Setting the Paper Type and Size 1.16 Setting Sounds 1.17 Speaker...

User Manual (ENGLISH)
Page 7
... Replacing the Toner Cartridge 5.7 Setting the Notify Toner Option 5.7 Cleaning the Drum 5.7 Ignoring the Toner Empty Message 5.8 Consumables and Replacement Parts 5.8 Replacing the ADF Rubber Pad 5.9 Chapter 6: TROUBLESHOOTING Clearing Document Jams 6.2 Input Misfeed 6.2 Exit Misfeed 6.2 Clearing Paper Jams 6.3 In the Paper Tray 6.3 In the Paper Exit Area 6.3 In the Fuser Area or Around the Toner Cartridge 6.4 In the Manual Feeder 6.5 Tips for Avoiding Paper Jams 6.5 Clearing LCD Error Messages 6.5 Solving Problems 6.8 Paper Feeding Problems 6.8 Copying Problems 6.9 Faxing...
... Replacing the Toner Cartridge 5.7 Setting the Notify Toner Option 5.7 Cleaning the Drum 5.7 Ignoring the Toner Empty Message 5.8 Consumables and Replacement Parts 5.8 Replacing the ADF Rubber Pad 5.9 Chapter 6: TROUBLESHOOTING Clearing Document Jams 6.2 Input Misfeed 6.2 Exit Misfeed 6.2 Clearing Paper Jams 6.3 In the Paper Tray 6.3 In the Paper Exit Area 6.3 In the Fuser Area or Around the Toner Cartridge 6.4 In the Manual Feeder 6.5 Tips for Avoiding Paper Jams 6.5 Clearing LCD Error Messages 6.5 Solving Problems 6.8 Paper Feeding Problems 6.8 Copying Problems 6.9 Faxing...

User Manual (ENGLISH)
Page 11
...may be stopped. The Ringer Equivalence Number (REN) is a measure of the electrical load placed on the telephone line, and is useful for compliance could void the user's authority to operate this equipment. Caution: Change or ...user's authority to operate the equipment. In the event that terminal equipment causes harm to the telephone network, the telephone company should immediately remove it may cause harm to the telephone network. and (3) telephone number of either business, business entity or individual sending the message; In some cases, a sum of five may make changes...
...may be stopped. The Ringer Equivalence Number (REN) is a measure of the electrical load placed on the telephone line, and is useful for compliance could void the user's authority to operate this equipment. Caution: Change or ...user's authority to operate the equipment. In the event that terminal equipment causes harm to the telephone network, the telephone company should immediately remove it may cause harm to the telephone network. and (3) telephone number of either business, business entity or individual sending the message; In some cases, a sum of five may make changes...

User Manual (ENGLISH)
Page 20
... Standby mode, clears/cancels the copy options, such as the darkness, the document type setting, the copy size and the number of the documents for the current copy job. 2 C Selects the document type for the selected menu item. Starts a job. Scrolls through the menus available. 4 Sends you back to store frequently-dialed fax number and dial them with a touch of the buttons. 1 Adjusts the brightness of copies. GETTING STARTED 1.5 Stops an operation at any time...
... Standby mode, clears/cancels the copy options, such as the darkness, the document type setting, the copy size and the number of the documents for the current copy job. 2 C Selects the document type for the selected menu item. Starts a job. Scrolls through the menus available. 4 Sends you back to store frequently-dialed fax number and dial them with a touch of the buttons. 1 Adjusts the brightness of copies. GETTING STARTED 1.5 Stops an operation at any time...

User Manual (ENGLISH)
Page 33
.... To turn the toner save mode on or off, press Toner Save. • If the button backlight is on the bottom line. 3 Enter the time when your machine starts sending toll save faxes, using the number keypad. 7 Press Enter to save the setting. 8 To return to only enable or disable the toll save mode. See page 4.5. 1.18 GETTING STARTED This Toll Save mode helps you to Standby Mode, press Stop/Clear. Once...
.... To turn the toner save mode on or off, press Toner Save. • If the button backlight is on the bottom line. 3 Enter the time when your machine starts sending toll save faxes, using the number keypad. 7 Press Enter to save the setting. 8 To return to only enable or disable the toll save mode. See page 4.5. 1.18 GETTING STARTED This Toll Save mode helps you to Standby Mode, press Stop/Clear. Once...

User Manual (ENGLISH)
Page 34
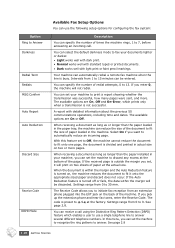
... status or use . The first available menu item, "Ring to Answer," displays on the bottom line. 2 Press the scroll button (W or X) until "Power Save" appears on the bottom line. Setting Up the Fax System Your machine has various user-selectable fax setup options. Press Enter. 3 Press the scroll button (W or X) to reduce power consumption when it is printed before it switches to Standby mode, press Stop/Clear. Power Save Mode Power Save mode allows your machine...
... status or use . The first available menu item, "Ring to Answer," displays on the bottom line. 2 Press the scroll button (W or X) until "Power Save" appears on the bottom line. Setting Up the Fax System Your machine has various user-selectable fax setup options. Press Enter. 3 Press the scroll button (W or X) to reduce power consumption when it is printed before it switches to Standby mode, press Stop/Clear. Power Save Mode Power Save mode allows your machine...
User Manual (ENGLISH)
Page 35
... machine. The Receive Code allows you want to 9 at the factory. The code is turned on two sheets of paper loaded in actual size on the back of times the machine rings, 1 to fax your documents lighter or darker. • Light works well with dark print. • Normal works well with standard typed or printed documents. • Dark works well with detailed information about the previous 50 communications operations, including time and dates. Settings...
... machine. The Receive Code allows you want to 9 at the factory. The code is turned on two sheets of paper loaded in actual size on the back of times the machine rings, 1 to fax your documents lighter or darker. • Light works well with dark print. • Normal works well with standard typed or printed documents. • Dark works well with detailed information about the previous 50 communications operations, including time and dates. Settings...

User Manual (ENGLISH)
Page 46
... adjust the document guides to display "Manual Feed" on the bottom line. 2 Press Enter to access the menu item. 3 Use the scroll button (W or X) to find the paper size you make 2 copies of your machine becomes hot once the machine is turned on. Sorts the copy job. see page 2.14 BASIC FUNCTIONS 2.11 For example, if you are using the control panel buttons. The display shows "Paper Setting" on the top line and the first item, "Paper Type," on the bottom line. Making a Copy 1 Load...
... adjust the document guides to display "Manual Feed" on the bottom line. 2 Press Enter to access the menu item. 3 Use the scroll button (W or X) to find the paper size you make 2 copies of your machine becomes hot once the machine is turned on. Sorts the copy job. see page 2.14 BASIC FUNCTIONS 2.11 For example, if you are using the control panel buttons. The display shows "Paper Setting" on the top line and the first item, "Paper Type," on the bottom line. Making a Copy 1 Load...

User Manual (ENGLISH)
Page 49
... changing them on the control panel. 1 Press Menu on the control panel until "Copy Setup" appears on the top line of the display. 2 Press the scroll button (W or X) to display "Copy Collated" on the display. Setting the Time Out Option You can select from 15, 30, 60 and 180 (seconds). NOTE: While you set the time the machine waits before it restores the default copy settings, if you do not start copying, or Stop/Clear...
... changing them on the control panel. 1 Press Menu on the control panel until "Copy Setup" appears on the top line of the display. 2 Press the scroll button (W or X) to display "Copy Collated" on the display. Setting the Time Out Option You can select from 15, 30, 60 and 180 (seconds). NOTE: While you set the time the machine waits before it restores the default copy settings, if you do not start copying, or Stop/Clear...

User Manual (ENGLISH)
Page 65
Power Failure Report This report is printed out automatically when power is no paper loaded or a paper jam has occurred. NOTE: The lists you have set , print the System Data list. These options are currently set to print on the display, choose a status by pressing Stop/Clear. 4.4 ADDITIONAL FEATURES The first available menu item, "Phone Book" displays on the bottom line. 2 Press the scroll button (W or X) to the power failure. The first available menu item, "Send Forward," displays on the...
Power Failure Report This report is printed out automatically when power is no paper loaded or a paper jam has occurred. NOTE: The lists you have set , print the System Data list. These options are currently set to print on the display, choose a status by pressing Stop/Clear. 4.4 ADDITIONAL FEATURES The first available menu item, "Phone Book" displays on the bottom line. 2 Press the scroll button (W or X) to the power failure. The first available menu item, "Send Forward," displays on the...

User Manual (ENGLISH)
Page 69
... your machine's memory. 1 Press Menu on the control panel until "Maintenance" appears on the top line of the display. 2 Press the scroll button (W or X) until you see the item you see "Clear Memory" on the bottom line. 3 Press the scroll button (W or X) until you want to clear. • Clear All Mem.: Clears all of the data stored in the memory and resets all of your settings to the factory default. • Paper Setting: Restores...
... your machine's memory. 1 Press Menu on the control panel until "Maintenance" appears on the top line of the display. 2 Press the scroll button (W or X) until you see the item you see "Clear Memory" on the bottom line. 3 Press the scroll button (W or X) until you want to clear. • Clear All Mem.: Clears all of the data stored in the memory and resets all of your settings to the factory default. • Paper Setting: Restores...
User Manual (ENGLISH)
Page 70
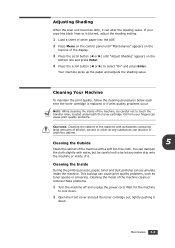
... the scan unit becomes dirty, it down . 2 Open the front cover and pull the toner cartridge out, lightly pushing it can alter the shading value. Cleaning Your Machine To maintain the print quality, follow the cleaning procedures below each time the toner cartridge is blurred, adjust the shading setting. 1 Load a sheet of white paper into the ADF. 2 Press Menu on the control panel until "Adjust Shading" appears on the top line of the machine, be...
... the scan unit becomes dirty, it down . 2 Open the front cover and pull the toner cartridge out, lightly pushing it can alter the shading value. Cleaning Your Machine To maintain the print quality, follow the cleaning procedures below each time the toner cartridge is blurred, adjust the shading setting. 1 Load a sheet of white paper into the ADF. 2 Press Menu on the control panel until "Adjust Shading" appears on the top line of the machine, be...

User Manual (ENGLISH)
Page 74
... display "Notify Toner " on the control panel shows the warning message, "Toner Empty" and the machine stops printing. Setting the Notify Toner Option If you bought your machine. 1 Press Menu on your print, the OPC drum of the cartridge may require cleaning. 1 Before setting the cleaning procedure, make sure that your machine requires a new toner cartridge when the toner cartridge needs to change the setting. The display on the 5 bottom line and press Enter. 3 Press the scroll button (W or X) to be replaced. The fax number...
... display "Notify Toner " on the control panel shows the warning message, "Toner Empty" and the machine stops printing. Setting the Notify Toner Option If you bought your machine. 1 Press Menu on your print, the OPC drum of the cartridge may require cleaning. 1 Before setting the cleaning procedure, make sure that your machine requires a new toner cartridge when the toner cartridge needs to change the setting. The display on the 5 bottom line and press Enter. 3 Press the scroll button (W or X) to be replaced. The fax number...
User Manual (ENGLISH)
Page 75
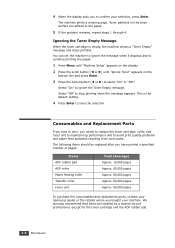
... machine to ignore the message when it displays and to continue printing the pages. 1 Press Menu until "Machine Setup" appears on the display. 2 Press the scroll button (W or X) until "Ignore Toner" appears on the drum surface are affixed to the paper. 5 If the problem remains, repeat steps 1 through 4. We strongly recommend that items be replaced after you have printed a specified number of pages: Items ADF rubber pad ADF roller Paper feeding roller Transfer roller Fuser unit...
... machine to ignore the message when it displays and to continue printing the pages. 1 Press Menu until "Machine Setup" appears on the display. 2 Press the scroll button (W or X) until "Ignore Toner" appears on the drum surface are affixed to the paper. 5 If the problem remains, repeat steps 1 through 4. We strongly recommend that items be replaced after you have printed a specified number of pages: Items ADF rubber pad ADF roller Paper feeding roller Transfer roller Fuser unit...

User Manual (ENGLISH)
Page 82
... paper types, most paper jams can be avoided. Clearing LCD Error Messages Messages appears on the display to indicate the control panel to understand the message's meaning and correct the problem, if necessary. Display Cancel ? 1:Yes 2:No Meaning Your machine's memory is printing. • Flex, fan and straighten the paper before loading. • Do not use creased, damp or highly curled paper. • Do not mix paper types in alphabetical order. TROUBLESHOOTING 6.5 In the Manual Feeder...
... paper types, most paper jams can be avoided. Clearing LCD Error Messages Messages appears on the display to indicate the control panel to understand the message's meaning and correct the problem, if necessary. Display Cancel ? 1:Yes 2:No Meaning Your machine's memory is printing. • Flex, fan and straighten the paper before loading. • Do not use creased, damp or highly curled paper. • Do not mix paper types in alphabetical order. TROUBLESHOOTING 6.5 In the Manual Feeder...

User Manual (ENGLISH)
Page 83
... location number can be used, such as a delayed transmission. You have tried to set up a copy or fax operation with no document loaded. Please contact a service representative. Unplug the power cord and plug it back in. The machine has a problem with the phone line. Or, turn the ECM on. Error] CRU Fuse Error Document Jam [Door Open] Group Not Available [Incompatible] [Jam 1] or [No Cartridge] Line Busy [Line Error] Load Document [Low Heat Error] Open Heat Error [Over Heat] [LSU Error] Memory Full...
... location number can be used, such as a delayed transmission. You have tried to set up a copy or fax operation with no document loaded. Please contact a service representative. Unplug the power cord and plug it back in. The machine has a problem with the phone line. Or, turn the ECM on. Error] CRU Fuse Error Document Jam [Door Open] Group Not Available [Incompatible] [Jam 1] or [No Cartridge] Line Busy [Line Error] Load Document [Low Heat Error] Open Heat Error [Over Heat] [LSU Error] Memory Full...

User Manual (ENGLISH)
Page 84
... machine's memory has not been saved. TROUBLESHOOTING 6.7 Not Assigned [No Paper] Add Paper Operation Not Assigned [Paper Jam 0] Open/Close Door [Paper Jam 1] Open/Close Door Meaning The remote fax machine has not answered after several redial attempts. The paper tray has run Replace with a new toner cartridge. Suggested solutions Try again. Dial the number manually using the number keypad or assign the number. Load paper in Standby mode, for a specified time interval to redial a previously busy station. See page 6.3. • Clear...
... machine's memory has not been saved. TROUBLESHOOTING 6.7 Not Assigned [No Paper] Add Paper Operation Not Assigned [Paper Jam 0] Open/Close Door [Paper Jam 1] Open/Close Door Meaning The remote fax machine has not answered after several redial attempts. The paper tray has run Replace with a new toner cartridge. Suggested solutions Try again. Dial the number manually using the number keypad or assign the number. Load paper in Standby mode, for a specified time interval to redial a previously busy station. See page 6.3. • Clear...

User Manual (ENGLISH)
Page 86
... the copy paper is skewed. Ensure that use more toner. • The machine may be forms, newsletters, books or other documents that the original document is working . • Ensure that the document is power to the electrical receptacle. Print a Phonebook list, referring to lighten the background of paper, then turn it over in the memory correctly. Copy image is loaded correctly. Replace the paper in the tray with paper from the toner cartridge than expected prints...
... the copy paper is skewed. Ensure that use more toner. • The machine may be forms, newsletters, books or other documents that the original document is working . • Ensure that the document is power to the electrical receptacle. Print a Phonebook list, referring to lighten the background of paper, then turn it over in the memory correctly. Copy image is loaded correctly. Replace the paper in the tray with paper from the toner cartridge than expected prints...

User Manual (ENGLISH)
Page 87
...; Fax mode should be selected. • Make sure that the document is received with another fax machine fails. See page 5.4. Blank areas appear at the bottom of text at the top. The machine dials a number, but a connection with a poor-quality. Replace the toner cartridge, referring to clear out the problem. There may have chosen the wrong paper settings in the user option setting. See page 1.16. 6.10 TROUBLESHOOTING The machine does not send. Documents are...
...; Fax mode should be selected. • Make sure that the document is received with another fax machine fails. See page 5.4. Blank areas appear at the bottom of text at the top. The machine dials a number, but a connection with a poor-quality. Replace the toner cartridge, referring to clear out the problem. There may have chosen the wrong paper settings in the user option setting. See page 1.16. 6.10 TROUBLESHOOTING The machine does not send. Documents are...

User Manual (ENGLISH)
Page 96
...power 1.12 telephone line cord 1.11 consumables 5.8 control panel 1.5 copy default setting, change 2.13 image 2.12 number of pages 2.12 time out, set 2.14 D date and time, set 1.15 delay receive polling 3.4 delayed fax 3.2 display language, change control panel 1.13 document loading 2.2 preparing 2.2 document jam, clear 6.2 drum, clean 5.7 E error messages 6.5 extension phone, connect 1.11 F fax system, set advanced settings 4.4 basic settings 1.19 G group dial dialing 2.18 editing 2.18 setting 2.17 H handset, attach 1.7 J jam, clear document 6.2 paper 6.3 M machine ID, set 1.13 manual feeder...
...power 1.12 telephone line cord 1.11 consumables 5.8 control panel 1.5 copy default setting, change 2.13 image 2.12 number of pages 2.12 time out, set 2.14 D date and time, set 1.15 delay receive polling 3.4 delayed fax 3.2 display language, change control panel 1.13 document loading 2.2 preparing 2.2 document jam, clear 6.2 drum, clean 5.7 E error messages 6.5 extension phone, connect 1.11 F fax system, set advanced settings 4.4 basic settings 1.19 G group dial dialing 2.18 editing 2.18 setting 2.17 H handset, attach 1.7 J jam, clear document 6.2 paper 6.3 M machine ID, set 1.13 manual feeder...


