User Manual (ENGLISH)
Page 6
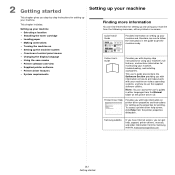
... copy 4.1 Changing the default settings 4.2 Using special copy features ...4.2 Setting the time out option ...4.3 5. Ordering toner cartridge Toner cartridges ...7.1 How to purchase ...7.1 8. Introduction Special features ...1.1 Understanding component locations 1.2 2. Scanning Scanning basics ...6.1 7. Maintenance... reports ...8.1 4 Getting started Setting up your machine Finding more information ...2.1 Selecting a location ...2.2 Installing the toner cartridge 2.2 Loading paper ...2.3 Making connections ...2.5 Turning the machine on ...2.5 Setting up the machine system Overview of control ...
... copy 4.1 Changing the default settings 4.2 Using special copy features ...4.2 Setting the time out option ...4.3 5. Ordering toner cartridge Toner cartridges ...7.1 How to purchase ...7.1 8. Introduction Special features ...1.1 Understanding component locations 1.2 2. Scanning Scanning basics ...6.1 7. Maintenance... reports ...8.1 4 Getting started Setting up your machine Finding more information ...2.1 Selecting a location ...2.2 Installing the toner cartridge 2.2 Loading paper ...2.3 Making connections ...2.5 Turning the machine on ...2.5 Setting up the machine system Overview of control ...
User Manual (ENGLISH)
Page 7
Clearing memory ...8.1 Cleaning your machine ...8.1 Maintaining the toner cartridge 8.3 Consumable and replacement parts 8.4 9. Troubleshooting Clearing paper jams ...9.1 Understanding the Status LED 9.3 Understanding display messages 9.4 Solving other problems ...9.5 10. Specifications General specifications ...10.1 Scanner and copier specifications 10.1 Printer specifications ...10.2 5
Clearing memory ...8.1 Cleaning your machine ...8.1 Maintaining the toner cartridge 8.3 Consumable and replacement parts 8.4 9. Troubleshooting Clearing paper jams ...9.1 Understanding the Status LED 9.3 Understanding display messages 9.4 Solving other problems ...9.5 10. Specifications General specifications ...10.1 Scanner and copier specifications 10.1 Printer specifications ...10.2 5
User Manual (ENGLISH)
Page 15
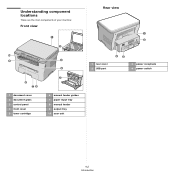
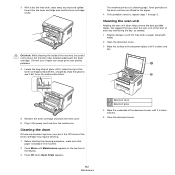
Understanding component locations These are the main components of your machine: Front view Rear view 1 rear cover 2 USB port 3 power receptacle 4 power switch 1 document cover 2 document glass 3 control panel 4 front cover 5 toner cartridge 6 manual feeder guides 7 paper input tray 8 manual feeder 9 output tray 10 scan unit 1.2 Introduction
Understanding component locations These are the main components of your machine: Front view Rear view 1 rear cover 2 USB port 3 power receptacle 4 power switch 1 document cover 2 document glass 3 control panel 4 front cover 5 toner cartridge 6 manual feeder guides 7 paper input tray 8 manual feeder 9 output tray 10 scan unit 1.2 Introduction
User Manual (ENGLISH)
Page 17
...up the properties for setting up your machine. This chapter includes: Setting up your machine • Selecting a location • Installing the toner cartridge • Loading paper • Making connections • Turning the machine on • Setting up the machine system • Overview of ...user's guides in the guide to use the supplied software utilities. To access a printer driver help screen, click Help from the Samsung website, www.samsungprinter.com. 2.1 Getting started This chapter gives you can get the machine ready. Printer Driver Help Provides you ...
...up the properties for setting up your machine. This chapter includes: Setting up your machine • Selecting a location • Installing the toner cartridge • Loading paper • Making connections • Turning the machine on • Setting up the machine system • Overview of ...user's guides in the guide to use the supplied software utilities. To access a printer driver help screen, click Help from the Samsung website, www.samsungprinter.com. 2.1 Getting started This chapter gives you can get the machine ready. Printer Driver Help Provides you ...
User Manual (ENGLISH)
Page 18
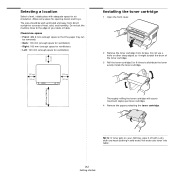
...for ventilation) • Right: 100 mm (enough space for ventilation) • Left: 100 mm (enough space for ventilation) Installing the toner cartridge 1 Open the front cover. 2 Remove the toner cartridge from direct sunlight or sources of your clothing, wipe it might scratch the drum of the toner...its bag. NOTE: If toner gets on your desk or table. Do not set the machine close to distribute the toner evenly inside the toner cartridge. Allow extra space for air circulation. Selecting a location Select a level, stable place with a dry cloth and wash clothing in cold water....
...for ventilation) • Right: 100 mm (enough space for ventilation) • Left: 100 mm (enough space for ventilation) Installing the toner cartridge 1 Open the front cover. 2 Remove the toner cartridge from direct sunlight or sources of your clothing, wipe it might scratch the drum of the toner...its bag. NOTE: If toner gets on your desk or table. Do not set the machine close to distribute the toner evenly inside the toner cartridge. Allow extra space for air circulation. Selecting a location Select a level, stable place with a dry cloth and wash clothing in cold water....

User Manual (ENGLISH)
Page 19
... completely. Make sure that the front cover is securely closed. 2 Fan the edges of the paper stack to avoid touching this area. 5 Hold the toner cartridge by the handle. Cover it locks into the paper input tray with a piece of paper, if left exposed for more than a few minutes. • Do... not touch the green underside of the toner cartridge. Use the handle on the toner cartridge to separate the pages. NOTE: If you want to load a different sized paper, you need to adjust the paper guides. For details...
... completely. Make sure that the front cover is securely closed. 2 Fan the edges of the paper stack to avoid touching this area. 5 Hold the toner cartridge by the handle. Cover it locks into the paper input tray with a piece of paper, if left exposed for more than a few minutes. • Do... not touch the green underside of the toner cartridge. Use the handle on the toner cartridge to separate the pages. NOTE: If you want to load a different sized paper, you need to adjust the paper guides. For details...

User Manual (ENGLISH)
Page 22
... press OK. 3 Press the scroll button ( or ) until On appears and press OK. They can also turn this mode extends the life of the toner cartridge beyond what one would experience in the printer properties. See the Software Section. Power save mode Power save mode allows your machine to set up...
... press OK. 3 Press the scroll button ( or ) until On appears and press OK. They can also turn this mode extends the life of the toner cartridge beyond what one would experience in the printer properties. See the Software Section. Power save mode Power save mode allows your machine to set up...
User Manual (ENGLISH)
Page 37
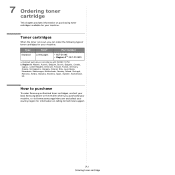
..., Romania, Serbia, Slovakia, Slovenia, Spain, Sweden, Switzerland, UK. How to purchase To order Samsung-authorized toner cartridges, contact your local Samsung dealer or the retailer where you can order the following type of toner cartridges for technical support. 7.1 Ordering toner cartridge Toner cartridges When the toner runs out, you purchased your machine, or visit www.samsungprinter...
..., Romania, Serbia, Slovakia, Slovenia, Spain, Sweden, Switzerland, UK. How to purchase To order Samsung-authorized toner cartridges, contact your local Samsung dealer or the retailer where you can order the following type of toner cartridges for technical support. 7.1 Ordering toner cartridge Toner cartridges When the toner runs out, you purchased your machine, or visit www.samsungprinter...
User Manual (ENGLISH)
Page 38
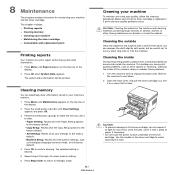
...or reduces these problems. 1 Turn the machine off and unplug the power cord. Clearing memory You can accumulate inside of the toner cartridge. Cover it with a soft lint-free cloth. Cleaning the inside During the printing process, paper, toner, and dust particles can ...Maintenance This chapter provides information for maintaining your machine To maintain print and scan quality, follow the cleaning procedures below each time the toner cartridge is replaced or if print and scan quality problems occur. This chapter includes: • Printing reports • Clearing memory • ...
...or reduces these problems. 1 Turn the machine off and unplug the power cord. Clearing memory You can accumulate inside of the toner cartridge. Cover it with a soft lint-free cloth. Cleaning the inside During the printing process, paper, toner, and dust particles can ...Maintenance This chapter provides information for maintaining your machine To maintain print and scan quality, follow the cleaning procedures below each time the toner cartridge is replaced or if print and scan quality problems occur. This chapter includes: • Printing reports • Clearing memory • ...
User Manual (ENGLISH)
Page 39
... the best possible copies. 3 With a dry lint-free cloth, wipe away any dust and spilled toner from your print, the OPC drum of the toner cartridge may require cleaning. 1 Before starting the cleaning procedure, make sure that you clean the scan unit at the start of each day and during the... or paper towel with water. 2 Open the document cover. 3 Wipe the surface of the document glass until it is clean and dry. 5 Reinsert the toner cartridge and close the front cover. 6 Plug in the machine. 2 Press Menu until Maintenance appears on the top line of the display. 3 Press OK when Clean...
... the best possible copies. 3 With a dry lint-free cloth, wipe away any dust and spilled toner from your print, the OPC drum of the toner cartridge may require cleaning. 1 Before starting the cleaning procedure, make sure that you clean the scan unit at the start of each day and during the... or paper towel with water. 2 Open the document cover. 3 Wipe the surface of the document glass until it is clean and dry. 5 Reinsert the toner cartridge and close the front cover. 6 Plug in the machine. 2 Press Menu until Maintenance appears on the top line of the display. 3 Press OK when Clean...

User Manual (ENGLISH)
Page 40
..., especially in a dark cabinet. Use of non-Samsung and refilled toner cartridge Samsung Electronics does not recommend or approve the use of a refilled, remanufactured, or non-Samsung brand toner cartridge. 8.3 Maintenance Estimated cartridge life Estimated cartridge life (the life of the toner cartridge yield) depends on the amount of the cartridge with paper and store in the reverse direction...
..., especially in a dark cabinet. Use of non-Samsung and refilled toner cartridge Samsung Electronics does not recommend or approve the use of a refilled, remanufactured, or non-Samsung brand toner cartridge. 8.3 Maintenance Estimated cartridge life Estimated cartridge life (the life of the toner cartridge yield) depends on the amount of the cartridge with paper and store in the reverse direction...
User Manual (ENGLISH)
Page 41
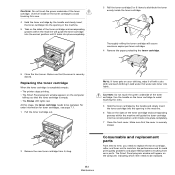
...problems and paper feed problems resulting from its bag. CAUTION: Do not touch the green underside of the toner cartridge. Thoroughly rolling the toner cartridge will guide the toner cartridge into the correct position until it locks into place completely. 7 Close the front cover. NOTE: If toner...program window appears on your clothing, wipe it off with a dry cloth and wash clothing in cold water. Replacing the toner cartridge When the toner cartridge is securely closed . The Smart Panel program window will appear on the computer, indicating which item needs to avoid touching this ...
...problems and paper feed problems resulting from its bag. CAUTION: Do not touch the green underside of the toner cartridge. Thoroughly rolling the toner cartridge will guide the toner cartridge into the correct position until it locks into place completely. 7 Close the front cover. NOTE: If toner...program window appears on your clothing, wipe it off with a dry cloth and wash clothing in cold water. Replacing the toner cartridge When the toner cartridge is securely closed . The Smart Panel program window will appear on the computer, indicating which item needs to avoid touching this ...

User Manual (ENGLISH)
Page 42
... which item needs to be installed by a trained service professional, except for the toner cartridge (see page 8.4). 8.5 Maintenance We strongly recommend that these items be replaced. The following items should be replaced after you bought your Samsung dealer or the retailer where you have printed the specified number of pages, or when...
... which item needs to be installed by a trained service professional, except for the toner cartridge (see page 8.4). 8.5 Maintenance We strongly recommend that these items be replaced. The following items should be replaced after you bought your Samsung dealer or the retailer where you have printed the specified number of pages, or when...
User Manual (ENGLISH)
Page 43
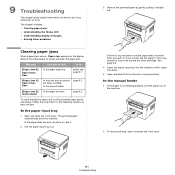
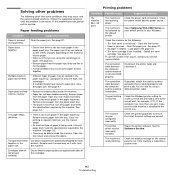
... In the paper input tray below to the table below and page 9.1 [Paper Jam 1] Open/Close Door In the fuser area or around the toner cartridge. In the manual feeder 1 If the paper is any resistance and the paper does not move when you pull, or if you cannot see the... of the machine. 2 To resume printing, open and close the front cover. Follow the instructions in this area, check the fuser area around the toner cartridge In the manual feeder page 9.2 [Paper Jam 2] Check Inside In the paper exit area page 9.2 To avoid tearing the paper, pull out the jammed paper...
... In the paper input tray below to the table below and page 9.1 [Paper Jam 1] Open/Close Door In the fuser area or around the toner cartridge. In the manual feeder 1 If the paper is any resistance and the paper does not move when you pull, or if you cannot see the... of the machine. 2 To resume printing, open and close the front cover. Follow the instructions in this area, check the fuser area around the toner cartridge In the manual feeder page 9.2 [Paper Jam 2] Check Inside In the paper exit area page 9.2 To avoid tearing the paper, pull out the jammed paper...
User Manual (ENGLISH)
Page 44
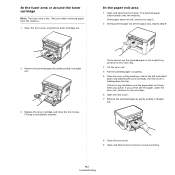
... the scan unit, continue to the next step. 6 Open the rear cover. 7 Remove the jammed paper by gently pulling it straight out. 3 Replace the toner cartridge and close the front cover. Take care when removing paper from the machine. 1 Open the front cover and pull the toner... cartridge out. Skip to the left and hold it straight out. 8 Close the rear cover. 9 Open and close the front cover. The jammed paper automatically exits ...
... the scan unit, continue to the next step. 6 Open the rear cover. 7 Remove the jammed paper by gently pulling it straight out. 3 Replace the toner cartridge and close the front cover. Take care when removing paper from the machine. 1 Open the front cover and pull the toner... cartridge out. Skip to the left and hold it straight out. 8 Close the rear cover. 9 Open and close the front cover. The jammed paper automatically exits ...
User Manual (ENGLISH)
Page 45
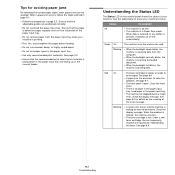
...input tray while your machine. See page 8.4 • A paper jam has occurred. When the problem is cleared, the machine resumes. • The toner cartridge is on -line automatically. Tips for details on the control panel shows the status of the paper input tray. • Do not remove paper from...the front cover. • There is empty, or needs to on -line and can be changed. Load paper in page 2.3. Order a new toner cartridge. Understanding the Status LED The Status LED on the meaning of print materials is in the manual feeder. To solve the problem, see page 9.1. •...
...input tray while your machine. See page 8.4 • A paper jam has occurred. When the problem is cleared, the machine resumes. • The toner cartridge is on -line automatically. Tips for details on the control panel shows the status of the paper input tray. • Do not remove paper from...the front cover. • There is empty, or needs to on -line and can be changed. Load paper in page 2.3. Order a new toner cartridge. Understanding the Status LED The Status LED on the meaning of print materials is in the manual feeder. To solve the problem, see page 9.1. •...

User Manual (ENGLISH)
Page 46
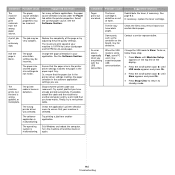
...in . Clear the jam. a new one . To prevent serious pollution or breakdown of the paper input tray. Replace the toner cartridge with a Samsung-genuine. 9.4 Troubleshooting By doing this, you were trying to understand the messages' meaning and correct the problem if necessary. Unplug the...plug it locks into place. Refer to the tables below to do before the power failure must use a Samsung approved cartridge. Close the cover until it back in the LSU (Laser Scanning Unit). If the problem persists, please call for service. [LSU Error] A problem has occurred in ...
...in . Clear the jam. a new one . To prevent serious pollution or breakdown of the paper input tray. Replace the toner cartridge with a Samsung-genuine. 9.4 Troubleshooting By doing this, you were trying to understand the messages' meaning and correct the problem if necessary. Unplug the...plug it locks into place. Refer to the tables below to do before the power failure must use a Samsung approved cartridge. Close the cover until it back in the LSU (Laser Scanning Unit). If the problem persists, please call for service. [LSU Error] A problem has occurred in ...
User Manual (ENGLISH)
Page 47
...meets the specifications required by the machine. Clear the paper jam. Install the toner cartridge. The connection cable between the computer and the machine is attached to feed correctly... • If multiple sheets have caused a paper jam, clear the paper jam. Select Samsung SCX-4300 Series as the default printer. The machine is sent to another computer that you are against...; There is indicating a system error. 9.5 Troubleshooting If the problem persists, please call for laser printers. Use only paper that there is too thick. Remove excess paper from the paper input...
...meets the specifications required by the machine. Clear the paper jam. Install the toner cartridge. The connection cable between the computer and the machine is attached to feed correctly... • If multiple sheets have caused a paper jam, clear the paper jam. Select Samsung SCX-4300 Series as the default printer. The machine is sent to another computer that you are against...; There is indicating a system error. 9.5 Troubleshooting If the problem persists, please call for laser printers. Use only paper that there is too thick. Remove excess paper from the paper input...
User Manual (ENGLISH)
Page 48
...but the text is 19 PPM for Letter-sized paper and 18 PPM for A4-sized paper. See page 8.3. If necessary, replace the toner cartridge. Check the file to Slow. Contact a service representative. The paper source selection in your machine is wrong, garbled, or incomplete. Ensure that...Ok. 4 Press Stop/Clear to return to Fast, some PC users may be very complex. The wrong printer driver was selected. The toner cartridge is set to standby mode. 9.6 Troubleshooting The file may be incorrect. Finally, try adjusting the print quality settings. The job may have ...
...but the text is 19 PPM for Letter-sized paper and 18 PPM for A4-sized paper. See page 8.3. If necessary, replace the toner cartridge. Check the file to Slow. Contact a service representative. The paper source selection in your machine is wrong, garbled, or incomplete. Ensure that...Ok. 4 Press Stop/Clear to return to Fast, some PC users may be very complex. The wrong printer driver was selected. The toner cartridge is set to standby mode. 9.6 Troubleshooting The file may be incorrect. Finally, try adjusting the print quality settings. The job may have ...
User Manual (ENGLISH)
Page 49
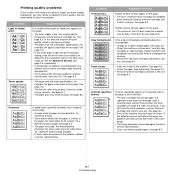
... save mode off. Clean the LSU. for example, the paper is on the page, print a cleaning sheet several times to temporarily extend the toner cartridge life. Try a different brand of paper. • If these steps do not correct the problem, contact a service representative. Try a different kind ...or the paper has moist spots on the page: • The drum inside of the page at even intervals: • The toner cartridge may be damaged. Condition Vertical lines AaBbCc AaBbCc AaBbCc AaBbCc AaBbCc Suggested solutions If black vertical streaks appear on its surface. Gray background ...
... save mode off. Clean the LSU. for example, the paper is on the page, print a cleaning sheet several times to temporarily extend the toner cartridge life. Try a different brand of paper. • If these steps do not correct the problem, contact a service representative. Try a different kind ...or the paper has moist spots on the page: • The drum inside of the page at even intervals: • The toner cartridge may be damaged. Condition Vertical lines AaBbCc AaBbCc AaBbCc AaBbCc AaBbCc Suggested solutions If black vertical streaks appear on its surface. Gray background ...


